warning YAMAHA FJR1300AS 2015 Service Manual
[x] Cancel search | Manufacturer: YAMAHA, Model Year: 2015, Model line: FJR1300AS, Model: YAMAHA FJR1300AS 2015Pages: 124, PDF Size: 3.39 MB
Page 97 of 124

PERIODIC MAINTENANCE AND ADJUSTMENT
6-25
6
EAU40603
Changing the brake and
YCC-S clutch fluidsHave a Yamaha dealer change the
brake and YCC-S clutch fluids at the
intervals specified in the periodic main-
tenance and lubrication chart or in the
TIP after the periodic maintenance and
lubrication chart. In addition, have the
oil seals of the brake and YCC-S clutch
master cylinders and calipers as well
as the brake and YCC-S clutch hoses
replaced at the intervals listed below or
whenever they are damaged or leak-
ing.
Oil seals: Replace every two
years.
Brake and YCC-S clutch hoses:
Replace every four years.
EAU23098
Checking and lubricating the
cablesThe operation of all control cables and
the condition of the cables should be
checked before each ride, and the ca-
bles and cable ends should be lubri-
cated if necessary. If a cable is
damaged or does not move smoothly,
have a Yamaha dealer check or re-
place it. WARNING! Damage to the
outer housing of cables may result
in internal rusting and cause inter-
ference with cable movement. Re-
place damaged cables as soon as
possible to prevent unsafe condi-
tions.
[EWA10712]EAU23115
Checking and lubricating the
throttle grip and cableThe operation of the throttle grip
should be checked before each ride. In
addition, the cable should be lubricat-
ed by a Yamaha dealer at the intervals
specified in the periodic maintenance
chart.
The throttle cable is equipped with a
rubber cover. Make sure that the cover
is securely installed. Even though the
cover is installed correctly, it does not
completely protect the cable from wa-
ter entry. Therefore, use care not to
pour water directly onto the cover or
cable when washing the vehicle. If the
cable or cover becomes dirty, wipe
clean with a moist cloth.
Recommended lubricant:
Yamaha cable lubricant or other
suitable cable lubricant
U1MDE1E0.book Page 25 Monday, July 28, 2014 10:48 AM
Page 99 of 124

PERIODIC MAINTENANCE AND ADJUSTMENT
6-27
6
EAU23215
Checking and lubricating the
centerstand and sidestandThe operation of the centerstand and
sidestand should be checked before
each ride, and the pivots and metal-to-
metal contact surfaces should be lubri-
cated if necessary.
WARNING
EWA10742
If the centerstand or sidestand does
not move up and down smoothly,
have a Yamaha dealer check or re-
pair it. Otherwise, the centerstand or
sidestand could contact the ground
and distract the operator, resulting
in a possible loss of control.
EAU23252
Lubricating the rear suspen-
sionThe pivoting points of the rear suspen-
sion must be lubricated by a Yamaha
dealer at the intervals specified in the
periodic maintenance and lubrication
chart.
Recommended lubricant:
Lithium-soap-based grease
Recommended lubricant:
Lithium-soap-based grease
U1MDE1E0.book Page 27 Monday, July 28, 2014 10:48 AM
Page 100 of 124

PERIODIC MAINTENANCE AND ADJUSTMENT
6-28
6
EAUM1653
Lubricating the swingarm piv-
otsThe swingarm pivots must be lubricat-
ed by a Yamaha dealer at the intervals
specified in the periodic maintenance
and lubrication chart.
EAU23273
Checking the front forkThe condition and operation of the
front fork must be checked as follows
at the intervals specified in the periodic
maintenance and lubrication chart.
To check the condition
Check the inner tubes for scratches,
damage and excessive oil leakage.
To check the operation
1. Place the vehicle on a level sur-
face and hold it in an upright posi-
tion. WARNING! To avoid injury,
securely support the vehicle so
there is no danger of it falling
over.
[EWA10752]
2. While applying the front brake,
push down hard on the handle-
bars several times to check if the
front fork compresses and re-
bounds smoothly.
NOTICE
ECA10591
If any damage is found or the front
fork does not operate smoothly,
have a Yamaha dealer check or re-
pair it.
Recommended lubricant:
Lithium-soap-based grease
U1MDE1E0.book Page 28 Monday, July 28, 2014 10:48 AM
Page 101 of 124

PERIODIC MAINTENANCE AND ADJUSTMENT
6-29
6
EAU45512
Checking the steeringWorn or loose steering bearings may
cause danger. Therefore, the operation
of the steering must be checked as fol-
lows at the intervals specified in the
periodic maintenance and lubrication
chart.
1. Place the vehicle on the center-
stand. WARNING! To avoid inju-
ry, securely support the vehicle
so there is no danger of it falling
over.
[EWA10752]
2. Hold the lower ends of the front
fork legs and try to move them for-
ward and backward. If any free
play can be felt, have a Yamaha
dealer check or repair the steer-
ing.
EAU23292
Checking the wheel bearingsThe front and rear wheel bearings must
be checked at the intervals specified in
the periodic maintenance and lubrica-
tion chart. If there is play in the wheel
hub or if the wheel does not turn
smoothly, have a Yamaha dealer
check the wheel bearings.
EAU39526
BatteryThe battery is located under panel A.
(See page 6-8.)
This model is equipped with a VRLA
(Valve Regulated Lead Acid) battery.
There is no need to check the electro-
lyte or to add distilled water. However,
the battery lead connections need to
be checked and, if necessary, tight-
ened.
WARNING
EWA10761
Electrolyte is poisonous and
dangerous since it contains sul-
furic acid, which causes severe1. Battery
2. Positive battery lead (red)
3. Negative battery lead (black)
12
3
U1MDE1E0.book Page 29 Monday, July 28, 2014 10:48 AM
Page 103 of 124
PERIODIC MAINTENANCE AND ADJUSTMENT
6-31
6
EAU54513
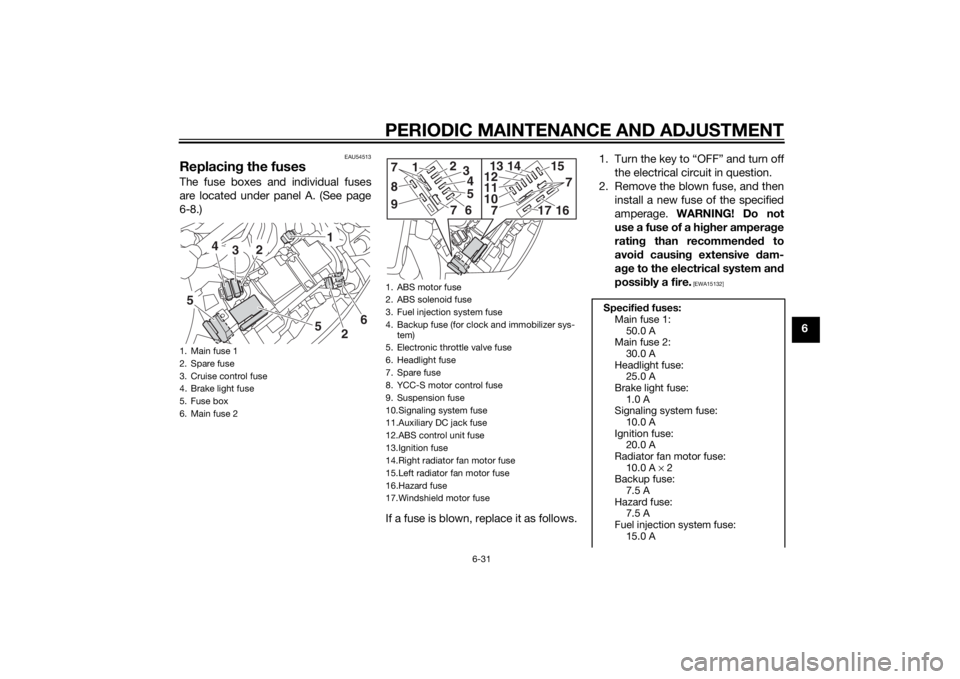
Replacing the fusesThe fuse boxes and individual fuses
are located under panel A. (See page
6-8.)
If a fuse is blown, replace it as follows.1. Turn the key to “OFF” and turn off
the electrical circuit in question.
2. Remove the blown fuse, and then
install a new fuse of the specified
amperage. WARNING! Do not
use a fuse of a higher amperage
rating than recommended to
avoid causing extensive dam-
age to the electrical system and
possibly a fire.
[EWA15132]
1. Main fuse 1
2. Spare fuse
3. Cruise control fuse
4. Brake light fuse
5. Fuse box
6. Main fuse 2
5
1
3 4
2
5
26
1. ABS motor fuse
2. ABS solenoid fuse
3. Fuel injection system fuse
4. Backup fuse (for clock and immobilizer sys-
tem)
5. Electronic throttle valve fuse
6. Headlight fuse
7. Spare fuse
8. YCC-S motor control fuse
9. Suspension fuse
10.Signaling system fuse
11.Auxiliary DC jack fuse
12.ABS control unit fuse
13.Ignition fuse
14.Right radiator fan motor fuse
15.Left radiator fan motor fuse
16.Hazard fuse
17.Windshield motor fuse
15
7
11
101213
14
7
17
16
8
1
9
2
3456
7
7
Specified fuses:
Main fuse 1:
50.0 A
Main fuse 2:
30.0 A
Headlight fuse:
25.0 A
Brake light fuse:
1.0 A
Signaling system fuse:
10.0 A
Ignition fuse:
20.0 A
Radiator fan motor fuse:
10.0 A × 2
Backup fuse:
7.5 A
Hazard fuse:
7.5 A
Fuel injection system fuse:
15.0 A
U1MDE1E0.book Page 31 Monday, July 28, 2014 10:48 AM
Page 106 of 124
PERIODIC MAINTENANCE AND ADJUSTMENT
6-34
6
EAU24314
Replacing the license plate
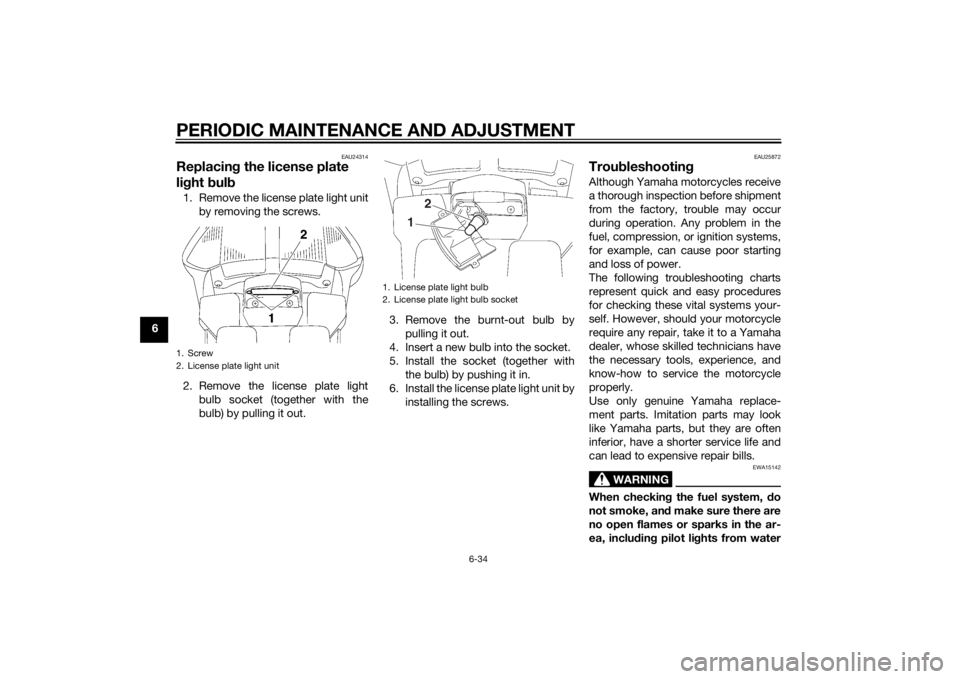
light bulb1. Remove the license plate light unit
by removing the screws.
2. Remove the license plate light
bulb socket (together with the
bulb) by pulling it out.3. Remove the burnt-out bulb by
pulling it out.
4. Insert a new bulb into the socket.
5. Install the socket (together with
the bulb) by pushing it in.
6. Install the license plate light unit by
installing the screws.
EAU25872
TroubleshootingAlthough Yamaha motorcycles receive
a thorough inspection before shipment
from the factory, trouble may occur
during operation. Any problem in the
fuel, compression, or ignition systems,
for example, can cause poor starting
and loss of power.
The following troubleshooting charts
represent quick and easy procedures
for checking these vital systems your-
self. However, should your motorcycle
require any repair, take it to a Yamaha
dealer, whose skilled technicians have
the necessary tools, experience, and
know-how to service the motorcycle
properly.
Use only genuine Yamaha replace-
ment parts. Imitation parts may look
like Yamaha parts, but they are often
inferior, have a shorter service life and
can lead to expensive repair bills.
WARNING
EWA15142
When checking the fuel system, do
not smoke, and make sure there are
no open flames or sparks in the ar-
ea, including pilot lights from water
1. Screw
2. License plate light unit
1. License plate light bulb
2. License plate light bulb socket
1
2
U1MDE1E0.book Page 34 Monday, July 28, 2014 10:48 AM
Page 109 of 124

PERIODIC MAINTENANCE AND ADJUSTMENT
6-37
6 Engine overheating
WARNING
EWAT1041
Do not remove the radiator cap when the engine and radiator are hot. Scalding hot fluid and steam may be
blown out under pressure, which could cause serious injury. Be sure to wait until the engine has cooled.
Place a thick rag, like a towel, over the radiator cap, and then slowly rotate the cap counterclockwise to the
detent to allow any residual pressure to escape. When the hissing sound has stopped, press down on the cap
while turning it counterclockwise, and then remove the cap.TIPIf coolant is not available, tap water can be temporarily used instead, provided that it is changed to the recommended cool-
ant as soon as possible.
Wait until the
engine has cooled.
Check the coolant level in the
reservoir and radiator.
The coolant level
is OK.The coolant level is low.
Check the cooling system
for leakage.
Have a Yamaha dealer checkand repair the cooling system.Add coolant. (See TIP.)
Start the engine. If the engine overheats again,
have a
Yamaha dealer check
and repair the cooling system.
There is
leakage.
There is
no leakage.
U1MDE1E0.book Page 37 Monday, July 28, 2014 10:48 AM
Page 112 of 124

MOTORCYCLE CARE AND STORAGE
7-3
7windshield. Before using them, make a
test by polishing an area which does
not affect your visibility.
After cleaning
1. Dry the motorcycle with a chamois
or an absorbing cloth.
2. Use a chrome polish to shine
chrome, aluminum and stainless-
steel parts, including the exhaust
system. (Even the thermally in-
duced discoloring of stainless-
steel exhaust systems can be re-
moved through polishing.)
3. To prevent corrosion, it is recom-
mended to apply a corrosion pro-
tection spray on all metal,
including chrome- and nickel-plat-
ed, surfaces.
4. Use spray oil as a universal clean-
er to remove any remaining dirt.
5. Touch up minor paint damage
caused by stones, etc.
6. Wax all painted surfaces.
7. Let the motorcycle dry completely
before storing or covering it.
WARNING
EWA11132
Contaminants on the brakes or tires
can cause loss of control.
Make sure that there is no oil or
wax on the brakes or tires.
If necessary, clean the brake
discs and brake linings with a
regular brake disc cleaner or
acetone, and wash the tires with
warm water and a mild deter-
gent. Before riding at higher
speeds, test the motorcycle’s
braking performance and cor-
nering behavior.NOTICE
ECA10801
Apply spray oil and wax spar-
ingly and make sure to wipe off
any excess.
Never apply oil or wax to any
rubber and plastic parts, but
treat them with a suitable care
product.
Avoid using abrasive polishing
compounds as they will wear
away the paint.
TIPConsult a Yamaha dealer for ad-
vice on what products to use.
Washing, rainy weather or humid
climates can cause the headlight
lens to fog. Turning the headlight
on for a short period of time will
help remove the moisture from the
lens.
U1MDE1E0.book Page 3 Monday, July 28, 2014 10:48 AM
Page 113 of 124

MOTORCYCLE CARE AND STORAGE7-4
7
EAU26244
StorageShort-term
Always store your motorcycle in a cool,
dry place and, if necessary, protect it
against dust with a porous cover. Be
sure the engine and the exhaust sys-
tem are cool before covering the mo-
torcycle.NOTICE
ECA10811
Storing the motorcycle in a
poorly ventilated room or cover-
ing it with a tarp, while it is still
wet, will allow water and humid-
ity to seep in and cause rust.
To prevent corrosion, avoid
damp cellars, stables (because
of the presence of ammonia)
and areas where strong chemi-
cals are stored.Long-term
Before storing your motorcycle for sev-
eral months:
1. Follow all the instructions in the
“Care” section of this chapter.2. Fill up the fuel tank and add fuel
stabilizer (if available) to prevent
the fuel tank from rusting and the
fuel from deteriorating.
3. Perform the following steps to
protect the cylinders, piston rings,
etc. from corrosion.
a. Remove the spark plug caps
and spark plugs.
b. Pour a teaspoonful of engine
oil into each spark plug bore.
c. Install the spark plug caps onto
the spark plugs, and then
place the spark plugs on the
cylinder head so that the elec-
trodes are grounded. (This will
limit sparking during the next
step.)
d. Turn the engine over several
times with the starter. (This will
coat the cylinder walls with oil.)
WARNING! To prevent dam-
age or injury from sparking,
make sure to ground the
spark plug electrodes while
turning the engine over.
[EWA10952]
e. Remove the spark plug caps
from the spark plugs, and then
install the spark plugs and the
spark plug caps.
4. Lubricate all control cables and
the pivoting points of all levers and
pedals as well as of the side-
stand/centerstand.
5. Check and, if necessary, correct
the tire air pressure, and then lift
the motorcycle so that both of its
wheels are off the ground. Alterna-
tively, turn the wheels a little every
month in order to prevent the tires
from becoming degraded in one
spot.
6. Cover the muffler outlets with
plastic bags to prevent moisture
from entering them.
7. Remove the battery and fully
charge it. Store it in a cool, dry
place and charge it once a month.
Do not store the battery in an ex-
cessively cold or warm place [less
than 0 °C (30 °F) or more than 30
°C (90 °F)]. For more information
on storing the battery, see page
6-29.
U1MDE1E0.book Page 4 Monday, July 28, 2014 10:48 AM
Page 117 of 124

SPECIFICATIONS
8-3
8
Wheel travel:
125 mm (4.9 in)Electrical system:Ignition system:
TCI
Charging system:
AC magnetoBattery:Model:
GT14B-4
Voltage, capacity:
12 V, 12.0 AhHeadlight:Bulb type:
Halogen bulbBulb voltage, wattage × quantity:Headlight:
12 V, 60.0 W/55.0 W × 2
Tail/brake light:
12 V, 5.0 W/21.0 W × 2
Front turn signal light:
LED
Rear turn signal light:
12 V, 21.0 W × 2
Auxiliary light:
LED
License plate light:
12 V, 5.0 W × 1
Meter lighting:
LED
Neutral indicator light:
LED
High beam indicator light:
LEDOil level warning light:
LED
Turn signal indicator light:
LED
Engine trouble warning light:
LED
ABS warning light:
LED
Cruise control “SET” indicator light:
LED
Cruise control “ON” indicator light:
LED
Immobilizer system indicator light:
LED
Traction control system indicator/warning
light:
LED
"STOP MODE" indicator light:
LED
Shift down indicator light:
LED
YCC-S system warning light:
LED
Suspension warning light:
LED
Fuses:Main fuse 1:
50.0 A
Main fuse 2:
30.0 A
Headlight fuse:
25.0 A
Brake light fuse:
1.0 ASignaling system fuse:
10.0 A
Ignition fuse:
20.0 A
Radiator fan motor fuse:
10.0 A × 2
Hazard fuse:
7.5 A
Fuel injection system fuse:
15.0 A
ABS control unit fuse:
7.5 A
ABS motor fuse:
30.0 A
ABS solenoid fuse:
20.0 A
Suspension fuse:
15.0 A
Cruise control fuse:
1.0 A
Auxiliary DC jack fuse:
3.0 A
YCC-S motor control fuse:
30.0 A
Backup fuse:
7.5 A
Windshield motor fuse:
20.0 A
Electronic throttle valve fuse:
7.5 A
U1MDE1E0.book Page 3 Monday, July 28, 2014 10:48 AM