engine YAMAHA FJR1300AS 2020 Service Manual
[x] Cancel search | Manufacturer: YAMAHA, Model Year: 2020, Model line: FJR1300AS, Model: YAMAHA FJR1300AS 2020Pages: 122, PDF Size: 3.42 MB
Page 83 of 122
Periodic maintenance an d a djustment
6-12
6
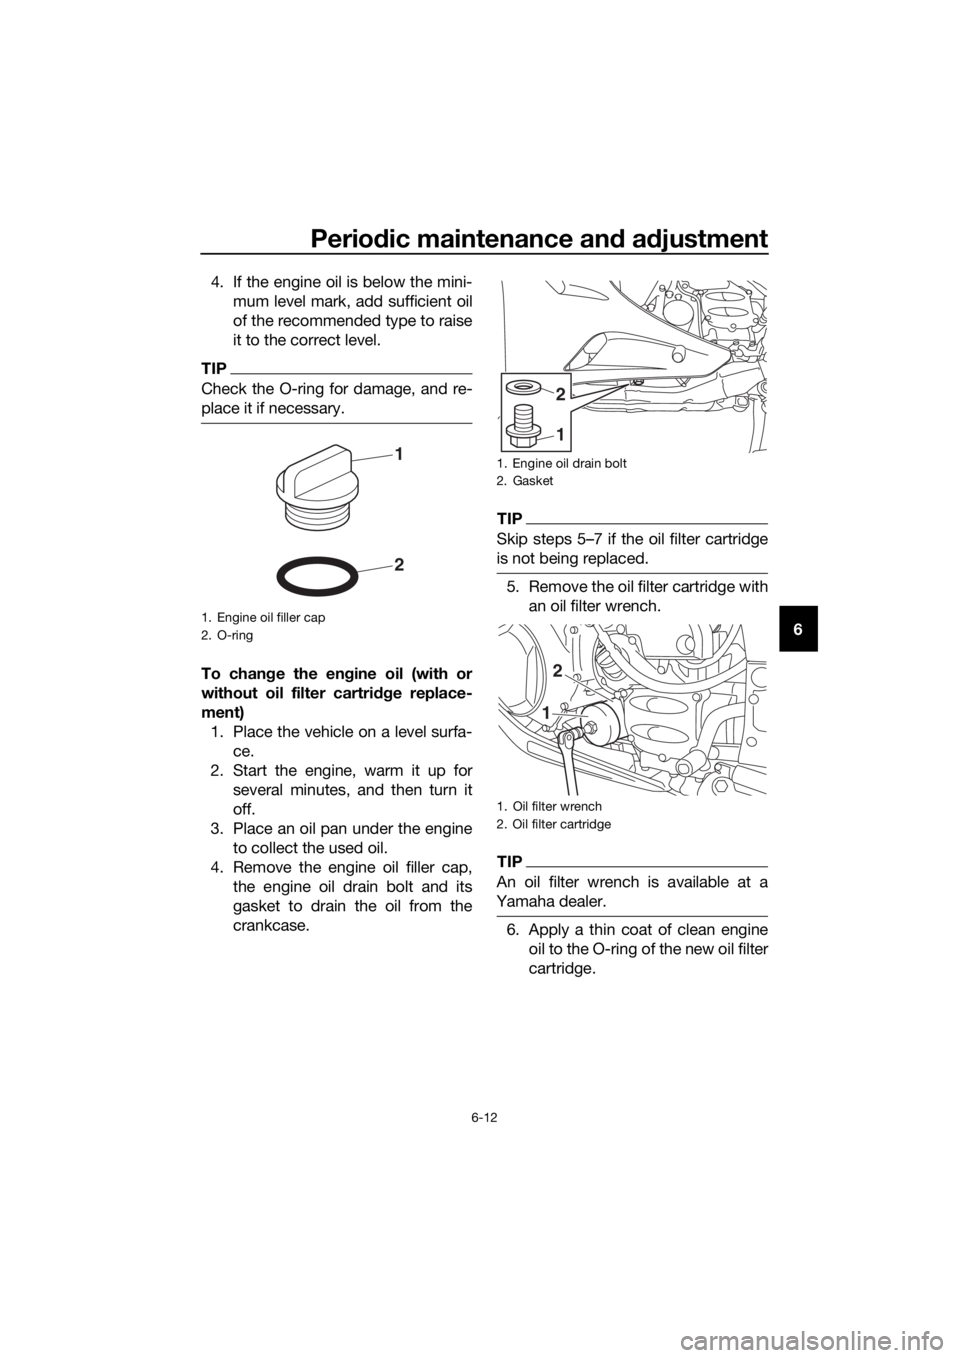
4. If the engine oil is below the mini-
mum level mark, add sufficient oil
of the recommended type to raise
it to the correct level.
TIP
Check the O-ring for damage, and re-
place it if necessary.
To chan ge the en gine oil (with or
without oil filter cartri dge replace-
ment) 1. Place the vehicle on a level surfa- ce.
2. Start the engine, warm it up for several minutes, and then turn it
off.
3. Place an oil pan under the engine to collect the used oil.
4. Remove the engine oil filler cap, the engine oil drain bolt and its
gasket to drain the oil from the
crankcase.
TIP
Skip steps 5–7 if the oil filter cartridge
is not being replaced.
5. Remove the oil filter cartridge withan oil filter wrench.
TIP
An oil filter wrench is available at a
Yamaha dealer.
6. Apply a thin coat of clean engine oil to the O-ring of the new oil filter
cartridge.
1. Engine oil filler cap
2. O-ring
2
11. Engine oil drain bolt
2. Gasket
1. Oil filter wrench
2. Oil filter cartridge
1
2
1
2
UB95E2E0.book Page 12 Tuesday, December 17, 2019 10:29 AM
Page 84 of 122
Periodic maintenance an d a djustment
6-13
6
TIP
Make sure that the O-ring is properly
seated.
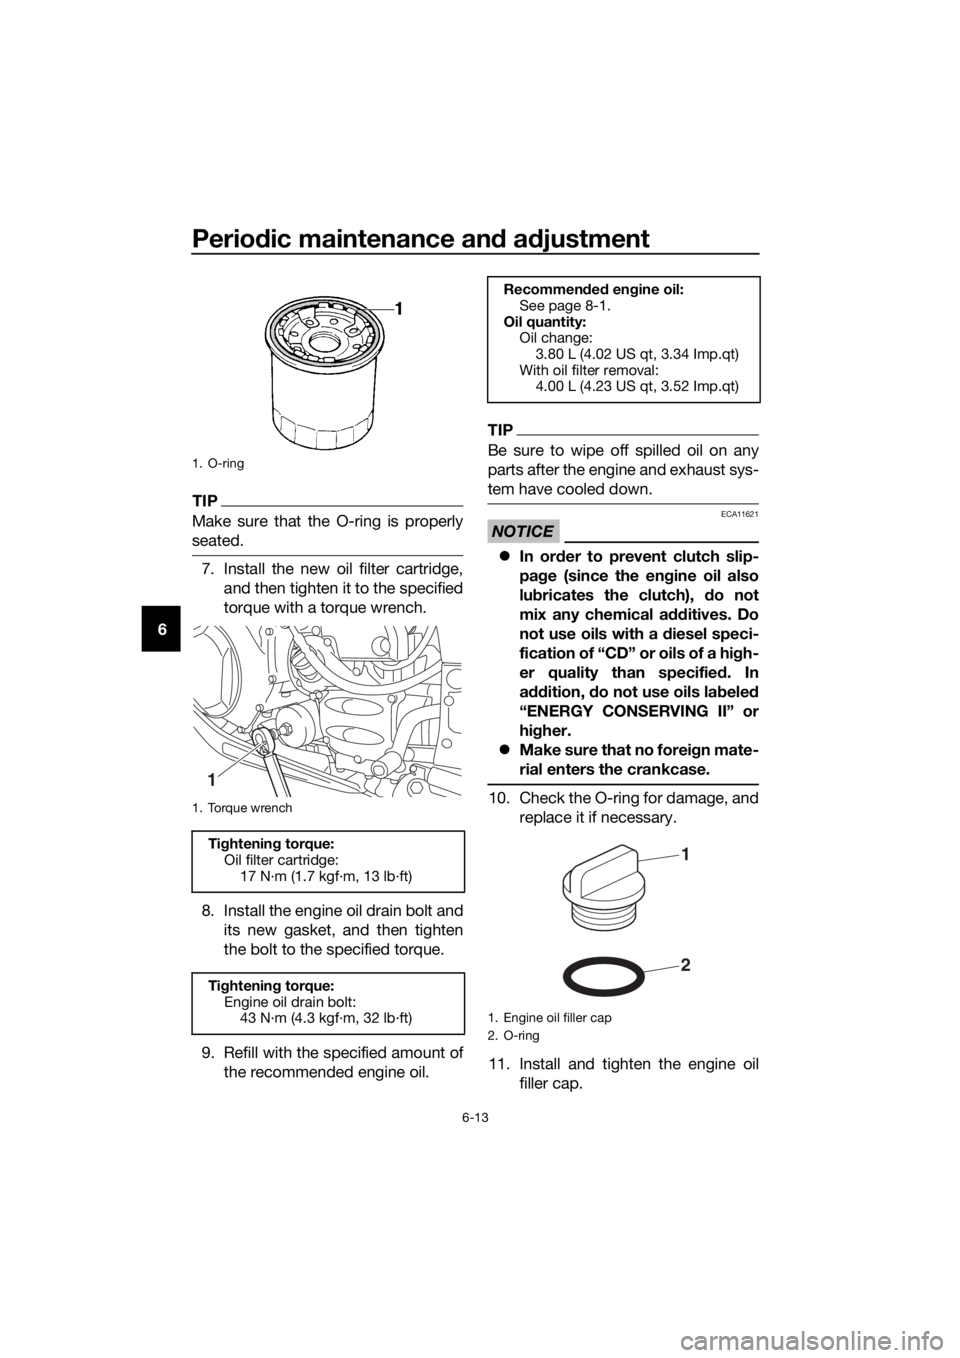
7. Install the new oil filter cartridge,
and then tighten it to the specified
torque with a torque wrench.
8. Install the engine oil drain bolt and its new gasket, and then tighten
the bolt to the specified torque.
9. Refill with the specified amount of the recommended engine oil.
TIP
Be sure to wipe off spilled oil on any
parts after the engine and exhaust sys-
tem have cooled down.
NOTICE
ECA11621
In or der to prevent clutch slip-
pa ge (since the en gine oil also
lu bricates the clutch), do not
mix any chemical add itives. Do
not use oils with a d iesel speci-
fication of “CD” or oils of a hi gh-
er quality than specified . In
a ddition, do not use oils la bele d
“ENERGY CONSERVING II” or
hi gher.
Make sure that no forei gn mate-
rial enters the crankcase.
10. Check the O-ring for damage, and replace it if necessary.
11. Install and tighten the engine oil filler cap.
1. O-ring
1. Torque wrench
Tightenin g torque:
Oil filter cartridge: 17 N·m (1.7 kgf·m, 13 lb·ft)
Ti ghtenin g torque:
Engine oil drain bolt: 43 N·m (4.3 kgf·m, 32 lb·ft)
1
Recommen ded en gine oil:
See page 8-1.
Oil quantity: Oil change:
3.80 L (4.02 US qt, 3.34 Imp.qt)
With oil filter removal: 4.00 L (4.23 US qt, 3.52 Imp.qt)
1. Engine oil filler cap
2. O-ring
2
1
UB95E2E0.book Page 13 Tuesday, December 17, 2019 10:29 AM
Page 85 of 122
Periodic maintenance an d a djustment
6-14
6
12. Start the engine, and then let it idle
for several minutes while checking
it for oil leakage. If oil is leaking,
immediately turn the engine off
and check for the cause.
TIP
After the engine is started, the engine
oil level warning light should go off if
the oil level is sufficient.
NOTICE
ECA10402
If the oil level warnin g li ght flickers
or remains on even if the oil level is
correct, imme diately turn the en gine
off an d have a Yamaha dealer check
the vehicle.
13. Turn the engine off, and then check the oil level and correct it if
necessary.
EAU85450
Why Yamalu be
YAMALUBE oil is a Genuine YAMAHA
Part born of the engineers’ passion
and belief that engine oil is an impor-
tant liquid engine component. We form
teams of specialists in the fields of me-
chanical engineering, chemistry, elec-
tronics and track testing, and have
them develop the engine together with
the oil it will use. Yamalube oils take full
advantage of the base oil’s qualities
and blend in the ideal balance of addi-
tives to make sure the final oil clears
our performance standards. Thus,
Yamalube mineral, semisynthetic and synthetic oils have their own distinct
characters and value. Yamaha’s expe-
rience gained over many years of re-
search and development into oil since
the 1960’s helps make Yamalube the
best choice for your Yamaha engine.
UB95E2E0.book Page 14 Tuesday, December 17, 2019 10:29 AM
Page 87 of 122
Periodic maintenance an d a djustment
6-16
6
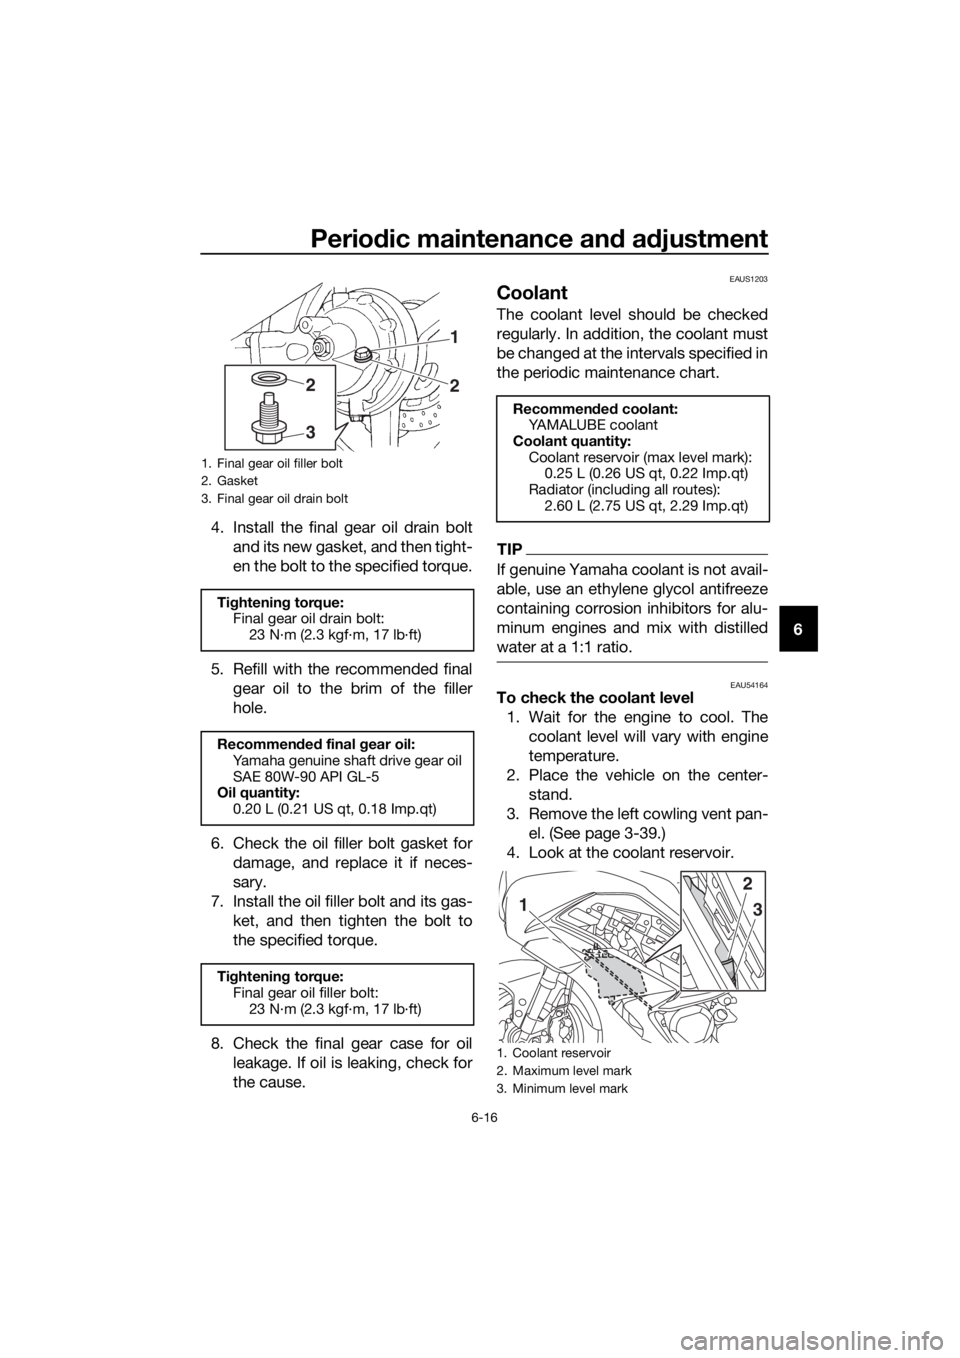
4. Install the final gear oil drain bolt
and its new gasket, and then tight-
en the bolt to the specified torque.
5. Refill with the recommended final gear oil to the brim of the filler
hole.
6. Check the oil filler bolt gasket for damage, and replace it if neces-
sary.
7. Install the oil filler bolt and its gas- ket, and then tighten the bolt to
the specified torque.
8. Check the final gear case for oil leakage. If oil is leaking, check for
the cause.
EAUS1203
Coolant
The coolant level should be checked
regularly. In addition, the coolant must
be changed at the intervals specified in
the periodic maintenance chart.
TIP
If genuine Yamaha coolant is not avail-
able, use an ethylene glycol antifreeze
containing corrosion inhibitors for alu-
minum engines and mix with distilled
water at a 1:1 ratio.
EAU54164To check the coolant level1. Wait for the engine to cool. The coolant level will vary with engine
temperature.
2. Place the vehicle on the center- stand.
3. Remove the left cowling vent pan- el. (See page 3-39.)
4. Look at the coolant reservoir.
1. Final gear oil filler bolt
2. Gasket
3. Final gear oil drain bolt
Ti ghtening torque:
Final gear oil drain bolt:
23 N·m (2.3 kgf·m, 17 lb·ft)
Recommen ded final gear oil:
Yamaha genuine shaft drive gear oil
SAE 80W-90 API GL-5
Oil quantity:
0.20 L (0.21 US qt, 0.18 Imp.qt)
Ti ghtening torque:
Final gear oil filler bolt: 23 N·m (2.3 kgf·m, 17 lb·ft)
1
2
32
Recommen ded coolant:
YAMALUBE coolant
Coolant quantity: Coolant reservoir (max level mark): 0.25 L (0.26 US qt, 0.22 Imp.qt)
Radiator (including all routes): 2.60 L (2.75 US qt, 2.29 Imp.qt)
1. Coolant reservoir
2. Maximum level mark
3. Minimum level mark
2
1 3
UB95E2E0.book Page 16 Tuesday, December 17, 2019 10:29 AM
Page 89 of 122

Periodic maintenance an d a djustment
6-18
6
EAU40372
Air filter element
The air filter element should be cleaned
or replaced at the intervals specified in
the periodic maintenance and lubrica-
tion chart. Have a Yamaha dealer clean
or replace the air filter element.
EAU44735
Checkin g the en gine i dlin g
spee d
Check the engine idling speed and, if
necessary, have it corrected by a
Yamaha dealer.
En gine i dlin g spee d:
1000–1100 r/min
UB95E2E0.book Page 18 Tuesday, December 17, 2019 10:29 AM
Page 90 of 122
Periodic maintenance an d a djustment
6-19
6
EAU21386
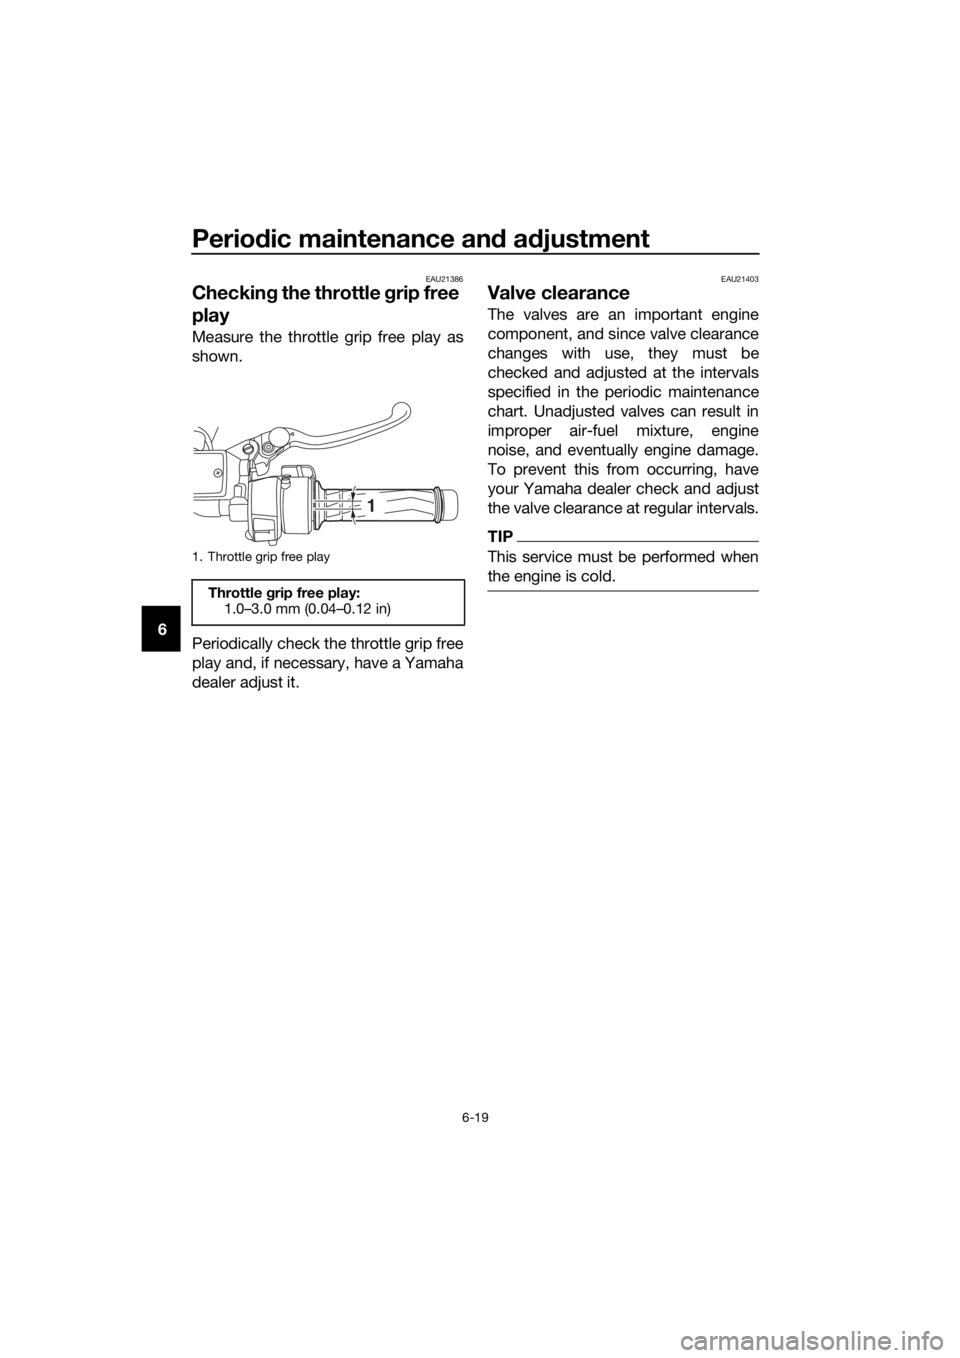
Checkin g the throttle grip free
play
Measure the throttle grip free play as
shown.
Periodically check the throttle grip free
play and, if necessary, have a Yamaha
dealer adjust it.
EAU21403
Valve clearance
The valves are an important engine
component, and since valve clearance
changes with use, they must be
checked and adjusted at the intervals
specified in the periodic maintenance
chart. Unadjusted valves can result in
improper air-fuel mixture, engine
noise, and eventually engine damage.
To prevent this from occurring, have
your Yamaha dealer check and adjust
the valve clearance at regular intervals.
TIP
This service must be performed when
the engine is cold.1. Throttle grip free play
Throttle grip free play:
1.0–3.0 mm (0.04–0.12 in)
1
UB95E2E0.book Page 19 Tuesday, December 17, 2019 10:29 AM
Page 94 of 122
Periodic maintenance an d a djustment
6-23
6
EAU40622
YCC-S clutch
This model is equipped with a hydrau-
lic clutch, therefore, it is necessary to
check the YCC-S clutch fluid level and
check the hydraulic system for leak-
age. (See page 6-25.)
TIP
If shifting becomes rough or clutch
slippage occurs, or if you notice poor
acceleration or engine stalls, have a
Yamaha dealer check the clutch for wear.
EAU37914
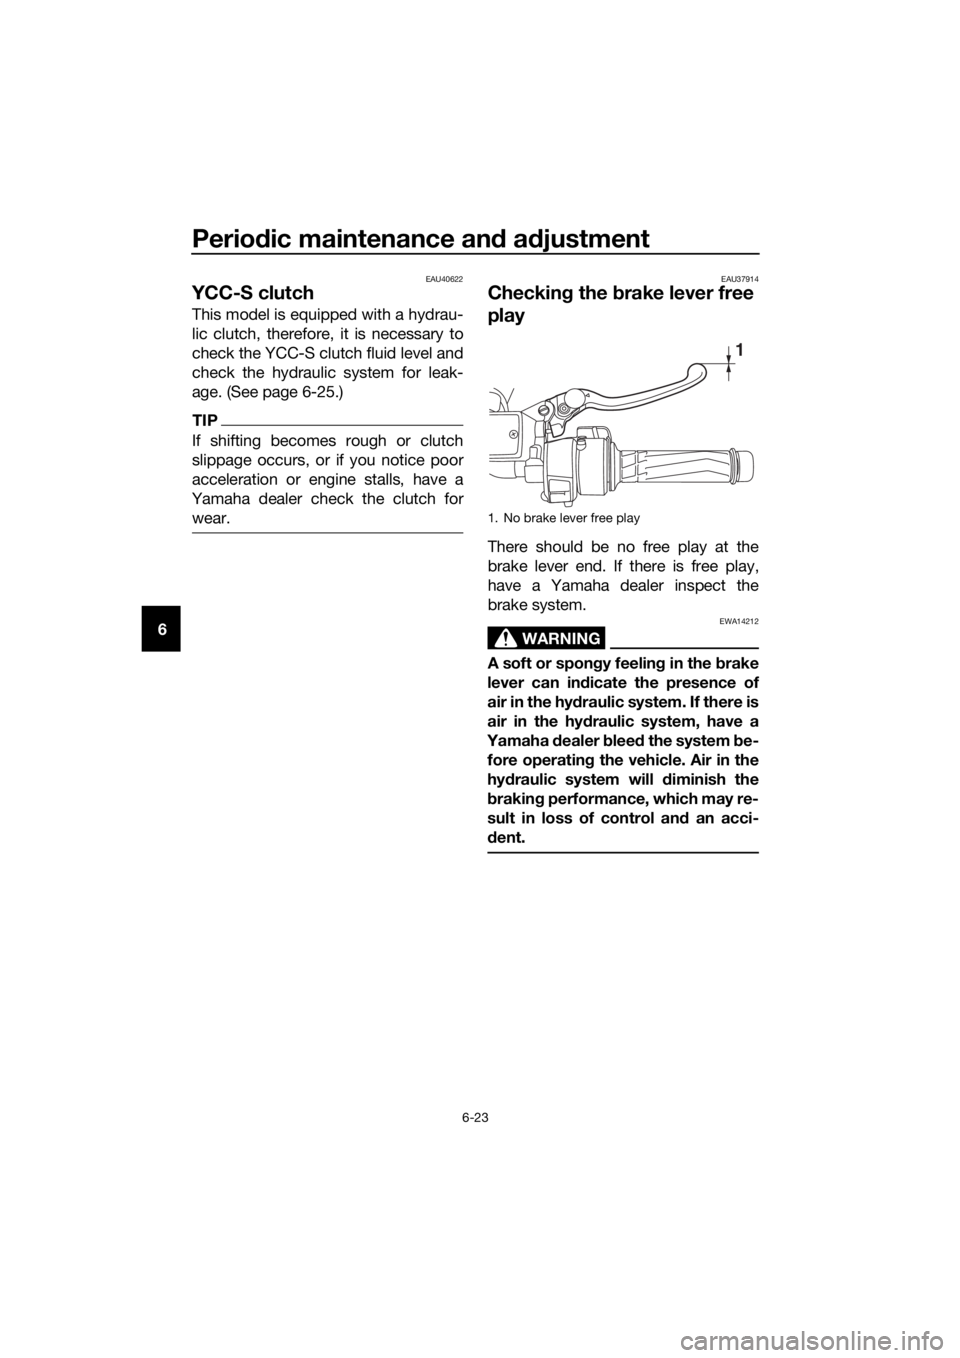
Checkin g the brake lever free
play
There should be no free play at the
brake lever end. If there is free play,
have a Yamaha dealer inspect the
brake system.
WARNING
EWA14212
A soft or spon gy feelin g in the b rake
lever can in dicate the presence of
air in the hy draulic system. If there is
air in the hy draulic system, have a
Yamaha dealer blee d the system be-
fore operatin g the vehicle. Air in the
hy draulic system will diminish the
b rakin g performance, which may re-
sult in loss of control an d an acci-
d ent.
1. No brake lever free play
1
UB95E2E0.book Page 23 Tuesday, December 17, 2019 10:29 AM
Page 107 of 122
Periodic maintenance an d a djustment
6-36
6
EAU86390
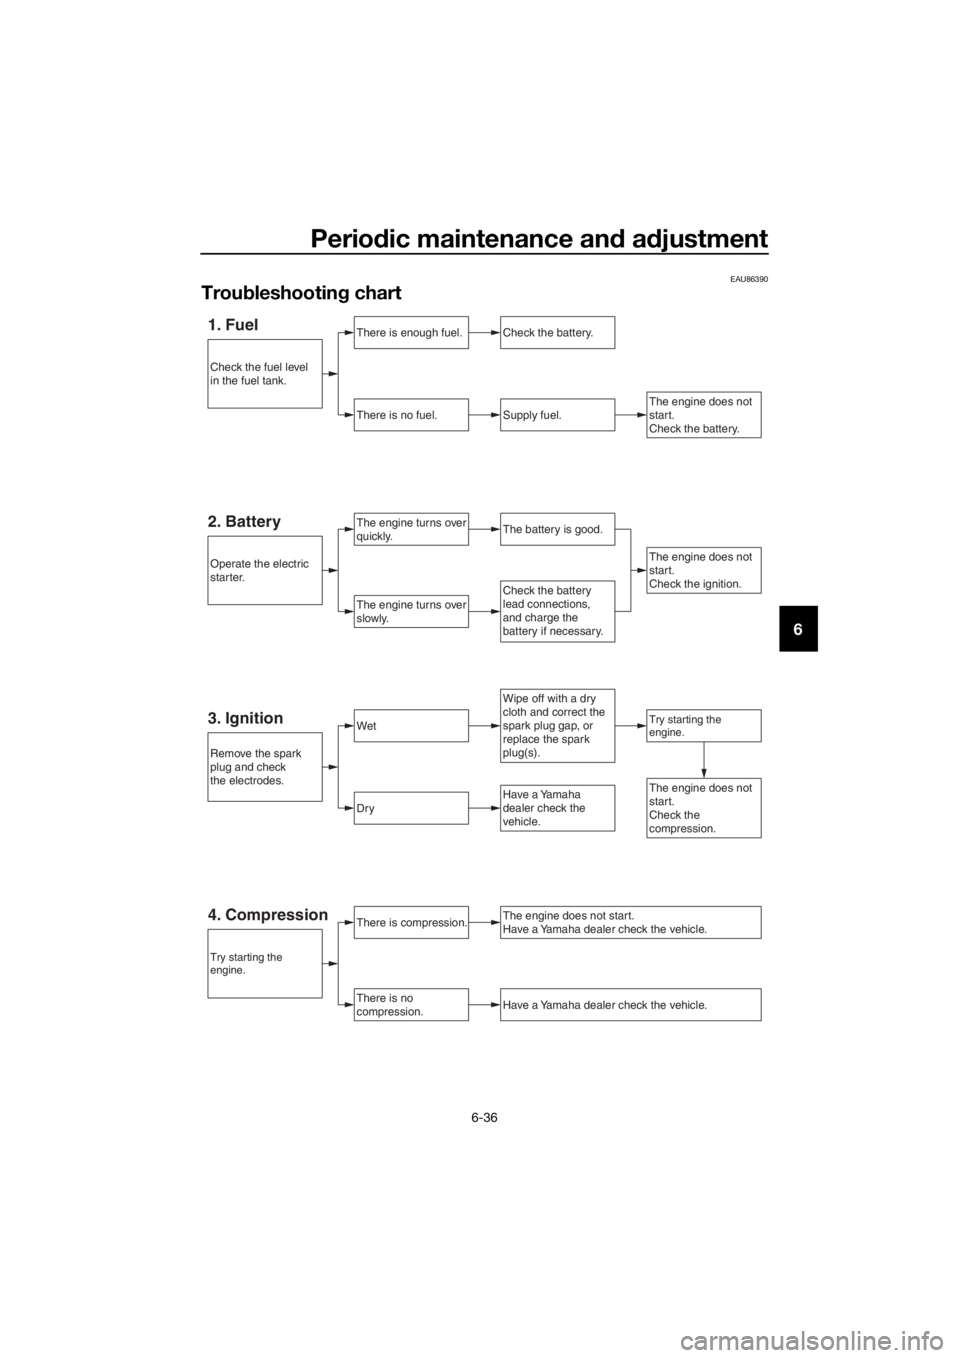
Trou bleshootin g chart
1. FuelThere is enough fuel.
There is no fuel.
Check the battery.
Supply fuel.
The engine turns over
quickly.
The engine turns over
slowly.
Try starting the
engine.
The engine does not
start.
Check the battery.
Wipe off with a dry
cloth and correct the
spark plug gap, or
replace the spark
plug(s).
Check the battery
lead connections,
and charge the
battery if necessary.
2. BatteryThe battery is good.
The engine does not
start.
Check the ignition.
3. IgnitionWet
Dry
There is compression.
There is no
compression.
The engine does not start.
Have a Yamaha dealer check the vehicle.
Have a Yamaha dealer check the vehicle.
The engine does not
start.
Check the
compression.Have a Yamaha
dealer check the
vehicle.
Remove the spark
plug and check
the electrodes.
Operate the electric
starter.
Try starting the
engine.
Check the fuel level
in the fuel tank.
4. Compression
UB95E2E0.book Page 36 Tuesday, December 17, 2019 10:29 AM
Page 108 of 122
Periodic maintenance an d a djustment
6-37
6
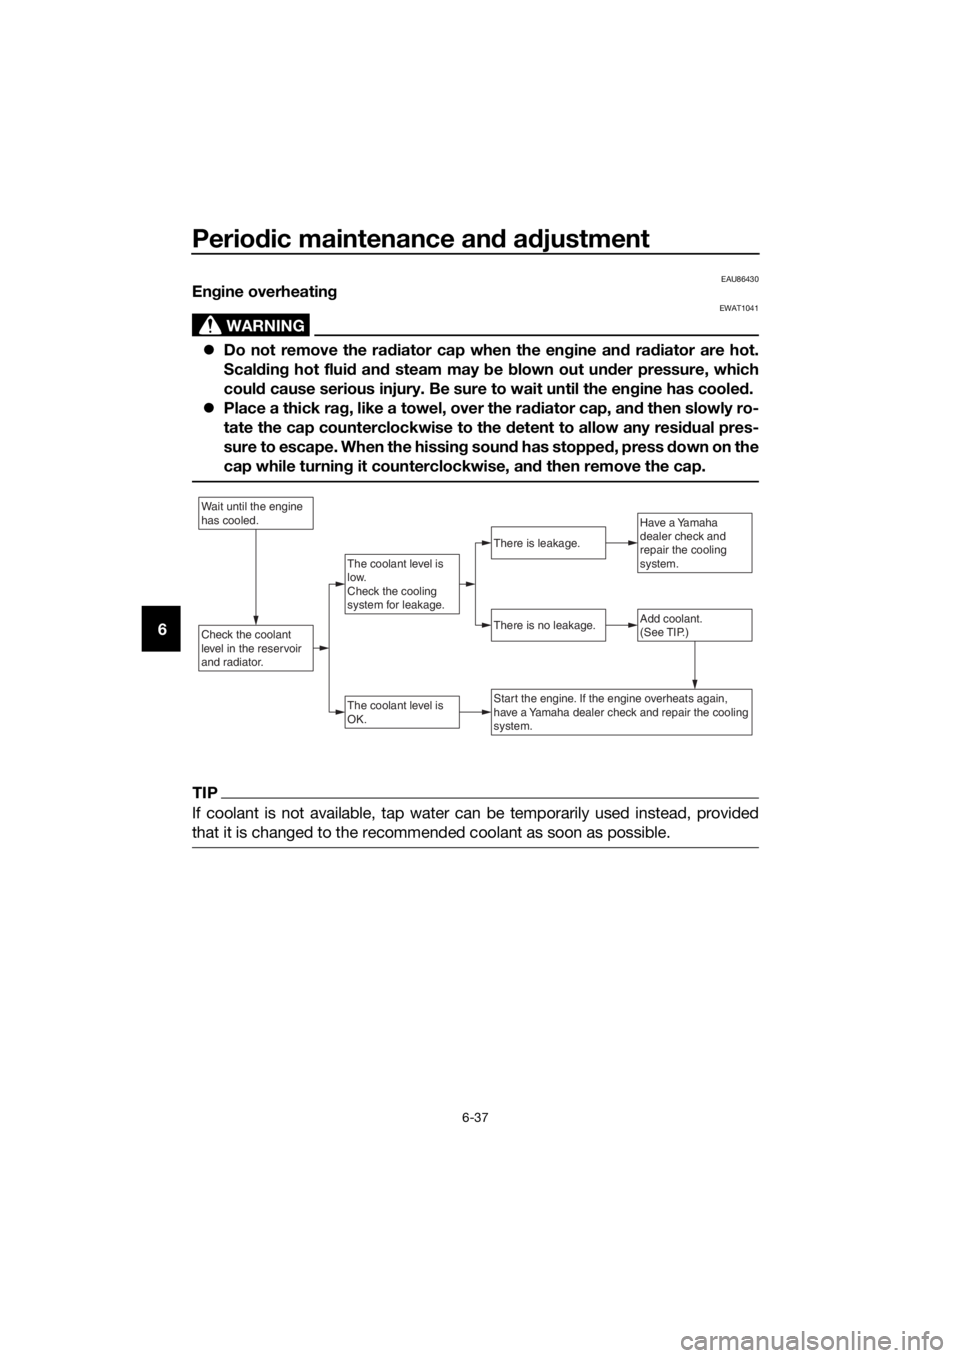
EAU86430En gine overheatin g
WARNING
EWAT1041
Do not remove the ra diator cap when the en gine an d ra diator are hot.
Scal din g hot flui d an d steam may b e blown out un der pressure, which
coul d cause serious injury. Be sure to wait until the eng ine has cooled.
Place a thick ra g, like a towel, over the ra diator cap, an d then slowly ro-
tate the cap counterclockwise to the detent to allow any resi dual pres-
sure to escape. When the hissin g soun d has stopped , press down on the
cap while turnin g it counterclockwise, an d then remove the cap.
TIP
If coolant is not available, tap water can be temporarily used instead, provided
that it is changed to the recommended coolant as soon as possible.
W ait until the engine
has cooled.
Check the coolant
le vel in the reser voir
and radiator.Add coolant.
(See TIP.)
The coolant le vel is
OK.
There is no leakage.
There is leakage.
The coolant le vel is
lo w.
Check the cooling
system for leakage.
Ha ve a Yamaha
dealer check and
repair the cooling
system.
Start the engine. If the engine o verheats again,
ha ve a Yamaha dealer check and repair the cooling
system.
UB95E2E0.book Page 37 Tuesday, December 17, 2019 10:29 AM
Page 111 of 122
Motorcycle care and stora ge
7-3
7
2. For drive chain-equipped models:
Dry and then lubricate the drive
chain to prevent rust.
3. Use a chrome polish to shine chrome, aluminum, and stainless
steel parts. Often the thermally in-
duced discoloring of stainless
steel exhaust systems can be re-
moved through polishing.
4. Apply a corrosion protection spray on all metal parts including
chrome or nickel-plated surfaces.
WARNING! Do not apply silicone
or oil spray to seats, han d g rips,
ru bber foot pe gs or tire tread s.
Otherwise these parts will b e-
come slippery, which coul d
cause loss of control. Thor-
ou ghly clean the surfaces of
these parts before operatin g the
vehicle. [EWA20650]
5. Treat rubber, vinyl, and unpainted plastic parts with a suitable care
product.
6. Touch up minor paint damage caused by stones, etc.
7. Wax all painted surfaces using a non-abrasive wax or use a detail
spray for motorcycles.
8. When finished cleaning, start the engine and let it idle for several mi-
nutes to help dry any remaining
moisture.
9. If the headlight lens has fogged up, start the engine and turn on
the headlight to help remove the
moisture.
10. Let the vehicle dry completely be- fore storing or covering it.
NOTICE
ECA26320
Do not apply wax to ru bber or
unpainte d plastic parts.
Do not use a brasive polishin g
compoun ds as they will wear
away the paint.
Apply sprays an d wax sparin gly.
Wipe off excess afterwar ds.
WARNING
EWA20660
Contaminants left on the brakes or
tires can cause loss of control. Make sure there is no lu bricant
or wax on the brakes or tires.
If necessary, wash the tires with
warm water an d a mil d d eter-
g ent.
If necessary, clean the brake
d iscs an d pad s with b rake
cleaner or acetone.
Before ri din g at hi gher spee ds,
test the vehicle’s brakin g per-
formance an d cornerin g b ehav-
ior.
UB95E2E0.book Page 3 Tuesday, December 17, 2019 10:29 AM