check oil YAMAHA FX SVHO 2021 Owners Manual
[x] Cancel search | Manufacturer: YAMAHA, Model Year: 2021, Model line: FX SVHO, Model: YAMAHA FX SVHO 2021Pages: 116, PDF Size: 5.03 MB
Page 7 of 116

Table of contents
Engine oil requirements ................ 59
Engine oil .......................................... 59
Draining the bilge water ................ 61
Draining the bilge water on land ...... 61
Draining the bilge water on water .... 61
Transporting on a trailer ................ 62
First-time operation ........................ 63 Engine break-in ............................. 63
Pre-operation checks ..................... 64
Pre-operation checklist .................... 64
Pre-operation check points........... 66
Pre-launch checks ........................... 66
Post-launch checks ......................... 72
Operation ......................................... 74 Operating your watercraft ............. 74
Getting to know your watercraft ...... 74
Learning to operate your
watercraft ...................................... 74
Riding position ................................. 75
Launching the watercraft ................. 75
Starting the engine on water ............ 75
Stopping the engine ......................... 76
Leaving the watercraft...................... 76
Operating the watercraft .................. 76
Turning the watercraft ...................... 77
Stopping the watercraft ................... 78
Operating the watercraft in reverse or neutral ...................................... 79
Boarding the watercraft ................... 80
Starting off........................................ 82
Capsized watercraft ......................... 83
Beaching and docking the
watercraft ...................................... 84
Operating in weeded areas .............. 84
After removing the watercraft from the water ....................................... 85
Care and storage............................. 86Post-operation care ...................... 86
Flushing the cooling water
passages....................................... 86 Cleaning the watercraft .................... 87
Battery care ...................................... 87
Long-term storage ........................ 89
Cleaning ........................................... 89
Lubrication ....................................... 89
Rustproofing ..................................... 90
Maintenance .................................... 91
Maintenance ................................. 91
Removing and installing the engine
cover ............................................. 91
Periodic maintenance chart ............. 93
Engine oil and oil filter ...................... 95
Specifications .................................. 96 Specifications ............................... 96
Trouble recovery ............................. 97 Troubleshooting ............................ 97
Troubleshooting chart ...................... 97
Emergency procedures .............. 100
Cleaning the jet intake and
impeller ....................................... 100
Raising the reverse gate ................ 101
Jumping the battery ....................... 101
Replacing the fuses ........................ 102
Towing the watercraft..................... 104
Submerged watercraft ................... 104
Index............................................... 106
UF3X72E0.book Page 2 Friday, May 29, 2020 10:09 AM
Page 53 of 116
Instrument operation
46
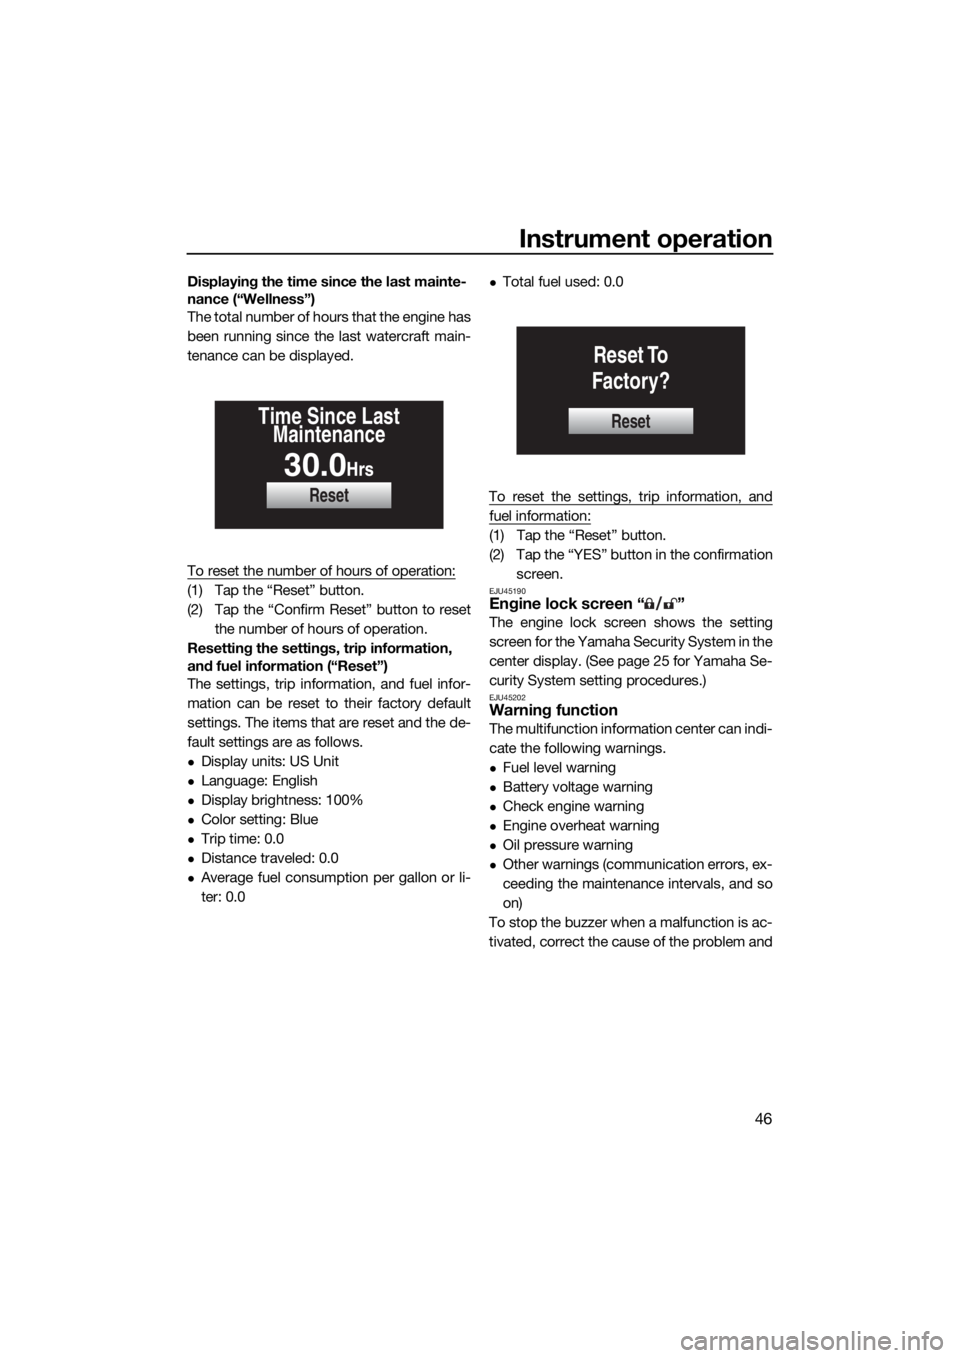
Displaying the time since the last mainte-
nance (“Wellness”)
The total number of hours that the engine has
been running since the last watercraft main-
tenance can be displayed.
To reset the number of hours of operation:
(1) Tap the “Reset” button.
(2) Tap the “Confirm Reset” button to resetthe number of hours of operation.
Resetting the settings, trip information,
and fuel information (“Reset”)
The settings, trip information, and fuel infor-
mation can be reset to their factory default
settings. The items that are reset and the de-
fault settings are as follows.
Display units: US Unit
Language: English
Display brightness: 100%
Color setting: Blue
Trip time: 0.0
Distance traveled: 0.0
Average fuel consumption per gallon or li-
ter: 0.0
Total fuel used: 0.0
To reset the settings, trip information, and
fuel information:
(1) Tap the “Reset” button.
(2) Tap the “YES” button in the confirmation screen.
EJU45190Engine lock screen “ ”
The engine lock screen shows the setting
screen for the Yamaha Security System in the
center display. (See page 25 for Yamaha Se-
curity System setting procedures.)
EJU45202Warning function
The multifunction information center can indi-
cate the following warnings.
Fuel level warning
Battery voltage warning
Check engine warning
Engine overheat warning
Oil pressure warning
Other warnings (communication errors, ex-
ceeding the maintenance intervals, and so
on)
To stop the buzzer when a malfunction is ac-
tivated, correct the cause of the problem and
Reset
Time Since Last Maintenance
30.0Hr s
Reset
Reset To
Factory?
UF3X72E0.book Page 46 Friday, May 29, 2020 10:09 AM
Page 55 of 116
Instrument operation
48
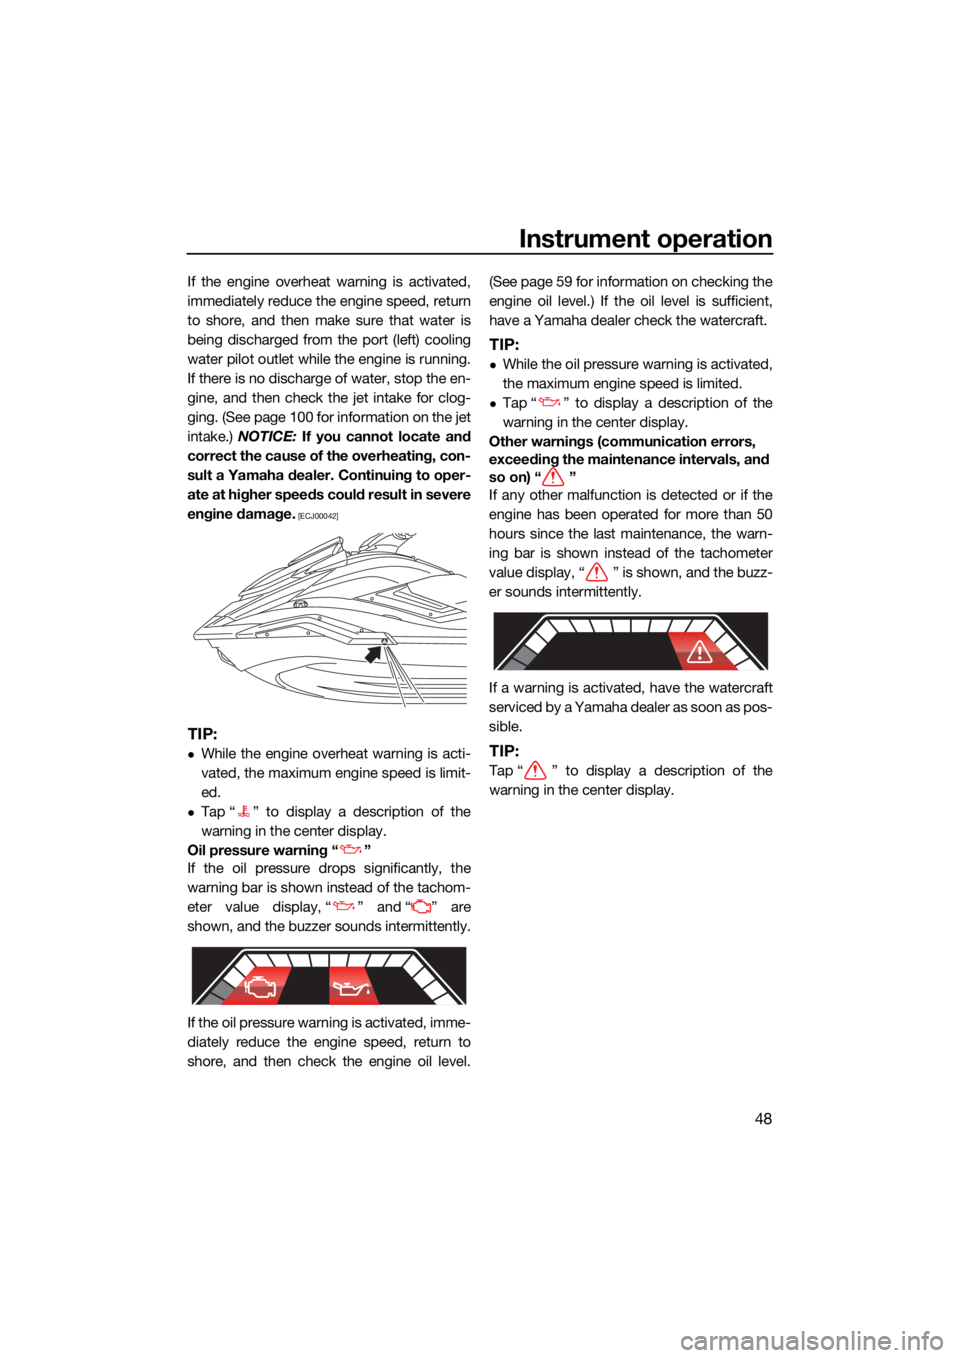
If the engine overheat warning is activated,
immediately reduce the engine speed, return
to shore, and then make sure that water is
being discharged from the port (left) cooling
water pilot outlet while the engine is running.
If there is no discharge of water, stop the en-
gine, and then check the jet intake for clog-
ging. (See page 100 for information on the jet
intake.) NOTICE: If you cannot locate and
correct the cause of the overheating, con-
sult a Yamaha dealer. Continuing to oper-
ate at higher speeds could result in severe
engine damage.
[ECJ00042]
TIP:
While the engine overheat warning is acti-
vated, the maximum engine speed is limit-
ed.
Tap “ ” to display a description of the
warning in the center display.
Oil pressure warning “ ”
If the oil pressure drops significantly, the
warning bar is shown instead of the tachom-
eter value display, “ ” and “ ” are
shown, and the buzzer sounds intermittently.
If the oil pressure warning is activated, imme-
diately reduce the engine speed, return to
shore, and then check the engine oil level. (See page 59 for information on checking the
engine oil level.) If the oil level is sufficient,
have a Yamaha dealer check the watercraft.
TIP:
While the oil pressure warning is activated,
the maximum engine speed is limited.
Tap “ ” to display a description of the
warning in the center display.
Other warnings (communication errors,
exceeding the maintenance intervals, and
so on) “ ”
If any other malfunction is detected or if the
engine has been operated for more than 50
hours since the last maintenance, the warn-
ing bar is shown instead of the tachometer
value display, “ ” is shown, and the buzz-
er sounds intermittently.
If a warning is activated, have the watercraft
serviced by a Yamaha dealer as soon as pos-
sible.
TIP:
Tap “ ” to display a description of the
warning in the center display.
UF3X72E0.book Page 48 Friday, May 29, 2020 10:09 AM
Page 66 of 116
Operation and handling requirements
59
EJU40291
Engine oil requirementsEJU41514Engine oilECJ00282
Use only 4-stroke engine oil. Usage of 2-
stroke engine oil could result in severe en-
gine damage.
TIP:
When the engine is operated at high speeds,
some engine oil may be consumed. Be sure
to check the engine oil level.
Why Yamalube
YAMALUBE oil is a Genuine YAMAHA Part
born of the engineers’ passion and belief that
engine oil is an important liquid engine com-
ponent. We form teams of specialists in the
fields of mechanical engineering, chemistry,
electronics and track testing, and have them
develop the engine together with the oil it will
use. Yamalube oils take full advantage of the
base oil’s qualities and blend in the ideal bal-
ance of additives to make sure the final oil
clears our performance standards. Thus,
Yamalube mineral, semisynthetic and syn- thetic oils have their own distinct characters
and value. Yamaha’s experience gained over
many years of research and development
into oil since the 1960’s helps make Yamalube the best choice for your Yamaha
engine.
Checking the engine oil level
EWJ00341
Engine oil is extremely hot immediately af-
ter the engine is turned off. Coming in con-
tact with or getting any engine oil on your
clothes could result in burns.
ECJ01002
Make sure that debris and water do not
enter the oil filler hole. Debris and water in
the engine oil can cause serious engine
damage.
To check the engine oil level:
(1) Place the watercraft in a precisely level position on land with the engine
stopped. If the engine was running, allow
the engine oil to settle by waiting 5 min-
utes or more before checking the oil lev-
el.
(2) Remove the seats. (See page 49 for seat removal and installation procedures.)
Recommended engine oil:
YAMALUBE 4W or 4-stroke motor oil
Recommended engine oil type: SAE 10W-30, 10W-40, 20W-40,
20W-50
Recommended engine oil grade: API SG, SH, SJ, SL
UF3X72E0.book Page 59 Friday, May 29, 2020 10:09 AM
Page 67 of 116
Operation and handling requirements
60
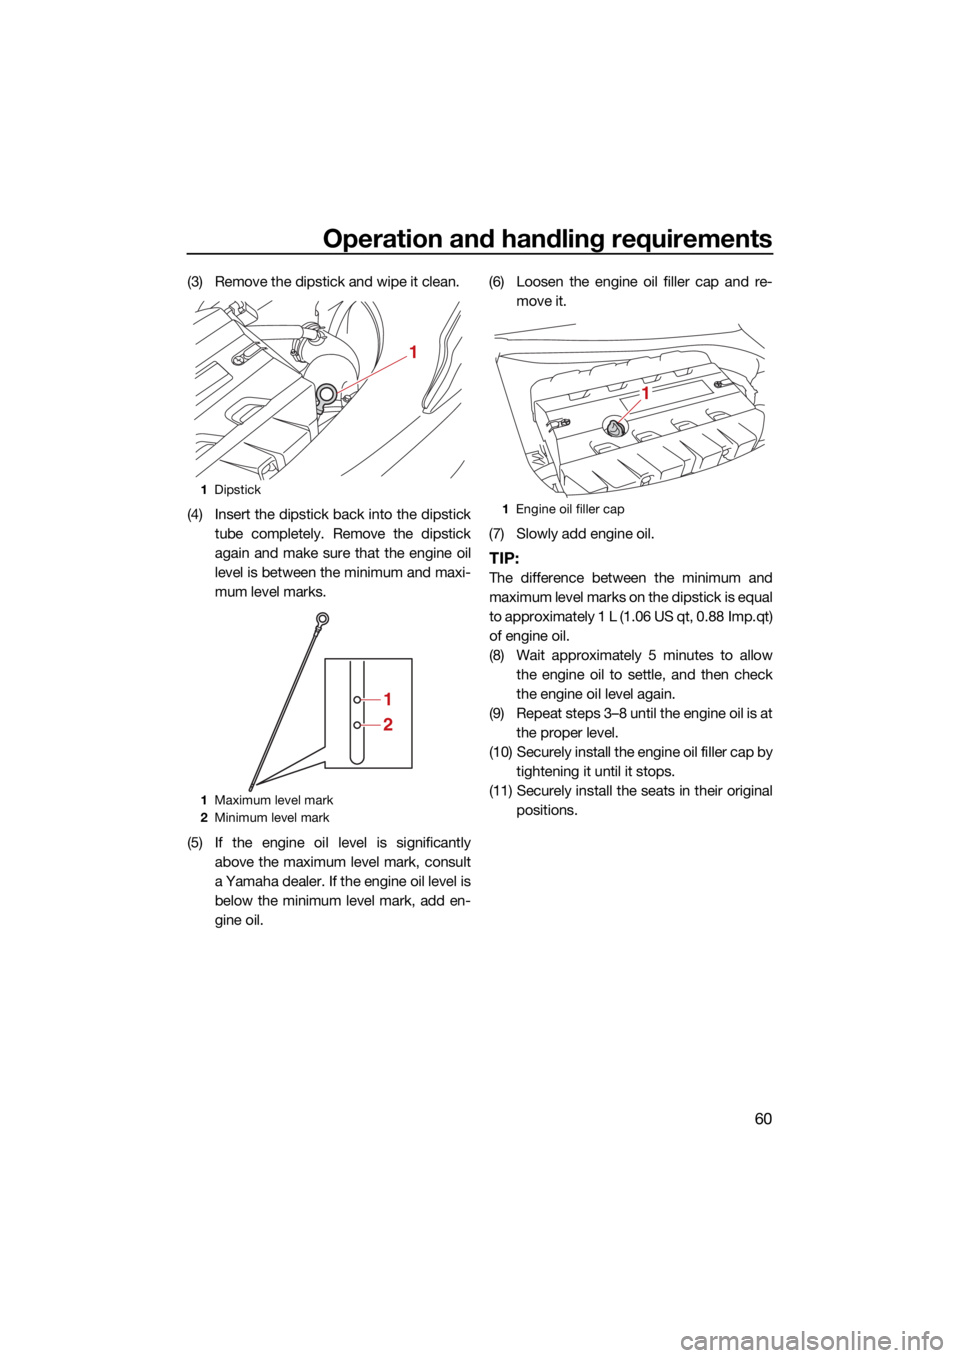
(3) Remove the dipstick and wipe it clean.
(4) Insert the dipstick back into the dipsticktube completely. Remove the dipstick
again and make sure that the engine oil
level is between the minimum and maxi-
mum level marks.
(5) If the engine oil level is significantly above the maximum level mark, consult
a Yamaha dealer. If the engine oil level is
below the minimum level mark, add en-
gine oil. (6) Loosen the engine oil filler cap and re-
move it.
(7) Slowly add engine oil.
TIP:
The difference between the minimum and
maximum level marks on the dipstick is equal
to approximately 1 L (1.06 US qt, 0.88 Imp.qt)
of engine oil.
(8) Wait approximately 5 minutes to allow the engine oil to settle, and then check
the engine oil level again.
(9) Repeat steps 3–8 until the engine oil is at the proper level.
(10) Securely install the engine oil filler cap by tightening it until it stops.
(11) Securely install the seats in their original positions.
1Dipstick
1 Maximum level mark
2 Minimum level mark
1
1
2
1Engine oil filler cap
1
UF3X72E0.book Page 60 Friday, May 29, 2020 10:09 AM
Page 70 of 116

First-time operation
63
EJU42690
Engine break-inECJ00432
Failure to perform the engine break-in
could result in reduced engine life or even
severe engine damage.
The engine break-in is essential to allow the
various components of the engine to wear
and polish themselves to the correct operat-
ing clearances. This ensures proper perfor-
mance and promotes longer component life.
To perform the engine break-in:
(1) Check the engine oil level. (See page 59for information on checking the engine
oil level.)
(2) Launch the watercraft and start the en- gine. (See page 75 for information on
starting the engine.)
(3) For the first 5 minutes, operate with the engine speed at 2000 r/min.
(4) For the next 90 minutes, operate with the engine speed below 5000 r/min.
After the engine break-in is complete, the wa-
tercraft can be operated normally.
UF3X72E0.book Page 63 Friday, May 29, 2020 10:09 AM
Page 71 of 116

Pre-operation checks
64
EJU31982
EWJ00412
Failure to inspect or maintain the watercraft properly increases the possibility of an ac-
cident or damage to the watercraft. Do not operate the watercraft if you find any prob-
lem. If a problem cannot be corrected by the procedures provided in this manual, have
the watercraft inspected by a Yamaha dealer.
EJU41235Pre-operation checklist
Before using this watercraft, be sure to perform the checks in the following checklist.
ITEMROUTINEPAGE
PRE-LAUNCH CHECKS
Engine compartment Ventilate the engine compartment.
Check inside the engine compartment for damage.
66
Fuel system Check the fuel system for leakage.
Check the fuel level in the fuel tank.
66
Water separator Check the water separator for water. 67
Engine unit Check the exterior of the engine unit for damage. 67
Engine oil level Check the engine oil level. 67
Bilge water Check the engine compartment for bilge water. 67
Battery Check the battery connections. 67
Steering system Check the steering system for proper operation. 68
Adjustable tilt steering sys-
tem Check the adjustable tilt steering system for proper
operation and check that the handlebars are se-
curely locked in place.
69
RiDE lever Check the RiDE lever for proper operation. 69
Throttle lever Check the throttle lever for proper operation. 69
Yamaha Security System Check the Yamaha Security System for proper op-
eration.
69
Engine shut-off cord (lan-
yard) Check the engine shut-off cord (lanyard) for dam-
age.
69
Switches Check the start switch, engine stop switch, and en-
gine shut-off switch for proper operation.
69
Electric trim system Check the electric trim system for proper operation. 70
Storage compartments Check the storage compartments for damage and
water.
70
Fire extinguisher holder,
cover, and band Check the fire extinguisher holder, cover, and band
for damage.
70
Fire extinguisher Check the condition of the fire extinguisher. 71
Safety equipment Check that safety equipment meeting the applica-
ble regulations is on board.
71
Hull and deck Check the hull and deck for damage. 71
Jet intake Check the jet intake for damage and clogging. 71
UF3X72E0.book Page 64 Friday, May 29, 2020 10:09 AM
Page 74 of 116
Pre-operation checks
67
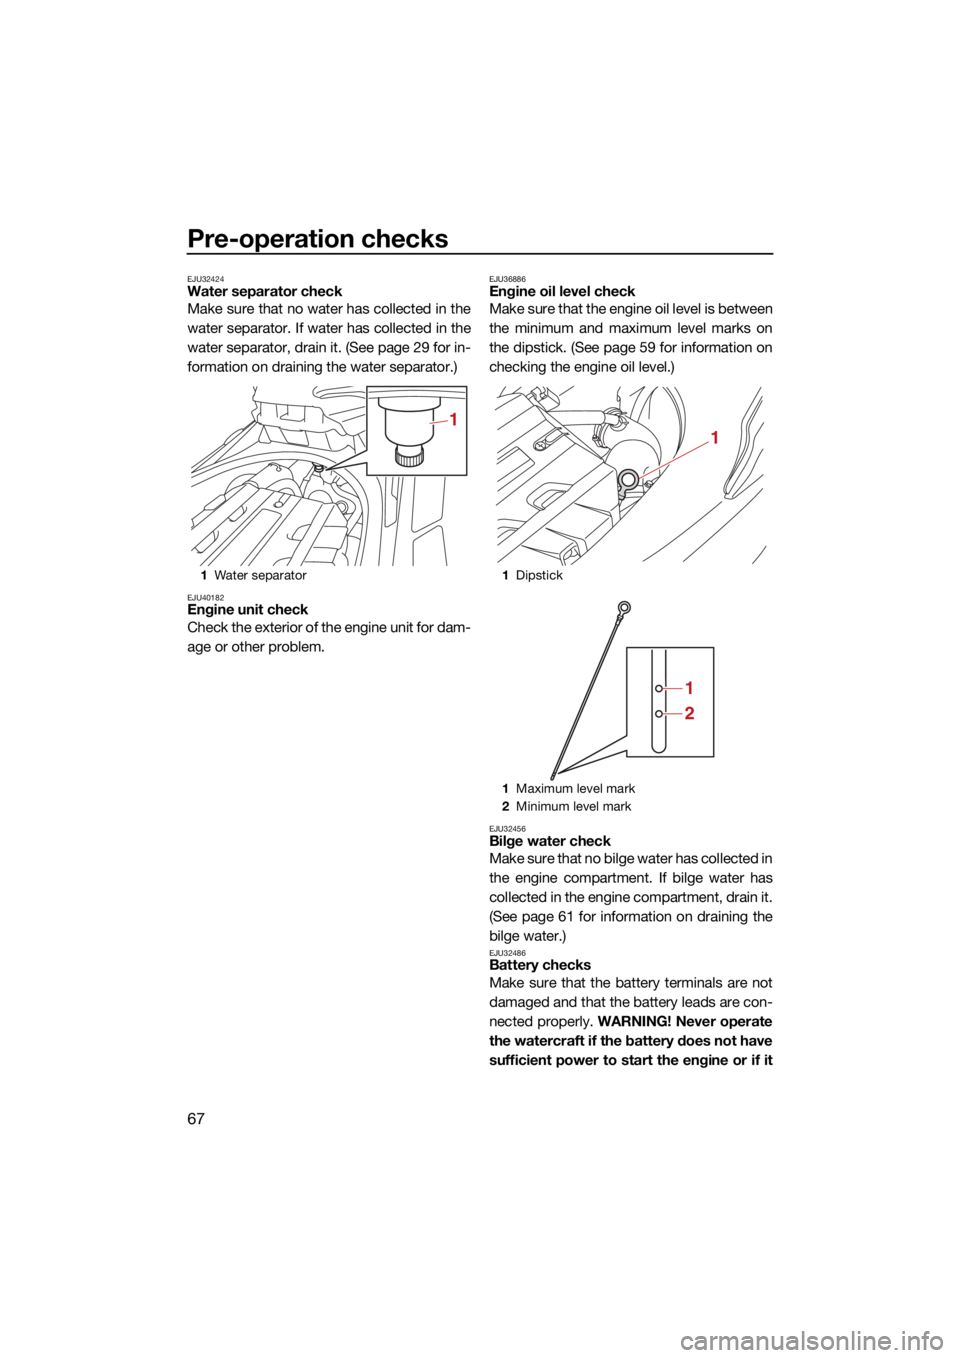
EJU32424Water separator check
Make sure that no water has collected in the
water separator. If water has collected in the
water separator, drain it. (See page 29 for in-
formation on draining the water separator.)
EJU40182Engine unit check
Check the exterior of the engine unit for dam-
age or other problem.
EJU36886Engine oil level check
Make sure that the engine oil level is between
the minimum and maximum level marks on
the dipstick. (See page 59 for information on
checking the engine oil level.)
EJU32456Bilge water check
Make sure that no bilge water has collected in
the engine compartment. If bilge water has
collected in the engine compartment, drain it.
(See page 61 for information on draining the
bilge water.)
EJU32486Battery checks
Make sure that the battery terminals are not
damaged and that the battery leads are con-
nected properly. WARNING! Never operate
the watercraft if the battery does not have
sufficient power to start the engine or if it
1 Water separator
1
1Dipstick
1 Maximum level mark
2 Minimum level mark
1
1
2
UF3X72E0.book Page 67 Friday, May 29, 2020 10:09 AM
Page 95 of 116
Care and storage
88
egg, or vegetable oil. Call a physician im-
mediately.
Eyes: Flush with water for 15 minutes and
get prompt medical attention.
Batteries produce explosive gases. Keep
sparks, flames, cigarettes, etc., well away.
If using or charging the battery in an en-
closed space, make sure that it is well
ventilated. Always shield your eyes when
working near batteries.
Keep out of the reach of children.
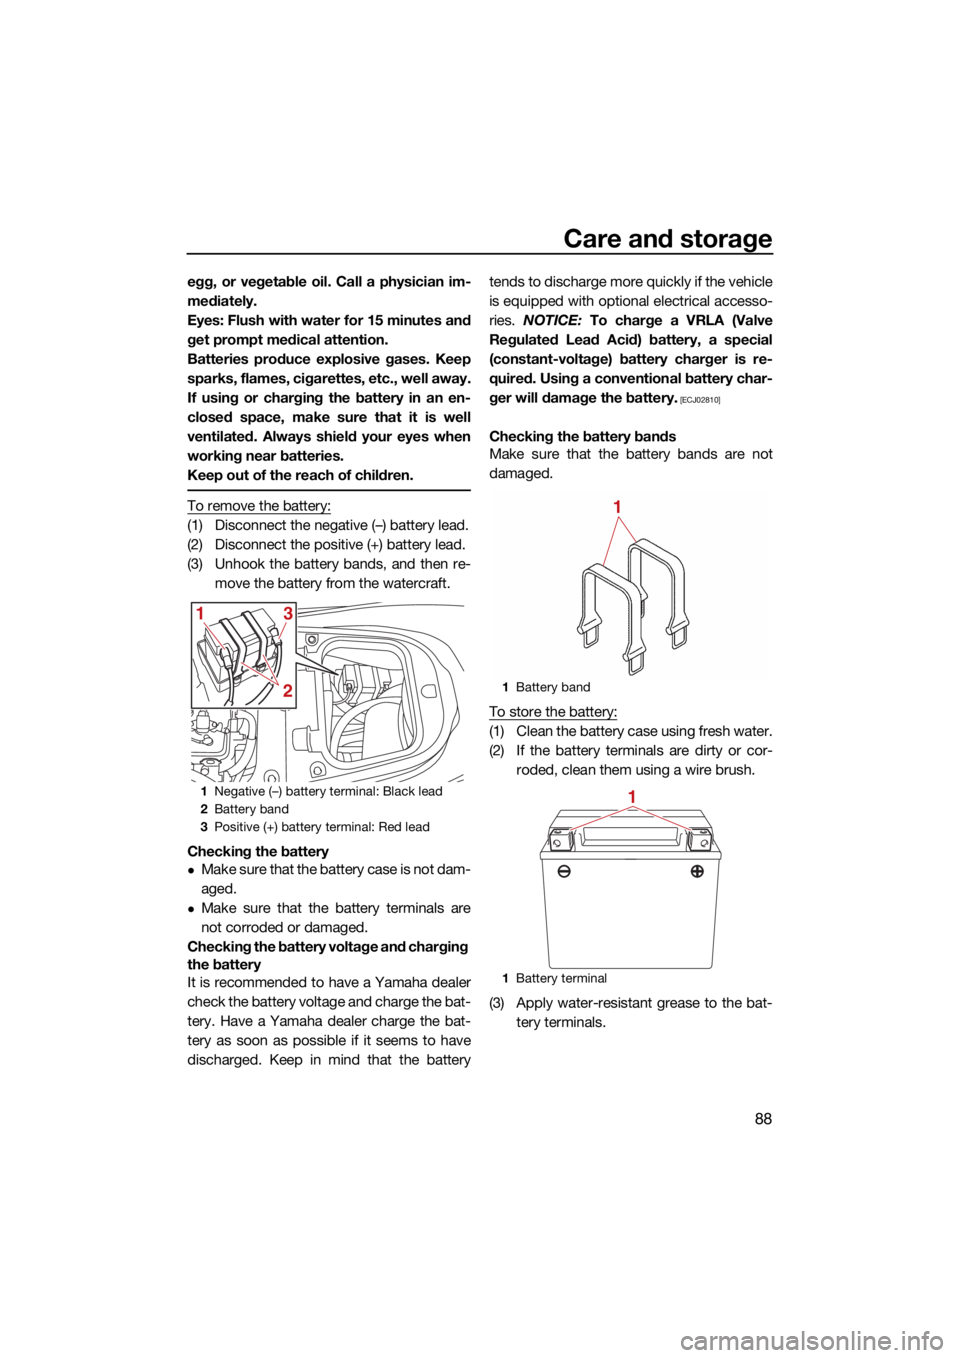
To remove the battery:
(1) Disconnect the negative (–) battery lead.
(2) Disconnect the positive (+) battery lead.
(3) Unhook the battery bands, and then re-move the battery from the watercraft.
Checking the battery
Make sure that the battery case is not dam-
aged.
Make sure that the battery terminals are
not corroded or damaged.
Checking the battery voltage and charging
the battery
It is recommended to have a Yamaha dealer
check the battery voltage and charge the bat-
tery. Have a Yamaha dealer charge the bat-
tery as soon as possible if it seems to have
discharged. Keep in mind that the battery tends to discharge more quickly if the vehicle
is equipped with optional electrical accesso-
ries.
NOTICE: To charge a VRLA (Valve
Regulated Lead Acid) battery, a special
(constant-voltage) battery charger is re-
quired. Using a conventional battery char-
ger will damage the battery.
[ECJ02810]
Checking the battery bands
Make sure that the battery bands are not
damaged.
To store the battery:
(1) Clean the battery case using fresh water.
(2) If the battery terminals are dirty or cor- roded, clean them using a wire brush.
(3) Apply water-resistant grease to the bat- tery terminals.
1Negative (–) battery terminal: Black lead
2 Battery band
3 Positive (+) battery terminal: Red lead
1
231
Battery band
1 Battery terminal
1
1
UF3X72E0.book Page 88 Friday, May 29, 2020 10:09 AM
Page 100 of 116

Maintenance
93
EJU43101Periodic maintenance chart
The periodic maintenance chart gives general guidelines for periodic maintenance. Have a
Yamaha dealer perform the checks in the following chart. However, maintenance may need to be performed more frequently depending on your operating conditions. If you have any
questions, consult a Yamaha dealer.
This “ √” mark indicates items to be checked and serviced by a Yamaha dealer.
Item OperationInitial Thereafter every
Page
10 hours 50 hours
or 12
months *1 100
hours or 12
months *1 200
hours or 24
months *1
Fuel line Check fuel hoses and
clamps
√
—
Fuel filler cap/Wa-
ter separator Check O-rings for cracks
and deformation
√
—
Fuel tank Check installation and
straps
√
—
Water inlet strainer Check for clogs and dam-
age
√
—
Cooling water hos-
es Check for damage and
leakage, and check
clamps
√
—
Engine oil Replace √√ 95
Oil filter Replace √95
Intermediate hous-
ing Lubricate
√—
Spark plugs Check √√ —
Battery Check state of charge,
terminals and bands
√
—
Battery leads Check terminals √—
Steering master Check operation and for
looseness
√√
—
Steering cable Check exterior and con-
nections, and lubricate
√
—
Electric trim rod Check exterior and con-
nections, and lubricate
√
—
Shift rod and re-
verse gate Check exterior and con-
nections, and lubricate
√
—
Air filter element Check for damage and
dirt
√
—
Air intake hoses Check for damage, and
check clamps
√
—
Thr
ottle body Lubricate throttle valve √—
UF3X72E0.book Page 93 Friday, May 29, 2020 10:09 AM