oil YAMAHA FZ8 N 2015 User Guide
[x] Cancel search | Manufacturer: YAMAHA, Model Year: 2015, Model line: FZ8 N, Model: YAMAHA FZ8 N 2015Pages: 110, PDF Size: 3.05 MB
Page 56 of 110

PERIODIC MAINTENANCE AND ADJUSTMENT
6-6
6
22*Rear suspension re-
lay arm an
d con-
nectin g arm
pivotin g points • Check operation.
√√√√
23 En gine oil • Change.
• Check oil level and vehicle for oil
leakage. √√√√√√
24 En
gine oil filter car-
tri dge • Replace.
√√√
25 *Coolin g system • Check coolant level and vehicle
for coolant leakage. √√√√√
• Change coolant. Every 3 years
26 *Front an
d rear
b rake switches • Check operation.
√√√√√√
27 Movin
g parts an d
cab les • Lubricate.
√√√√√
28 *Throttle grip • Check operation.
• Check throttle grip free play, and
adjust if necessary.
• Lubricate cable and grip housing. √√√√√
29 *Li
ghts, si gnals an d
switches • Check operation.
• Adjust headlight beam.
√√√√√√
NO. ITEM CHECK OR MAINTENANCE JOB
ODOMETER READING
ANNUAL
CHECK
1000 km
(600 mi) 10000 km
(6000 mi) 20000 km
(12000 mi) 30000 km
(18000 mi) 40000 km
(24000 mi)U2SHE1E0.book Page 6 Tuesday, July 15, 2014 4:04 PM
Page 57 of 110

PERIODIC MAINTENANCE AND ADJUSTMENT
6-7
6
EAU18681
TIPAir filter
• This model’s air filter is equipped with a disposable oil-coated paper element, which must not be cleaned with com- pressed air to avoid damaging it.
• The air filter element needs to be replaced more frequently when riding in unusually wet or dusty areas.
Hydraulic brake service
• Regularly check and, if necessary, correct the brake fluid level.
• Every two years replace the internal components of the brake master cylinders and calipers, and change the brake fluid.
• Replace the brake hoses every four years and if cracked or damaged.
U2SHE1E0.book Page 7 Tuesday, July 15, 2014 4:04 PM
Page 60 of 110

PERIODIC MAINTENANCE AND ADJUSTMENT
6-10
6
TIPIf a torque wrench is not available
when installing a spark plug, a good
estimate of the correct torque is 1/4–
1/2 turn past finger tight. However, the
spark plug should be tightened to the
specified torque as soon as possible.NOTICE
ECA10841
Do not use any tools to remove or in-
stall the spark plug cap, otherwise
the i gnition coil coupler may get
d amag ed . The spark plu g cap may
b e difficult to remove b ecause the
ru bber seal on the en d of the cap fits
ti g htly. To remove the spark plu g
cap, simply twist it b ack and forth
while pullin g it out; to install it, twist
it back an d forth while pushin g it in.
EAU19918
En gine oil an d oil filter car-
tri dgeThe engine oil level should be checked
before each ride. In addition, the oil
must be changed and the oil filter car-
tridge replaced at the intervals speci-
fied in the periodic maintenance and
lubrication chart.
To check the en gine oil level
1. Place the vehicle on a level sur- face and hold it in an upright posi-
tion. A slight tilt to the side can
result in a false reading.
2. Start the engine, warm it up for several minutes, and then turn it
off.
3. Wait a few minutes until the oil set- tles, and then check the oil level
through the check window locat-
ed at the bottom-right side of the
crankcase.TIPThe engine oil should be between the
minimum and maximum level marks.
FZ8-N
FZ8-NA1. Engine oil filler cap
2. Engine oil level check window
3. Maximum level mark
4. Minimum level mark
1. Engine oil filler cap
2. Engine oil level check window
3. Maximum level mark
4. Minimum level mark
3
4 1
2
1
2
3
4
U2SHE1E0.book Page 10 Tuesday, July 15, 2014 4:04 PM
Page 61 of 110

PERIODIC MAINTENANCE AND ADJUSTMENT
6-11
6
4. If the engine oil is at or below the
minimum level mark, add suffi-
cient oil of the recommended type
to raise it to the correct level.
To chan ge the en gine oil (with or
without oil filter cartri dge replace-
ment) 1. Place the vehicle on a level sur- face.
2. Remove cowling A. (See page 6-8.) (FZ8-NA)
3. Start the engine, warm it up for several minutes, and then turn it
off.
4. Place an oil pan under the engine to collect the used oil.
5. Remove the engine oil filler cap, the engine oil drain bolt and its
gasket to drain the oil from the
crankcase.
TIPSkip steps 6–8 if the oil filter cartridge
is not being replaced.6. Remove the oil filter cartridge withan oil filter wrench.
TIPAn oil filter wrench is available at a
Yamaha dealer.7. Apply a thin coat of clean engineoil to the O-ring of the new oil filter
cartridge.TIPMake sure that the O-ring is properly
seated.8. Install the new oil filter cartridgewith an oil filter wrench, and then
tighten it to the specified torque
with a torque wrench.
1. Engine oil drain bolt
2. Gasket
1. Oil filter wrench
2. Oil filter cartridge
12
1
2
1. O-ring
U2SHE1E0.book Page 11 Tuesday, July 15, 2014 4:04 PM
Page 62 of 110

PERIODIC MAINTENANCE AND ADJUSTMENT
6-12
69. Install the engine oil drain bolt andits new gasket, and then tighten
the bolt to the specified torque.
10. Refill with the specified amount of the recommended engine oil, and
then install and tighten the oil filler
cap.
TIPBe sure to wipe off spilled oil on any
parts after the engine and exhaust sys-
tem have cooled down.NOTICE
ECA11621
In or der to prevent clutch slip-
pa ge (since the en gine oil also
lu bricates the clutch), do not
mix any chemical additives. Do
not use oils with a diesel speci-
fication of “CD” or oils of a hi gh-
er quality than specifie d. In
a ddition, do not use oils la beled
“ENERGY CONSERVING II” or
hi gher.
Make sure that no forei gn mate-
rial enters the crankcase.
11. Start the engine, and then let it idle for several minutes while checking
it for oil leakage. If oil is leaking,
immediately turn the engine off
and check for the cause.TIPAfter the engine is started, the engine
oil level warning light should go off if
the oil level is sufficient.NOTICE
ECA10402
If the oil level warnin g lig ht flickers
or remains on even if the oil level is
correct, immed iately turn the en gine
off an d have a Yamaha d ealer check
the vehicle.12. Turn the engine off, wait a few minutes until the oil settles, and
then check the oil level and cor-
rect it if necessary.
13. Install the cowling. (FZ8-NA)
1. Torque wrenchTi ghtenin g torque:
Oil filter cartridge: 17 Nm (1.7 m·kgf, 12 ft·lbf)
Ti ghtenin g torque:
Engine oil drain bolt:
43 Nm (4.3 m·kgf, 31 ft·lbf)
1
Recommen ded en gine oil:
See page 8-1.
Oil quantity: Without oil filter cartridge replace-
ment:2.90 L (3.07 US qt, 2.55 Imp.qt)
With oil filter cartridge replacement:
3.10 L (3.28 US qt, 2.73 Imp.qt)
U2SHE1E0.book Page 12 Tuesday, July 15, 2014 4:04 PM
Page 74 of 110
PERIODIC MAINTENANCE AND ADJUSTMENT
6-24
6
TIPThe rear brake fluid reservoir is located
under the rider seat. (See page 3-18.)
WARNING
EWA16011
Improper maintenance can result in
loss of brakin g a bility. O bserve
these precautions: Insufficient brake flui d may al-
low air to enter the b rake sys-
tem, re ducin g brakin g
performance.
Clean the filler cap before re-
moving . Use only DOT 4 b rake
flui d from a seale d container.
Use only the specified b rake flu-
i d ; otherwise, the ru bber seals
may deteriorate, causin g leak-
a g e.
Refill with the same type of
brake flui d. A ddin g a brake flui d
other than DOT 4 may result in a
harmful chemical reaction.
Be careful that water or dust
d oes not enter the brake flui d
reservoir when refillin g. Water
will si gnificantly lower the boil-
in g point of the flui d an d may re-
sult in vapor lock, an d d ir t may
clo g
the ABS hy draulic unit
valves.
NOTICE
ECA17641
Brake fluid may damag e painted
surfaces or plastic parts. Always
clean up spille d flui d imme diately.As the brake pads wear, it is normal for
the brake fluid level to gradually go
down. A low brake fluid level may indi-
cate worn brake pads and/or brake
system leakage; therefore, be sure to
check the brake pads for wear and the
brake system for leakage. If the brake
fluid level goes down suddenly, have a
Yamaha dealer check the cause before further riding.
EAU22733
Chan gin g the brake flui dHave a Yamaha dealer change the
brake fluid at the intervals specified in
the periodic maintenance and lubrica-
tion chart. In addition, have the oil seals
of the master cylinders and calipers as
well as the brake hoses replaced at the
intervals listed below or whenever they
are damaged or leaking.
Oil seals: Replace every two
years.
Brake hoses: Replace every four
years.
Specifie d b rake flui d:
DOT 4
U2SHE1E0.book Page 24 Tuesday, July 15, 2014 4:04 PM
Page 76 of 110
PERIODIC MAINTENANCE AND ADJUSTMENT
6-26
6
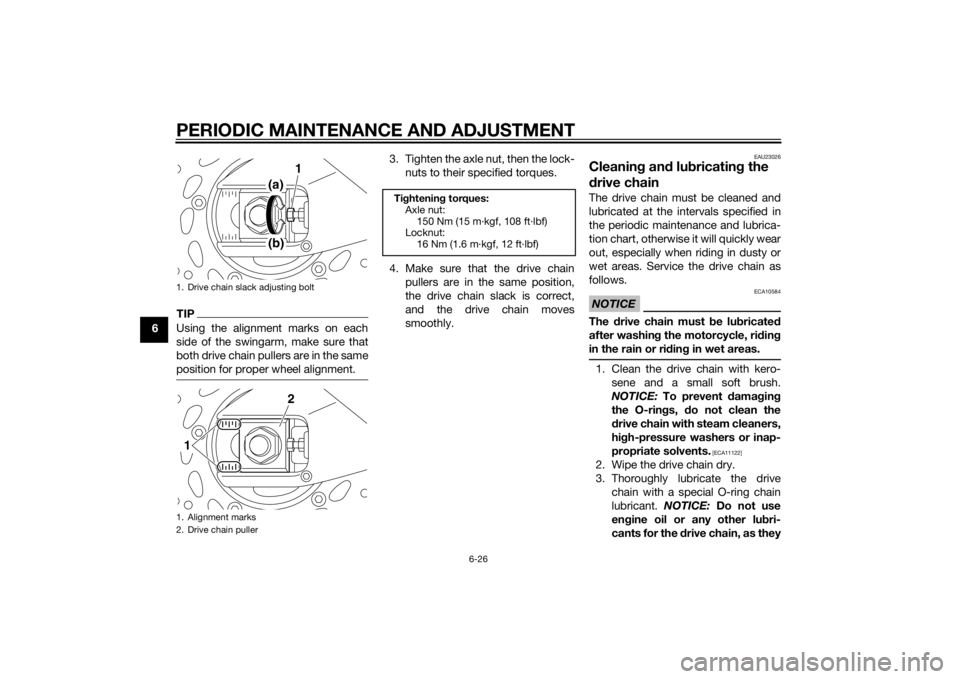
TIPUsing the alignment marks on each
side of the swingarm, make sure that
both drive chain pullers are in the same
position for proper wheel alignment.
3. Tighten the axle nut, then the lock-nuts to their specified torques.
4. Make sure that the drive chain pullers are in the same position,
the drive chain slack is correct,
and the drive chain moves
smoothly.
EAU23026
Cleanin g an d lu bricatin g the
d rive chainThe drive chain must be cleaned and
lubricated at the intervals specified in
the periodic maintenance and lubrica-
tion chart, otherwise it will quickly wear
out, especially when riding in dusty or
wet areas. Service the drive chain as
follows.NOTICE
ECA10584
The drive chain must be lu bricated
after washin g the motorcycle, ri din g
in the rain or ri din g in wet areas.1. Clean the drive chain with kero-
sene and a small soft brush.
NOTICE: To prevent d amaging
the O-ring s, do not clean the
d rive chain with steam cleaners,
hi gh-pressure washers or inap-
propriate solvents.
[ECA11122]
2. Wipe the drive chain dry.
3. Thoroughly lubricate the drive chain with a special O-ring chain
lubricant. NOTICE: Do not use
en gine oil or any other lu bri-
cants for the drive chain, as they
1. Drive chain slack adjusting bolt
1. Alignment marks
2. Drive chain puller
1
(a)(b)
2
1
Ti ghtenin g torques:
Axle nut: 150 Nm (15 m·kgf, 108 ft·lbf)
Locknut:
16 Nm (1.6 m·kgf, 12 ft·lbf)
U2SHE1E0.book Page 26 Tuesday, July 15, 2014 4:04 PM
Page 79 of 110
PERIODIC MAINTENANCE AND ADJUSTMENT
6-29
6
EAU23203
Checking an d lu bricatin g the
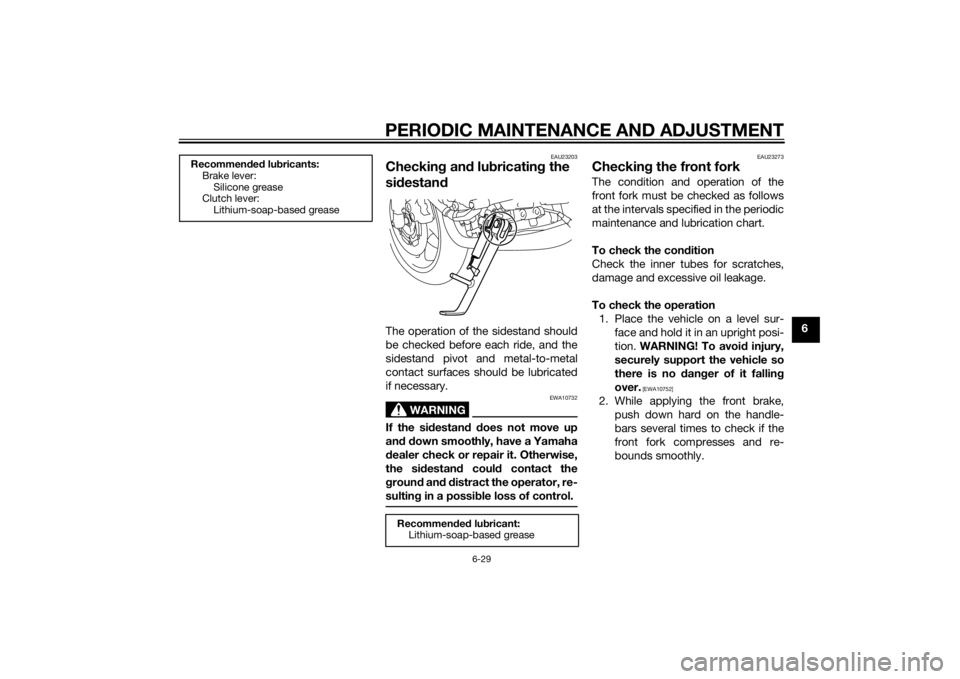
si destan dThe operation of the sidestand should
be checked before each ride, and the
sidestand pivot and metal-to-metal
contact surfaces should be lubricated
if necessary.
WARNING
EWA10732
If the sid estand d oes not move up
an d d own smoothly, have a Yamaha
d ealer check or repair it. Otherwise,
the si destan d coul d contact the
g roun d an d d istract the operator, re-
sultin g in a possi ble loss of control.
EAU23273
Checkin g the front forkThe condition and operation of the
front fork must be checked as follows
at the intervals specified in the periodic
maintenance and lubrication chart.
To check the con dition
Check the inner tubes for scratches,
damage and excessive oil leakage.
To check the operation 1. Place the vehicle on a level sur- face and hold it in an upright posi-
tion. WARNING! To avoi d injury,
securely support the vehicle so
there is no d anger of it fallin g
over.
[EWA10752]
2. While applying the front brake, push down hard on the handle-
bars several times to check if the
front fork compresses and re-
bounds smoothly.
Recommen ded lu bricants:
Brake lever:
Silicone grease
Clutch lever:
Lithium-soap-based grease
Recommen ded lu bricant:
Lithium-soap-based grease
U2SHE1E0.book Page 29 Tuesday, July 15, 2014 4:04 PM
Page 85 of 110

PERIODIC MAINTENANCE AND ADJUSTMENT
6-35
6
EAU49654
Replacing the hea dlig ht bul bThis model is equipped with a halogen
bulb headlight. If the headlight bulb
burns out, replace it as follows.NOTICE
ECA10651
Take care not to damag e the follow-
in g parts:
Hea dlig ht bul b
Do not touch the glass part of
the hea dlig ht bul b to keep it free
from oil, otherwise the transpar-
ency of the g lass, the luminosity
of the b ulb, an d the b ulb life will
b e ad versely affected . Thor-
ou ghly clean off any d irt and fin-
g erprints on the head light bul b
using a cloth moistened with al-
cohol or thinner.
Hea dlig ht lens
Do not affix any type of tinted
film or stickers to the head light
lens.
Do not use a hea dlig ht bul b of a
watta ge hi gher than specified .
1. Remove the headlight unit top
cover by removing its bolts.
2. Remove the bolt behind the head- light unit as shown. 3. Remove the headlight unit bolts.
4. Disconnect the coupler, then take
off the headlight unit from the ve-
hicle.1. Do not touch the glass part of the bulb.
1. Headlight unit top cover
2. Bolt
2
1
1. Bolt
1. Bolt
1
1
U2SHE1E0.book Page 35 Tuesday, July 15, 2014 4:04 PM
Page 97 of 110

MOTORCYCLE CARE AND STORAGE7-1
7
EAU37834
Matte color cautionNOTICE
ECA15193
Some models are equipped with
matte colored finished parts. Be
sure to consult a Yamaha dealer for
a d vice on what prod ucts to use be-
fore cleanin g the vehicle. Usin g a
b rush, harsh chemical pro ducts or
cleanin g compoun ds when cleanin g
these parts will scratch or damag e
their surface. Wax also shoul d not
b e applie d to any matte colored fin-
ishe d parts.
EAU26015
CareWhile the open design of a motorcycle
reveals the attractiveness of the tech-
nology, it also makes it more vulnera-
ble. Rust and corrosion can develop
even if high-quality components are
used. A rusty exhaust pipe may go un-
noticed on a car, however, it detracts
from the overall appearance of a mo-
torcycle. Frequent and proper care
does not only comply with the terms of
the warranty, but it will also keep your
motorcycle looking good, extend its
life and optimize its performance.
Before cleanin g
1. Cover the muffler outlet with a plastic bag after the engine has
cooled down.
2. Make sure that all caps and cov- ers as well as all electrical cou-
plers and connectors, including
the spark plug caps, are tightly in-
stalled.
3. Remove extremely stubborn dirt, like oil burnt onto the crankcase,
with a degreasing agent and a
brush, but never apply such prod- ucts onto seals, gaskets, sprock-
ets, the drive chain and wheel
axles. Always rinse the dirt and
degreaser off with water.
Cleanin g
NOTICE
ECA10773
Avoi d usin g stron g aci dic wheel
cleaners, especially on spoked
wheels. If such pro ducts are
use d on har d-to-remove dirt, do
not leave the cleaner on the af-
fected area any lon ger than in-
structed . Also, thorou ghly rinse
the area off with water, immed i-
ately dry it, an d then apply a cor-
rosion protection spray.
Improper cleanin g can d amage
plastic parts (such as cowlin gs,
panels, win dshiel ds, head light
lenses, meter lenses, etc.) an d
the mufflers. Use only a soft,
clean cloth or spon ge with wa-
ter to clean plastic. However, if
the plastic parts cannot be thor-
ou ghly cleaned with water, di-
lute d mil d d eter gent with water
may be used . Be sure to rinse
U2SHE1E0.book Page 1 Tuesday, July 15, 2014 4:04 PM