YAMAHA FZS 2012 Service Manual
Manufacturer: YAMAHA, Model Year: 2012, Model line: FZS, Model: YAMAHA FZS 2012Pages: 106, PDF Size: 7.23 MB
Page 41 of 106
Watercraft operation
35
TIP:
If the remote control transmitter is operated
while the dual analog meter unit is in the
standby state, the unit will perform the initial
operation, and then the setting is selected.
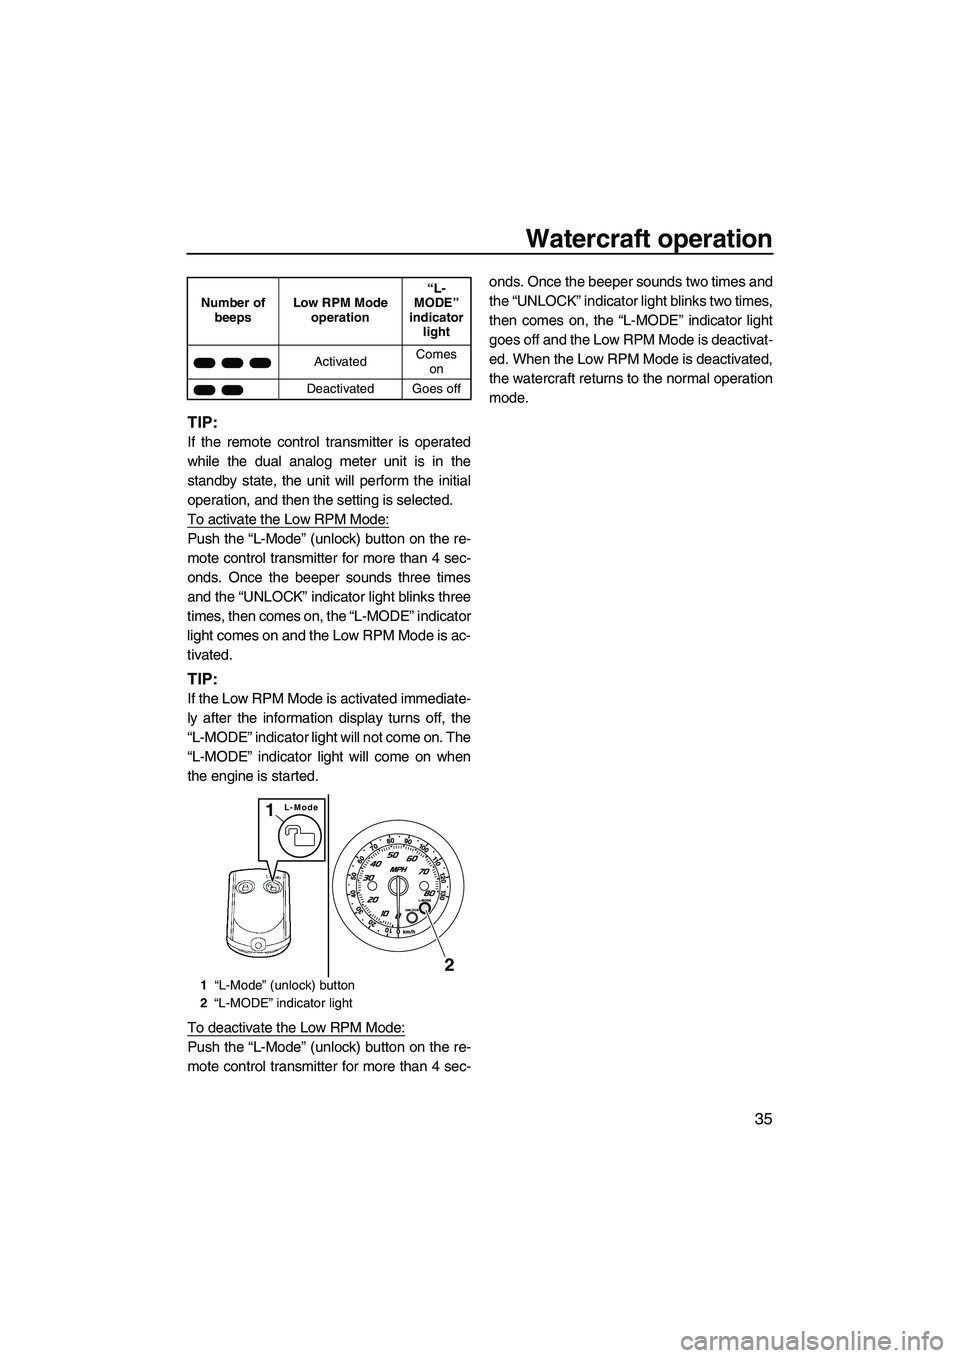
To activate the Low RPM Mode:
Push the “L-Mode” (unlock) button on the re-
mote control transmitter for more than 4 sec-
onds. Once the beeper sounds three times
and the “UNLOCK” indicator light blinks three
times, then comes on, the “L-MODE” indicator
light comes on and the Low RPM Mode is ac-
tivated.
TIP:
If the Low RPM Mode is activated immediate-
ly after the information display turns off, the
“L-MODE” indicator light will not come on. The
“L-MODE” indicator light will come on when
the engine is started.
To deactivate the Low RPM Mode:
Push the “L-Mode” (unlock) button on the re-
mote control transmitter for more than 4 sec-onds. Once the beeper sounds two times and
the “UNLOCK” indicator light blinks two times,
then comes on, the “L-MODE” indicator light
goes off and the Low RPM Mode is deactivat-
ed. When the Low RPM Mode is deactivated,
the watercraft returns to the normal operation
mode.
Number of
beepsLow RPM Mode
operation“L-
MODE”
indicator
light
ActivatedComes
on
Deactivated Goes off
1“L-Mode” (unlock) button
2“L-MODE” indicator light
L-Mode1
2
UF2C73E0.book Page 35 Monday, June 13, 2011 8:52 AM
Page 42 of 106
Instrument operation
36
EJU37432
Dual analog meter unit
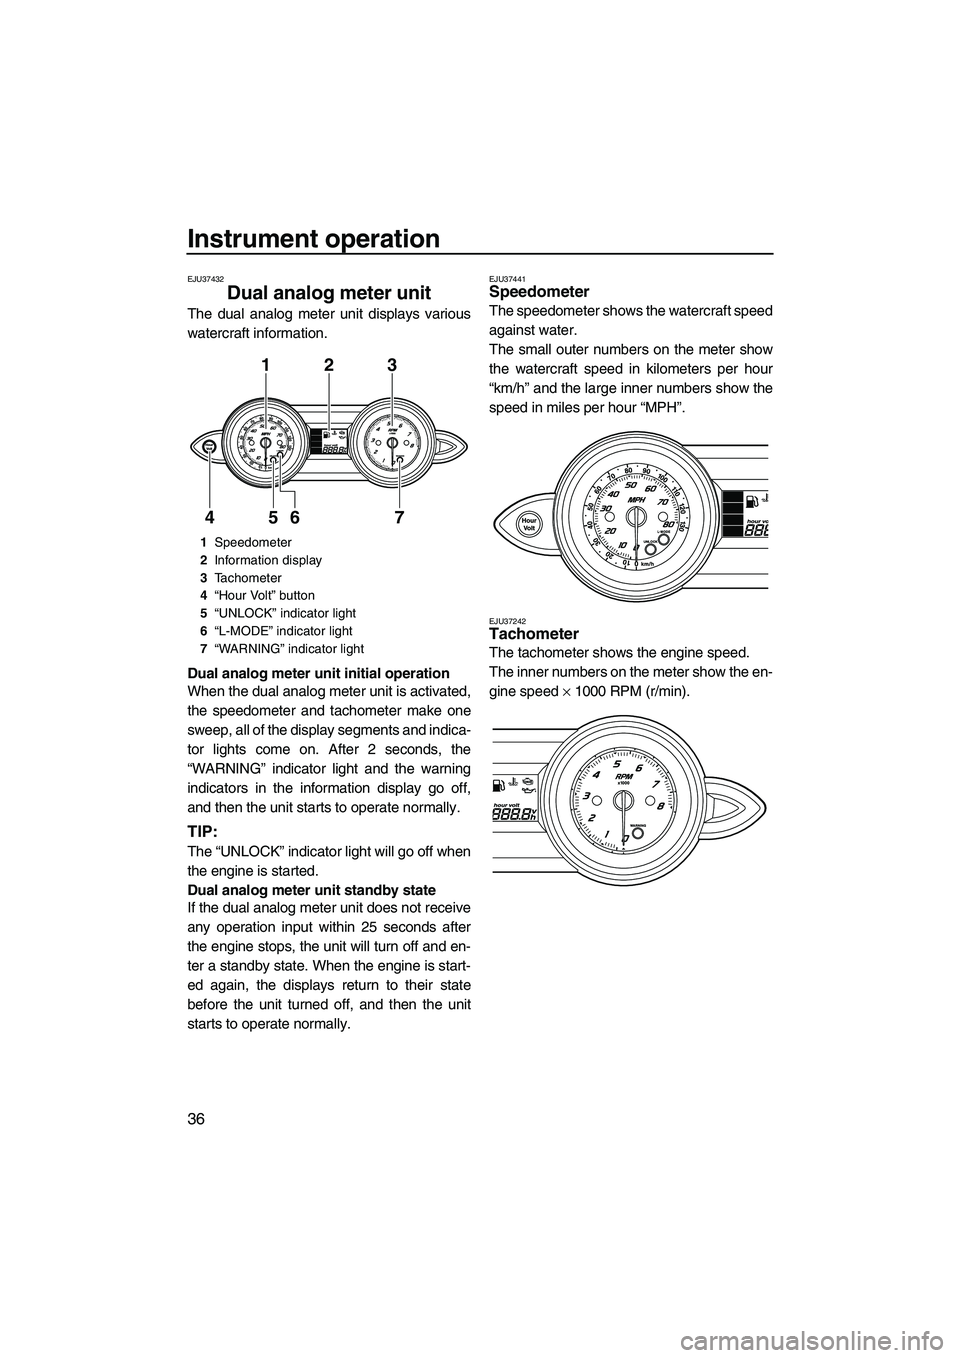
The dual analog meter unit displays various
watercraft information.
Dual analog meter unit initial operation
When the dual analog meter unit is activated,
the speedometer and tachometer make one
sweep, all of the display segments and indica-
tor lights come on. After 2 seconds, the
“WARNING” indicator light and the warning
indicators in the information display go off,
and then the unit starts to operate normally.
TIP:
The “UNLOCK” indicator light will go off when
the engine is started.
Dual analog meter unit standby state
If the dual analog meter unit does not receive
any operation input within 25 seconds after
the engine stops, the unit will turn off and en-
ter a standby state. When the engine is start-
ed again, the displays return to their state
before the unit turned off, and then the unit
starts to operate normally.
EJU37441Speedometer
The speedometer shows the watercraft speed
against water.
The small outer numbers on the meter show
the watercraft speed in kilometers per hour
“km/h” and the large inner numbers show the
speed in miles per hour “MPH”.
EJU37242Tachometer
The tachometer shows the engine speed.
The inner numbers on the meter show the en-
gine speed × 1000 RPM (r/min).
1Speedometer
2Information display
3Tachometer
4“Hour Volt” button
5“UNLOCK” indicator light
6“L-MODE” indicator light
7“WARNING” indicator light
123
7 6 5 4
UF2C73E0.book Page 36 Monday, June 13, 2011 8:52 AM
Page 43 of 106
Instrument operation
37
EJU35024Information display
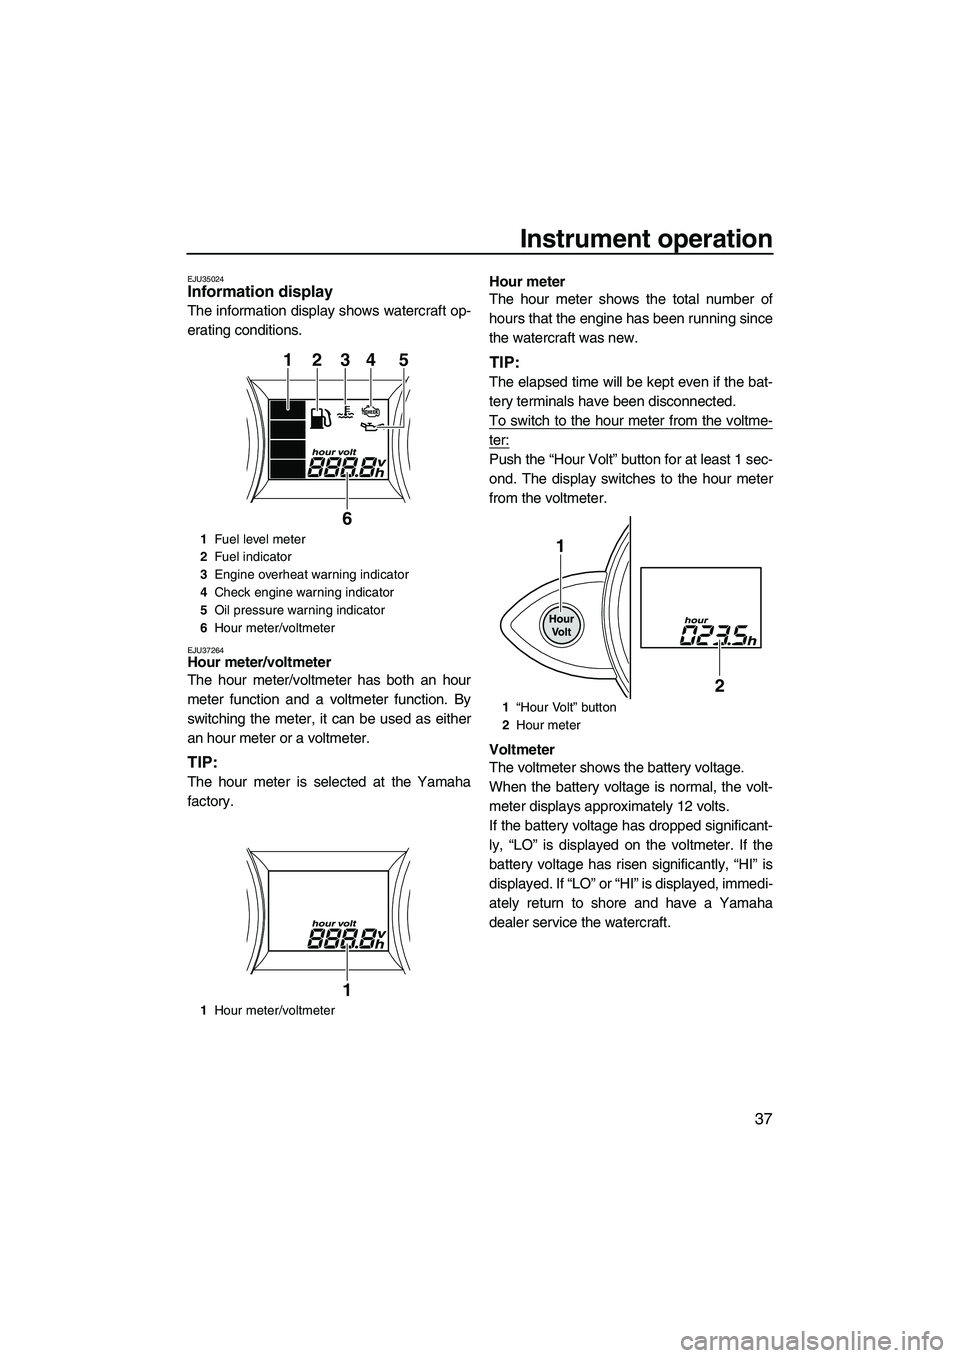
The information display shows watercraft op-
erating conditions.
EJU37264Hour meter/voltmeter
The hour meter/voltmeter has both an hour
meter function and a voltmeter function. By
switching the meter, it can be used as either
an hour meter or a voltmeter.
TIP:
The hour meter is selected at the Yamaha
factory.Hour meter
The hour meter shows the total number of
hours that the engine has been running since
the watercraft was new.
TIP:
The elapsed time will be kept even if the bat-
tery terminals have been disconnected.
To switch to the hour meter from the voltme-
ter:
Push the “Hour Volt” button for at least 1 sec-
ond. The display switches to the hour meter
from the voltmeter.
Voltmeter
The voltmeter shows the battery voltage.
When the battery voltage is normal, the volt-
meter displays approximately 12 volts.
If the battery voltage has dropped significant-
ly, “LO” is displayed on the voltmeter. If the
battery voltage has risen significantly, “HI” is
displayed. If “LO” or “HI” is displayed, immedi-
ately return to shore and have a Yamaha
dealer service the watercraft.
1Fuel level meter
2Fuel indicator
3Engine overheat warning indicator
4Check engine warning indicator
5Oil pressure warning indicator
6Hour meter/voltmeter
1Hour meter/voltmeter
12345
6
1
1“Hour Volt” button
2Hour meter
1
2
UF2C73E0.book Page 37 Monday, June 13, 2011 8:52 AM
Page 44 of 106
Instrument operation
38
To switch to the voltmeter from the hour
meter:
Push the “Hour Volt” button for at least 1 sec-
ond. The display switches to the voltmeter
from the hour meter.
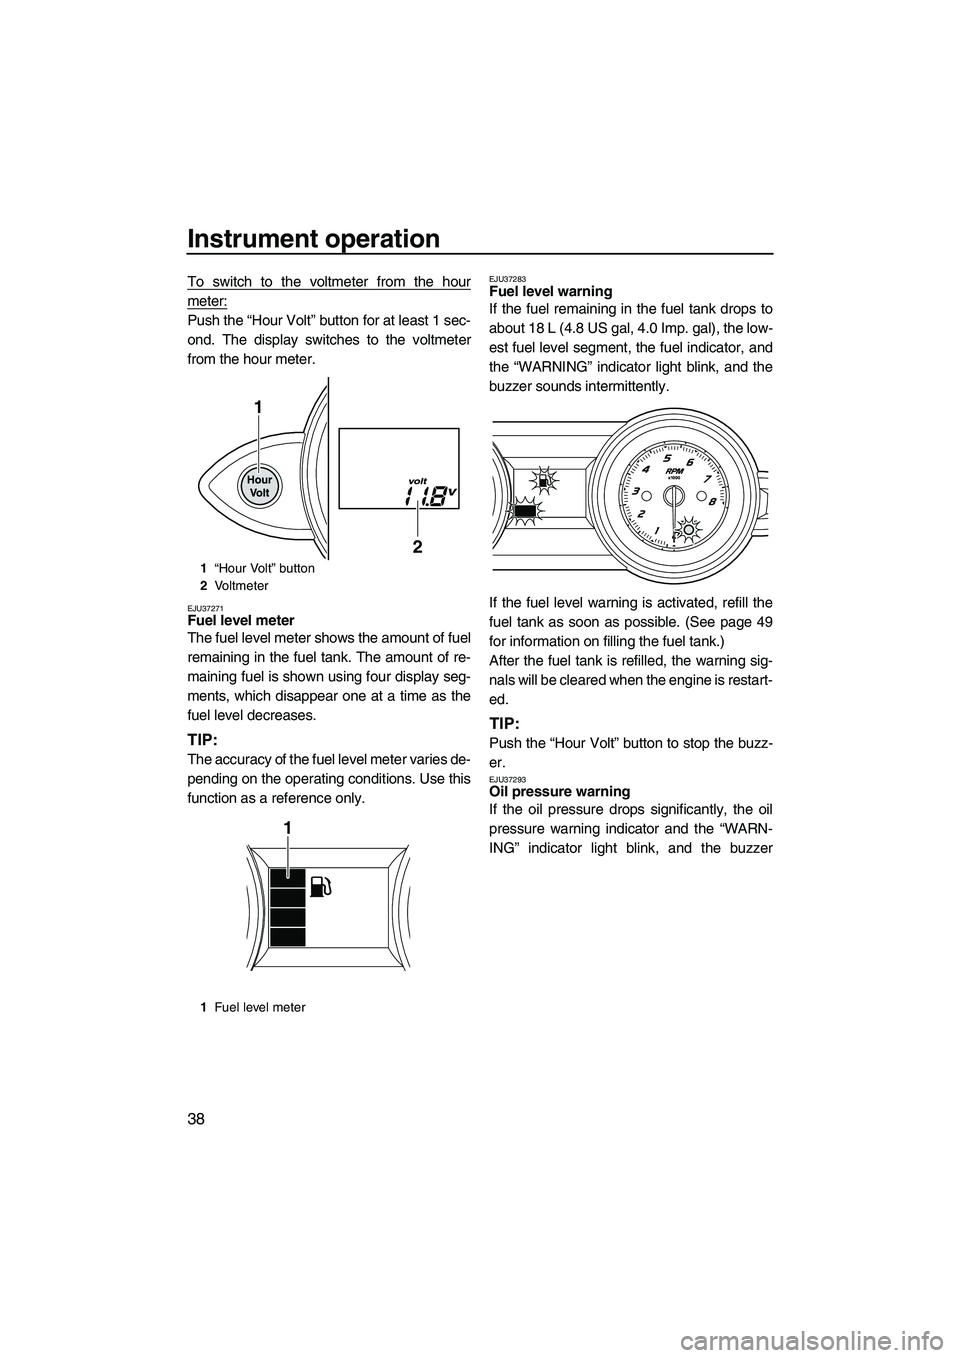
EJU37271Fuel level meter
The fuel level meter shows the amount of fuel
remaining in the fuel tank. The amount of re-
maining fuel is shown using four display seg-
ments, which disappear one at a time as the
fuel level decreases.
TIP:
The accuracy of the fuel level meter varies de-
pending on the operating conditions. Use this
function as a reference only.
EJU37283Fuel level warning
If the fuel remaining in the fuel tank drops to
about 18 L (4.8 US gal, 4.0 Imp. gal), the low-
est fuel level segment, the fuel indicator, and
the “WARNING” indicator light blink, and the
buzzer sounds intermittently.
If the fuel level warning is activated, refill the
fuel tank as soon as possible. (See page 49
for information on filling the fuel tank.)
After the fuel tank is refilled, the warning sig-
nals will be cleared when the engine is restart-
ed.
TIP:
Push the “Hour Volt” button to stop the buzz-
er.
EJU37293Oil pressure warning
If the oil pressure drops significantly, the oil
pressure warning indicator and the “WARN-
ING” indicator light blink, and the buzzer
1“Hour Volt” button
2Vo l t m e t e r
1Fuel level meter
1
2
1
UF2C73E0.book Page 38 Monday, June 13, 2011 8:52 AM
Page 45 of 106
Instrument operation
39
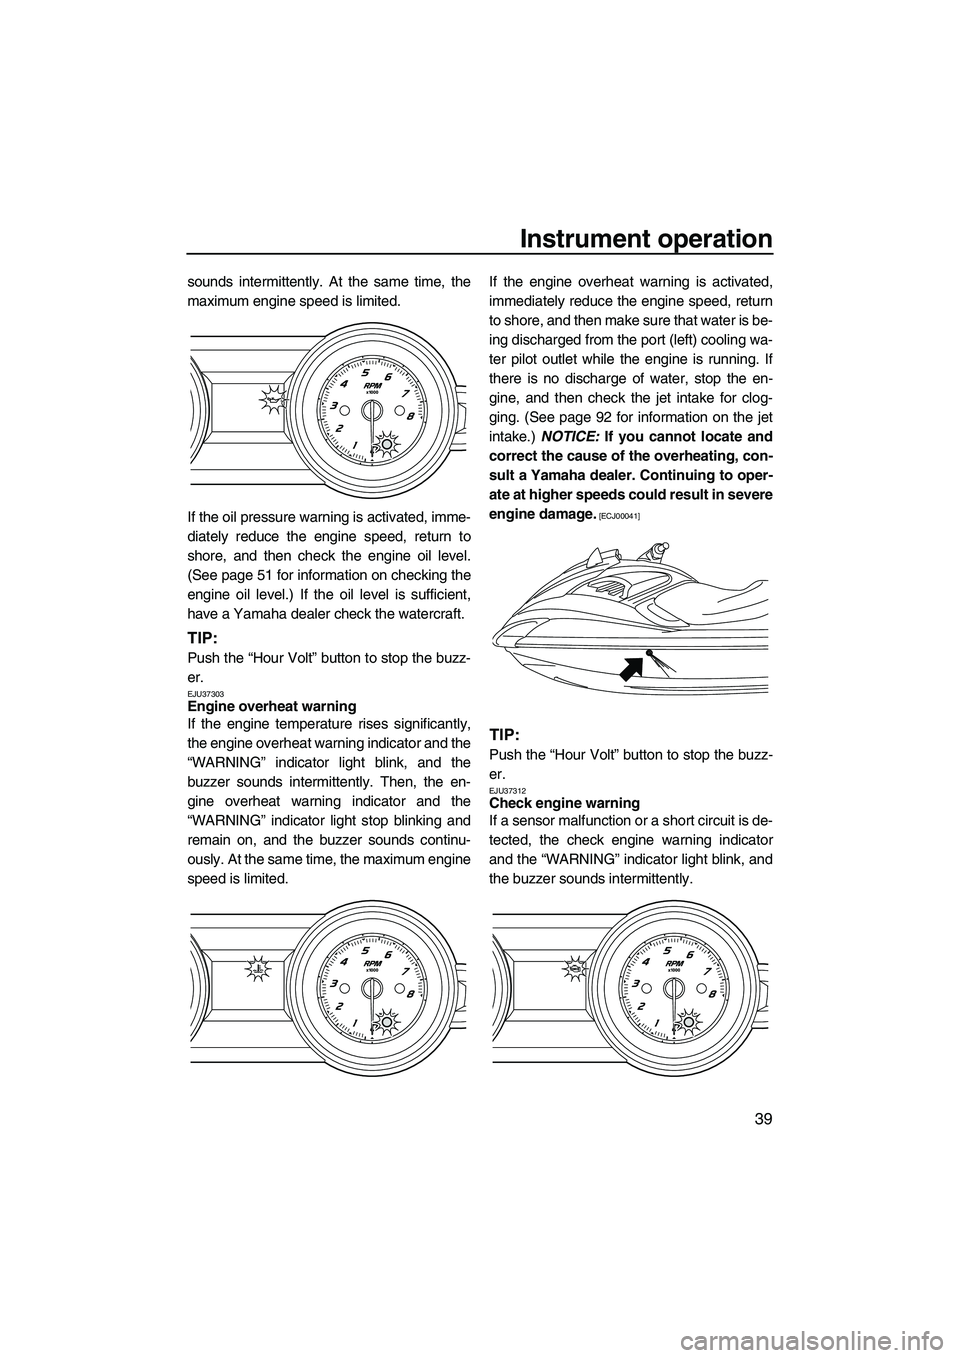
sounds intermittently. At the same time, the
maximum engine speed is limited.
If the oil pressure warning is activated, imme-
diately reduce the engine speed, return to
shore, and then check the engine oil level.
(See page 51 for information on checking the
engine oil level.) If the oil level is sufficient,
have a Yamaha dealer check the watercraft.
TIP:
Push the “Hour Volt” button to stop the buzz-
er.
EJU37303Engine overheat warning
If the engine temperature rises significantly,
the engine overheat warning indicator and the
“WARNING” indicator light blink, and the
buzzer sounds intermittently. Then, the en-
gine overheat warning indicator and the
“WARNING” indicator light stop blinking and
remain on, and the buzzer sounds continu-
ously. At the same time, the maximum engine
speed is limited.If the engine overheat warning is activated,
immediately reduce the engine speed, return
to shore, and then make sure that water is be-
ing discharged from the port (left) cooling wa-
ter pilot outlet while the engine is running. If
there is no discharge of water, stop the en-
gine, and then check the jet intake for clog-
ging. (See page 92 for information on the jet
intake.) NOTICE: If you cannot locate and
correct the cause of the overheating, con-
sult a Yamaha dealer. Continuing to oper-
ate at higher speeds could result in severe
engine damage.
[ECJ00041]
TIP:
Push the “Hour Volt” button to stop the buzz-
er.
EJU37312Check engine warning
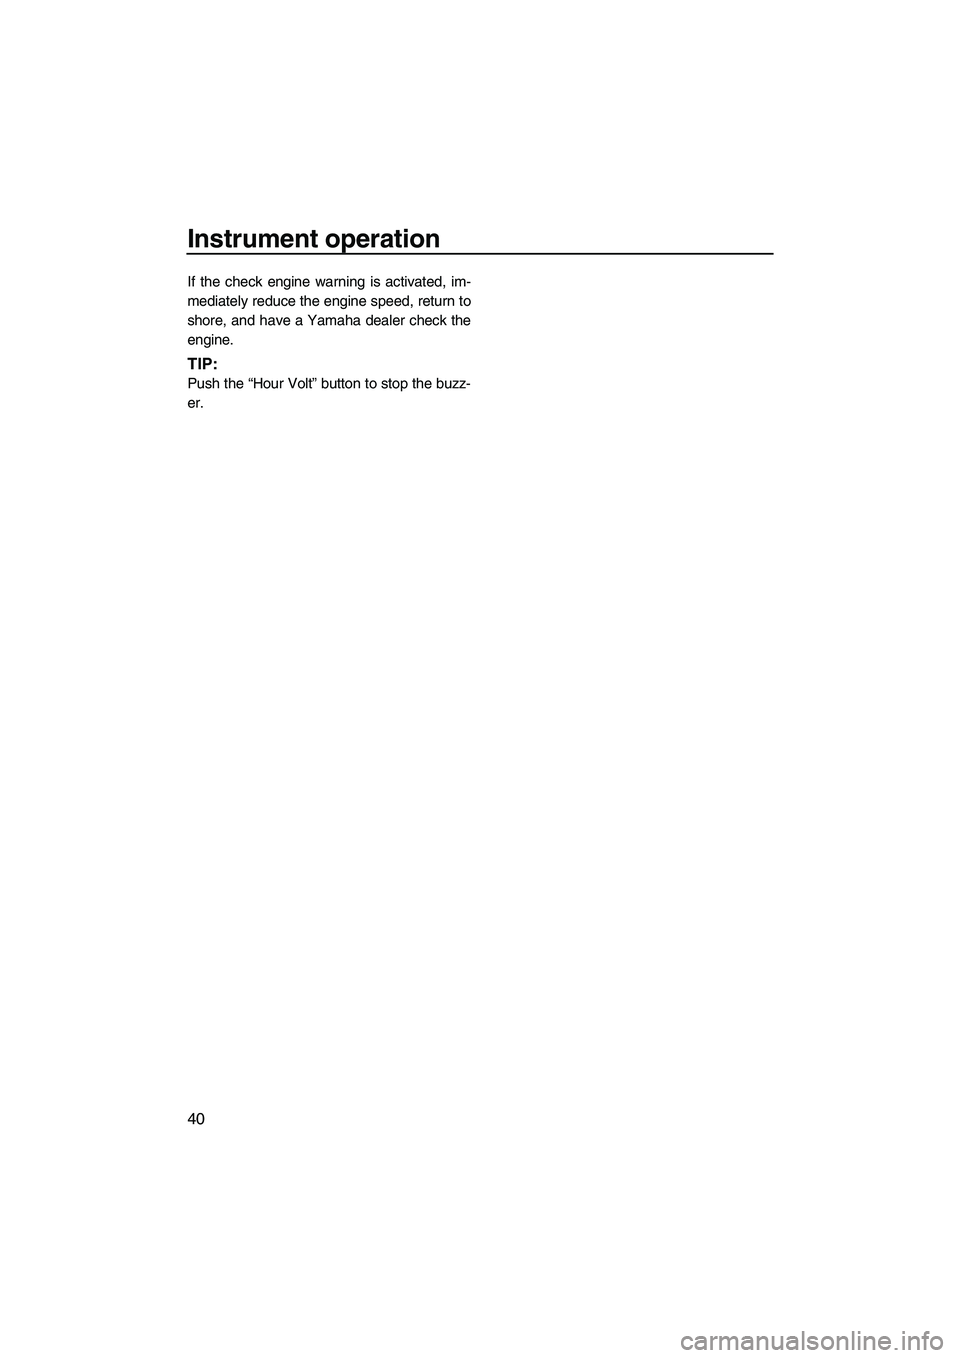
If a sensor malfunction or a short circuit is de-
tected, the check engine warning indicator
and the “WARNING” indicator light blink, and
the buzzer sounds intermittently.
UF2C73E0.book Page 39 Monday, June 13, 2011 8:52 AM
Page 46 of 106
Instrument operation
40
If the check engine warning is activated, im-
mediately reduce the engine speed, return to
shore, and have a Yamaha dealer check the
engine.
TIP:
Push the “Hour Volt” button to stop the buzz-
er.
UF2C73E0.book Page 40 Monday, June 13, 2011 8:52 AM
Page 47 of 106

Equipment operation
41
EJU40333
Equipment EJU41410Seats
The front and rear seats are removable.
Remove the seats to access the engine com-
partment and watertight storage compart-
ment.
To remove the rear seat:
(1) Pull the rear seat latch up, and then lift up
the rear of the seat.
(2) Pull the seat rearward and remove it.To install the rear seat:
(1) Insert the projections on the front of the
seat into the stays on the deck.
(2) Push the rear of the seat down to secure-
ly lock it in place.
To remove the front seat:
(1) Remove the rear seat.
(2) Pull the front seat latch up, and then lift up
the rear of the seat.
1Seat latch
1
1Seat latch
1
UF2C73E0.book Page 41 Monday, June 13, 2011 8:52 AM
Page 48 of 106
Equipment operation
42
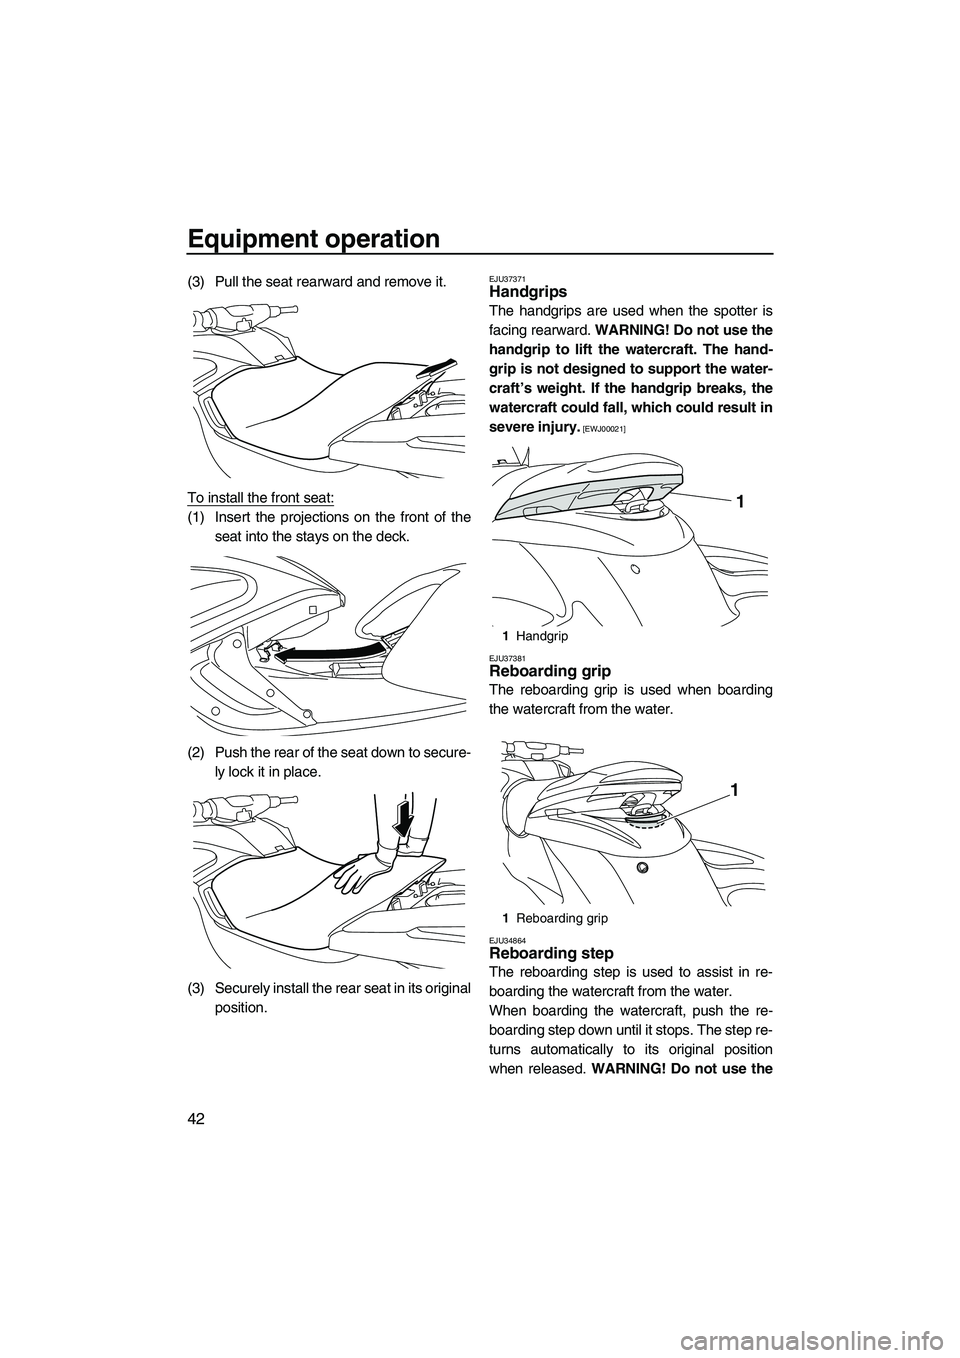
(3) Pull the seat rearward and remove it.
To install the front seat:
(1) Insert the projections on the front of the
seat into the stays on the deck.
(2) Push the rear of the seat down to secure-
ly lock it in place.
(3) Securely install the rear seat in its original
position.
EJU37371Handgrips
The handgrips are used when the spotter is
facing rearward. WARNING! Do not use the
handgrip to lift the watercraft. The hand-
grip is not designed to support the water-
craft’s weight. If the handgrip breaks, the
watercraft could fall, which could result in
severe injury.
[EWJ00021]
EJU37381
Reboarding grip
The reboarding grip is used when boarding
the watercraft from the water.
EJU34864Reboarding step
The reboarding step is used to assist in re-
boarding the watercraft from the water.
When boarding the watercraft, push the re-
boarding step down until it stops. The step re-
turns automatically to its original position
when released. WARNING! Do not use the
1Handgrip
1Reboarding grip
1
1
UF2C73E0.book Page 42 Monday, June 13, 2011 8:52 AM
Page 49 of 106
Equipment operation
43
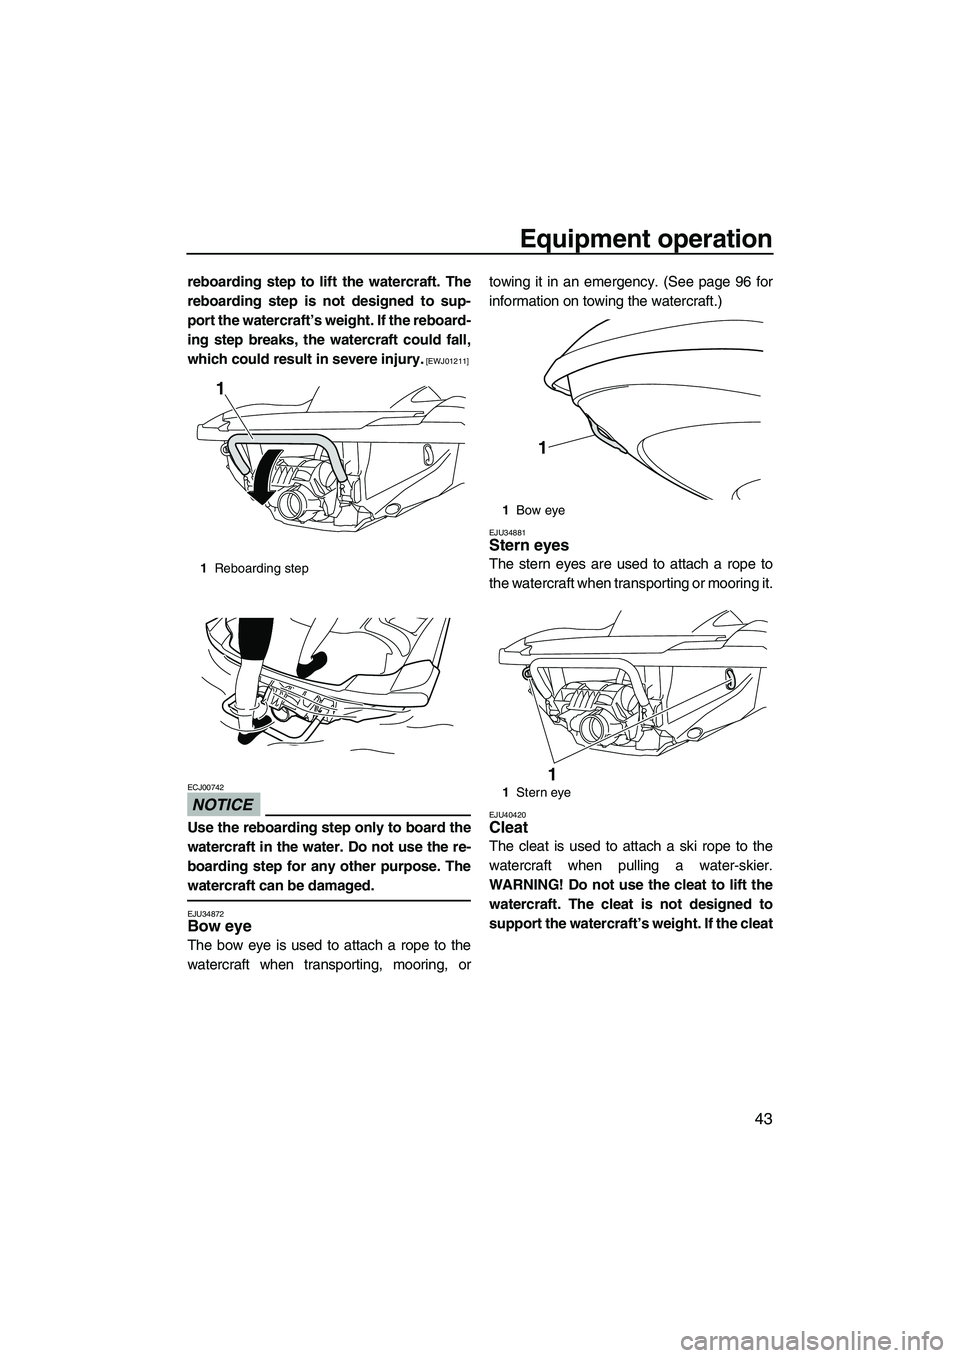
reboarding step to lift the watercraft. The
reboarding step is not designed to sup-
port the watercraft’s weight. If the reboard-
ing step breaks, the watercraft could fall,
which could result in severe injury.
[EWJ01211]
NOTICE
ECJ00742
Use the reboarding step only to board the
watercraft in the water. Do not use the re-
boarding step for any other purpose. The
watercraft can be damaged.
EJU34872Bow eye
The bow eye is used to attach a rope to the
watercraft when transporting, mooring, ortowing it in an emergency. (See page 96 for
information on towing the watercraft.)
EJU34881Stern eyes
The stern eyes are used to attach a rope to
the watercraft when transporting or mooring it.
EJU40420Cleat
The cleat is used to attach a ski rope to the
watercraft when pulling a water-skier.
WARNING! Do not use the cleat to lift the
watercraft. The cleat is not designed to
support the watercraft’s weight. If the cleat
1Reboarding step
1
1Bow eye
1Stern eye
1
1
UF2C73E0.book Page 43 Monday, June 13, 2011 8:52 AM
Page 50 of 106
![YAMAHA FZS 2012 Service Manual Equipment operation
44
breaks, the watercraft could fall, which
could result in severe injury.
[EWJ01510]
EJU35146
Storage compartments
This watercraft is equipped with the following
storage compart YAMAHA FZS 2012 Service Manual Equipment operation
44
breaks, the watercraft could fall, which
could result in severe injury.
[EWJ01510]
EJU35146
Storage compartments
This watercraft is equipped with the following
storage compart](/img/51/50209/w960_50209-49.png)
Equipment operation
44
breaks, the watercraft could fall, which
could result in severe injury.
[EWJ01510]
EJU35146
Storage compartments
This watercraft is equipped with the following
storage compartments.
Only the securely closed watertight storage
compartment is waterproof. If you carry ob-
jects that must be kept dry, put them in a wa-
terproof bag.
Make sure that the storage compartments are
closed securely before operating the water-
craft.
EJU37331Bow storage compartment
The bow storage compartment is located un-
der the hood.To open the bow storage compartment:
Push the hood latch, and then lift up the rear
of the hood.
1Cleat
1
1Hood latch
1Bow storage compartment
Bow storage compartment:
Capacity:
68.4 L (18.1 US gal, 15.0 Imp.gal)
Load limit:
5.0 kg (11 lb)
1
1
UF2C73E0.book Page 44 Monday, June 13, 2011 8:52 AM