engine YAMAHA GRIZZLY 125 2004 Owner's Guide
[x] Cancel search | Manufacturer: YAMAHA, Model Year: 2004, Model line: GRIZZLY 125, Model: YAMAHA GRIZZLY 125 2004Pages: 362, PDF Size: 5.51 MB
Page 186 of 362

7-37
Select a large, flat area off-road to become
familiar with your ATV. Make sure that this area
is free of obstacles and other riders. You should
practice control of the throttle, brakes, shifting
procedures, and turning techniques in this area
before trying more difficult terrain. Always avoid
riding on paved surfaces: the ATV is designed
for off-road use only, and handling maneuvers
are more difficult to perform on pavement.
Set the parking brake and follow the instruction
on page 6-3 to start the engine. Once it has
warmed up you are ready to begin riding your
ATV. Remember that the engine and exhaust
pipe will be hot when riding and afterwards; do
not allow skin or clothing to come in contact with
these components.
1C5-9-60-07 11/12/03 7:24 PM Page 38
Page 188 of 362

7-39
With the engine idling, return the starter knob to
the closed position and shift the drive select
lever into the forward position. Then release the
parking brake. Apply the throttle slowly and
smoothly. The centrifugal clutch will engage and
you will start to accelerate. If the throttle is
applied too abruptly, the front wheels may lift off
the ground resulting in a loss of directional con-
trol. Avoid higher speeds until you are thorough-
ly familiar with the operation of your ATV.
When slowing down or stopping, release the
throttle and apply the brakes smoothly and
evenly. Improper use of the brakes can cause
the tires to lose traction, reducing control and
increasing the possibility of an accident.
1C5-9-60-07 11/12/03 7:24 PM Page 40
Page 230 of 362

8-1
EBU00516
PERIODIC
MAINTENANCE AND
ADJUSTMENT
Periodic inspection, adjustment and lubrication
will keep your machine in the safest and most
efficient condition possible. Safety is an obliga-
tion of the machine owner. The most important
points of machine inspection, adjustment and
lubrication are explained on the following pages.
w
Never service an engine while it is running.
Moving parts can catch clothing or parts of
the body, causing injury. Electrical compo-
nents can cause shocks or can start fires.
Turn off the engine when performing mainte-
nance unless otherwise specified. Have a
Yamaha dealer perform service if you are not
familiar with machine service.
1C5-9-60-08 9/12/03 8:38 PM Page 8-2
Page 236 of 362

8-7
EBU00262
PERIODIC MAINTENANCE/LUBRICATION
INITIAL EVERY
ITEM ROUTINE
13661
monthmonths months monthsyear
Valves*• Check valve clearance.
1111
• Adjust if necessary.
• Check condition.
Spark plug• Adjust gap and clean.11111
• Replace if necessary.
Air filter element
• Clean. Every 20–40 hours
(for engine and V-belt
• Replace if necessary. (more often in wet or dusty areas)
case)
Carburetor*• Check idle speed/starter operation.
1111
• Adjust if necessary.
Cylinder head cover• Check breather hose for cracks or damage.
111
breather system*• Replace if necessary.
• Check leakage.
Exhaust system*• Retighten if necessary.111
• Replace gasket if necessary.
Fuel line*• Check fuel hose for cracks or damage.
111
• Replace if necessary.
Engine oil• Replace (warm engine before draining).1111
Oil strainer*• Clean.
111
• Replace if necessary.
Drive chain• Check and adjust slack/alignment/clean/lube.11111
Final transmission oil• Check oil level/oil leakage.
11
• Replace every 12 months.
1C5-9-60-08 9/12/03 8:38 PM Page 8-8
Page 242 of 362
8-13
EBU14900
Engine oil
The engine oil level should be checked before
each ride. In addition, the oil must be changed
at the intervals specified in the periodic mainte-
nance and lubrication chart.
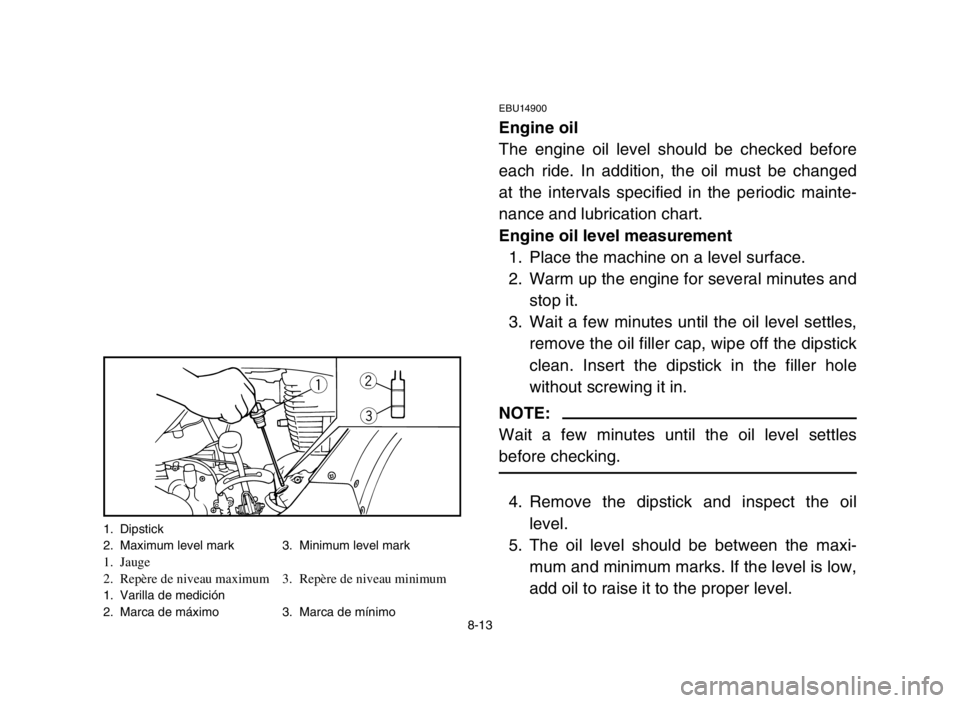
Engine oil level measurement
1. Place the machine on a level surface.
2. Warm up the engine for several minutes and
stop it.
3. Wait a few minutes until the oil level settles,
remove the oil filler cap, wipe off the dipstick
clean. Insert the dipstick in the filler hole
without screwing it in.
NOTE:
Wait a few minutes until the oil level settles
before checking.
4. Remove the dipstick and inspect the oil
level.
5. The oil level should be between the maxi-
mum and minimum marks. If the level is low,
add oil to raise it to the proper level.
qw
e
1. Dipstick
2. Maximum level mark 3. Minimum level mark
1. Jauge
2. Repère de niveau maximum 3. Repère de niveau minimum
1. Varilla de medición
2. Marca de máximo 3. Marca de mínimo
1C5-9-60-08 9/12/03 8:38 PM Page 8-14
Page 244 of 362
8-15
cC
Be sure no foreign material enters the
crankcase.
Engine oil replacement and oil filter cleaning
1. Place the machine on a level surface.
2. Warm up the engine for several minutes and
stop it.
3. Place a container under the engine to col-
lect the used oil.
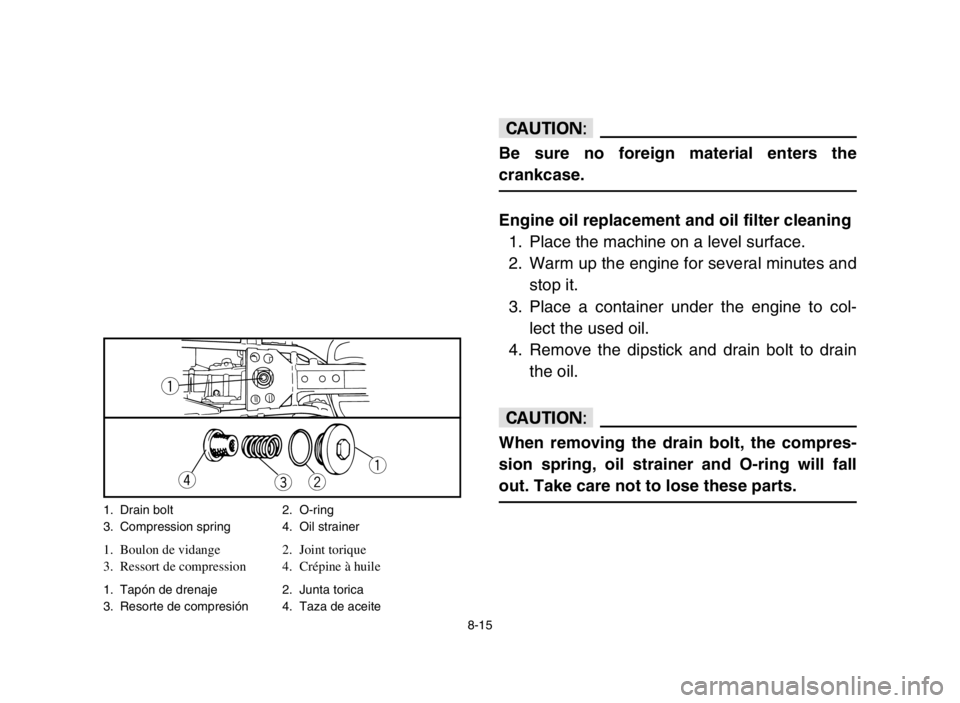
4. Remove the dipstick and drain bolt to drain
the oil.
cC
When removing the drain bolt, the compres-
sion spring, oil strainer and O-ring will fall
out. Take care not to lose these parts.
q
rewq
1. Drain bolt 2. O-ring
3. Compression spring 4. Oil strainer
1. Boulon de vidange 2. Joint torique
3. Ressort de compression 4. Crépine à huile
1. Tapón de drenaje 2. Junta torica
3. Resorte de compresión 4. Taza de aceite
1C5-9-60-08 9/12/03 8:38 PM Page 8-16
Page 246 of 362
8-17
5. Clean the oil strainer with solvent.
6. Inspect the O-ring and replace it if dam-
aged.
7. Install the O-ring, oil strainer, compression
spring and drain bolt. Tighten the drain bolt
to specification.
cC
Before installing the drain bolt, be sure to
install the O-ring, compression spring and
oil strainer.
8. Fill the engine with oil and install the dip-
stick. Tightening torque:
Drain bolt:
32 Nm (3.2 m0kgf)
1C5-9-60-08 9/12/03 8:38 PM Page 8-18
Page 248 of 362
8-19
cC
Be sure no foreign material enters the
crankcase.
9. Warm up the engine for several minutes at
idle speed. Check for oil leakage while
warming up.
cC
If oil leakage is found, stop the engine imme-
diately and check for the cause.
Recommended oil:
See page 10-2.
Oil quantity:
Periodic oil change
1.25 L
1C5-9-60-08 9/12/03 8:38 PM Page 8-20
Page 252 of 362
8-23
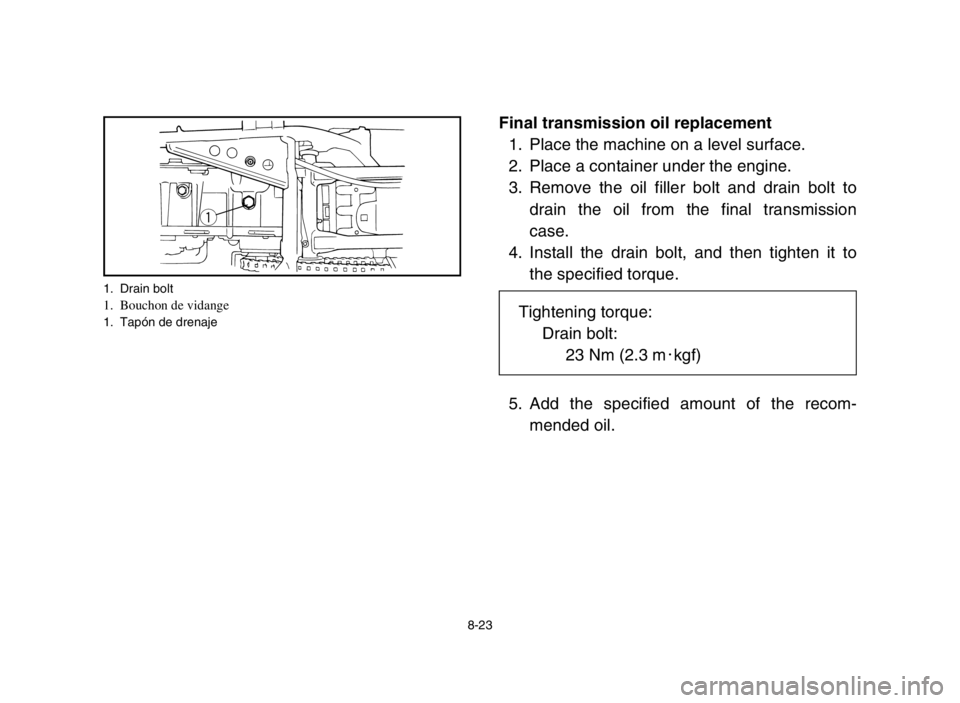
Final transmission oil replacement
1. Place the machine on a level surface.
2. Place a container under the engine.
3. Remove the oil filler bolt and drain bolt to
drain the oil from the final transmission
case.
4. Install the drain bolt, and then tighten it to
the specified torque.
5. Add the specified amount of the recom-
mended oil.
q
1. Drain bolt1. Bouchon de vidange1. Tapón de drenajeTightening torque:
Drain bolt:
23 Nm (2.3 m0kgf)
1C5-9-60-08 9/12/03 8:38 PM Page 8-24
Page 256 of 362

8-27
EBU11820
Spark plug inspection
The spark plug is an important engine compo-
nent and is easy to inspect. The condition of the
spark plug can indicate the condition of the
engine.
For example, a very white center electrode
porcelain color could indicate an intake air leak
or carburetion problem for that cylinder. Do not
attempt to diagnose such problems yourself.
Instead, take the ATV to a Yamaha dealer. You
should periodically remove and inspect the
spark plug because heat and deposits will cause
the spark plug to slowly break down and erode.
If electrode erosion becomes excessive, you
should replace the spark plug with one of the
proper type.
Standard spark plug:
CR7HS (NGK)
1C5-9-60-08 9/12/03 8:38 PM Page 8-28