brake YAMAHA GRIZZLY 125 2013 Owners Manual
[x] Cancel search | Manufacturer: YAMAHA, Model Year: 2013, Model line: GRIZZLY 125, Model: YAMAHA GRIZZLY 125 2013Pages: 134, PDF Size: 3.93 MB
Page 8 of 134

EBU17420
TABLE OF CONTENTS
LOCATION OF THE WARNING AND
SPECIFICATION LABELS ............................ 1-1
SAFETY INFORMATION .............................. 2-1
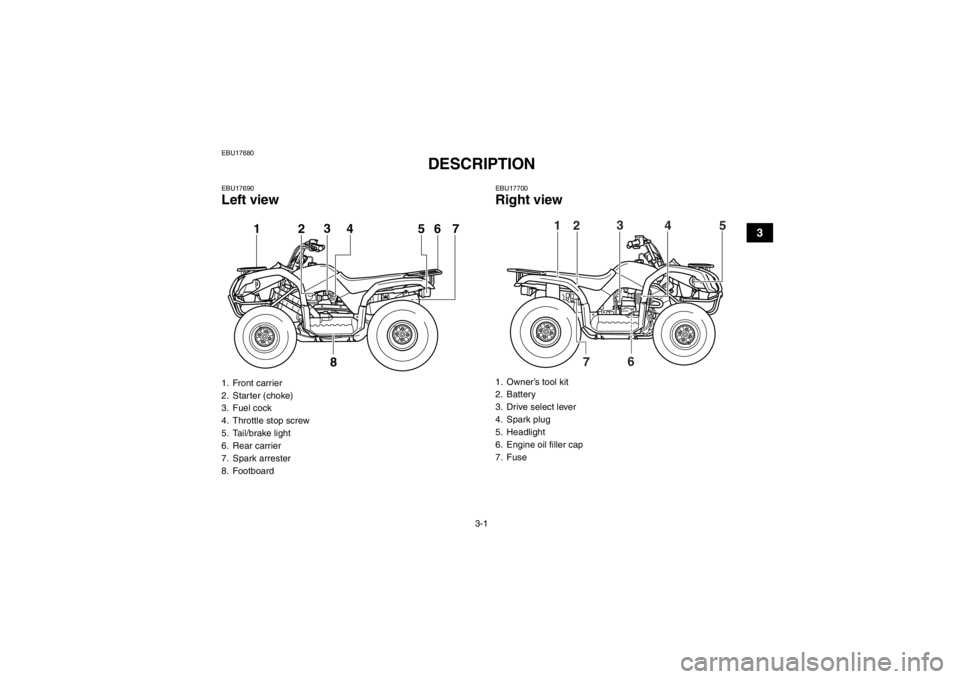
DESCRIPTION .............................................. 3-1Left view ...................................................... 3-1
Right view.................................................... 3-1
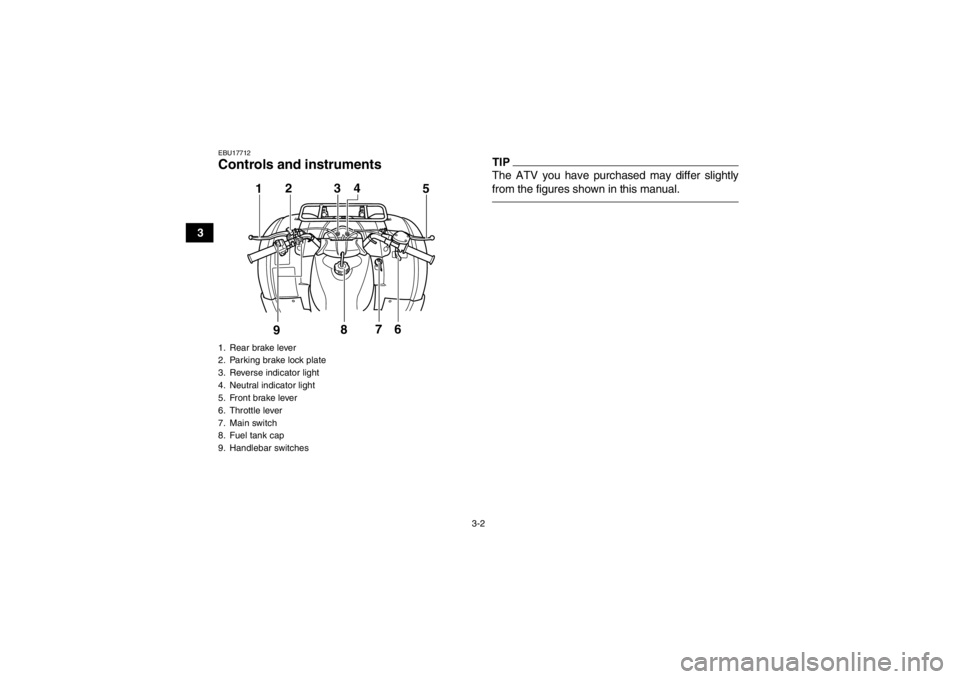
Controls and instruments ............................ 3-2
INSTRUMENT AND CONTROL
FUNCTIONS .................................................. 4-1 Main switch ................................................ 4-1
Indicator lights ............................................ 4-2
Handlebar switches .................................... 4-2
Throttle lever .............................................. 4-3
Speed limiter .............................................. 4-4
Front brake lever ........................................ 4-4
Rear brake lever ......................................... 4-5
Parking brake ............................................. 4-5
Drive select lever ........................................ 4-6
Fuel tank cap .............................................. 4-7
Fuel ............................................................ 4-7
Fuel cock .................................................... 4-8 Starter (choke) ..........................................4-10
Seat ..........................................................4-10
Front carrier ..............................................4-11
Rear carrier ...............................................4-11
PRE-OPERATION CHECKS ..........................5-1 Fuel .............................................................5-3
Engine oil ....................................................5-3
Transmission oil ..........................................5-3
Front and rear brakes .................................5-3
Throttle lever ...............................................5-3
Drive chain ..................................................5-3
Tires ............................................................5-3
Chassis fasteners .......................................5-6
Instruments, lights and switches .................5-6
Battery ........................................................5-6
OPERATION...................................................6-1 Starting a cold engine .................................6-1
Starting a warm engine ...............................6-3
Operating the drive select lever and driving in reverse ......................................6-3
Engine break-in ...........................................6-4
Parking ........................................................6-5U1PY61E0.book Page 1 Wednesday, March 14, 2012 5:22 PM
Page 9 of 134

Parking on a slope ..................................... 6-5
Accessories and loading ............................ 6-6
RIDING YOUR ATV ...................................... 7-1 GETTING TO KNOW YOUR ATV............... 7-2
RIDE WITH CARE AND GOOD JUDGMENT .............................................. 7-2
BE CAREFUL WHERE YOU RIDE ............. 7-9
TURNING YOUR ATV .............................. 7-12
CLIMBING UPHILL ................................... 7-14
RIDING DOWNHILL.................................. 7-16
CROSSING A SLOPE............................... 7-17
CROSSING THROUGH SHALLOW WATER ................................................... 7-18
RIDING OVER ROUGH TERRAIN ........... 7-20
SLIDING AND SKIDDING ......................... 7-20
WHAT TO DO IF... .................................... 7-22
WHAT TO DO... ........................................ 7-22
PERIODIC MAINTENANCE AND
ADJUSTMENT ............................................... 8-1 Owner’s manual and tool kit ....................... 8-2
Periodic maintenance chart for the emission control system ................ 8-3
General maintenance and lubrication chart ......................................................... 8-5
Checking the spark plug ............................. 8-9 Engine oil ..................................................8-11
Transmission oil ........................................8-14
Cleaning the engine and V-belt case air
filter elements .........................................8-17
Cleaning the spark arrester ......................8-23
V-belt case drain screw ............................8-24
Adjusting the carburetor ............................8-25
Adjusting the engine idling speed .............8-26
Adjusting the throttle lever free play .........8-26
Valve clearance ........................................8-27
Brakes .......................................................8-28
Checking the front and rear brake shoes ......................................................8-28
Adjusting the front brake lever free play ...8-29
Adjusting the rear brake lever free play ....8-33
Drive chain slack .......................................8-34
Lubricating the drive chain ........................8-37
Checking and lubricating the cables .........8-37
Checking and lubricating the front and rear brake levers .....................................8-38
Checking the wheel hub bearings .............8-39
Lubricating the lower arm pivots ...............8-39
Lubricating the front knuckle pivots ..........8-40
Lubricating the steering shaft ....................8-41
Battery ......................................................8-41
Replacing the fuse ....................................8-44
Replacing a headlight bulb .......................8-45
U1PY61E0.book Page 2 Wednesday, March 14, 2012 5:22 PM
Page 10 of 134

Adjusting a headlight beam ...................... 8-47
Replacing the tail/brake light bulb ............ 8-47
Removing a wheel .................................... 8-48
Installing a wheel ...................................... 8-48
Troubleshooting ....................................... 8-49
Troubleshooting chart .............................. 8-51
CLEANING AND STORAGE .......................... 9-1 Cleaning ..................................................... 9-1
Storage ....................................................... 9-2
SPECIFICATIONS ...................................... 10-1
CONSUMER INFORMATION ...................... 11-1 Identification numbers .............................. 11-1
U1PY61E0.book Page 3 Wednesday, March 14, 2012 5:22 PM
Page 19 of 134

2-3
2
●Always use proper procedures if you stall or roll
backwards when climbing a hill. To avoid stall-
ing, maintain a steady speed when climbing a
hill. If you stall or roll backwards, follow the spe-
cial procedure for braking described in this man-
ual. Dismount on the uphill side or to a side if
pointed straight uphill. Turn the ATV around and
remount, following the procedure described in
this manual.●Always check for obstacles before operating in a
new area.●Never attempt to operate over large obstacles,
such as large rocks or fallen trees. Always follow
proper procedures when operating over obsta-
cles as described in this manual.●Always be careful when skidding or sliding.
Learn to safely control skidding or sliding by
practicing at low speeds and on level, smooth
terrain. On extremely slippery surfaces, such as
ice, go slowly and be very cautious in order to re-
duce the chance of skidding or sliding out of con-
trol.●Never operate an ATV in fast flowing water or in
water deeper than that recommended in this
manual. Remember that wet brakes may havereduced stopping ability. Test your brakes after
leaving water. If necessary, apply them several
times to let friction dry out the linings.
●Always be sure there are no obstacles or people
behind you when you operate in reverse. When
it is safe to proceed in reverse, go slowly.●Always use the size and type of tires specified in
this manual.●Always maintain proper tire pressure as de-
scribed in this manual.●Never exceed the stated load capacity for an
ATV. Cargo should be properly distributed and
securely attached. Reduce speed and follow in-
structions in this manual for carrying cargo. Al-
low greater distance for braking.●Do not operate your ATV during darkness un-
less it is equipped with a properly functioning
headlight. Off-road riding is inherently danger-
ous and additionally, off-road trails do not have
streetlights to guide you.●Never maintain an ATV without proper knowl-
edge. Contact an authorized ATV dealer to in-
form you on basic ATV maintenance. Certain
maintenance can only be carried out by certified
staff.
U1PY61E0.book Page 3 Wednesday, March 14, 2012 5:22 PM
Page 23 of 134
3-1
3
EBU17680
DESCRIPTION
EBU17690Left view
EBU17700Right view
1. Front carrier
2. Starter (choke)
3. Fuel cock
4. Throttle stop screw
5. Tail/brake light
6. Rear carrier
7. Spark arrester
8. Footboard
123
56 7
8
4
1. Owner’s tool kit
2. Battery
3. Drive select lever
4. Spark plug
5. Headlight
6. Engine oil filler cap
7. Fuse
2 3
5
6
7
1
4
U1PY61E0.book Page 1 Wednesday, March 14, 2012 5:22 PM
Page 24 of 134
3-2
3
EBU17712Controls and instruments
TIPThe ATV you have purchased may differ slightly
from the figures shown in this manual.
1. Rear brake lever
2. Parking brake lock plate
3. Reverse indicator light
4. Neutral indicator light
5. Front brake lever
6. Throttle lever
7. Main switch
8. Fuel tank cap
9. Handlebar switches
12
34
5
9 8
7
6
U1PY61E0.book Page 2 Wednesday, March 14, 2012 5:22 PM
Page 28 of 134
4-4
4
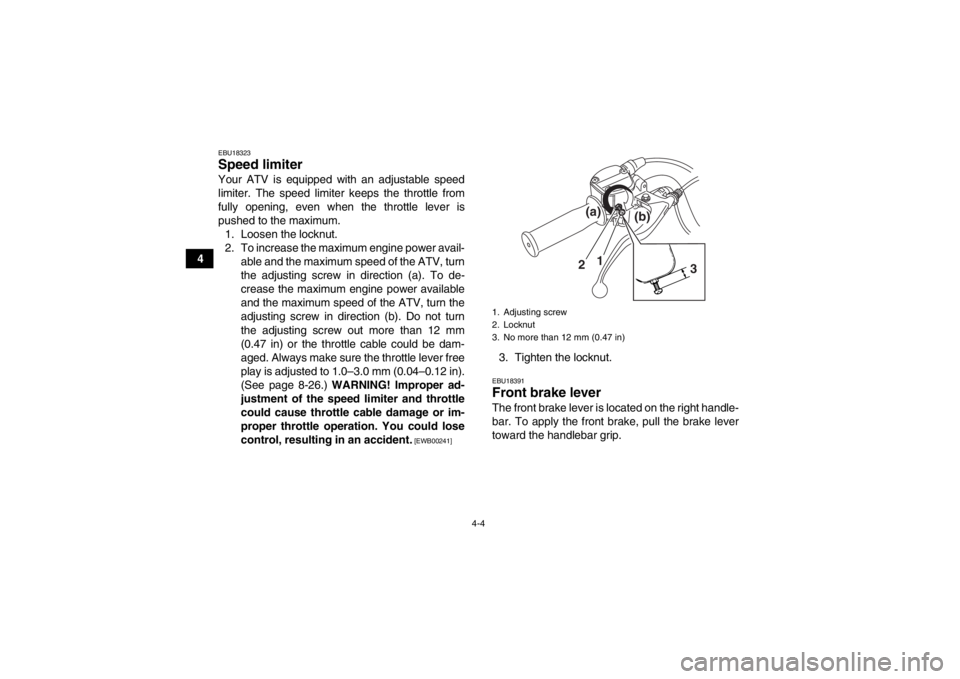
EBU18323Speed limiter Your ATV is equipped with an adjustable speed
limiter. The speed limiter keeps the throttle from
fully opening, even when the throttle lever is
pushed to the maximum.1. Loosen the locknut.
2. To increase the maximum engine power avail- able and the maximum speed of the ATV, turn
the adjusting screw in direction (a). To de-
crease the maximum engine power available
and the maximum speed of the ATV, turn the
adjusting screw in direction (b). Do not turn
the adjusting screw out more than 12 mm
(0.47 in) or the throttle cable could be dam-
aged. Always make sure the throttle lever free
play is adjusted to 1.0–3.0 mm (0.04–0.12 in).
(See page 8-26.) WARNING! Improper ad-
justment of the speed limiter and throttle
could cause throttle cable damage or im-
proper throttle operation. You could lose
control, resulting in an accident.
[EWB00241]
3. Tighten the locknut.EBU18391Front brake lever The front brake lever is located on the right handle-
bar. To apply the front brake, pull the brake lever
toward the handlebar grip.1. Adjusting screw
2. Locknut
3. No more than 12 mm (0.47 in)
3
1
2
(a)
(b)
U1PY61E0.book Page 4 Wednesday, March 14, 2012 5:22 PM
Page 29 of 134
4-5
4
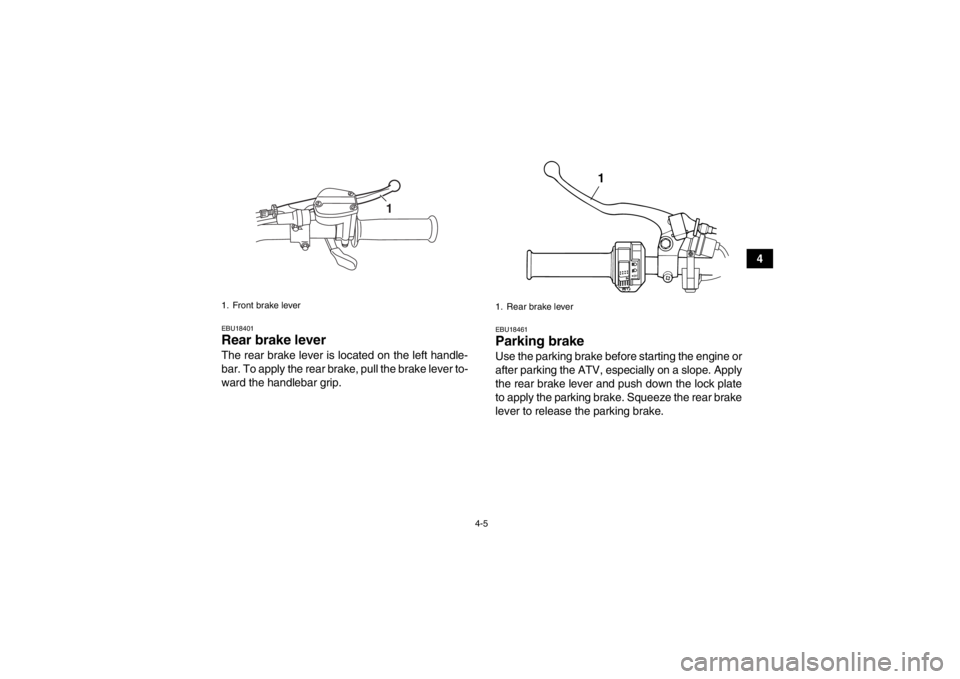
EBU18401Rear brake lever The rear brake lever is located on the left handle-
bar. To apply the rear brake, pull the brake lever to-
ward the handlebar grip.
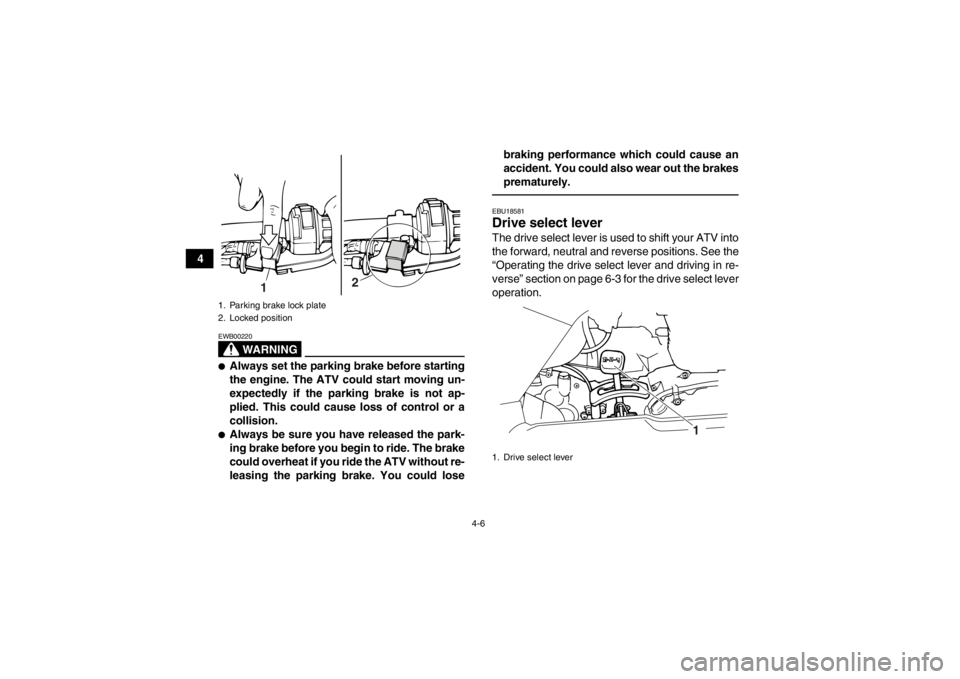
EBU18461Parking brake Use the parking brake before starting the engine or
after parking the ATV, especially on a slope. Apply
the rear brake lever and push down the lock plate
to apply the parking brake. Squeeze the rear brake
lever to release the parking brake.
1. Front brake lever
1
1. Rear brake lever
1
U1PY61E0.book Page 5 Wednesday, March 14, 2012 5:22 PM
Page 30 of 134
4-6
4
WARNING
EWB00220●Always set the parking brake before starting
the engine. The ATV could start moving un-
expectedly if the parking brake is not ap-
plied. This could cause loss of control or a
collision.●Always be sure you have released the park-
ing brake before you begin to ride. The brake
could overheat if you ride the ATV without re-
leasing the parking brake. You could losebraking performance which could cause an
accident. You could also wear out the brakes
prematurely.
EBU18581Drive select lever The drive select lever is used to shift your ATV into
the forward, neutral and reverse positions. See the
“Operating the drive select lever and driving in re-
verse” section on page 6-3 for the drive select lever
operation.
1. Parking brake lock plate
2. Locked position
2
1
1. Drive select lever
1
U1PY61E0.book Page 6 Wednesday, March 14, 2012 5:22 PM
Page 36 of 134

5-1
5
EBU19201
PRE-OPERATION CHECKS
EBU19224Inspect your vehicle each time you use it to make sure the vehicle is in safe operating condition. Always
follow the inspection and maintenance procedures and schedules described in the Owner’s Manual.
WARNING
EWB00481Failure to inspect or maintain the vehicle properly increases the possibility of an accident or equip-
ment damage. Do not operate the vehicle if you find any problem. If a problem cannot be corrected
by the procedures provided in this manual, have the vehicle inspected by a Yamaha dealer.Before using this vehicle, check the following points:
ITEMROUTINE PAGE
Fuel Check fuel level in fuel tank, and add recommended fuel if neces-
sary.
Check fuel line for leakage. Correct if necessary. 4-7, 5-3
Engine oil Check oil level in engine, and add recommended oil to specified lev-
el if necessary.
Check ATV for oil leakage. Correct if necessary. 5-3, 8-11
Transmission oil Check oil level in transmission case, and add recommended oil to
specified level if necessary.
Check ATV for oil leakage. Correct if necessary. 5-3, 8-14
Front brake Check operation, and correct if necessary.
Lubricate cable if necessary.
Check lever free play, and adjust if necessary. 5-3, 8-28, 8-29
U1PY61E0.book Page 1 Wednesday, March 14, 2012 5:22 PM