stop start YAMAHA GRIZZLY 350 2010 User Guide
[x] Cancel search | Manufacturer: YAMAHA, Model Year: 2010, Model line: GRIZZLY 350, Model: YAMAHA GRIZZLY 350 2010Pages: 142, PDF Size: 5 MB
Page 106 of 142

8-26
8
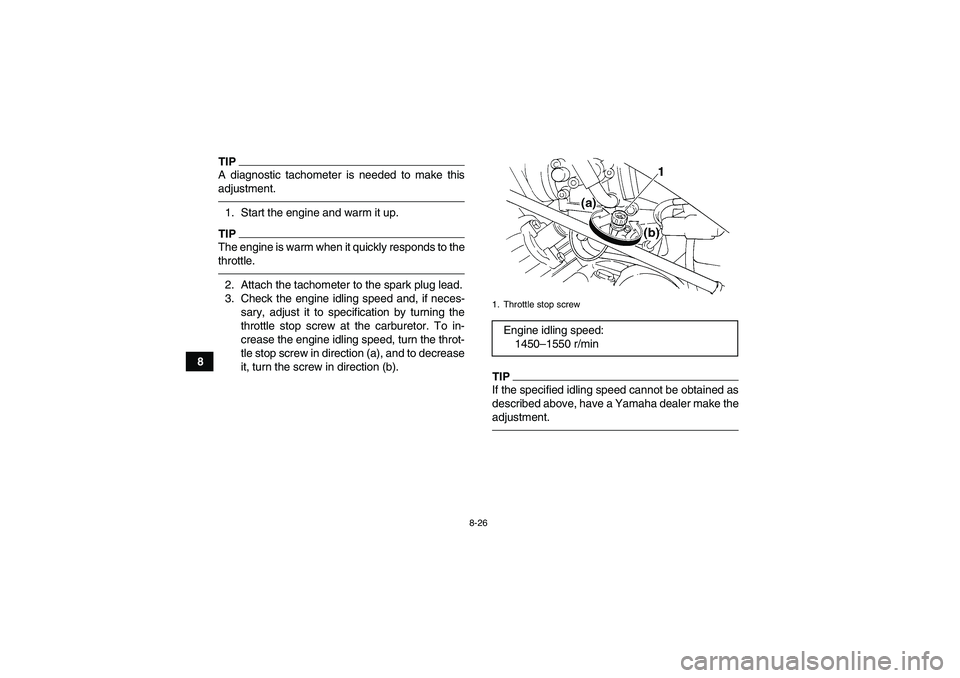
TIPA diagnostic tachometer is needed to make this
adjustment.1. Start the engine and warm it up.TIPThe engine is warm when it quickly responds to the
throttle.2. Attach the tachometer to the spark plug lead.
3. Check the engine idling speed and, if neces-
sary, adjust it to specification by turning the
throttle stop screw at the carburetor. To in-
crease the engine idling speed, turn the throt-
tle stop screw in direction (a), and to decrease
it, turn the screw in direction (b).
TIPIf the specified idling speed cannot be obtained as
described above, have a Yamaha dealer make the
adjustment.1. Throttle stop screwEngine idling speed:
1450–1550 r/min
U1AB60E0.book Page 26 Wednesday, April 29, 2009 10:19 AM
Page 128 of 142

9-1
9
EBU25860
CLEANING AND STORAGE
EBU25881Cleaning Frequent, thorough cleaning of your ATV will not
only enhance its appearance but will improve its
general performance and extend the useful life of
many components.
1. Before cleaning the ATV:
a. Block off the end of the exhaust pipe to
prevent water entry. A plastic bag and
strong rubber band may be used.
b. Make sure the spark plug and all filler caps
are properly installed.
2. If the engine case is excessively greasy, apply
degreaser with a paint brush. Do not apply de-
greaser to the wheel axles.
3. Rinse the dirt and degreaser off with a garden
hose. Use only enough pressure to do the job.
WARNING! Wet brakes may have reduced
stopping ability, increasing the chance of
an accident. Test the brakes after washing.
Apply the brakes several times at slow
speeds to let friction dry out the linings.
[EWB02311]
NOTICE: Excessive water pressure
may cause water seepage and deteriora-tion of wheel bearings, brakes, transmis-
sion seals and electrical devices. Many
expensive repair bills have resulted from
improper high-pressure detergent applica-
tions such as those available in coin-oper-
ated car washers.
[ECB00711]
4. Once most of the dirt has been hosed off,
wash all surfaces with warm water and mild,
detergent-type soap. An old toothbrush or bot-
tle brush is handy for hard-to-reach places.
5. Rinse the ATV off immediately with clean wa-
ter and dry all surfaces with a chamois, clean
towel or soft absorbing cloth.
6. Clean the seat with a vinyl upholstery cleaner
to keep the cover pliable and glossy.
7. Automotive type wax may be applied to all
painted and chrome plated surfaces. Avoid
combination cleaner-waxes. Many contain
abrasives which may mar the paint or protec-
tive finish. When finished cleaning, start the
engine and let it idle for several minutes.
U1AB60E0.book Page 1 Wednesday, April 29, 2009 10:19 AM
Page 139 of 142

INDEX
AAccessories and loading ................................................ 6-6
Air filter element, cleaning ............................................ 8-20
Axle boots .................................................................... 8-34BBattery .......................................................................... 8-38
Brake fluid, changing ................................................... 8-30
Brake fluid level, checking ........................................... 8-29
Brake lever free play, checking the front ...................... 8-30
Brake lever, front ............................................................ 4-7
Brake levers, checking and lubricating ........................ 8-36
Brake light switches ..................................................... 8-34
Brake pads and shoes, checking ................................. 8-28
Brake pedal and brake lever free play (rear) and
brake pedal position, adjusting and checking ............ 8-31
Brake pedal and rear brake lever ................................... 4-7
Brake pedal, checking and lubricating ......................... 8-36
Brakes .......................................................................... 8-28
Brakes, front and rear .................................................... 5-3CCables, checking and lubricating ................................. 8-35
Carburetor, adjusting ................................................... 8-25
Carrier, front ................................................................. 4-16
Carrier, rear .................................................................. 4-16
Chassis fasteners .......................................................... 5-6
Cleaning ......................................................................... 9-1DDifferential gear oil ......................................................... 5-3Differential gear oil, changing ...................................... 8-18
Drive select lever ........................................................... 4-9
Drive select lever and driving in reverse ........................ 6-3
Drive select lever safety system cable, adjusting ........ 8-28
EEngine break-in .............................................................. 6-4
Engine, cold start ........................................................... 6-1
Engine idling speed ..................................................... 8-25
Engine oil ....................................................................... 5-3
Engine oil and oil filter cartridge ................................... 8-12
Engine, starting a warm ................................................. 6-3
Engine stop switch ......................................................... 4-4FFinal gear oil ......................................................... 5-3, 8-16
Four-wheel-drive indicator light ...................................... 4-3
Fuel ....................................................................... 4-10, 5-3
Fuel cock ..................................................................... 4-12
Fuel tank cap ............................................................... 4-10
Fuses, replacing .......................................................... 8-40HHandlebar switches ....................................................... 4-4
Headlight beam, adjusting ........................................... 8-43
Headlight bulb, replacing ............................................. 8-42
Horn switch .................................................................... 4-4IIdentification numbers .................................................. 11-1
Indicator lights and warning light ................................... 4-2
Instruments, lights and switches .................................... 5-6
U1AB60E0.book Page 1 Wednesday, April 29, 2009 10:19 AM