fuel YAMAHA GRIZZLY 350 2013 Owners Manual
[x] Cancel search | Manufacturer: YAMAHA, Model Year: 2013, Model line: GRIZZLY 350, Model: YAMAHA GRIZZLY 350 2013Pages: 144, PDF Size: 3.33 MB
Page 8 of 144

EBU17420
TABLE OF CONTENTS
LOCATION OF THE WARNING AND
SPECIFICATION LABELS ............................ 1-1
SAFETY INFORMATION .............................. 2-1
DESCRIPTION .............................................. 3-1Left view ...................................................... 3-1
Right view.................................................... 3-1
Controls and instruments ............................ 3-2
INSTRUMENT AND CONTROL
FUNCTIONS .................................................. 4-1 Main switch ................................................ 4-1
Indicator lights and warning light ................ 4-2
Speedometer .............................................. 4-3
Handlebar switches .................................... 4-5
Throttle lever .............................................. 4-6
Speed limiter .............................................. 4-7
Front brake lever ........................................ 4-8
Brake pedal and rear brake lever ............... 4-8
Parking brake ............................................. 4-9
Drive select lever ...................................... 4-10
Fuel tank cap ............................................ 4-10
Fuel .......................................................... 4-11 Fuel cock ..................................................4-12
Starter (choke) ..........................................4-14
Seat ..........................................................4-14
Storage compartment ...............................4-15
Front carrier ..............................................4-16
Rear carrier ...............................................4-16
Adjusting the front shock absorber
assemblies ..............................................4-17
Adjusting the rear shock absorber assembly .................................................4-18
PRE-OPERATION CHECKS ..........................5-1 Fuel .............................................................5-3
Engine oil ....................................................5-3
Final gear oil ...............................................5-3
Differential gear oil ......................................5-3
Front and rear brakes .................................5-3
Throttle lever ...............................................5-4
Tires ............................................................5-4
Chassis fasteners .......................................5-6
Instruments, lights and switches .................5-6
OPERATION...................................................6-1 Starting a cold engine .................................6-1U1NS61E0.book Page 1 Tuesday, May 15, 2012 5:19 PM
Page 14 of 144
1-4
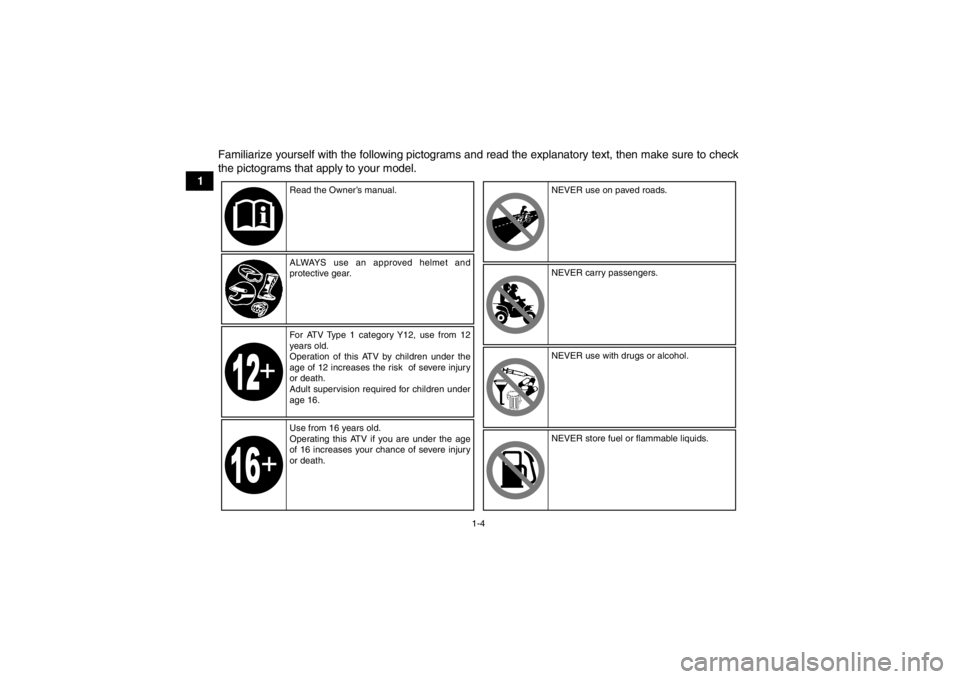
1Familiarize yourself with the following pictograms and read the explanatory text, then make sure to check
the pictograms that apply to your model.
Read the Owner’s manual.
ALWAYS use an approved helmet and
protective gear.
For ATV Type 1 category Y12, use from 12
years old.
Operation of this ATV by children under the
age of 12 increases the risk of severe injury
or death.
Adult supervision required for children under
age 16.
Use from 16 years old.
Operating this ATV if you are under the age
of 16 increases your chance of severe injury
or death. NEVER use on paved roads.
NEVER carry passengers.
NEVER use with drugs or alcohol.
NEVER store fuel or flammable liquids.
U1NS61E0.book Page 4 Tuesday, May 15, 2012 5:19 PM
Page 23 of 144

2-4
2
In the event of an accident
1. If serious injuries are incurred, you may be safer staying next to your vehicle; it may
shield you from oncoming riders. Depending
on your injuries and position in the trail; you
must make a judgment call as to whether you
should move to a position off the trail. If you
have sustained head, neck, or back injuries,
or cannot feel your limbs, you should not
move. Keep your helmet on and remain mo-
tionless. Lie down next to your vehicle and
wait for help.
2. If less serious injuries are incurred and you can walk, then move to a position off the trail.
Check yourself for injuries and apply first aid
as needed.
3. If your injuries are light, when safe to do so, move your vehicle off the trail to avoid colli-
sions with oncoming riders. Check for injuries
and apply first aid as necessary. If you can
physically operate your vehicle, inspect your
vehicle. If the vehicle is in safe operating con-
dition and you can safely operate it, restart it
and ride gently back to camp or other known
location where you can receive medical atten- tion. If necessary, contact your riding party or
local authorities to let them know where you
are and what has happened.
In the event of a breakdown 1. If your vehicle will not restart or is not in safe operating condition, turn off the main switch
and engine stop switch. If the breakdown oc-
curs at twilight or night, leave the main switch
on so that your lights may warn other riders of
your stopped vehicle.
2. Get out of danger. Check for oncoming vehi- cles and when safe, push your vehicle to the
side of the trail or even off the main trail to
avoid any possible collisions with oncoming
riders. If you cannot move your vehicle by
yourself, when safe, walk to the nearest van-
tage point and signal an oncoming rider to
help you push your vehicle to a safe place off
the trail.
3. Inspect your vehicle for any immediate haz- ardous conditions. The most obvious hazard-
ous conditions are leaking fuel and
ungrounded or broken wiring. Visually check
for broken wiring and leaking fuel. Leaking
fuel can be confirmed by the odor of gasoline.
U1NS61E0.book Page 4 Tuesday, May 15, 2012 5:19 PM
Page 24 of 144

2-5
24. Once immediate safety hazards are con-
firmed not to exist, you may remove your hel-
met to more closely inspect your vehicle.
Check for external signs of wear, broken
parts, fluid leaks, cracks in the frame, suspen-
sion damage, wheel damage, and so on. Fuel,
oil, and coolant usually give off a noticeable
odor.
5. If your vehicle will not restart or if it is unsafe to ride, then turn off all vehicle systems (en-
gine stop switch, main switch, and fuel cock),
and then signal or go for help.
Aftermarket Parts, Accessories, and Modifica-
tions
While you may find aftermarket products similar in
design and quality to genuine Yamaha accesso-
ries, recognize that some aftermarket accessories
or modifications are not suitable because of poten-
tial safety hazards to you or others. Installing after-
market products or having other modifications
performed to your vehicle that change any of the
vehicle’s design or operation characteristics can
put you and others at greater risk of serious injury
or death. You are responsible for injuries related to changes in the vehicle. Keep the following guide-
lines in mind, as well as those provided under
“Loading” when mounting accessories.
●Never install accessories that would impair the
performance of your ATV. Carefully inspect the
accessory before using it to make sure that it
does not in any way reduce ground clearance,
limit suspension travel, steering travel or control
operation.●Accessories fitted to the ATV can create instabil-
ity due to improper weight distribution.●Bulky or large accessories may seriously affect
the stability of the ATV.●Certain accessories can displace the operator
from his or her normal riding position. This im-
proper position limits the freedom of movement
of the operator and may limit control ability,
therefore, such accessories are not recom-
mended.●Use caution when adding electrical accessories.
If electrical accessories exceed the capacity of
the ATV’s electrical system, an electric failure
could result, which could cause a dangerous
loss of lights or engine power.
U1NS61E0.book Page 5 Tuesday, May 15, 2012 5:19 PM
Page 25 of 144
2-6
2
WARNING
EWB00072Avoid Carbon Monoxide Poisoning
All engine exhaust contains carbon monoxide,
a deadly gas. Breathing carbon monoxide can
cause headaches, dizziness, drowsiness, nau-
sea, confusion, and eventually death.
Carbon Monoxide is a colorless, odorless,
tasteless gas which may be present even if you
do not see or smell any engine exhaust. Deadly
levels of carbon monoxide can collect rapidly
and you can quickly be overcome and unable
to save yourself. Also, deadly levels of carbon
monoxide can linger for hours or days in en-
closed or poorly ventilated areas. If you experi-
ence any symptoms of carbon monoxide
poisoning, leave the area immediately, get
fresh air, and SEEK MEDICAL TREATMENT.●Do not run engine indoors. Even if you try to
ventilate engine exhaust with fans or open
windows and doors, carbon monoxide can
rapidly reach dangerous levels.●Do not run engine in poorly ventilated or par-
tially enclosed areas such as barns, garages,
or carports.
●Do not run engine outdoors where engine
exhaust can be drawn into a building
through openings such as windows and
doors.
WARNING
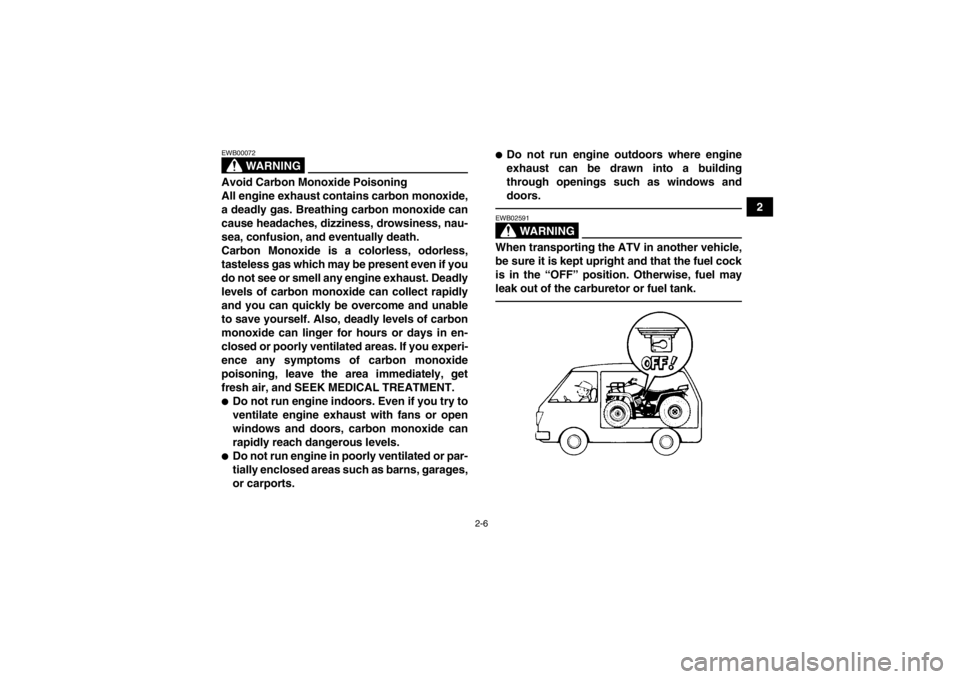
EWB02591When transporting the ATV in another vehicle,
be sure it is kept upright and that the fuel cock
is in the “OFF” position. Otherwise, fuel may
leak out of the carburetor or fuel tank.
U1NS61E0.book Page 6 Tuesday, May 15, 2012 5:19 PM
Page 26 of 144
3-1
3
EBU17680
DESCRIPTION
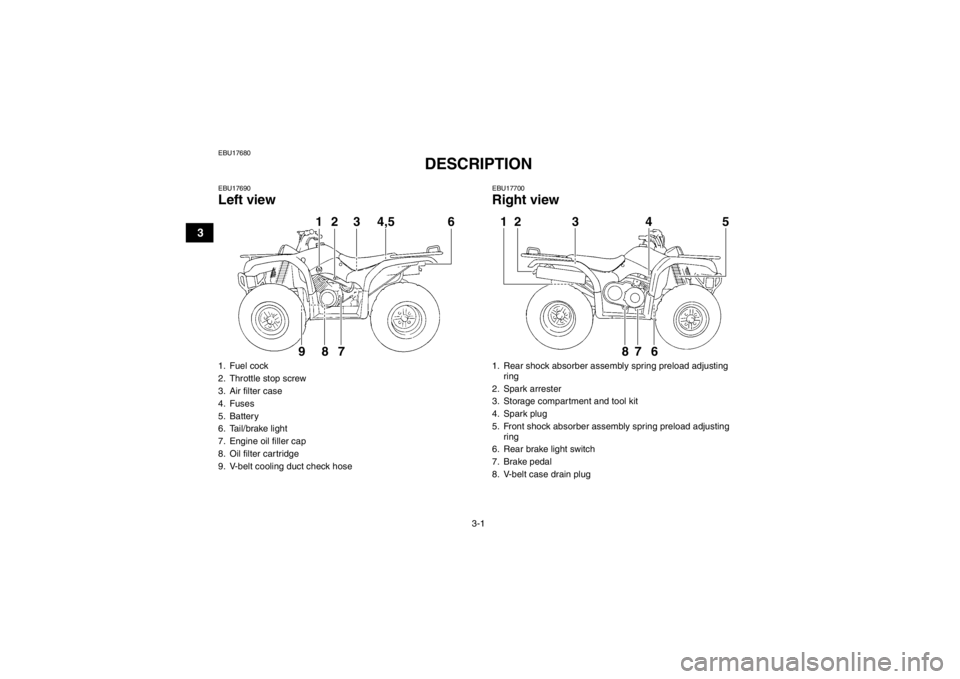
EBU17690Left view
EBU17700Right view
1. Fuel cock
2. Throttle stop screw
3. Air filter case
4. Fuses
5. Battery
6. Tail/brake light
7. Engine oil filler cap
8. Oil filter cartridge
9. V-belt cooling duct check hose
3
4,5
1
26
987
1. Rear shock absorber asse mbly spring preload adjusting
ring
2. Spark arrester
3. Storage compartment and tool kit
4. Spark plug
5. Front shock absorber assembly spring preload adjusting ring
6. Rear brake light switch
7. Brake pedal
8. V-belt case drain plug12 3 4 5
678
U1NS61E0.book Page 1 Tuesday, May 15, 2012 5:19 PM
Page 27 of 144
3-2
3
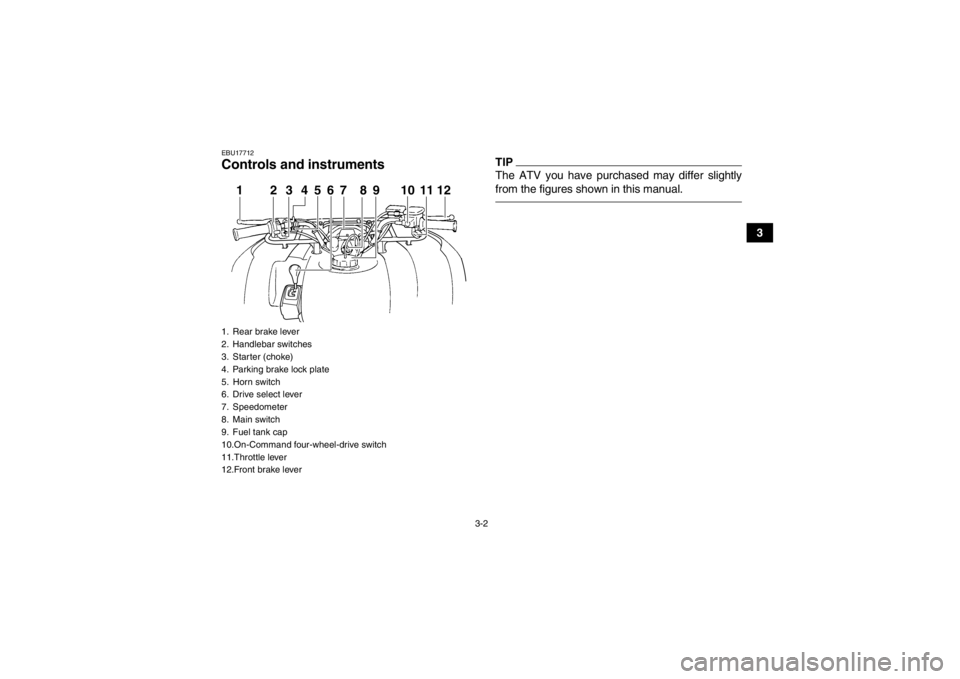
EBU17712Controls and instruments
TIPThe ATV you have purchased may differ slightly
from the figures shown in this manual.
1. Rear brake lever
2. Handlebar switches
3. Starter (choke)
4. Parking brake lock plate
5. Horn switch
6. Drive select lever
7. Speedometer
8. Main switch
9. Fuel tank cap
10.On-Command four-wheel-drive switch
11.Throttle lever
12.Front brake lever
123410
567 89 1112
U1NS61E0.book Page 2 Tuesday, May 15, 2012 5:19 PM
Page 30 of 144

4-3
4
EBU26932Oil temperature warning light “ ”
This warning light comes on when the engine over-
heats. When this occurs, stop the engine as soon
as it is safe to do so, and allow it to cool.
The electrical circuit of the warning light can be
checked by turning the key to “ON”, with the engine
stop switch set to “ ”, and then pushing the start
switch.
If the warning light does not come on while the start
switch is being pushed, or if the warning light re-
mains on after the start switch is released, have a
Yamaha dealer check the electrical circuit. If the warning light stays on when the engine is
cool, have a Yamaha dealer check the electrical
circuit.NOTICEECB00010●The engine may overheat if the ATV is over-
loaded. In this case, reduce the load to spec-
ification.●Start the engine after making sure that the
warning light is out. Continuous use while
the warning light is on may cause damage to
the engine.
EBU17952On-Command four-wheel-drive indicator
light “ ”
This indicator light comes on when the On-Com-
mand four-wheel-drive switch is set to the “4WD”
position.TIPDue to the synchronizing mechanism in the differ-
ential gear case, the light may not come on until
the ATV starts moving.EBU18023Speedometer This speedometer is equipped with an odometer
and a tripmeter. The tripmeter can be reset to zero
with the reset knob. Use the tripmeter to estimate
how far you can ride on a tank of fuel before going
to reserve. This information will enable you to plan
fuel stops in the future.
U1NS61E0.book Page 3 Tuesday, May 15, 2012 5:19 PM
Page 37 of 144
4-10
4
●Always be sure you have released the park-
ing brake before you begin to ride. The brake
could overheat if you ride the ATV without re-
leasing the parking brake. You could lose
braking performance which could cause an
accident. You could also wear out the brakes
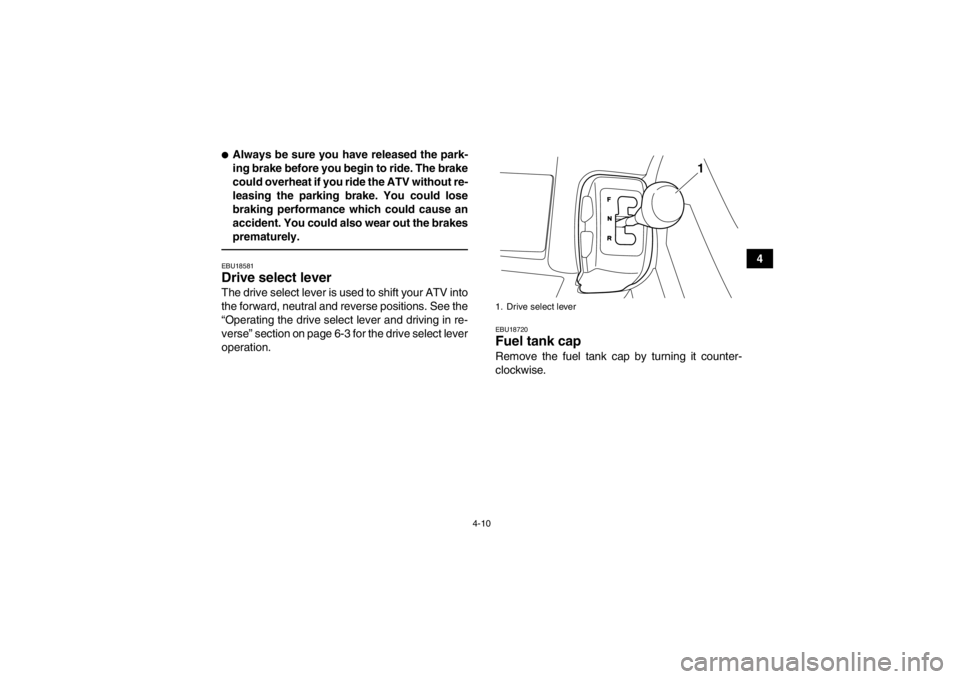
prematurely.EBU18581Drive select lever The drive select lever is used to shift your ATV into
the forward, neutral and reverse positions. See the
“Operating the drive select lever and driving in re-
verse” section on page 6-3 for the drive select lever
operation.
EBU18720Fuel tank cap Remove the fuel tank cap by turning it counter-
clockwise.1. Drive select lever
1
U1NS61E0.book Page 10 Tuesday, May 15, 2012 5:19 PM
Page 38 of 144
4-11
4
EBU18755Fuel Make sure there is sufficient gasoline in the tank.
WARNING
EWB02521Gasoline and gasoline vapors are extremely
flammable. To avoid fires and explosions and
to reduce the risk of injury when refueling, fol-
low these instructions.1. Before refueling, turn off the engine and besure that no one is sitting on the vehicle. Nev-
er refuel while smoking, or while in the vicinity of sparks, open flames, or other sources of ig-
nition such as the pilot lights of water heaters
and clothes dryers.
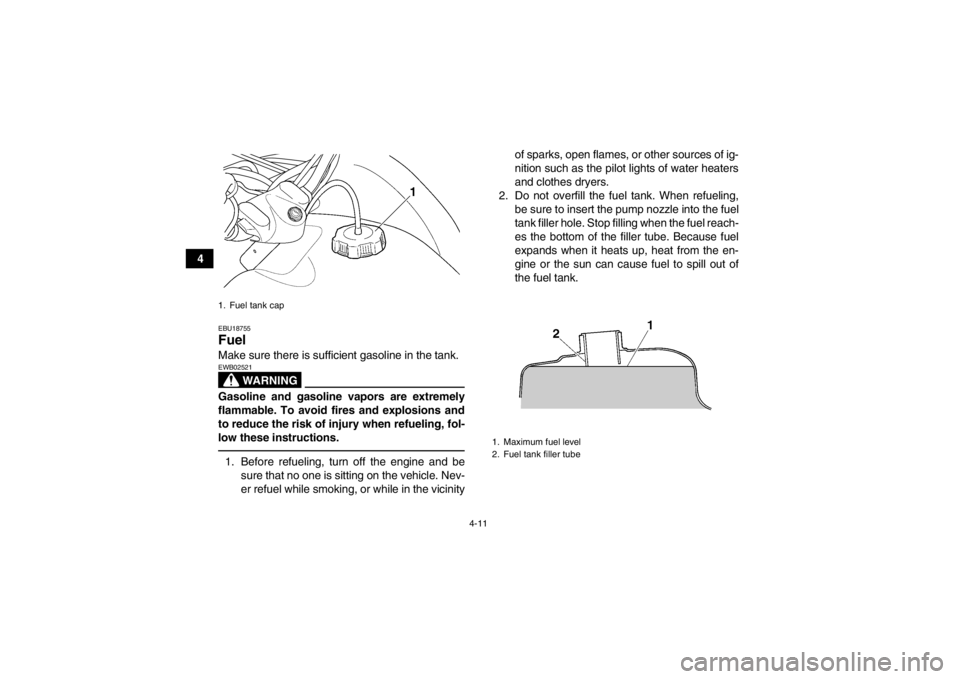
2. Do not overfill the fuel tank. When refueling, be sure to insert the pump nozzle into the fuel
tank filler hole. Stop filling when the fuel reach-
es the bottom of the filler tube. Because fuel
expands when it heats up, heat from the en-
gine or the sun can cause fuel to spill out of
the fuel tank.1. Fuel tank cap
1. Maximum fuel level
2. Fuel tank filler tube
U1NS61E0.book Page 11 Tuesday, May 15, 2012 5:19 PM