wheel YAMAHA GRIZZLY 550 2014 Owner's Manual
[x] Cancel search | Manufacturer: YAMAHA, Model Year: 2014, Model line: GRIZZLY 550, Model: YAMAHA GRIZZLY 550 2014Pages: 174, PDF Size: 4.2 MB
Page 87 of 174
7-18
7
●Shift your weight to the uphill side of the
ATV.●Never attempt to turn the ATV around on any
hill until you have mastered the turning tech-
nique as described in the Owner’s Manual on
level ground. Be very careful when turning
on any hill.Traversing a sloping surface on your ATV requires
you to properly position your weight to maintain
proper balance. Be sure that you have learned the
basic riding skills on flat ground before attempting
to cross a sloping surface. Avoid slopes with slip-
pery surfaces or rough terrain that may upset your
balance.
As you travel across a slope, lean your body in the
uphill direction. It may be necessary to correct the
steering when riding on loose surfaces by pointing
the front wheels slightly uphill. When riding on
slopes, be sure not to make sharp turns either up
or down hill.
If your ATV does begin to tip over, gradually steer
in the downhill direction if there are no obstacles in
your path. As you regain proper balance, gradually
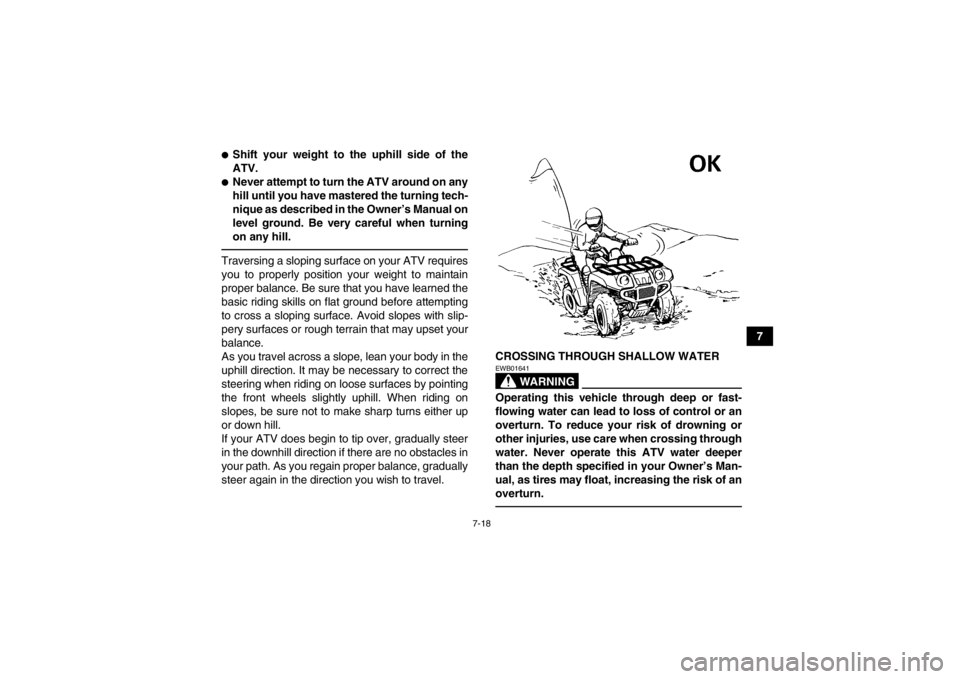
steer again in the direction you wish to travel.CROSSING THROUGH SHALLOW WATER
WARNING
EWB01641Operating this vehicle through deep or fast-
flowing water can lead to loss of control or an
overturn. To reduce your risk of drowning or
other injuries, use care when crossing through
water. Never operate this ATV water deeper
than the depth specified in your Owner’s Man-
ual, as tires may float, increasing the risk of an
overturn.
U2LB60E0.book Page 18 Thursday, March 21, 2013 10:20 AM
Page 90 of 174

7-21
7RIDING OVER ROUGH TERRAIN
WARNING
EWB01651Riding improperly over obstacles could cause
loss of control or a collision. Before operating
in a new area, check for obstacles. Never at-
tempt to ride over large obstacles, such as
large rocks or fallen trees. When you go over
obstacles, always follow proper procedures as
described in the Owner’s Manual.Riding over rough terrain should be done with cau-
tion. Look out for obstacles which could cause
damage to the ATV or could lead to an upset or ac- cident. Be sure to keep your feet firmly mounted on
the footboards at all times. Avoid jumping the ATV
as loss of control and damage to the ATV may re-
sult.
SLIDING AND SKIDDING
WARNING
EWB01662Skidding or sliding improperly may cause you
to lose control of this ATV. You may also re-
gain traction unexpectedly, which may cause
the ATV to overturn.●Learn to safely control skidding or sliding by
practicing at low speeds and on level,
smooth terrain.●On extremely slippery surfaces, such as ice,
go slowly and be very cautious in order to re-
duce the chance of skidding or sliding out of
control.Care should be used when riding on loose or slip-
pery surfaces since the ATV may slide. If unex-
pected and uncorrected, sliding could lead to an
accident.
To reduce the tendency for the front wheels to slide
in loose or slippery conditions, positioning your
weight over the front wheels will sometimes help.
1. V-belt case drain plugU2LB60E0.book Page 21 Thursday, March 21, 2013 10:20 AM
Page 91 of 174

7-22
7
If the rear wheels of your ATV start to slide side-
ways, control can usually be regained (if there is
room to do so) by steering in the direction of the
slide. Applying the brakes or accelerating is not
recommended until you have corrected the slide. With practice, over a period of time, skill at con-
trolled sliding can be developed. The terrain
should be chosen carefully before attempting such
maneuvers, since both stability and control are re-
duced. Bear in mind that sliding maneuvers should
always be avoided on extremely slippery surfaces
such as ice, since all control may be lost.
WHAT TO DO IF...
This section is designed to be a reference guide
only. Be sure to read each section on riding tech-
niques completely.
U2LB60E0.book Page 22 Thursday, March 21, 2013 10:20 AM
Page 92 of 174

7-23
7WHAT TO DO...
●If your ATV doesn’t turn when you want it to:
Bring the ATV to a stop and practice the turning
maneuvers again. Be sure you are putting your
weight on the footboard to the outside of the
turn. Position your weight over the front wheels
for better control. (See page 7-12.)●If your ATV begins to tip while turning:
Lean more into the turn to regain balance. If nec-
essary, gradually let off the throttle and/or steer
to the outside of the turn. (See page 7-12.)●If your ATV starts to slide sideways:
Steer in the direction of the slide if you have the
room. Applying the brakes or accelerating is not
recommended until you have corrected the
slide. (See page 7-21.)●If your ATV can’t make it up a hill you are trying
to climb:
Turn the ATV around if you still have forward
speed. If not, stop, dismount on the uphill side of
the ATV and physically turn the ATV around. If
the ATV starts to slip backwards, DO NOT USE
THE REAR BRAKE IF THE ATV IS IN “2WD” –
the ATV may tip over on top of you. Dismount
the ATV on the uphill side. (See page 7-13.)
●If your ATV is traversing a sloping surface:
Be sure to ride with your weight positioned to-
wards the uphill side of the ATV to maintain
proper balance. If the ATV starts to tip, steer
down the hill (if there are no obstacles in your
way) to regain balance. If you discover that the
ATV is going to tip over, dismount on the uphill
side. (See page 7-17.)●If your ATV encounters shallow water:
Ride slowly and carefully through slow moving
water, watching for obstacles. Be sure to let wa-
ter drain from the ATV and CHECK YOUR
BRAKES FOR PROPER OPERATION when
you come out of the water. Do not continue to
ride your ATV until you have regained adequate
braking ability. (See page 7-18.)
U2LB60E0.book Page 23 Thursday, March 21, 2013 10:20 AM
Page 98 of 174

8-6
8
3*Rear brake Check operation and correct if necessary.
Check brake pedal free play and adjust if neces-
sary.
Check fluid level and ATV for fluid leakage, and correct if necessary. √√√√√
Replace brake pads. Whenever worn to the limit
4 *Brake hoses Check for cracks or other damage, and replace if
necessary. √√√√
Replace. Every 4 years
5 *Brake fluid Replace. Every 2 years
6 *Wheels Check runout and for damage, and replace if nec-
essary. √ √√√
7 *Tires Check tread depth and for damage, and replace if
necessary.
Check air pressure and balance, and correct if necessary. √ √√√
8 *Wheel hub bearings Check for looseness or damage, and replace if
necessary. √ √√√
9 *V- b e l t Check for wear, cracks or other damage, and re-
place if necessary. √ √√√
10 *Chassis fasteners Make sure that all nuts, bolts, and screws are
properly tightened. √√√√√
NO. ITEM
CHECK OR MAINTENANCE
JOB INITIAL EVERY
Whichev- er comes first month136612
km
(mi) 320
(200) 1300
(800) 2500
(1600) 2500
(1600) 5000
(3200)
hours 20 80 160 160 320U2LB60E0.book Page 6 Thursday, March 21, 2013 10:20 AM
Page 138 of 174

8-46
8
EBU24060Valve clearance The valve clearance changes with use, resulting in
improper air-fuel mixture and/or engine noise. To
prevent this from occurring, the valve clearance
must be adjusted by a Yamaha dealer at the inter-
vals specified in the periodic maintenance and lu-
brication chart.EBU24071Adjusting the drive select lever safety
system cable The drive select lever safety system cable stretch-
es with use, which can result in improper function.
Therefore, the safety system cable should be
checked and adjusted by a Yamaha dealer at the
intervals specified in the periodic maintenance and
lubrication chart.EBU29601Brakes Replacement of brake components requires pro-
fessional knowledge. Brake service should be per-
formed by a Yamaha dealer.
WARNING
EWB02571Operating with improperly serviced or adjust-
ed brakes could lead to a loss in braking ability
and an accident.EBU27470Checking the front and rear brake pads The front and rear brake pads must be checked for
wear at the intervals specified in the periodic main-
tenance and lubrication chart. Each brake pad is
provided with a wear indicator groove, which al-
lows you to check the brake pad wear without hav-
ing to disassemble the brake. If a brake pad has
worn to the point that the wear indicator groove has
almost disappeared, have a Yamaha dealer re-
place the brake pads as a set.TIPThe wheels need to be removed to check the
brake pads. (See page 8-64.)
U2LB60E0.book Page 46 Thursday, March 21, 2013 10:20 AM
Page 146 of 174

8-54
8
EBU28832Checking and lubricating the brake
pedal The operation of the brake pedal should be
checked before each ride, and the pedal pivot
should be lubricated if necessary.TIPTo access the brake pedal pivot, remove panel G.
(See page 8-10.)
EBU24963Checking the wheel hub bearings The front and rear wheel hub bearings must be
checked at the intervals specified in the periodic
maintenance and lubrication chart. If there is play
in a wheel hub or if a wheel does not turn smoothly,
have a Yamaha dealer check the wheel hub bear-
ings.EBU25022Checking the stabilizer bushes The stabilizer bushes must be checked for cracks
or damage at the intervals specified in the periodic
maintenance and lubrication chart.
Have a Yamaha dealer replace the stabilizer bush-
es if necessary.
Recommended lubricant:
Lithium-soap-based grease
U2LB60E0.book Page 54 Thursday, March 21, 2013 10:20 AM
Page 152 of 174
8-60
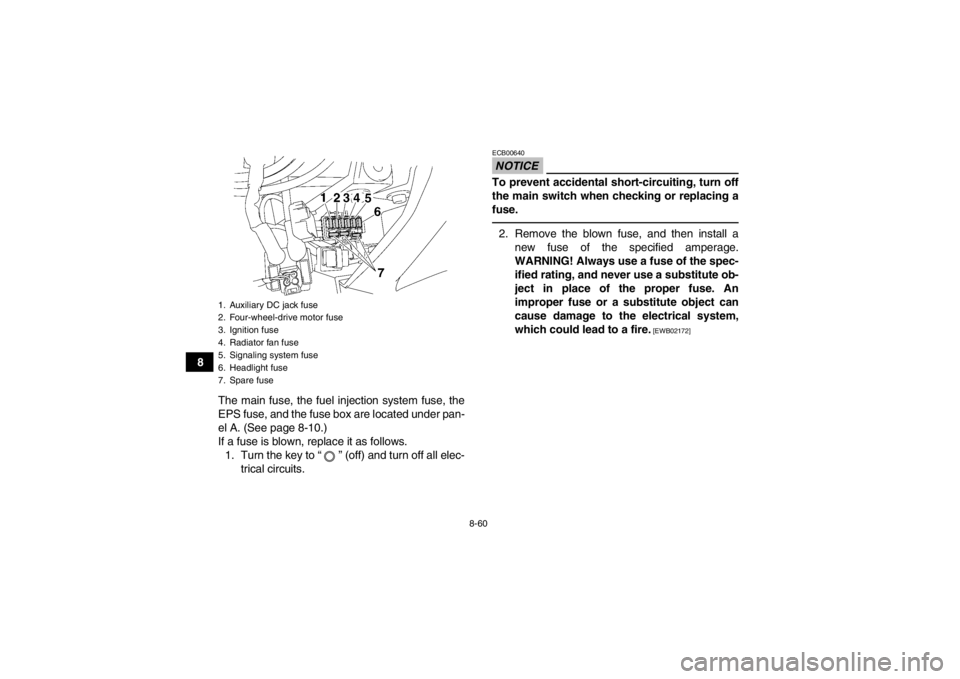
8The main fuse, the fuel injection system fuse, the
EPS fuse, and the fuse box are located under pan-
el A. (See page 8-10.)
If a fuse is blown, replace it as follows.1. Turn the key to “ ” (off) and turn off all elec- trical circuits.
NOTICEECB00640To prevent accidental short-circuiting, turn off
the main switch when checking or replacing a
fuse.2. Remove the blown fuse, and then install anew fuse of the specified amperage.
WARNING! Always use a fuse of the spec-
ified rating, and never use a substitute ob-
ject in place of the proper fuse. An
improper fuse or a substitute object can
cause damage to the electrical system,
which could lead to a fire.
[EWB02172]
1. Auxiliary DC jack fuse
2. Four-wheel-drive motor fuse
3. Ignition fuse
4. Radiator fan fuse
5. Signaling system fuse
6. Headlight fuse
7. Spare fuseU2LB60E0.book Page 60 Thursday, March 21, 2013 10:20 AM
Page 153 of 174
8-61
8
3. Turn the key to “ ” (on) and turn on the elec- trical circuits to check if the devices operate.
4. If the fuse immediately blows again, have a Yamaha dealer check the electrical system.
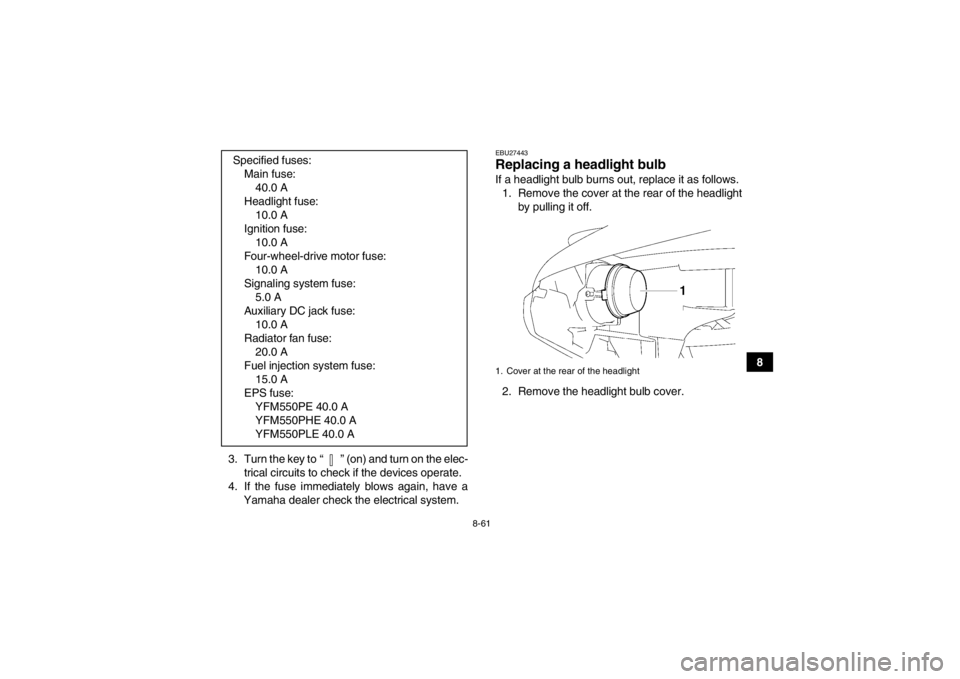
EBU27443Replacing a headlight bulb If a headlight bulb burns out, replace it as follows.1. Remove the cover at the rear of the headlight by pulling it off.
2. Remove the headlight bulb cover.
Specified fuses:
Main fuse:40.0 A
Headlight fuse: 10.0 A
Ignition fuse: 10.0 A
Four-wheel-drive motor fuse: 10.0 A
Signaling system fuse: 5.0 A
Auxiliary DC jack fuse: 10.0 A
Radiator fan fuse: 20.0 A
Fuel injection system fuse: 15.0 A
EPS fuse: YFM550PE 40.0 A
YFM550PHE 40.0 A
YFM550PLE 40.0 A1. Cover at the rear of the headlight
U2LB60E0.book Page 61 Thursday, March 21, 2013 10:20 AM
Page 156 of 174

8-64
83. Remove the burnt-out bulb by pushing it in
and turning it counterclockwise. 4. Insert a new bulb into the bulb holder, push it
in, and then turn it clockwise until it stops.
5. Install the bulb holder (together with the bulb) by turning it clockwise.
6. Install the panel.
EBU25651Removing a wheel 1. Place the ATV on a level surface.
2. Loosen the wheel nuts.
3. Elevate the ATV and place a suitable stand under the frame.
4. Remove the nuts from the wheel.
5. Remove the wheel.
1. Tail/brake light bulb holder
1. Tail/brake light bulb
1. Wheel nut
U2LB60E0.book Page 64 Thursday, March 21, 2013 10:20 AM