display YAMAHA GRIZZLY 660 2004 Owners Manual
[x] Cancel search | Manufacturer: YAMAHA, Model Year: 2004, Model line: GRIZZLY 660, Model: YAMAHA GRIZZLY 660 2004Pages: 444, PDF Size: 17.76 MB
Page 66 of 444
4-3
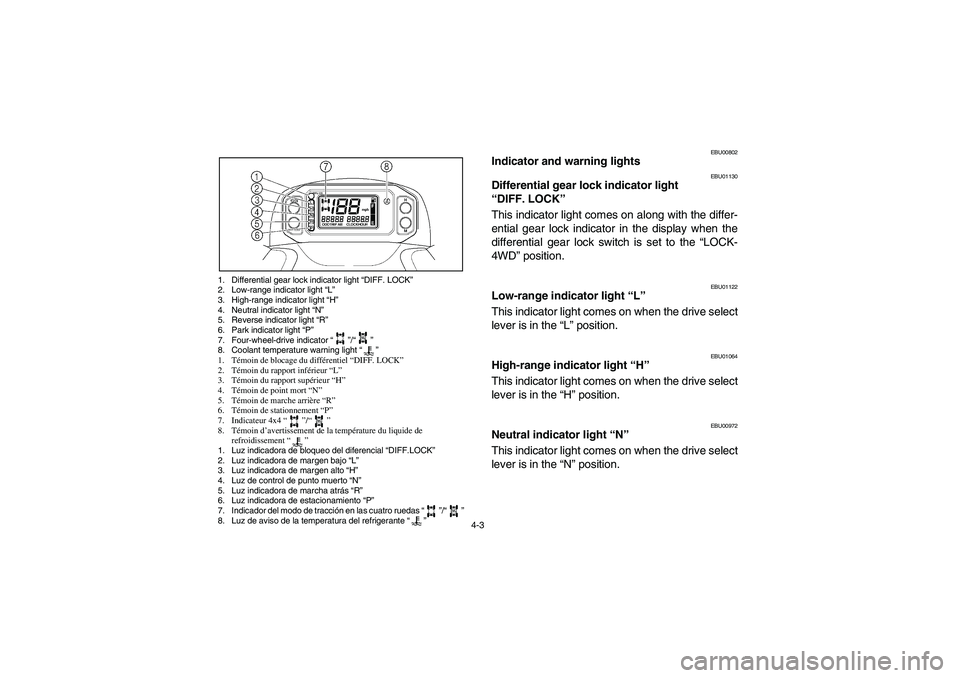
1. Differential gear lock indicator light “DIFF. LOCK”
2. Low-range indicator light “L”
3. High-range indicator light “H”
4. Neutral indicator light “N”
5. Reverse indicator light “R”
6. Park indicator light “P”
7. Four-wheel-drive indicator “”/“”
8. Coolant temperature warning light “”
1. Témoin de blocage du différentiel “DIFF. LOCK”
2. Témoin du rapport inférieur “L”
3. Témoin du rapport supérieur “H”
4. Témoin de point mort “N”
5. Témoin de marche arrière “R”
6. Témoin de stationnement “P”
7. Indicateur 4x4 “”/“”
8. Témoin d’avertissement de la température du liquide de
refroidissement “”
1. Luz indicadora de bloqueo del diferencial “DIFF.LOCK”
2. Luz indicadora de margen bajo “L”
3. Luz indicadora de margen alto “H”
4. Luz de control de punto muerto “N”
5. Luz indicadora de marcha atrás “R”
6. Luz indicadora de estacionamiento “P”
7. Indicador del modo de tracción en las cuatro ruedas “”/“”
8. Luz de aviso de la temperatura del refrigerante “”
DIFF.
LOCK
DIFF.
LOCK
DIFF.
LOCK
EBU00802
Indicator and warning lights
EBU01130
Differential gear lock indicator light
“DIFF. LOCK”
This indicator light comes on along with the differ-
ential gear lock indicator in the display when the
differential gear lock switch is set to the “LOCK-
4WD” position.
EBU01122
Low-range indicator light “L”
This indicator light comes on when the drive select
lever is in the “L” position.
EBU01064
High-range indicator light “H”
This indicator light comes on when the drive select
lever is in the “H” position.
EBU00972
Neutral indicator light “N”
This indicator light comes on when the drive select
lever is in the “N” position.
EE.book Page 3 Tuesday, April 1, 2003 12:23 PM
Page 74 of 444
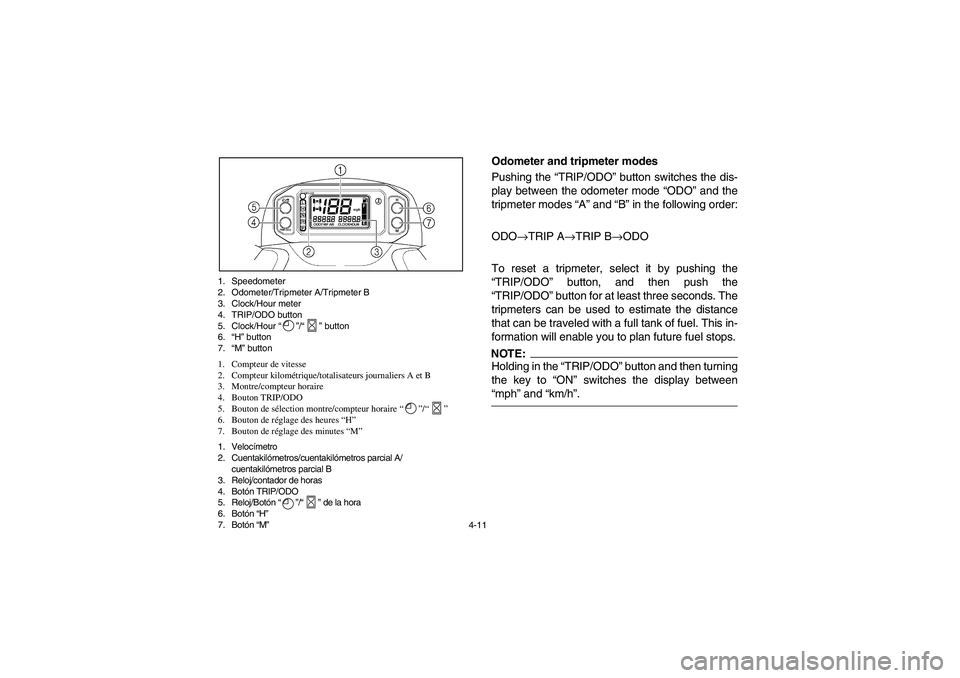
4-11 1. Speedometer
2. Odometer/Tripmeter A/Tripmeter B
3. Clock/Hour meter
4. TRIP/ODO button
5. Clock/Hour “”/“” button
6.“H” button
7.“M” button
1. Compteur de vitesse
2. Compteur kilométrique/totalisateurs journaliers A et B
3. Montre/compteur horaire
4. Bouton TRIP/ODO
5. Bouton de sélection montre/compteur horaire “”/“”
6. Bouton de réglage des heures “H”
7. Bouton de réglage des minutes “M”
1. Velocímetro
2. Cuentakilómetros/cuentakilómetros parcial A/
cuentakilómetros parcial B
3. Reloj/contador de horas
4. Botón TRIP/ODO
5. Reloj/Botón “”/“” de la hora
6. Botón “H”
7. Botón “M”
Odometer and tripmeter modes
Pushing the “TRIP/ODO” button switches the dis-
play between the odometer mode “ODO” and the
tripmeter modes “A” and “B” in the following order:
ODO
→TRIP A
→TRIP B
→ODO
To reset a tripmeter, select it by pushing the
“TRIP/ODO” button, and then push the
“TRIP/ODO” button for at least three seconds. The
tripmeters can be used to estimate the distance
that can be traveled with a full tank of fuel. This in-
formation will enable you to plan future fuel stops.NOTE:_ Holding in the “TRIP/ODO” button and then turning
the key to “ON” switches the display between
“mph” and “km/h”. _
EE.book Page 11 Tuesday, April 1, 2003 12:23 PM
Page 76 of 444
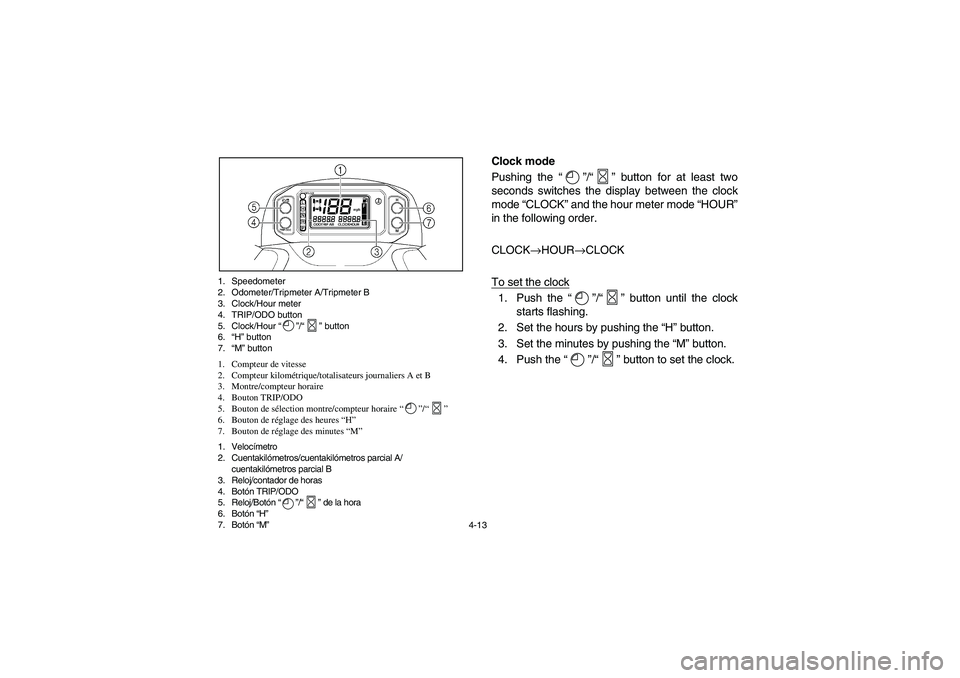
4-13 1. Speedometer
2. Odometer/Tripmeter A/Tripmeter B
3. Clock/Hour meter
4. TRIP/ODO button
5. Clock/Hour “”/“” button
6.“H” button
7.“M” button
1. Compteur de vitesse
2. Compteur kilométrique/totalisateurs journaliers A et B
3. Montre/compteur horaire
4. Bouton TRIP/ODO
5. Bouton de sélection montre/compteur horaire “”/“”
6. Bouton de réglage des heures “H”
7. Bouton de réglage des minutes “M”
1. Velocímetro
2. Cuentakilómetros/cuentakilómetros parcial A/
cuentakilómetros parcial B
3. Reloj/contador de horas
4. Botón TRIP/ODO
5. Reloj/Botón “”/“” de la hora
6. Botón “H”
7. Botón “M”
Clock mode
Pushing the “”/“” button for at least two
seconds switches the display between the clock
mode “CLOCK” and the hour meter mode “HOUR”
in the following order.
CLOCK
→HOUR
→CLOCK
To set the clock1. Push the “”/“” button until the clock
starts flashing.
2. Set the hours by pushing the “H” button.
3. Set the minutes by pushing the “M” button.
4. Push the “”/“” button to set the clock.
EE.book Page 13 Tuesday, April 1, 2003 12:23 PM
Page 78 of 444
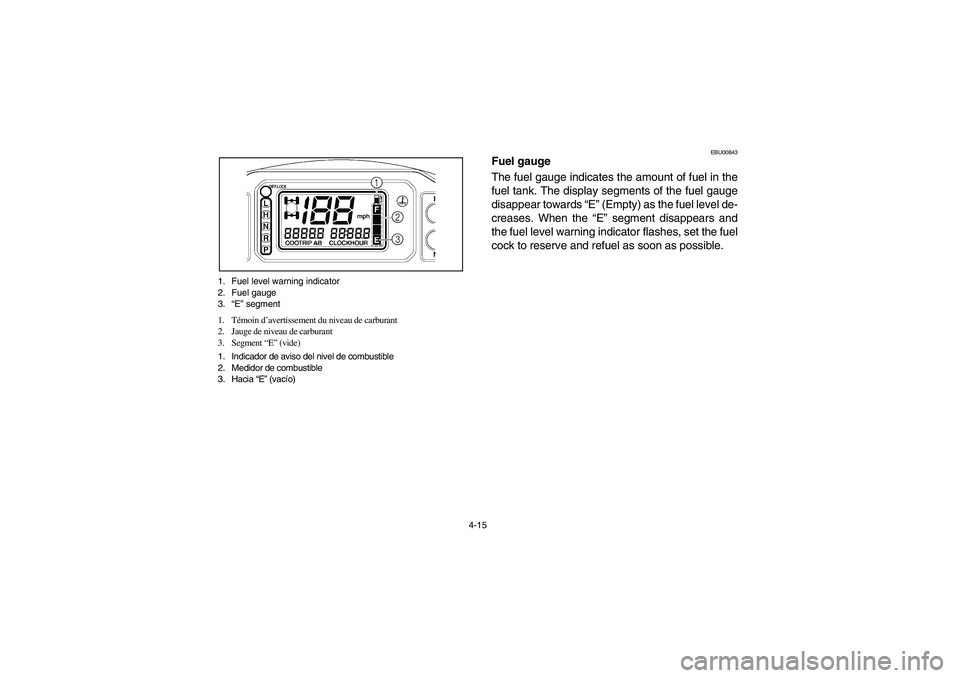
4-15 1. Fuel level warning indicator
2. Fuel gauge
3.“E” segment
1. Témoin d’avertissement du niveau de carburant
2. Jauge de niveau de carburant
3. Segment “E” (vide)
1. Indicador de aviso del nivel de combustible
2. Medidor de combustible
3. Hacia “E” (vacío)
EBU00843
Fuel gauge
The fuel gauge indicates the amount of fuel in the
fuel tank. The display segments of the fuel gauge
disappear towards “E” (Empty) as the fuel level de-
creases. When the “E” segment disappears and
the fuel level warning indicator flashes, set the fuel
cock to reserve and refuel as soon as possible.
EE.book Page 15 Tuesday, April 1, 2003 12:23 PM
Page 92 of 444
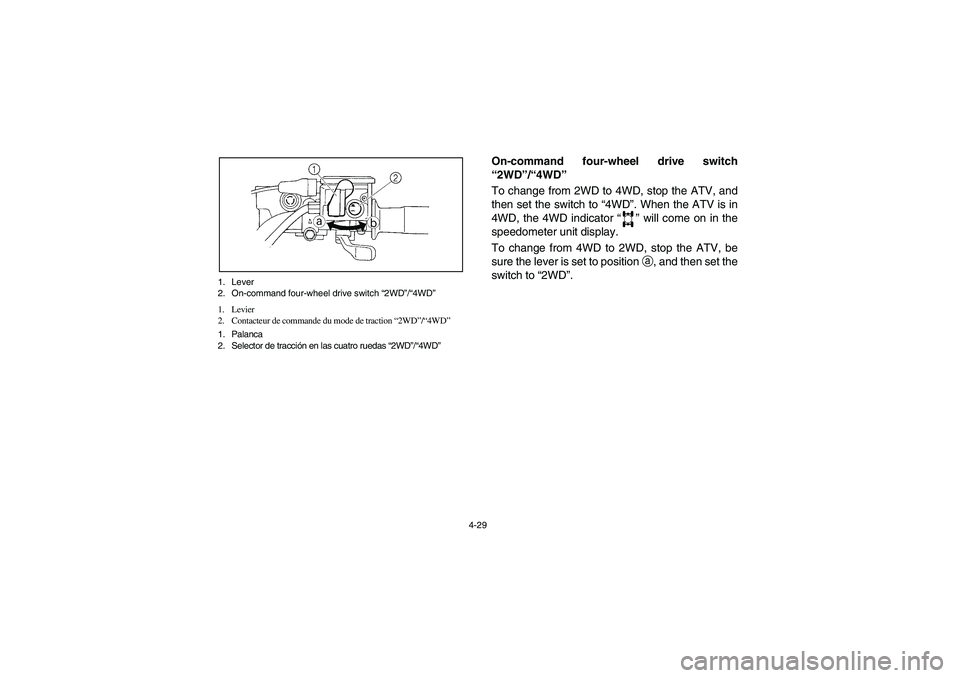
4-29 1. Lever
2. On-command four-wheel drive switch “2WD”/“4WD”
1. Levier
2. Contacteur de commande du mode de traction “2WD”/“4WD”
1. Palanca
2. Selector de tracción en las cuatro ruedas “2WD”/“4WD”
On-command four-wheel drive switch
“2WD”/“4WD”
To change from 2WD to 4WD, stop the ATV, and
then set the switch to “4WD”. When the ATV is in
4WD, the 4WD indicator “” will come on in the
speedometer unit display.
To change from 4WD to 2WD, stop the ATV, be
sure the lever is set to position
a, and then set the
switch to “2WD”.
EE.book Page 29 Tuesday, April 1, 2003 12:23 PM
Page 94 of 444
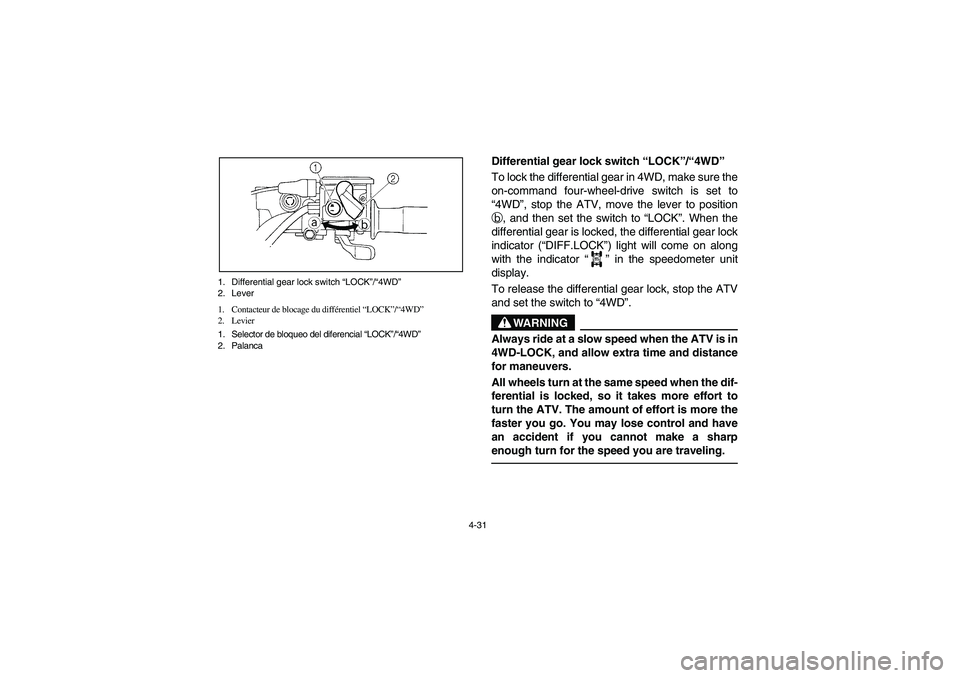
4-31 1. Differential gear lock switch “LOCK”/“4WD”
2. Lever
1. Contacteur de blocage du différentiel “LOCK”/“4WD”
2. Levier
1. Selector de bloqueo del diferencial “LOCK”/“4WD”
2. Palanca
Differential gear lock switch “LOCK”/“4WD”
To lock the differential gear in 4WD, make sure the
on-command four-wheel-drive switch is set to
“4WD”, stop the ATV, move the lever to position
b, and then set the switch to “LOCK”. When the
differential gear is locked, the differential gear lock
indicator (“DIFF.LOCK”) light will come on along
with the indicator “” in the speedometer unit
display.
To release the differential gear lock, stop the ATV
and set the switch to “4WD”.
WARNING
_ Always ride at a slow speed when the ATV is in
4WD-LOCK, and allow extra time and distance
for maneuvers.
All wheels turn at the same speed when the dif-
ferential is locked, so it takes more effort to
turn the ATV. The amount of effort is more the
faster you go. You may lose control and have
an accident if you cannot make a sharp
enough turn for the speed you are traveling. _
DIFF.
LOCK
EE.book Page 31 Tuesday, April 1, 2003 12:23 PM