oil YAMAHA GRIZZLY 700 2020 User Guide
[x] Cancel search | Manufacturer: YAMAHA, Model Year: 2020, Model line: GRIZZLY 700, Model: YAMAHA GRIZZLY 700 2020Pages: 182, PDF Size: 7.18 MB
Page 125 of 182
9-22
9
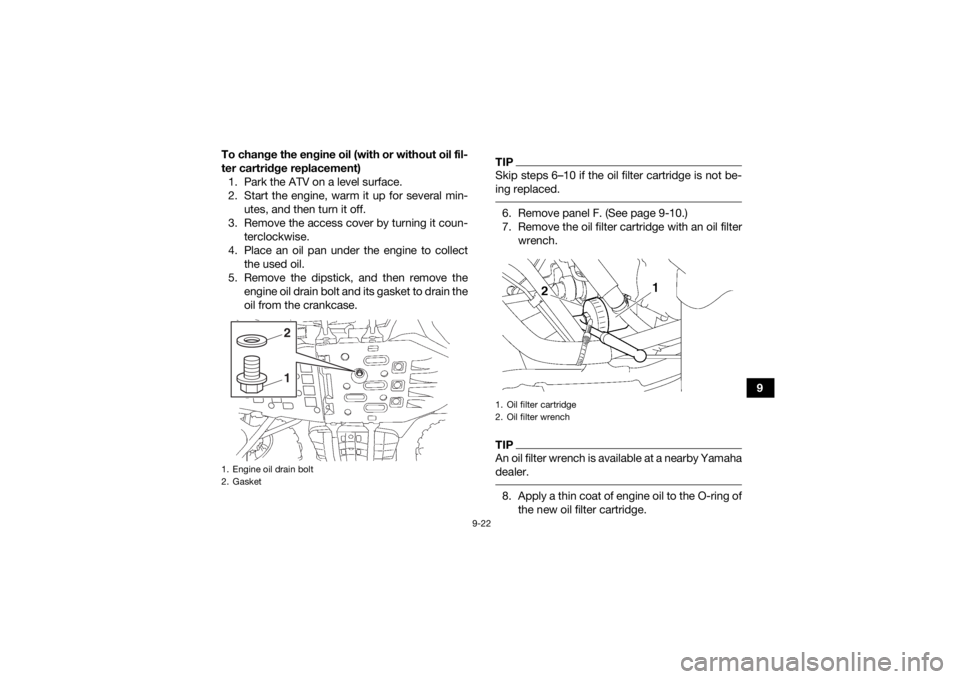
To change the engine oil (with or without oil fil-
ter cartridge replacement)
1. Park the ATV on a level surface.
2. Start the engine, warm it up for several min- utes, and then turn it off.
3. Remove the access cover by turning it coun- terclockwise.
4. Place an oil pan under the engine to collect the used oil.
5. Remove the dipstick, and then remove the engine oil drain bolt and its gasket to drain the
oil from the crankcase.
TIPSkip steps 6–10 if the oil filter cartridge is not be-
ing replaced. 6. Remove panel F. (See page 9-10.)
7. Remove the oil filter cartridge with an oil filterwrench.TIPAn oil filter wrench is available at a nearby Yamaha
dealer. 8. Apply a thin coat of engine oil to the O-ring ofthe new oil filter cartridge.
1. Engine oil drain bolt
2. Gasket
12
1. Oil filter cartridge
2. Oil filter wrench
UBDE60E0.book Page 22 Monday, April 22, 2019 4:12 PM
Page 126 of 182
9-23
9
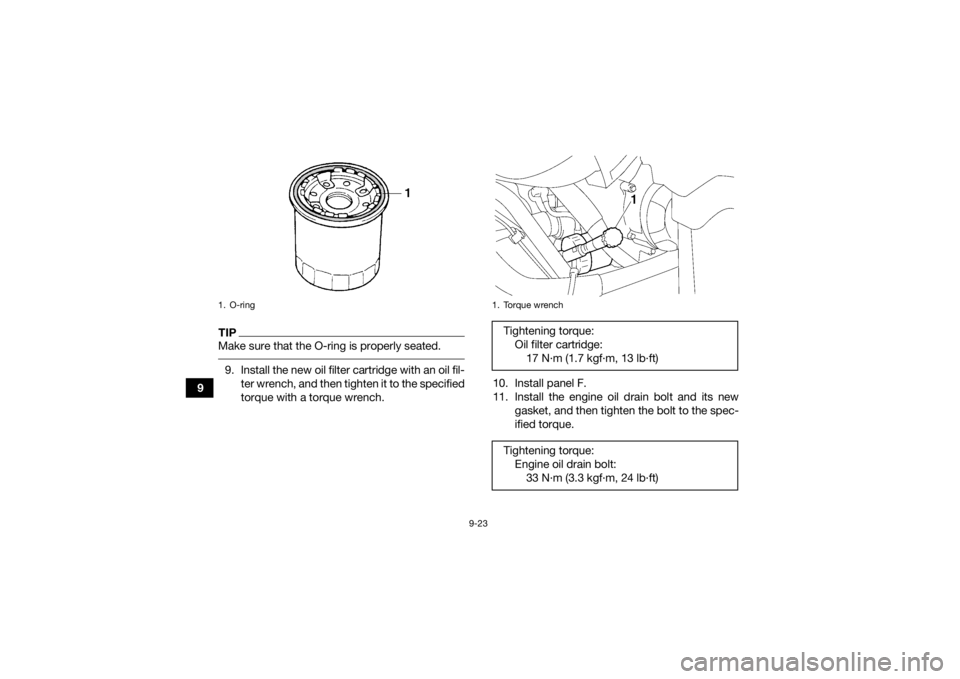
TIPMake sure that the O-ring is properly seated. 9. Install the new oil filter cartridge with an oil fil-ter wrench, and then tighten it to the specified
torque with a torque wrench. 10. Install panel F.
11. Install the engine oil drain bolt and its new
gasket, and then tighten the bolt to the spec-
ified torque.1. O-ring
1. Torque wrenchTightening torque:Oil filter cartridge:17 N·m (1.7 kgf·m, 13 lb·ft)
Tightening torque: Engine oil drain bolt:33 N·m (3.3 kgf·m, 24 lb·ft)
UBDE60E0.book Page 23 Monday, April 22, 2019 4:12 PM
Page 127 of 182
9-24
9
12. Refill with the specified amount of the recom-
mended engine oil, and then insert the dip-
stick completely into the oil filler hole.
TIPBe sure to wipe off spilled oil on any parts after the
engine and exhaust system have cooled down. NOTICEECB00301In order to prevent clutch slippage (since the
engine oil also lubricates the clutch), do not
mix any chemical additives. Do not use oils
with a diesel specification of “CD” or oils of
a higher quality than specified. In addition,
do not use oils labeled “ENERGY CONSERV-
ING II” or higher.
Make sure that no foreign material enters the
crankcase.
13. Start the engine, and then let it idle for several
minutes while checking it for oil leakage. If oil
is leaking, immediately turn the engine off and
check for the cause.
14. Turn the engine off, wait at least ten minutes, and then check the oil level and correct it if
necessary.
15. Install the access cover by turning it clock- wise.EBU38620Why YamalubeYAMALUBE oil is a Genuine YAMAHA Part born ofthe engineers’ passion and belief that engine oil is
an important liquid engine component. We form
teams of specialists in the fields of mechanical en-
gineering, chemistry, electronics and track test-
ing, and have them develop the engine together
with the oil it will use. Yamalube oils take full ad-
vantage of the base oil’s qualities and blend in the
ideal balance of additives to make sure the final oil
clears our performance standards. Thus,
Yamalube mineral, semisynthetic and synthetic oils have their own distinct characters and value.
Recommended oil:
See page 11-1.
Oil quantity: Without oil filter cartridge replacement:2.00 L (2.11 US qt, 1.76 Imp.qt)
With oil filter cartridge replacement: 2.10 L (2.22 US qt, 1.85 Imp.qt)
UBDE60E0.book Page 24 Monday, April 22, 2019 4:12 PM
Page 128 of 182
9-25
9Yamaha’s experience gained over many years of
research and development into oil since the
1960’s helps make Yamalube the best choice for
your Yamaha engine.
EBU27308Final gear oilThe final gear case must be checked for oil leak-
age before each ride. If any leakage is found, have
a Yamaha dealer check and repair the ATV. In ad-
dition, the final gear oil level must be checked and
the oil changed as follows at the intervals speci-
fied in the periodic maintenance and lubrication
chart.
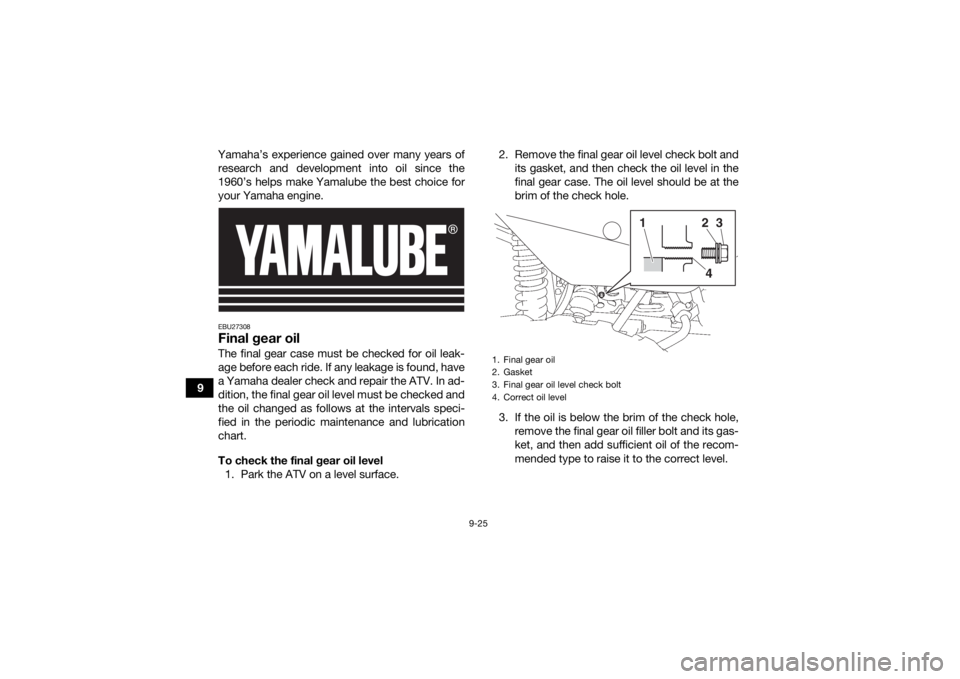
To check the final gear oil level 1. Park the ATV on a level surface. 2. Remove the final gear oil level check bolt and
its gasket, and then check the oil level in the
final gear case. The oil level should be at the
brim of the check hole.
3. If the oil is below the brim of the check hole, remove the final gear oil filler bolt and its gas-
ket, and then add sufficient oil of the recom-
mended type to raise it to the correct level.
1. Final gear oil
2. Gasket
3. Final gear oil level check bolt
4. Correct oil level
1
243
UBDE60E0.book Page 25 Monday, April 22, 2019 4:12 PM
Page 129 of 182
9-26
9
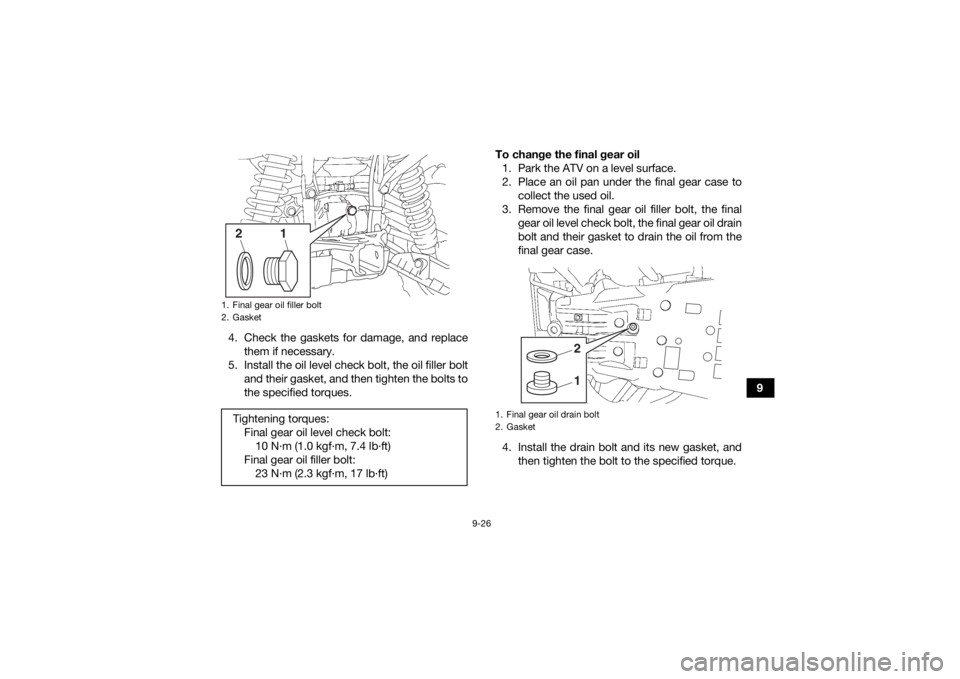
4. Check the gaskets for damage, and replace
them if necessary.
5. Install the oil level check bolt, the oil filler bolt and their gasket, and then tighten the bolts to
the specified torques. To change the final gear oil
1. Park the ATV on a level surface.
2. Place an oil pan under the final gear case to collect the used oil.
3. Remove the final gear oil filler bolt, the final gear oil level check bolt, the final gear oil drain
bolt and their gasket to drain the oil from the
final gear case.
4. Install the drain bolt and its new gasket, and then tighten the bolt to the specified torque.
1. Final gear oil filler bolt
2. GasketTightening torques:Final gear oil level check bolt:10 N·m (1.0 kgf·m, 7.4 lb·ft)
Final gear oil filler bolt: 23 N·m (2.3 kgf·m, 17 lb·ft)
1
2
1. Final gear oil drain bolt
2. Gasket
12
UBDE60E0.book Page 26 Monday, April 22, 2019 4:12 PM
Page 130 of 182
9-27
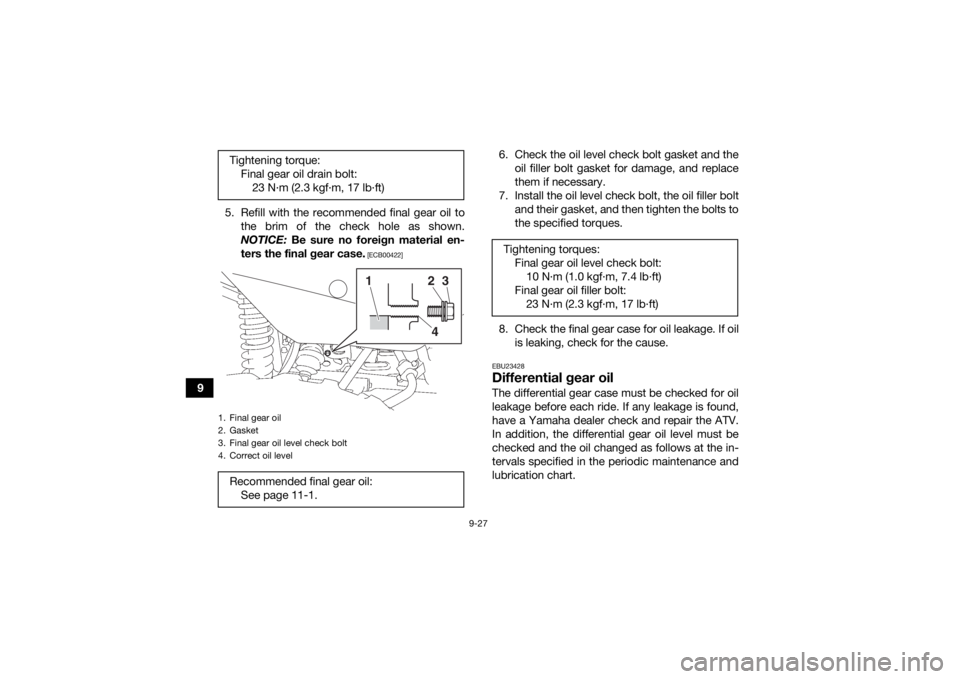
95. Refill with the recommended final gear oil to
the brim of the check hole as shown.
NOTICE: Be sure no foreign material en-
ters the final gear case.
[ECB00422]
6. Check the oil level check bolt gasket and the oil filler bolt gasket for damage, and replace
them if necessary.
7. Install the oil level check bolt, the oil filler bolt and their gasket, and then tighten the bolts to
the specified torques.
8. Check the final gear case for oil leakage. If oil is leaking, check for the cause.EBU23428Differential gear oilThe differential gear case must be checked for oil
leakage before each ride. If any leakage is found,
have a Yamaha dealer check and repair the ATV.
In addition, the differential gear oil level must be
checked and the oil changed as follows at the in-
tervals specified in the periodic maintenance and
lubrication chart.
Tightening torque:
Final gear oil drain bolt:23 N·m (2.3 kgf·m, 17 lb·ft)
1. Final gear oil
2. Gasket
3. Final gear oil level check bolt
4. Correct oil levelRecommended final gear oil:See page 11-1.
1
243
Tightening torques:Final gear oil level check bolt:10 N·m (1.0 kgf·m, 7.4 lb·ft)
Final gear oil filler bolt: 23 N·m (2.3 kgf·m, 17 lb·ft)
UBDE60E0.book Page 27 Monday, April 22, 2019 4:12 PM
Page 131 of 182
9-28
9
To check the differential gear oil level
1. Park the ATV on a level surface.
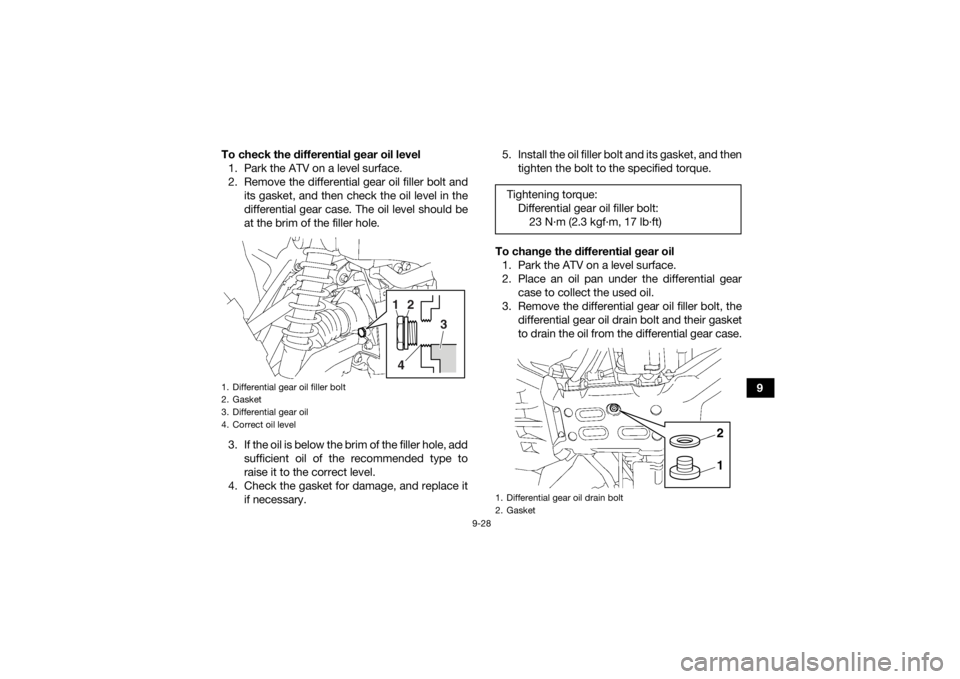
2. Remove the differential gear oil filler bolt and its gasket, and then check the oil level in the
differential gear case. The oil level should be
at the brim of the filler hole.
3. If the oil is below the brim of the filler hole, add sufficient oil of the recommended type to
raise it to the correct level.
4. Check the gasket for damage, and replace it if necessary. 5. Install the oil filler bolt and its gasket, and then
tighten the bolt to the specified torque.
To change the differential gear oil 1. Park the ATV on a level surface.
2. Place an oil pan under the differential gear case to collect the used oil.
3. Remove the differential gear oil filler bolt, the differential gear oil drain bolt and their gasket
to drain the oil from the differential gear case.
1. Differential gear oil filler bolt
2. Gasket
3. Differential gear oil
4. Correct oil level
1
2
3
4
Tightening torque: Differential gear oil filler bolt:23 N·m (2.3 kgf·m, 17 lb·ft)1. Differential gear oil drain bolt
2. Gasket
12
UBDE60E0.book Page 28 Monday, April 22, 2019 4:12 PM
Page 132 of 182
9-29
94. Install the drain bolt and its new gasket, and
then tighten the bolt to the specified torque.
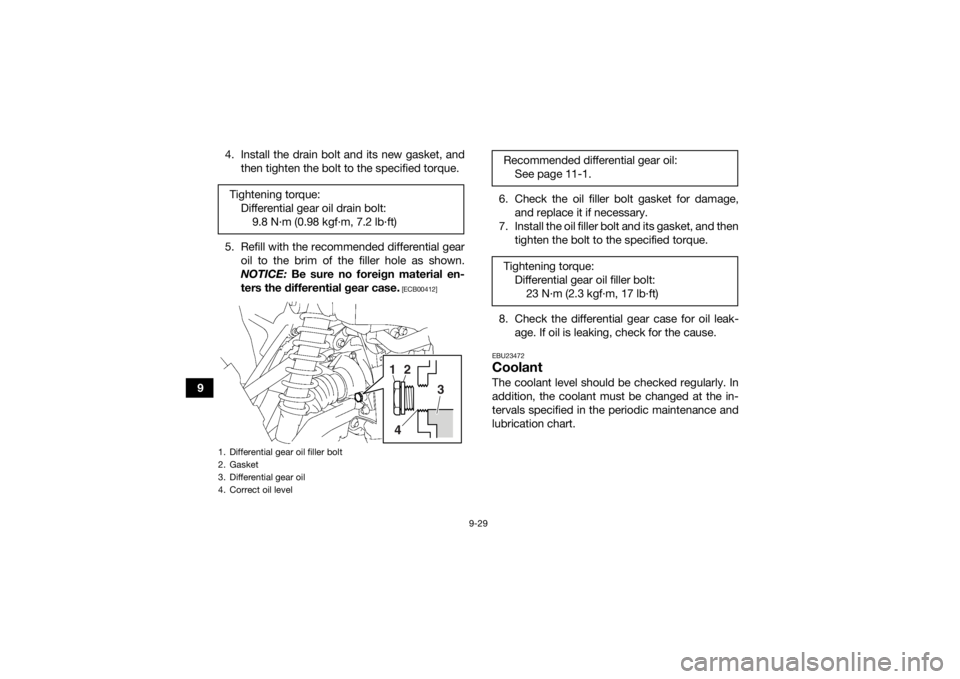
5. Refill with the recommended differential gear oil to the brim of the filler hole as shown.
NOTICE: Be sure no foreign material en-
ters the differential gear case.
[ECB00412]
6. Check the oil filler bolt gasket for damage, and replace it if necessary.
7. Install the oil filler bolt and its gasket, and then tighten the bolt to the specified torque.
8. Check the differential gear case for oil leak- age. If oil is leaking, check for the cause.EBU23472CoolantThe coolant level should be checked regularly. In
addition, the coolant must be changed at the in-
tervals specified in the periodic maintenance and
lubrication chart.
Tightening torque:
Differential gear oil drain bolt:9.8 N·m (0.98 kgf·m, 7.2 lb·ft)
1. Differential gear oil filler bolt
2. Gasket
3. Differential gear oil
4. Correct oil level
1
2
3
4
Recommended differential gear oil: See page 11-1.
Tightening torque: Differential gear oil filler bolt:23 N·m (2.3 kgf·m, 17 lb·ft)
UBDE60E0.book Page 29 Monday, April 22, 2019 4:12 PM
Page 142 of 182
9-39
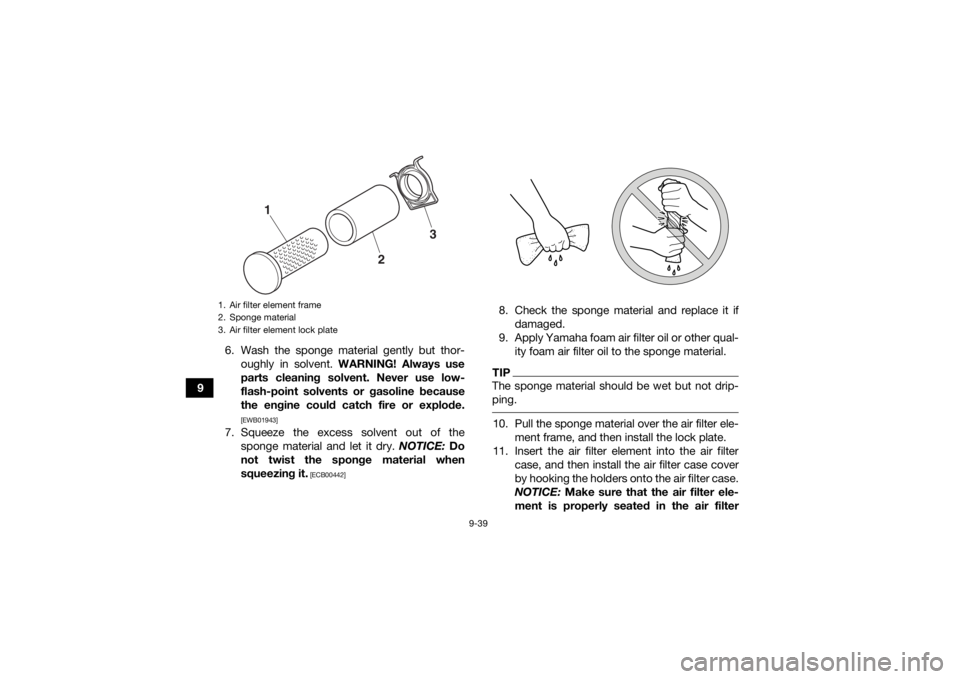
96. Wash the sponge material gently but thor-
oughly in solvent. WARNING! Always use
parts cleaning solvent. Never use low-
flash-point solvents or gasoline because
the engine could catch fire or explode.
[EWB01943]
7. Squeeze the excess solvent out of the sponge material and let it dry. NOTICE: Do
not twist the sponge material when
squeezing it.
[ECB00442]
8. Check the sponge material and replace it if damaged.
9. Apply Yamaha foam air filter oil or other qual- ity foam air filter oil to the sponge material.TIPThe sponge material should be wet but not drip-
ping. 10. Pull the sponge material over the air filter ele- ment frame, and then install the lock plate.
11. Insert the air filter element into the air filter case, and then install the air filter case cover
by hooking the holders onto the air filter case.
NOTICE: Make sure that the air filter ele-
ment is properly seated in the air filter
1. Air filter element frame
2. Sponge material
3. Air filter element lock plate
3
2
1
UBDE60E0.book Page 39 Monday, April 22, 2019 4:12 PM
Page 148 of 182
9-45
9brake pads for wear and the brake system for
leakage. If the brake fluid level suddenly goes
down, have a Yamaha dealer check the brake sys-
tem before further riding.
WARNING
EWB02721Improper maintenance can result in loss of
braking ability. Observe these precautions:
Insufficient brake fluid may allow air to enter
the brake system, reducing braking perfor-
mance.
Clean the filler cap before removing. Use
only DOT 4 brake fluid from a sealed contain-
er.
Use only the specified brake fluid; otherwise,
the rubber seals may deteriorate, causing
leakage.
Refill with the same type of brake fluid. Add-
ing a brake fluid other than DOT 4 may result
in a harmful chemical reaction.
Be careful that water does not enter the
brake fluid reservoir when refilling. Water will
significantly lower the boiling point of the flu-
id and may result in vapor lock.
EBU24293Changing the brake fluidHave a Yamaha dealer change the brake fluid at
the intervals specified in the periodic maintenance
and lubrication chart. In addition, have the oil seals
of the master cylinders and calipers as well as the
brake hoses replaced at the intervals listed below
or whenever they are damaged or leaking.
Oil seals: Replace every two years.
Brake hoses: Replace every four years.
UBDE60E0.book Page 45 Monday, April 22, 2019 4:12 PM