maintenance YAMAHA GRIZZLY 700 2021 User Guide
[x] Cancel search | Manufacturer: YAMAHA, Model Year: 2021, Model line: GRIZZLY 700, Model: YAMAHA GRIZZLY 700 2021Pages: 178, PDF Size: 4.73 MB
Page 104 of 178
9-5
9
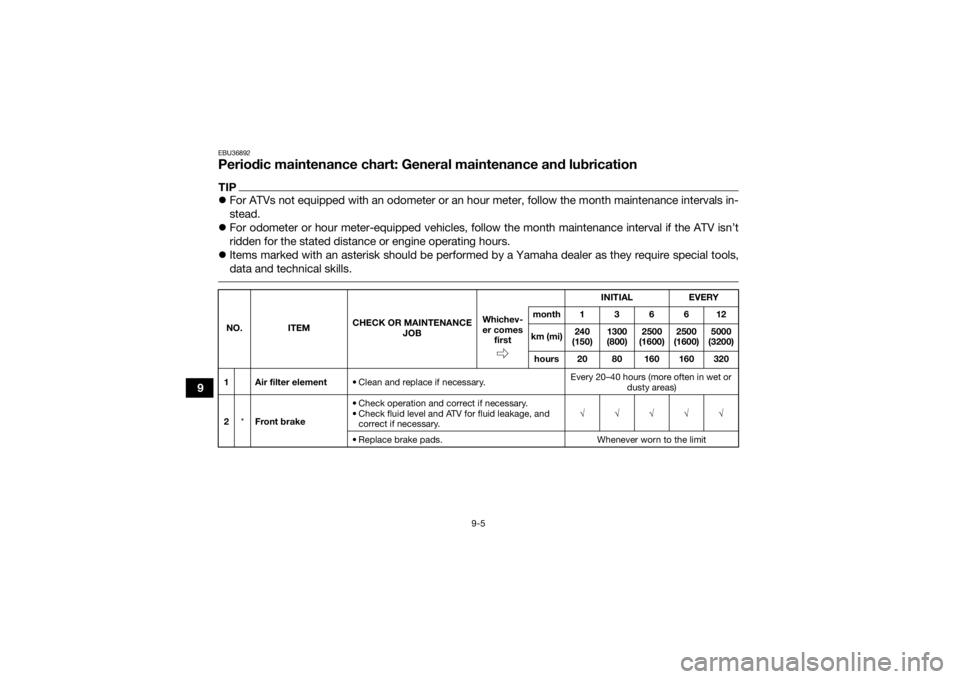
EBU36892Periodic maintenance chart: General maintenance and lubricationTIPFor ATVs not equipped with an odometer or an hour meter, follow the month maintenance intervals in-
stead.
For odometer or hour meter-equipped vehicles, follow the month maintenance interval if the ATV isn’t
ridden for the stated distance or engine operating hours.
Items marked with an asterisk should be performed by a Yamaha dealer as they require special tools,
data and technical skills. NO. ITEM CHECK OR MAINTENANCE
JOB INITIAL
EVERY
Whichev-
er comes first month136612
km (mi) 240
(150) 1300
(800) 2500
(1600) 2500
(1600) 5000
(3200)
hours 20 80 160 160 320
1 Air filter element • Clean and replace if necessary. Every 20–40 hours (more often in wet or
dusty areas)
2 *Front brake • Check operation and correct if necessary.
• Check fluid level and ATV for fluid leakage, and
correct if necessary. √√√√√
• Replace brake pads. Whenever worn to the limit
UBFE60E0.book Page 5 Tuesday, August 18, 2020 10:50 AM
Page 105 of 178
9-6
9
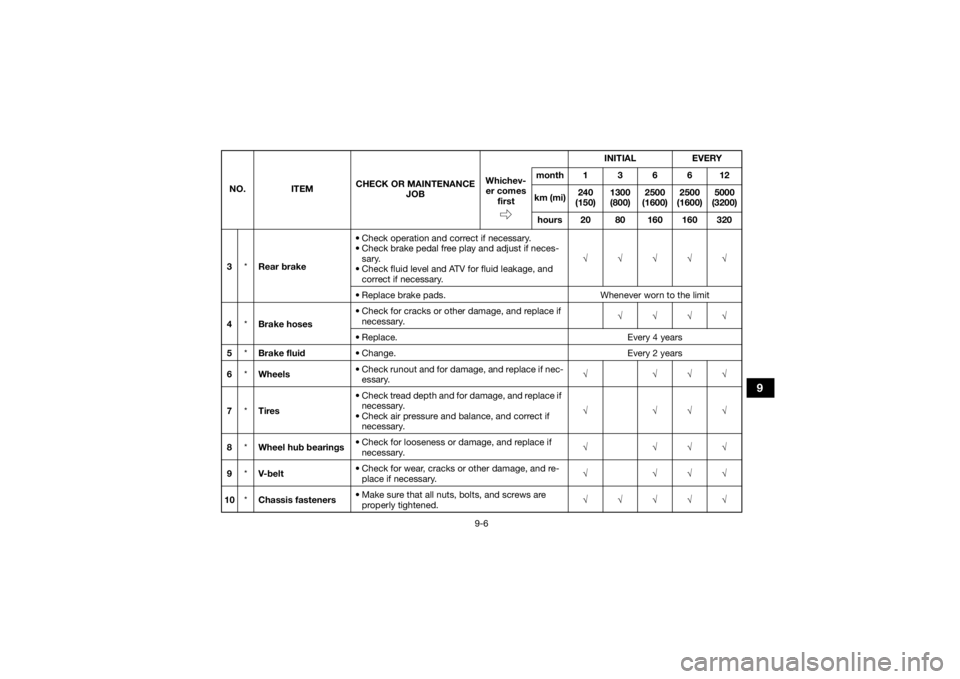
3*Rear brake • Check operation and correct if necessary.
• Check brake pedal free play and adjust if neces-
sary.
• Check fluid level and ATV for fluid leakage, and correct if necessary. √√√√√
• Replace brake pads. Whenever worn to the limit
4 *Brake hoses • Check for cracks or other damage, and replace if
necessary. √√√√
• Replace. Every 4 years
5 *Brake fluid • Change. Every 2 years
6 *Wheels • Check runout and for damage, and replace if nec-
essary. √ √√√
7 *Tires • Check tread depth and for damage, and replace if
necessary.
• Check air pressure and balance, and correct if necessary. √ √√√
8 *Wheel hub bearings • Check for looseness or damage, and replace if
necessary. √ √√√
9 *V- b e l t • Check for wear, cracks or other damage, and re-
place if necessary. √ √√√
10 *Chassis fasteners • Make sure that all nuts, bolts, and screws are
properly tightened. √√√√√
NO.
ITEM CHECK OR MAINTENANCE
JOB INITIAL
EVERY
Whichev- er comes first month136612
km (mi) 240
(150) 1300
(800) 2500
(1600) 2500
(1600) 5000
(3200)
hours 20 80 160 160 320
UBFE60E0.book Page 6 Tuesday, August 18, 2020 10:50 AM
Page 106 of 178
9-7
9
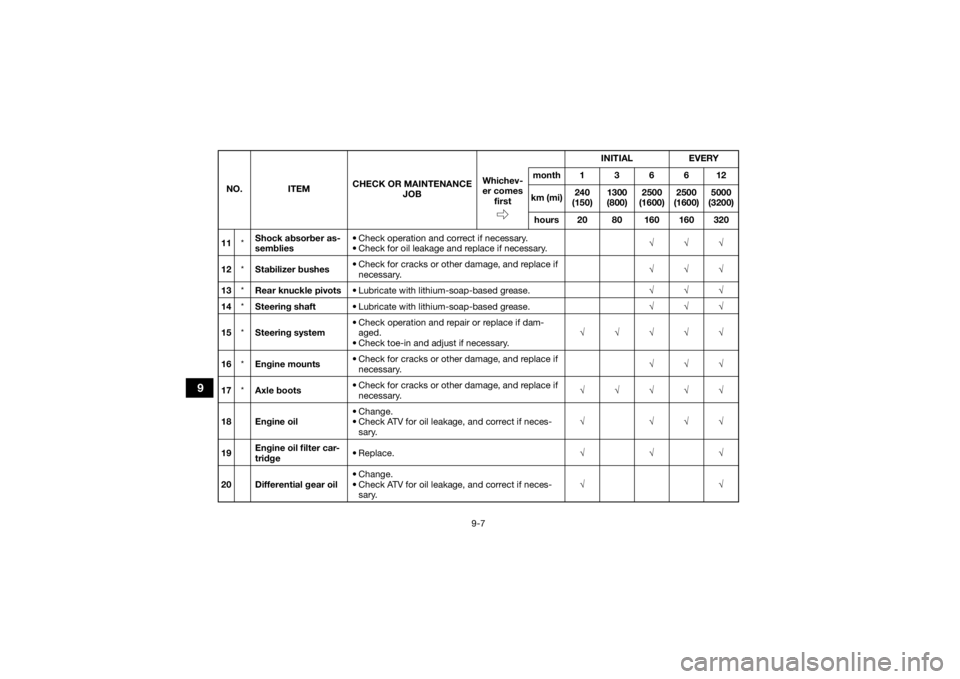
11*Shock absorber as-
semblies • Check operation and correct if necessary.
• Check for oil leakage and replace if necessary.
√√√
12 *Stabilizer bushes • Check for cracks or other damage, and replace if
necessary. √√√
13 *Rear knuckle pivots • Lubricate with lithium-soap-based grease. √√√
14 *Steering shaft • Lubricate with lithium-soap-based grease. √√√
15 *Steering system • Check operation and repair or replace if dam-
aged.
• Check toe-in and adjust if necessary. √√√√√
16 *Engine mounts • Check for cracks or other damage, and replace if
necessary. √√√
17 *Axle boots • Check for cracks or other damage, and replace if
necessary. √√√√√
18 Engine oil • Change.
• Check ATV for oil leakage, and correct if neces-
sary. √ √√√
19 Engine oil filter car-
tridge • Replace.
√√√
20 Differential gear oil • Change.
• Check ATV for oil leakage, and correct if neces-
sary. √√
NO.
ITEM CHECK OR MAINTENANCE
JOB INITIAL
EVERY
Whichev-
er comes first month136612
km (mi) 240
(150) 1300
(800) 2500
(1600) 2500
(1600) 5000
(3200)
hours 20 80 160 160 320UBFE60E0.book Page 7 Tuesday, August 18, 2020 10:50 AM
Page 107 of 178
9-8
9
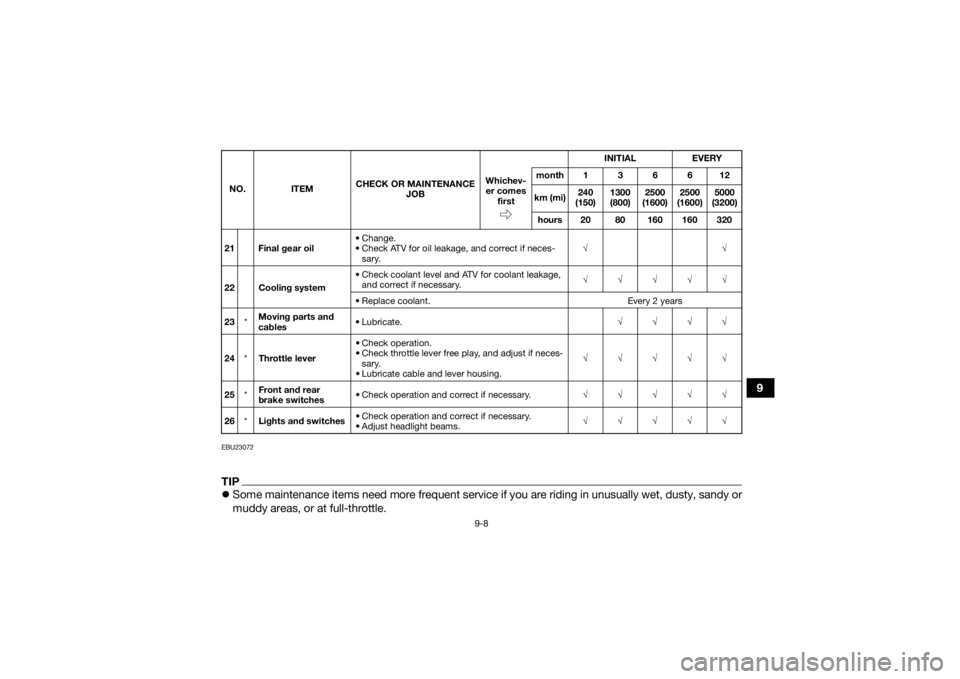
EBU23072TIPSome maintenance items need more frequent service if you are riding in unusually wet, dusty, sandy or
muddy areas, or at full-throttle.21 Final gear oil • Change.
• Check ATV for oil leakage, and correct if neces-
sary. √√
22 Cooling system • Check coolant level and ATV for coolant leakage,
and correct if necessary. √√√√√
• Replace coolant. Every 2 years
23 *Moving parts and
cables •Lubricate.
√√√√
24 *Throttle lever • Check operation.
• Check throttle lever free play, and adjust if neces-
sary.
• Lubricate cable and lever housing. √√√√√
25 *Front and rear
brake switches • Check operation and correct if necessary.
√√√√√
26 *Lights and switches • Check operation and correct if necessary.
• Adjust headlight beams. √√√√√
NO.
ITEM CHECK OR MAINTENANCE
JOB INITIAL
EVERY
Whichev- er comes first month136612
km (mi) 240
(150) 1300
(800) 2500
(1600) 2500
(1600) 5000
(3200)
hours 20 80 160 160 320UBFE60E0.book Page 8 Tuesday, August 18, 2020 10:50 AM
Page 109 of 178
9-10
9
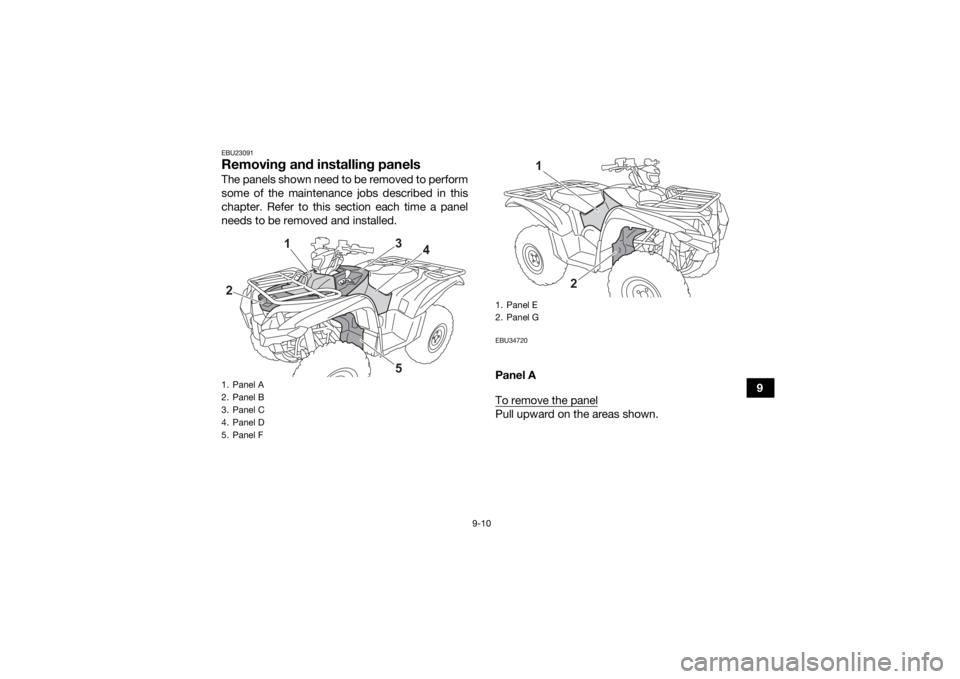
EBU23091Removing and installing panelsThe panels shown need to be removed to perform
some of the maintenance jobs described in this
chapter. Refer to this section each time a panel
needs to be removed and installed.
EBU34720Panel A
To remove the panelPull upward on the areas shown.
1. Panel A
2. Panel B
3. Panel C
4. Panel D
5. Panel F2
1
3
4
5
1. Panel b
2. Panel d
2
1
UBFE60E0.book Page 10 Tuesday, August 18, 2020 10:50 AM
Page 117 of 178
9-18
9
EBU38132Checking the spark plugThe spark plug is an important engine component,
which is easy to check. Since heat and deposits
will cause any spark plug to slowly erode, the
spark plug should be removed and checked in ac-
cordance with the periodic maintenance chart. In
addition, the condition of the spark plug can reveal
the condition of the engine.
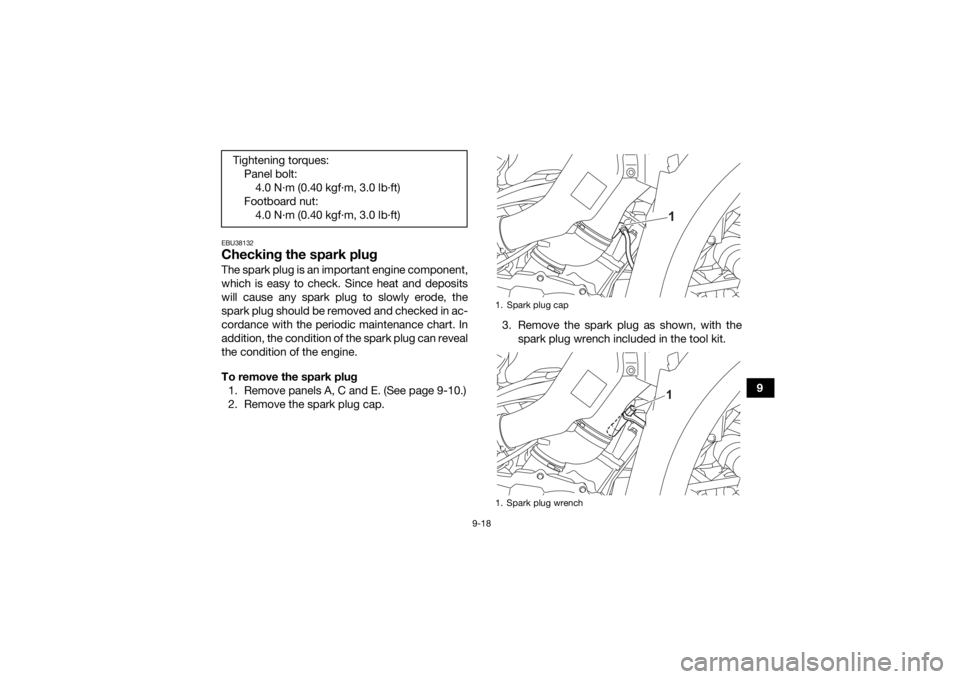
To remove the spark plug1. Remove panels A, C and E. (See page 9-10.)
2. Remove the spark plug cap. 3. Remove the spark plug as shown, with the
spark plug wrench included in the tool kit.
Tightening torques:
Panel bolt:4.0 N·m (0.40 kgf·m, 3.0 lb·ft)
Footboard nut: 4.0 N·m (0.40 kgf·m, 3.0 lb·ft)
1. Spark plug cap
1. Spark plug wrench
11
UBFE60E0.book Page 18 Tuesday, August 18, 2020 10:50 AM
Page 119 of 178
9-20
9
TIPIf a torque wrench is not available when installing
the spark plug, a good estimate of the correct
torque is 1/4–1/2 turn past finger tight. However,
the spark plug should be tightened to the speci-
fied torque as soon as possible. 3. Install the spark plug cap.
4. Install the panels.EBU2746DEngine oil and oil filter cartridgeThe engine oil level should be checked before
each ride. In addition, the oil must be changed and
the oil filter cartridge replaced at the intervals
specified in the periodic maintenance chart.
To check the engine oil level1. Park the ATV on a level surface.
2. Check the engine oil level on a cold engine.
TIPIf the engine was started before checking the oil
level, warm up the engine, and then wait at least
10 minutes until the oil settles for an accurate
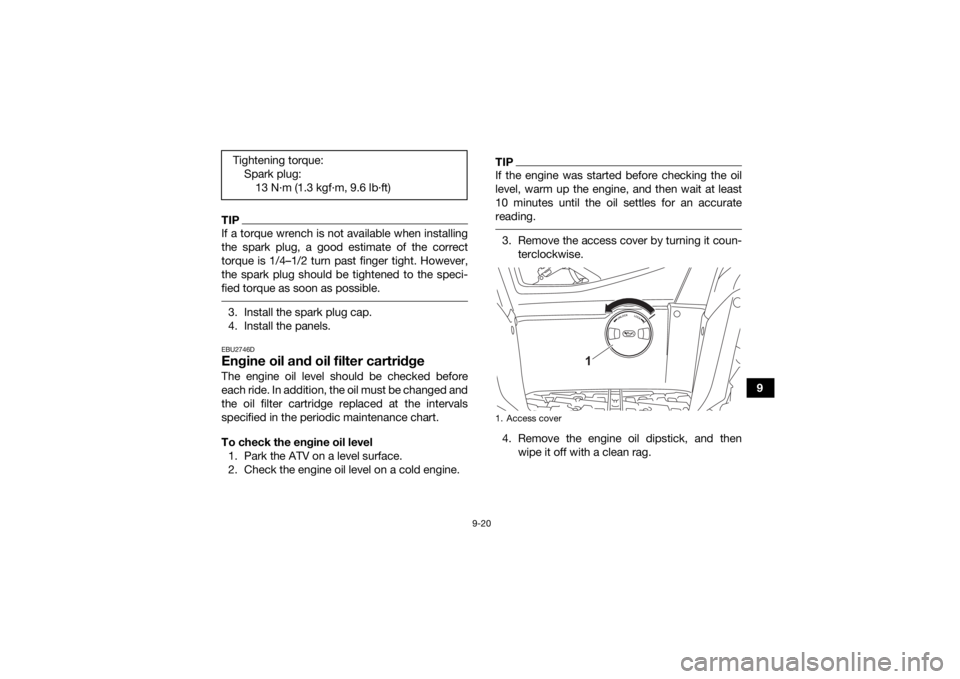
reading. 3. Remove the access cover by turning it coun- terclockwise.
4. Remove the engine oil dipstick, and then wipe it off with a clean rag.
Tightening torque:
Spark plug:13 N
Page 124 of 178
9-25
9Yamaha’s experience gained over many years of
research and development into oil since the
1960’s helps make Yamalube the best choice for
your Yamaha engine.
EBU27309Final gear oilThe final gear case must be checked for oil leak-
age before each ride. If any leakage is found, have
a Yamaha dealer check and repair the ATV. In ad-
dition, the final gear oil level must be checked and
the oil changed as follows at the intervals speci-
fied in the periodic maintenance chart.
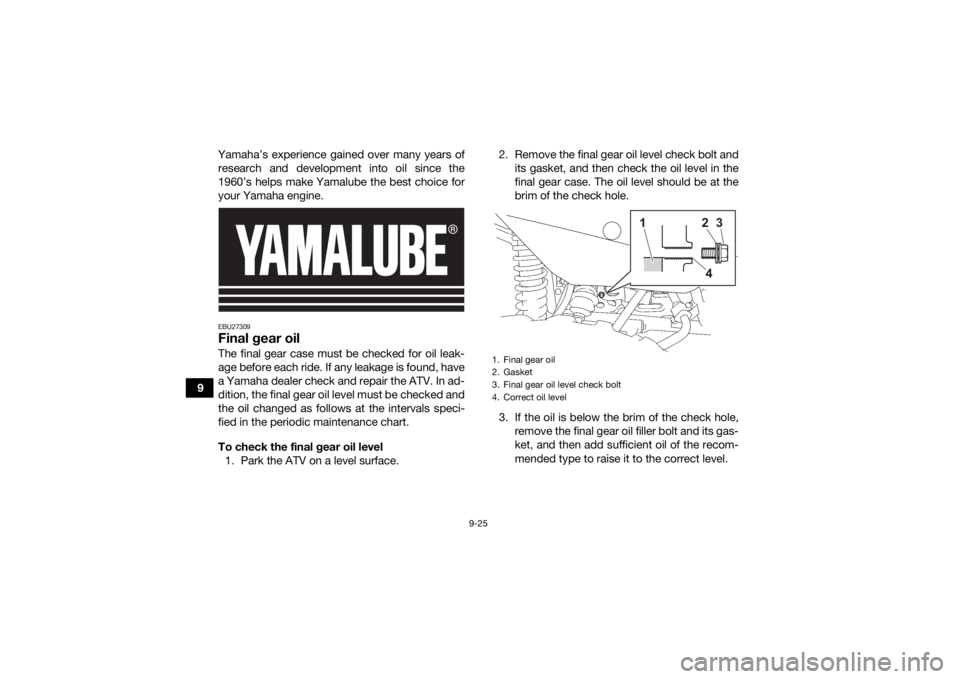
To check the final gear oil level 1. Park the ATV on a level surface. 2. Remove the final gear oil level check bolt and
its gasket, and then check the oil level in the
final gear case. The oil level should be at the
brim of the check hole.
3. If the oil is below the brim of the check hole, remove the final gear oil filler bolt and its gas-
ket, and then add sufficient oil of the recom-
mended type to raise it to the correct level.
1. Final gear oil
2. Gasket
3. Final gear oil level check bolt
4. Correct oil level
1
243
UBFE60E0.book Page 25 Tuesday, August 18, 2020 10:50 AM
Page 126 of 178
9-27
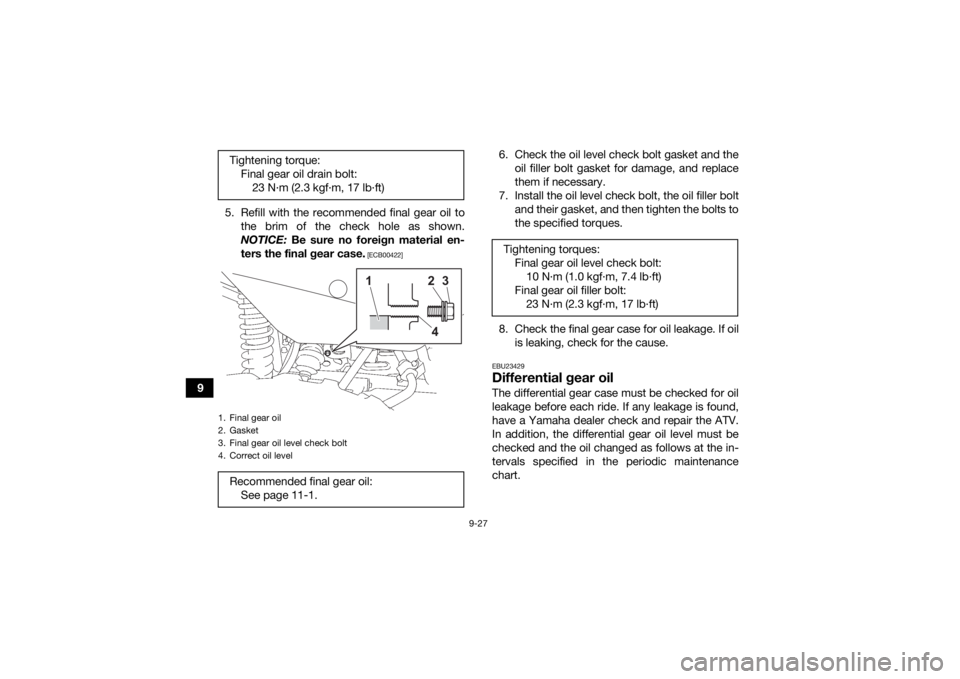
95. Refill with the recommended final gear oil to
the brim of the check hole as shown.
NOTICE: Be sure no foreign material en-
ters the final gear case.
[ECB00422]
6. Check the oil level check bolt gasket and the oil filler bolt gasket for damage, and replace
them if necessary.
7. Install the oil level check bolt, the oil filler bolt and their gasket, and then tighten the bolts to
the specified torques.
8. Check the final gear case for oil leakage. If oil is leaking, check for the cause.EBU23429Differential gear oilThe differential gear case must be checked for oil
leakage before each ride. If any leakage is found,
have a Yamaha dealer check and repair the ATV.
In addition, the differential gear oil level must be
checked and the oil changed as follows at the in-
tervals specified in the periodic maintenance
chart.
Tightening torque:
Final gear oil drain bolt:23 N·m (2.3 kgf·m, 17 lb·ft)
1. Final gear oil
2. Gasket
3. Final gear oil level check bolt
4. Correct oil levelRecommended final gear oil:See page 11-1.
1
243
Tightening torquesWFinal gear oil level check bolt:10 N
Page 128 of 178
9-29
94. Install the drain bolt and its new gasket, and
then tighten the bolt to the specified torque.
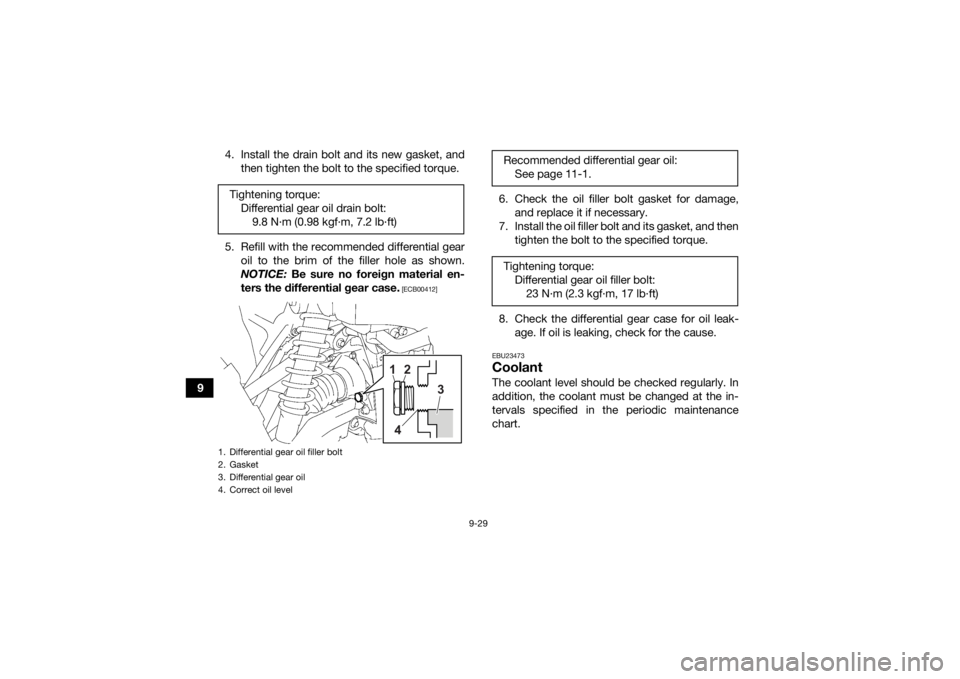
5. Refill with the recommended differential gear oil to the brim of the filler hole as shown.
NOTICE: Be sure no foreign material en-
ters the differential gear case.
[ECB00412]
6. Check the oil filler bolt gasket for damage, and replace it if necessary.
7. Install the oil filler bolt and its gasket, and then tighten the bolt to the specified torque.
8. Check the differential gear case for oil leak- age. If oil is leaking, check for the cause.EBU23473CoolantThe coolant level should be checked regularly. In
addition, the coolant must be changed at the in-
tervals specified in the periodic maintenance
chart.
Tightening torque:
Differential gear oil drain bolt:9.8 N·m (0.98 kgf·m, 7.2 lb·ft)
1. Differential gear oil filler bolt
2. Gasket
3. Differential gear oil
4. Correct oil level
1
2
3
4
Recommended differential gear oil: See page 11-1.
Tightening torque: Differential gear oil filler bolt:23 N