Panel e YAMAHA KODIAK 450 2021 Owners Manual
[x] Cancel search | Manufacturer: YAMAHA, Model Year: 2021, Model line: KODIAK 450, Model: YAMAHA KODIAK 450 2021Pages: 172, PDF Size: 5.2 MB
Page 9 of 172

OPERATION ................................................... 7-1Starting the engine ...................................... 7-1
Operating the drive select lever and driving in reverse ....................................... 7-2
Engine break-in ........................................... 7-4
Parking ........................................................ 7-4
Parking on a slope ...................................... 7-5
Accessories and loading ............................. 7-5
RIDING YOUR ATV ........................................ 8-1 GETTING TO KNOW YOUR ATV ................ 8-2
RIDE WITH CARE AND GOOD JUDGMENT .............................................. 8-2
BE CAREFUL WHERE YOU RIDE ............... 8-9
TURNING YOUR ATV................................ 8-12
CLIMBING UPHILL ................................... 8-13
RIDING DOWNHILL .................................. 8-16
CROSSING A SLOPE................................ 8-17
CROSSING THROUGH SHALLOW WATER .................................................... 8-18
RIDING OVER ROUGH TERRAIN ............. 8-20
SLIDING AND SKIDDING.......................... 8-21
WHAT TO DO IF... ..................................... 8-22
PERIODIC MAINTENANCE AND
ADJUSTMENT................................................ 9-1 Owner’s Manuals and Tool Kit .................... 9-2 Periodic maintenance chart: Emission
control system .......................................... 9-3
Periodic maintenance chart: General maintenance and lubrication .................... 9-5
Removing and installing panels ................ 9-10
Checking the spark plug........................... 9-17
Engine oil and oil filter cartridge ............... 9-19
Why Yamalube ......................................... 9-23
Final gear oil ............................................. 9-24
Changing the differential gear oil .............. 9-27
Coolant ..................................................... 9-29
Cleaning the air filter ................................. 9-33
Cleaning the spark arrester ...................... 9-36
V-belt cooling duct check hose ................ 9-37
V-belt case drain plug............................... 9-37
Adjusting the throttle lever free play ......... 9-38
Valve clearance......................................... 9-39
Brakes....................................................... 9-39
Checking the front brake pads and rear brake friction plates ................................ 9-40
Checking the brake fluid level .................. 9-40
Changing the brake fluid .......................... 9-42
Checking the front brake lever free play... 9-42
Adjusting the rear brake lever and brake pedal ............................................. 9-42
Axle boots................................................. 9-47
Brake light switches ................................. 9-48UBEY60E0.book Page 2 Monday, July 27, 2020 10:46 AM
Page 100 of 172
9-10
9
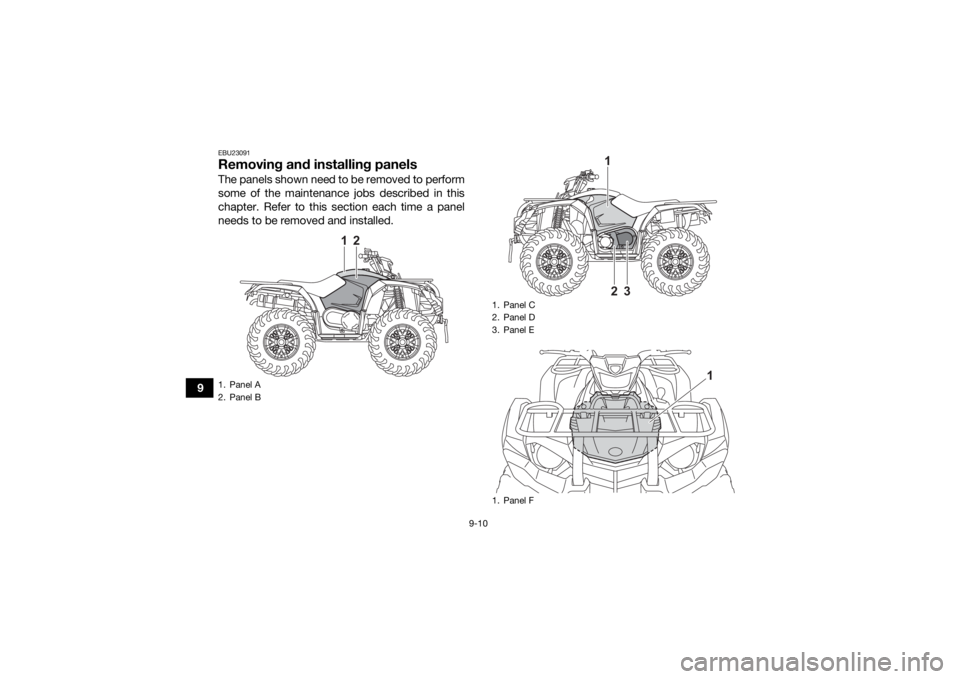
EBU23091Removing and installing panelsThe panels shown need to be removed to perform
some of the maintenance jobs described in this
chapter. Refer to this section each time a panel
needs to be removed and installed.1. Panel A
2. Panel B
2
1
1. Panel C
2. Panel a
3. Panel b
1. Panel c
1
3
2
1
UBEY60E0.book Page 10 Monday, July 27, 2020 10:46 AM
Page 101 of 172
![YAMAHA KODIAK 450 2021 Owners Manual 9-11
9
EBU27605Panel A
When removing or installing panel A, the fuel tank
cap must be removed. NOTICE: Make sure that
no foreign material enters the fuel tank.
[ECB01052]
To remove the panel1. Remove](/img/51/50534/w960_50534-100.png "YAMAHA KODIAK 450 2021 Owners Manual 9-11
9
EBU27605Panel A
When removing or installing panel A, the fuel tank
cap must be removed. NOTICE: Make sure that
no foreign material enters the fuel tank.
[ECB01052]
To remove the panel1. Remove")
9-11
9
EBU27605Panel A
When removing or installing panel A, the fuel tank
cap must be removed. NOTICE: Make sure that
no foreign material enters the fuel tank.
[ECB01052]
To remove the panel1. Remove the seat. (See page 5-18.)
2. Remove the bolts and quick fasteners.
3. Remove the fuel tank cap, and then pull thepanel off.1. Bolt
1
1. Quick fastener
1. Fuel tank cap
1
1
1
UBEY60E0.book Page 11 Monday, July 27, 2020 10:46 AM
Page 102 of 172
9-12
94. Install the fuel tank cap.
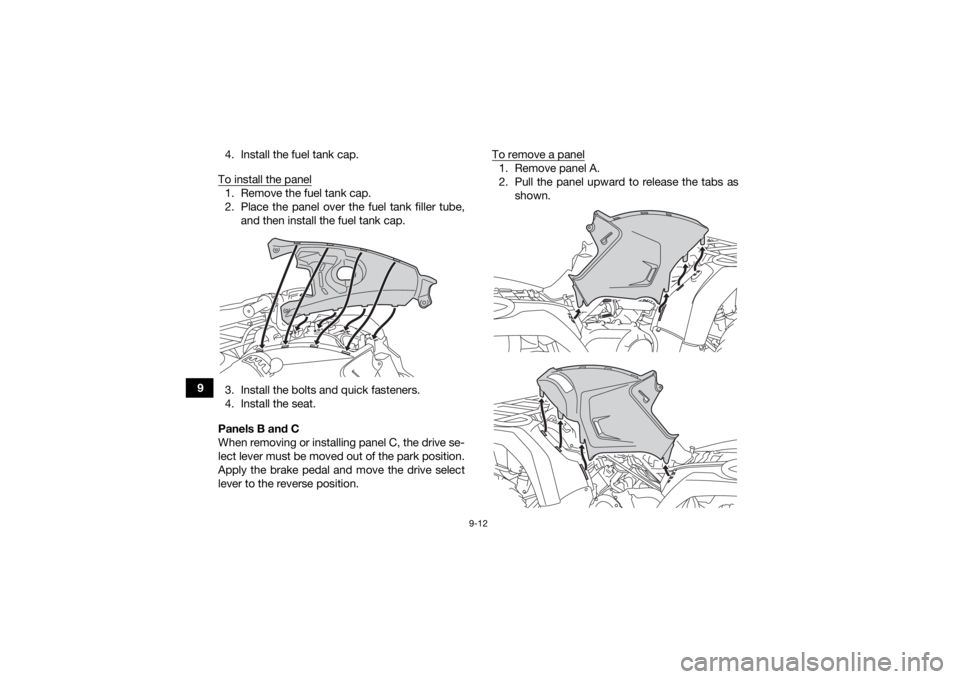
To install the panel
1. Remove the fuel tank cap.
2. Place the panel over the fuel tank filler tube, and then install the fuel tank cap.
3. Install the bolts and quick fasteners.
4. Install the seat.
Panels B and C
When removing or installing panel C, the drive se-
lect lever must be moved out of the park position.
Apply the brake pedal and move the drive select
lever to the reverse position. To remove a panel
1. Remove panel A.
2. Pull the panel upward to release the tabs as
shown.
UBEY60E0.book Page 12 Monday, July 27, 2020 10:46 AM
Page 103 of 172
9-13
9
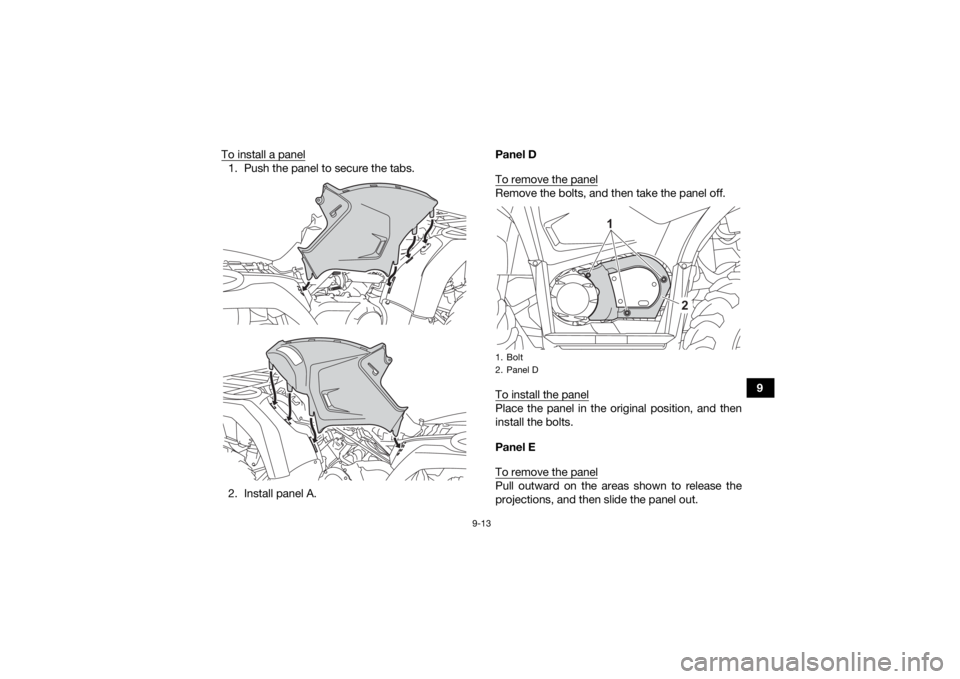
To install a panel
1. Push the panel to secure the tabs.
2. Install panel A. Panel D
To remove the panel
Remove the bolts, and then take the panel off.
To install the panelPlace the panel in the original position, and then
install the bolts.
Panel E
To remove the panelPull outward on the areas shown to release the
projections, and then slide the panel out.1. Bolt
2. Panel D
1
2
UBEY60E0.book Page 13 Monday, July 27, 2020 10:46 AM
Page 104 of 172
9-14
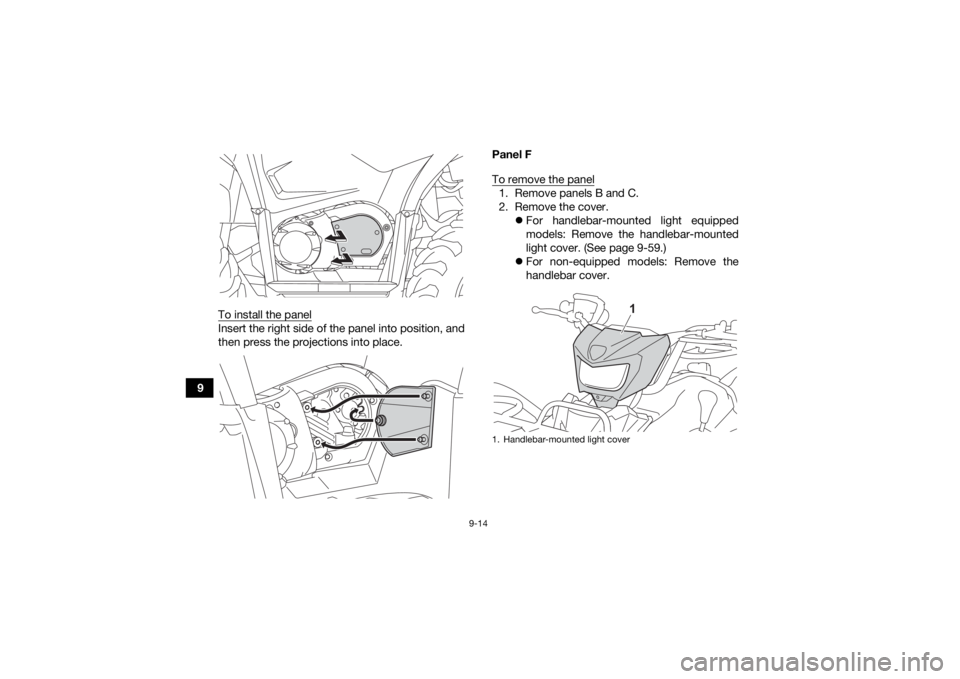
9To install the panel
Insert the right side of the panel into position, and
then press the projections into place. Panel F
To remove the panel
1. Remove panels B and C.
2. Remove the cover.
For handlebar-mounted light equipped
models: Remove the handlebar-mounted
light cover. (See page 9-59.)
For non-equipped models: Remove the
handlebar cover.1. Handlebar-mounted light cover
1
UBEY60E0.book Page 14 Monday, July 27, 2020 10:46 AM
Page 105 of 172
9-15
9
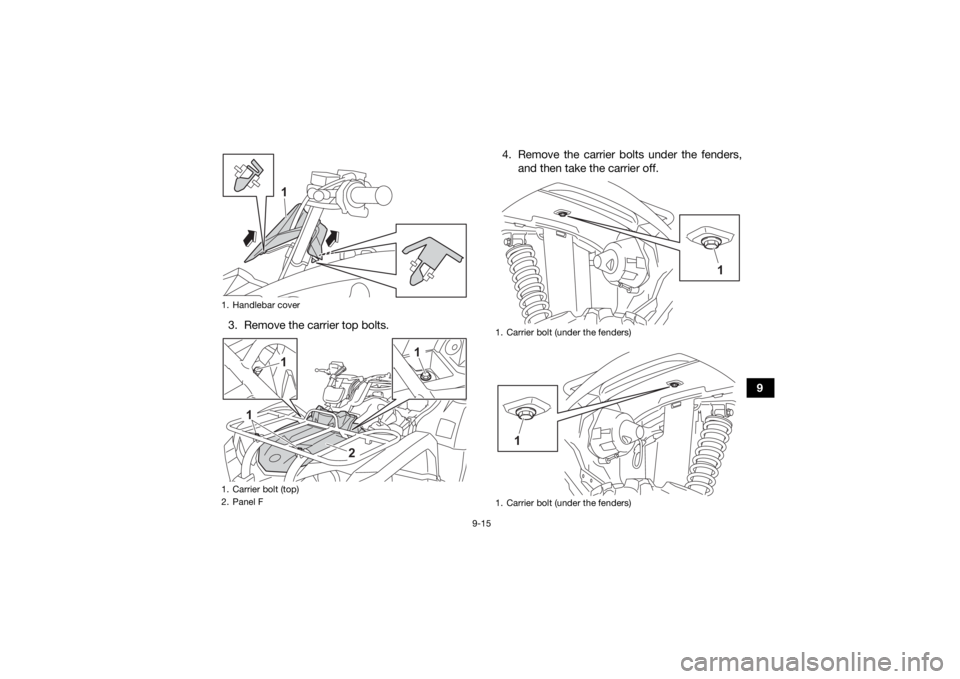
3. Remove the carrier top bolts. 4. Remove the carrier bolts under the fenders,
and then take the carrier off.
1. Handlebar cover
1. Carrier bolt (top)
2. Panel F
1
1
1
1
2
1. Carrier bolt (under the fenders)
1. Carrier bolt (under the fenders)
1
1
UBEY60E0.book Page 15 Monday, July 27, 2020 10:46 AM
Page 106 of 172
9-16
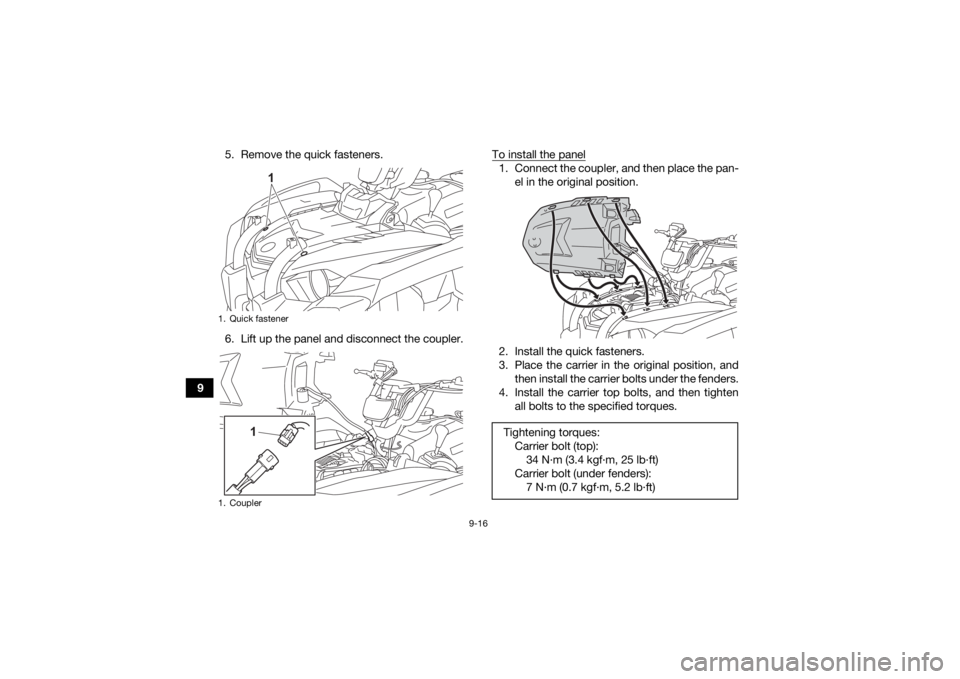
95. Remove the quick fasteners.
6. Lift up the panel and disconnect the coupler.
To install the panel
1. Connect the coupler, and then place the pan-
el in the original position.
2. Install the quick fasteners.
3. Place the carrier in the original position, and then install the carrier bolts under the fenders.
4. Install the carrier top bolts, and then tighten all bolts to the specified torques.
1. Quick fastener
1. Coupler
1
1
Tightening torquesWCarrier bolt (top)W34 N
Page 107 of 172
9-17
9
5. Install the cover.
For handlebar-mounted light equipped
models: Install the handlebar-mounted
light cover.
For non-equipped models: Install the han-
dlebar cover.
6. Install the panels.
EBU23216Checking the spark plugThe spark plug is an important engine component,
which is easy to check. Since heat and deposits
will cause any spark plug to slowly erode, the
spark plug should be removed and checked in ac-
cordance with the periodic maintenance chart. In
addition, the condition of the spark plug can reveal
the condition of the engine.
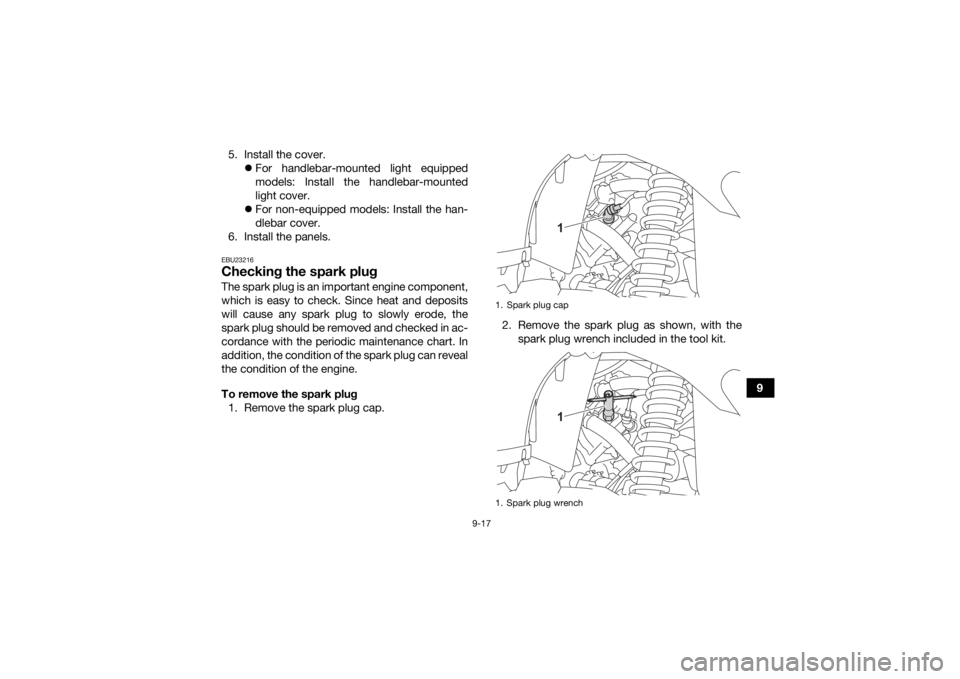
To remove the spark plug 1. Remove the spark plug cap. 2. Remove the spark plug as shown, with the
spark plug wrench included in the tool kit.
1. Spark plug cap
1. Spark plug wrench
11
UBEY60E0.book Page 17 Monday, July 27, 2020 10:46 AM
Page 109 of 172
9-19
9
TIPIf a torque wrench is not available when installing
the spark plug, a good estimate of the correct
torque is 1/4–1/2 turn past finger tight. However,
the spark plug should be tightened to the speci-
fied torque as soon as possible. 3. Install the spark plug cap.EBU30245Engine oil and oil filter cartridgeThe engine oil level should be checked before
each ride. In addition, the oil must be changed and
the oil filter cartridge replaced at the intervals
specified in the periodic maintenance chart.
To check the engine oil level1. Park the ATV on a level surface.
2. Remove panel E. (See page 9-10.)
3. Check the engine oil level on a cold engine.
TIPIf the engine was started before checking the oil
level, warm up the engine, and then wait at least
ten minutes until the oil settles for an accurate
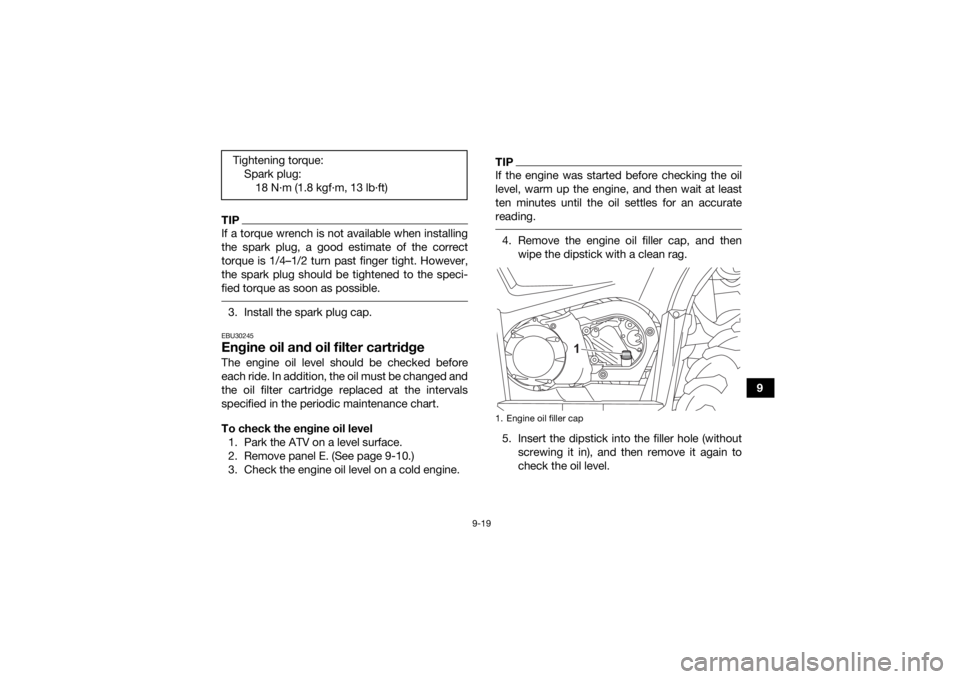
reading. 4. Remove the engine oil filler cap, and then wipe the dipstick with a clean rag.
5. Insert the dipstick into the filler hole (without screwing it in), and then remove it again to
check the oil level.
Tightening torque:
Spark plug:18 N