change time YAMAHA KODIAK 700 2018 Owners Manual
[x] Cancel search | Manufacturer: YAMAHA, Model Year: 2018, Model line: KODIAK 700, Model: YAMAHA KODIAK 700 2018Pages: 172, PDF Size: 4.52 MB
Page 35 of 172

4-6
4
The multi-function display is equipped with the
following:
speedometer
odometer
two tripmeters
clock
hour meter
fuel gauge
error code display
Speedometer
The speedometer shows the vehicle’s traveling
speed. The speedometer can be set to “mph” or
“km/h”. This also changes the odometer and trip-
meter units between miles and kilometers. To
change the display between “mph” and “km/h”,
turn the key to “ ” (off), then while holding the
“SELECT” button pushed, turn the key to “ ”
(on).
Odometer and tripmeters
The odometer shows the total distance traveled
by the vehicle. The odometer can be used for
maintenance and service intervals. The tripmeters show the distance traveled since
they were last reset. The tripmeters can be used to
record the distance traveled on a single trip, or to
estimate the distance that can be traveled with a
full tank of gas, etc.
Push the “SELECT” button to switch between the
odometer “ODO” and the tripmeters “TRIP A” and
“TRIP B” in the following order:
ODO
→ TRIP A → TRIP B → ODO
To reset a tripmeter, set the display to the tripme-
ter you want to reset, then push the “RESET” but-
ton for three seconds.
TIP The odometer will lock at 99999.
The tripmeters will reset and continue counting
after 9999.9 is reached. Clock and hour meter
The clock displays time in 12-hour format.
The hour meter shows the total time the engine
has been running.
Push the “CLOCK” button to switch between the
clock “CLOCK” and the hour meter mode
“HOUR” in the following order:
CLOCK → HOUR → CLOCK
UB1662E0.book Page 6 Monday, April 17, 2017 11:39 AM
Page 40 of 172

4-11
4
TIPIf the digits of the speedometer appear as shown
when the switch is NOT being pushed, this could
indicate a malfunction in the electrical system. In
this case, take the ATV to a Yamaha dealer at the
first opportunity.
WARNING
EWB00151Always ride at a slow speed when the ATV is in
four-wheel-drive differential gear lock, and al-
low extra time and distance for maneuvers.
All wheels turn at the same speed when the dif-
ferential is locked, so it takes more effort to
turn the ATV. The effort needed to turn increas-
es with the riding speed. You may lose control
and have an accident if you cannot make a
sharp enough turn for the speed you are trav-
eling.
EBU2660AOn-Command drive switch “2WD/4WD”
(YFM70KPXJ / YFM70KPAJ / YFM70KPHJ /
YFM70KPSJ)
Stop the ATV and push this switch to change from
two-wheel drive to four-wheel drive or vice versa.
Select the appropriate drive according to the ter-
rain and riding conditions.
“2WD” (two-wheel drive): power is supplied to
the rear wheels only, giving a smooth ride and
fuel economy.
“4WD” (four-wheel drive): power is supplied to
the front and rear wheels, giving increased trac-
tion.
WARNING
EWB00164Always stop the ATV before changing from
two-wheel drive to four-wheel drive and vice
versa. The ATV handles differently in two-
wheel drive than in four-wheel drive in some
circumstances. Changing from two-wheel
drive to four-wheel drive or vice versa while
moving may cause the ATV to unexpectedly
handle differently. This could distract the oper-
ator and increase the risk of losing control and
of causing an accident.
UB1662E0.book Page 11 Monday, April 17, 2017 11:39 AM
Page 42 of 172

4-13
4
When the icon and indicator light are flashing,
turning the handlebar back and forth will help
the differential gear lock to engage or disen-
gage.
Riding before the differential gear is properly en-
gaged or disengaged (e.g., when the icon and
indicator light are flashing) will cause the vehicle
speed to be limited until the differential gear is
completely engaged or disengaged.
When the ATV is in four-wheel-drive differential
gear lock, the maximum traveling speed is limit-
ed to 35 km/h (22 mi/h). However, if conditions
require full engine power to be available, push
and hold the override switch to disable the dif-
ferential gear lock speed limiter. (See page
4-10.)
WARNING
EWB00141Always ride at a slow speed when the ATV is in
differential gear lock, and allow extra time and
distance for maneuvers.
All wheels turn at the same speed when the dif-
ferential gear is locked, so it takes more effort
to turn the ATV. The effort needed to turn in-
creases with the riding speed. You may lose control and have an accident if you cannot
make a sharp enough turn for the speed you
are traveling.
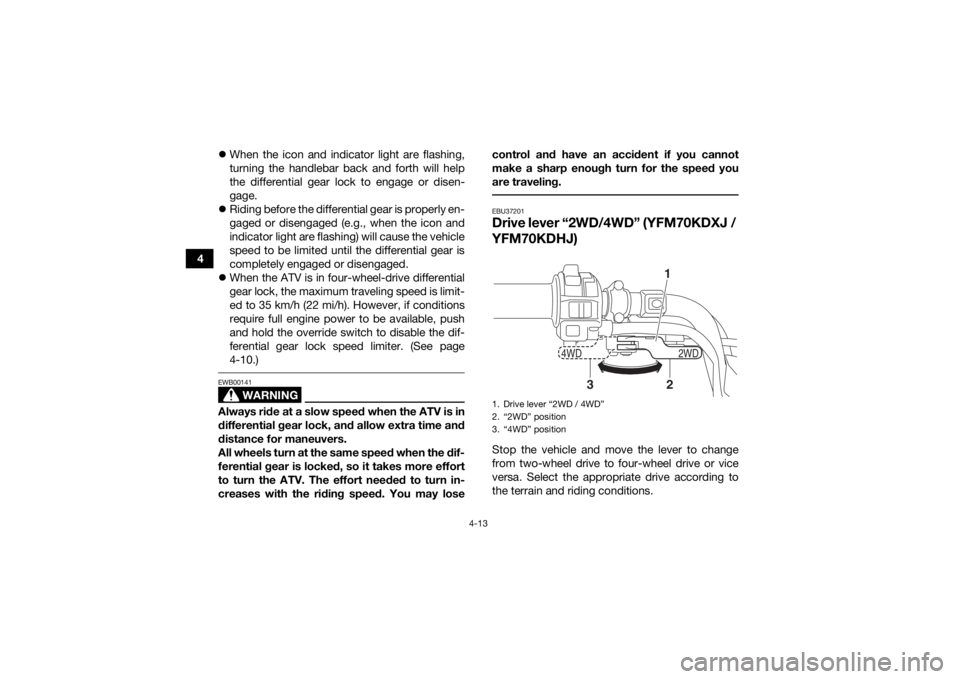
EBU37201Drive lever “2WD/4
WD” (YFM70KDXJ /
YFM70KDHJ)Stop the vehicle and move the lever to change
from two-wheel drive to four-wheel drive or vice
versa. Select the appropriate drive according to
the terrain and riding conditions.1. Drive lever “2WD / 4WD”
2. “2WD” position
3. “4WD” position
2WD
4WD
12
3
UB1662E0.book Page 13 Monday, April 17, 2017 11:39 AM
Page 79 of 172

7-13
7
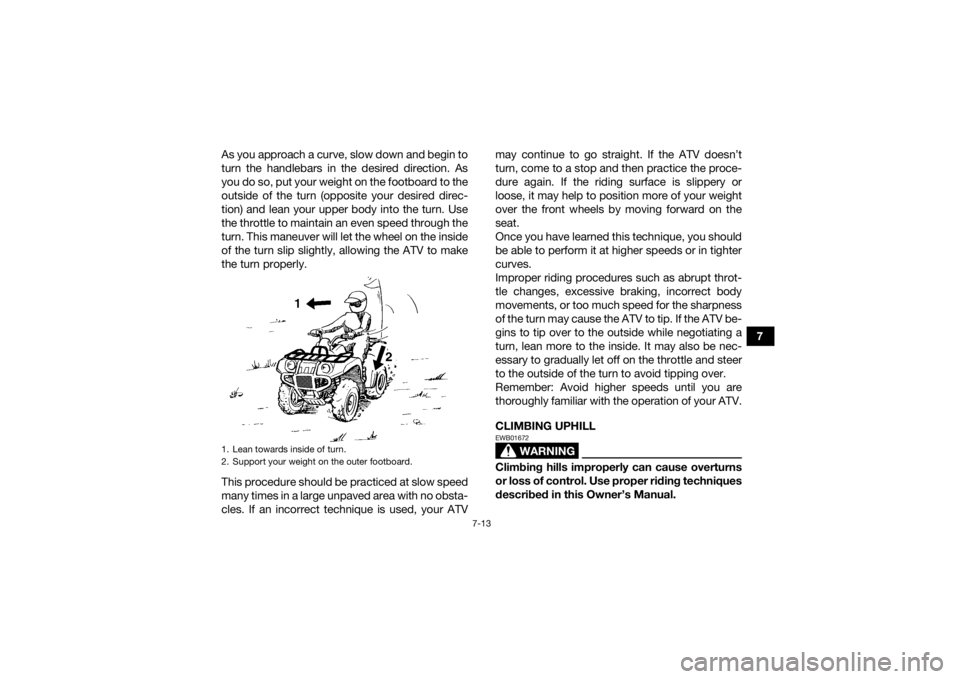
As you approach a curve, slow down and begin to
turn the handlebars in the desired direction. As
you do so, put your weight on the footboard to the
outside of the turn (opposite your desired direc-
tion) and lean your upper body into the turn. Use
the throttle to maintain an even speed through the
turn. This maneuver will let the wheel on the inside
of the turn slip slightly, allowing the ATV to make
the turn properly.
This procedure should be practiced at slow speed
many times in a large unpaved area with no obsta-
cles. If an incorrect technique is used, your ATV may continue to go straight. If the ATV doesn’t
turn, come to a stop and then practice the proce-
dure again. If the riding surface is slippery or
loose, it may help to position more of your weight
over the front wheels by moving forward on the
seat.
Once you have learned this technique, you should
be able to perform it at higher speeds or in tighter
curves.
Improper riding procedures such as abrupt throt-
tle changes, excessive braking, incorrect body
movements, or too much speed for the sharpness
of the turn may cause the ATV to tip. If the ATV be-
gins to tip over to the outside while negotiating a
turn, lean more to the inside. It may also be nec-
essary to gradually let off on the throttle and steer
to the outside of the turn to avoid tipping over.
Remember: Avoid higher speeds until you are
thoroughly familiar with the operation of your ATV.
CLIMBING UPHILL
WARNING
EWB01672Climbing hills improperly can cause overturns
or loss of control. Use proper riding techniques
described in this Owner’s Manual.
1. Lean towards inside of turn.
2. Support your weight on the outer footboard.UB1662E0.book Page 13 Monday, April 17, 2017 11:39 AM