warning lights YAMAHA KODIAK 700 2018 Owners Manual
[x] Cancel search | Manufacturer: YAMAHA, Model Year: 2018, Model line: KODIAK 700, Model: YAMAHA KODIAK 700 2018Pages: 172, PDF Size: 4.52 MB
Page 8 of 172

EBU17421
TABLE OF CONTENTS
LOCATION OF THE WARNING AND
SPECIFICATION LABELS .............................. 1-1
SAFETY INFORMATION ................................ 2-1
DESCRIPTION................................................ 3-1Left view ...................................................... 3-1
Right view.................................................... 3-1
Controls and instruments............................ 3-2
INSTRUMENT AND CONTROL
FUNCTIONS ................................................... 4-1 Main switch ................................................. 4-1
Indicator lights and warning lights .............. 4-1
Multi-function display (YFM70KPXJ / YFM70KPAJ / YFM70KPHJ /
YFM70KPSJ) ............................................. 4-5
Handlebar switches .................................... 4-8
Drive lever “2WD/4WD” (YFM70KDXJ / YFM70KDHJ) .......................................... 4-13
Throttle lever ............................................. 4-14
Speed limiter ............................................. 4-15
Front brake lever ....................................... 4-15
Brake pedal and rear brake lever .............. 4-16 Drive select lever ...................................... 4-16
Fuel tank cap ............................................ 4-17
Fuel ........................................................... 4-17
Seat .......................................................... 4-19
Storage compartment............................... 4-20
Front carrier .............................................. 4-21
Rear carrier ............................................... 4-22
Front and rear shock absorbers
(YFM70KPXJ / YFM70KPAJ /
YFM70KPHJ / YFM70KPSJ) .................. 4-22
Trailer hitch (YFM70KPXJ / YFM70KPAJ / YFM70KPHJ /
YFM70KPSJ) .......................................... 4-23
Auxiliary DC jack....................................... 4-24
PRE-OPERATION CHECKS .......................... 5-1 Fuel ............................................................. 5-3
Engine oil .................................................... 5-3
Final gear oil ............................................... 5-3
Differential gear oil ...................................... 5-3
Coolant ....................................................... 5-3
Front and rear brakes ................................. 5-3
Throttle lever ............................................... 5-4
Tires ............................................................ 5-4UB1662E0.book Page 1 Monday, April 17, 2017 11:39 AM
Page 27 of 172
2-6
2
gerous loss of lights or engine power. Also, the
battery tends to discharge more quickly if elec-
trical accessories are added.
WARNING
EWB00073Avoid Carbon Monoxide Poisoning
All engine exhaust contains carbon monoxide,
a deadly gas. Breathing carbon monoxide can
cause headaches, dizziness, drowsiness, nau-
sea, confusion, and eventually death.
Carbon Monoxide is a colorless, odorless,
tasteless gas which may be present even if you
do not see or smell any engine exhaust. Deadly
levels of carbon monoxide can collect rapidly
and you can quickly be overcome and unable
to save yourself. Also, deadly levels of carbon
monoxide can linger for hours or days in en-
closed or poorly ventilated areas. If you experi-
ence any symptoms of carbon monoxide
poisoning, leave the area immediately, get
fresh air, and SEEK MEDICAL TREATMENT.
Do not run engine indoors. Even if you try to
ventilate engine exhaust with fans or open
windows and doors, carbon monoxide can
rapidly reach dangerous levels.
Do not run engine in poorly ventilated or par-
tially enclosed areas such as barns, garages,
or carports.
Do not run engine outdoors where engine
exhaust can be drawn into a building through
openings such as windows and doors.
UB1662E0.book Page 6 Monday, April 17, 2017 11:39 AM
Page 29 of 172
3-2
3
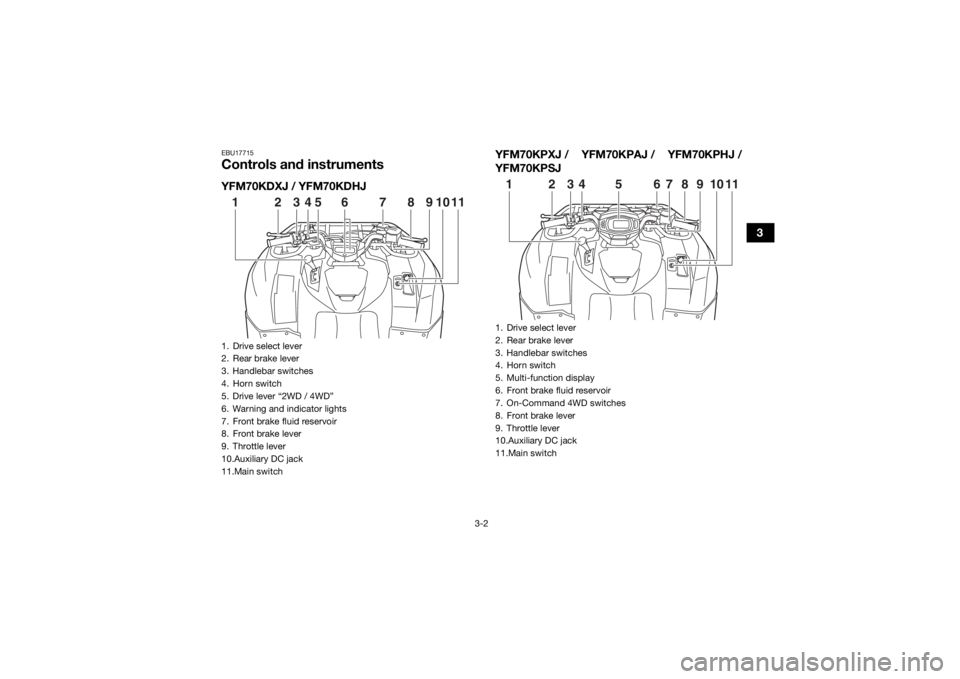
EBU17715Controls and instrumentsYFM70KDXJ / YFM70KDHJYFM70KPXJ / YFM70KPAJ / YFM70KPHJ /
YFM70KPSJ1. Drive select lever
2. Rear brake lever
3. Handlebar switches
4. Horn switch
5. Drive lever “2WD / 4WD”
6. Warning and indicator lights
7. Front brake fluid reservoir
8. Front brake lever
9. Throttle lever
10.Auxiliary DC jack
11.Main switch123
4 5 6 7 8 9 10 11
1. Drive select lever
2. Rear brake lever
3. Handlebar switches
4. Horn switch
5. Multi-function display
6. Front brake fluid reservoir
7. On-Command 4WD switches
8. Front brake lever
9. Throttle lever
10.Auxiliary DC jack
11.Main switch123 56
7891011
4
UB1662E0.book Page 2 Monday, April 17, 2017 11:39 AM
Page 30 of 172
4-1
4
EBU17738
INSTRUMENT AND CONTROL FUNCTIONS
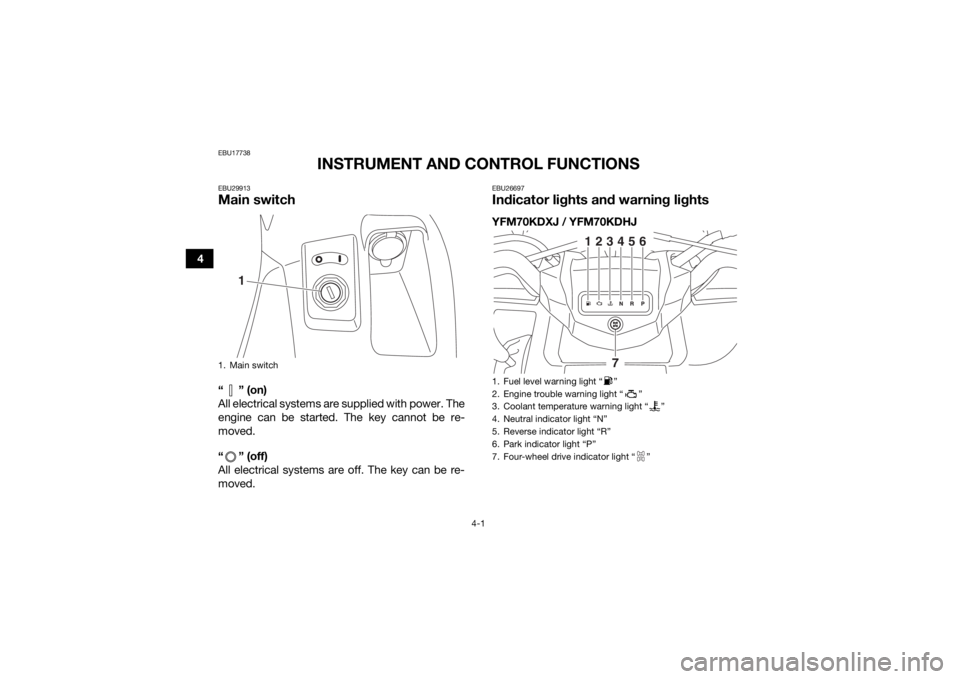
EBU29913Main switch“” (on)
All electrical systems are supplied with power. The
engine can be started. The key cannot be re-
moved.
“ ” (off)
All electrical systems are off. The key can be re-
moved.
EBU26697Indicator lights and warning lightsYFM70KDXJ / YFM70KDHJ
1. Main switch
1
1. Fuel level warning light “ ”
2. Engine trouble warning light “ ”
3. Coolant temperature warning light “ ”
4. Neutral indicator light “N”
5. Reverse indicator light “R”
6. Park indicator light “P”
7. Four-wheel drive indicator light “ ”
123456
7
UB1662E0.book Page 1 Monday, April 17, 2017 11:39 AM
Page 46 of 172
4-17
4
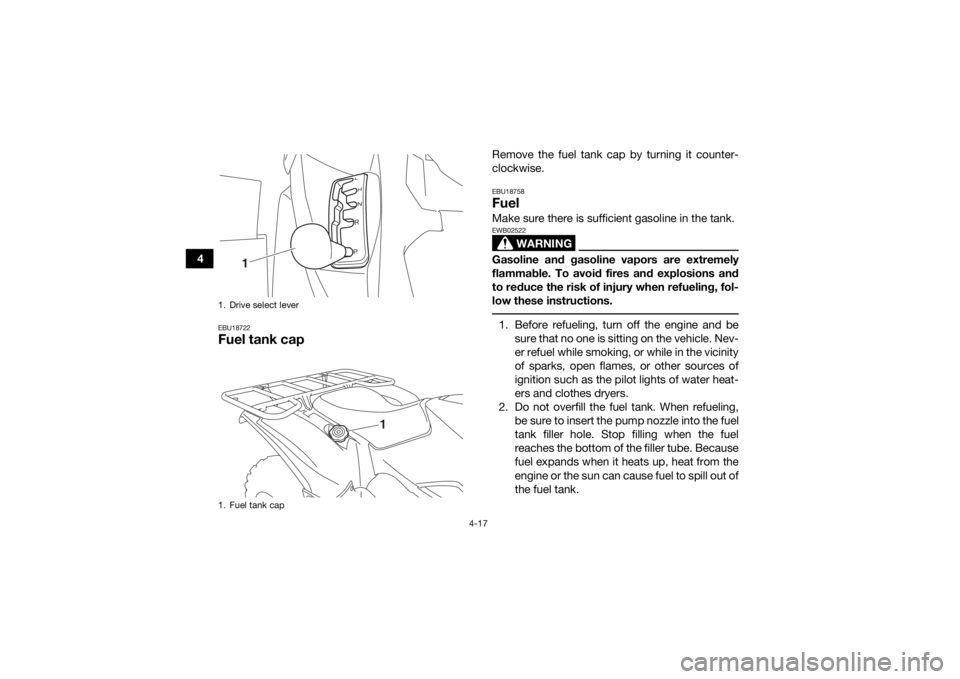
EBU18722Fuel tank cap
Remove the fuel tank cap by turning it counter-
clockwise.EBU18758FuelMake sure there is sufficient gasoline in the tank.
WARNING
EWB02522Gasoline and gasoline vapors are extremely
flammable. To avoid fires and explosions and
to reduce the risk of injury when refueling, fol-
low these instructions. 1. Before refueling, turn off the engine and besure that no one is sitting on the vehicle. Nev-
er refuel while smoking, or while in the vicinity
of sparks, open flames, or other sources of
ignition such as the pilot lights of water heat-
ers and clothes dryers.
2. Do not overfill the fuel tank. When refueling, be sure to insert the pump nozzle into the fuel
tank filler hole. Stop filling when the fuel
reaches the bottom of the filler tube. Because
fuel expands when it heats up, heat from the
engine or the sun can cause fuel to spill out of
the fuel tank.
1. Drive select lever
1. Fuel tank cap
1
1
UB1662E0.book Page 17 Monday, April 17, 2017 11:39 AM
Page 60 of 172
6-1
6
EBU19882
OPERATION
EBU19902Read the Owner’s Manual carefully before riding
the ATV. If there is a control or function you do not
understand, ask your Yamaha dealer.
WARNING
EWB00632Read the Owner’s Manual carefully to become
familiar with all controls in order to help pre-
vent any loss of control, which could cause an
accident or injury. EBU34161Starting the engineNOTICEECB00151See the “Engine break-in” section on page 6-4
prior to operating the engine for the first time. 1. Turn the key to “ ” (on) and the engine stopswitch to “ ”.
The EPS warning light (for equipped models)
should come on and stay on until the engine
is started. The following warning lights should come on
for a few seconds, then go off.
Coolant temperature warning light
Engine trouble warning light
Fuel level warning light (for equipped mod-
els)
NOTICEECB00826To avoid possible damage, do not operate the
ATV if a warning light does not work as de-
scribed above. 2. Apply the brake pedal, and then shift the drive
select lever into the neutral or park position.
The corresponding indicator light should
come on. If the indicator light does not come
on, have a Yamaha dealer check the electrical
circuit.TIPThis model is equipped with an ignition circuit cut-
off system. The engine can be started under the
following conditions:
The drive select lever is in the neutral or park po-
sition.
UB1662E0.book Page 1 Monday, April 17, 2017 11:39 AM
Page 154 of 172
8-65
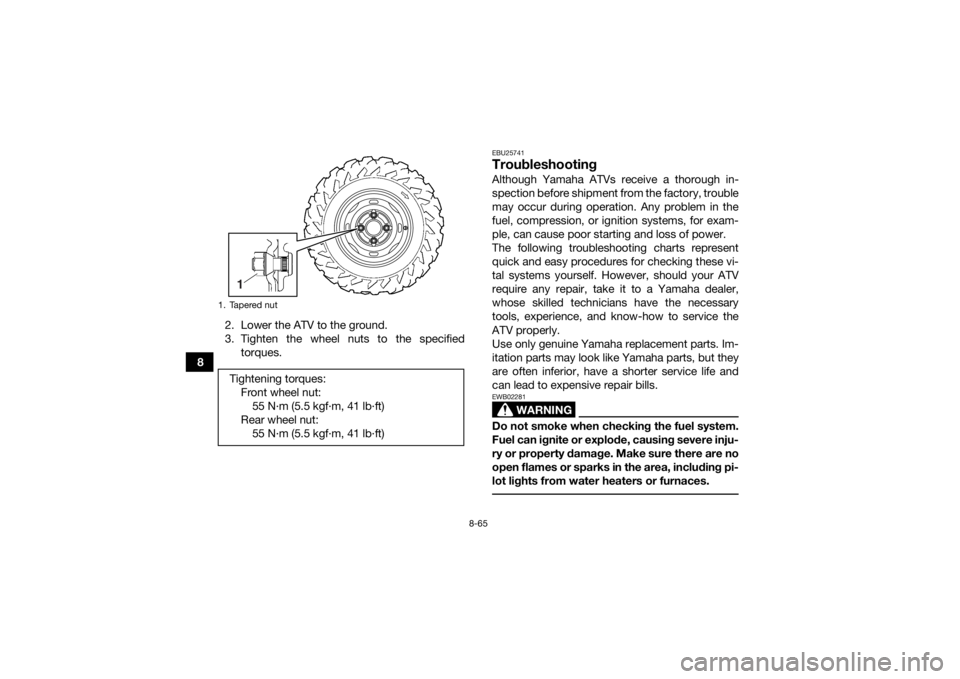
82. Lower the ATV to the ground.
3. Tighten the wheel nuts to the specified
torques.
EBU25741TroubleshootingAlthough Yamaha ATVs receive a thorough in-
spection before shipment from the factory, trouble
may occur during operation. Any problem in the
fuel, compression, or ignition systems, for exam-
ple, can cause poor starting and loss of power.
The following troubleshooting charts represent
quick and easy procedures for checking these vi-
tal systems yourself. However, should your ATV
require any repair, take it to a Yamaha dealer,
whose skilled technicians have the necessary
tools, experience, and know-how to service the
ATV properly.
Use only genuine Yamaha replacement parts. Im-
itation parts may look like Yamaha parts, but they
are often inferior, have a shorter service life and
can lead to expensive repair bills.
WARNING
EWB02281Do not smoke when checking the fuel system.
Fuel can ignite or explode, causing severe inju-
ry or property damage. Make sure there are no
open flames or sparks in the area, including pi-
lot lights from water heaters or furnaces.
1. Tapered nutTightening torques:Front wheel nut:55 N·m (5.5 kgf·m, 41 lb·ft)
Rear wheel nut: 55 N·m (5.5 kgf·m, 41 lb·ft)1
UB1662E0.book Page 65 Monday, April 17, 2017 11:39 AM
Page 169 of 172

12-2
12
High-range indicator light (YFM70KPXJ / YFM70KPAJ / YFM70KPHJ / YFM70KPSJ) ................ 4-2
Horn switch .................................................................. 4-10IIdentification numbers ................................................. 11-1
Indicator lights and warning lights ................................. 4-1
Instruments, lights and switches ................................... 5-6LLabel locations ............................................................... 1-1
Light switch .................................................................. 4-10
Low-range indicator light (YFM70KPXJ / YFM70KPAJ / YFM70KPHJ / YFM70KPSJ) ................ 4-2MMain switch .................................................................... 4-1
Maintenance and lubrication chart ................................ 8-5
Maintenance chart, emission control system ................ 8-3
Model label .................................................................. 11-1
Multi-function display (YFM70KPXJ / YFM70KPAJ / YFM70KPHJ / YFM70KPSJ) ....................................... 4-5NNeutral indicator light ..................................................... 4-2OOn-Command drive switch “4WD/LOCK” (YFM70KPXJ / YFM70KPAJ / YFM70KPHJ /
YFM70KPSJ) ............................................................. 4-12
Override switch (YFM70KPXJ / YFM70KPAJ / YFM70KPHJ / YFM70KPSJ) ..................................... 4-10
Owner’s manual and tool kit .......................................... 8-2PPanels, removing and installing ..................................... 8-9
Park indicator light ......................................................... 4-2 Parking ........................................................................... 6-4
Parking on a slope ......................................................... 6-5
Part locations ................................................................. 3-1
RRear brake, adjusting the lever, pedal free play .......... 8-45
Rear knuckle pivots, lubricating .................................. 8-52
Reverse indicator light ................................................... 4-2
Riding your ATV ............................................................. 7-1SSafety information .......................................................... 2-1
Seat .............................................................................. 4-19
Shock absorber assemblies, adjusting the front and
rear (YFM70KPXJ / YFM70KPAJ / YFM70KPHJ /
YFM70KPSJ) ............................................................. 4-22
Spark arrester, cleaning ............................................... 8-39
Spark plug, checking ................................................... 8-17
Specifications .............................................................. 10-1
Speed limiter ................................................................ 4-15
Stabilizer bushes, checking .......... ............................... 8-51
Starting the engine ........................................................ 6-1
Start switch .................................................................. 4-10
Steering shaft, lubricating ............................................ 8-52
Storage .......................................................................... 9-2
Storage compartment .................................................. 4-20TTail/brake light bulb, replacing .................................... 8-63
Throttle lever ......................................................... 4-14, 5-4
Throttle lever free play, adjusting ................................ 8-41
Tires ............................................................................... 5-4
Trailer hitch (YFM70KPXJ / YFM70KPAJ / YFM70KPHJ / YFM70KPSJ) ..................................... 4-23
Troubleshooting ........................................................... 8-65
UB1662E0.book Page 2 Monday, April 17, 2017 11:39 AM