check oil YAMAHA KODIAK 700 2021 User Guide
[x] Cancel search | Manufacturer: YAMAHA, Model Year: 2021, Model line: KODIAK 700, Model: YAMAHA KODIAK 700 2021Pages: 176, PDF Size: 4.75 MB
Page 119 of 176
9-24
9
Yamaha’s experience gained over many years of
research and development into oil since the
1960’s helps make Yamalube the best choice for
your Yamaha engine.
EBU27309Final gear oilThe final gear case must be checked for oil leak-
age before each ride. If any leakage is found, have
a Yamaha dealer check and repair the ATV. In ad-
dition, the final gear oil level must be checked and
the oil changed as follows at the intervals speci-
fied in the periodic maintenance chart.
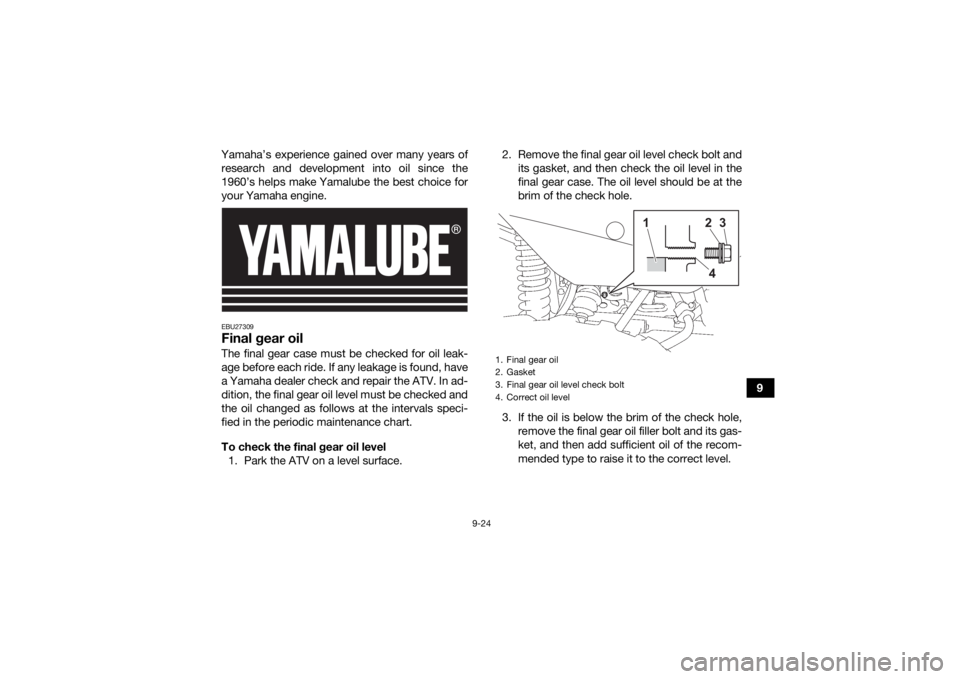
To check the final gear oil level 1. Park the ATV on a level surface. 2. Remove the final gear oil level check bolt and
its gasket, and then check the oil level in the
final gear case. The oil level should be at the
brim of the check hole.
3. If the oil is below the brim of the check hole, remove the final gear oil filler bolt and its gas-
ket, and then add sufficient oil of the recom-
mended type to raise it to the correct level.
1. Final gear oil
2. Gasket
3. Final gear oil level check bolt
4. Correct oil level
1
243
UB5K63E0.book Page 24 Monday, October 12, 2020 4:59 PM
Page 120 of 176
9-25
94. Check the gaskets for damage, and replace
them if necessary.
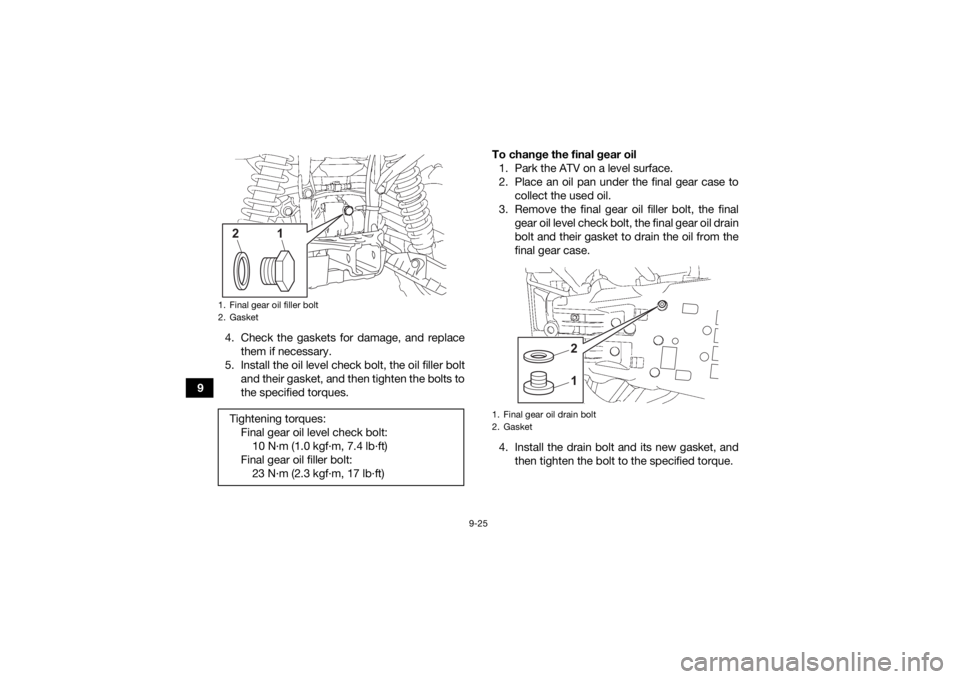
5. Install the oil level check bolt, the oil filler bolt and their gasket, and then tighten the bolts to
the specified torques. To change the final gear oil
1. Park the ATV on a level surface.
2. Place an oil pan under the final gear case to collect the used oil.
3. Remove the final gear oil filler bolt, the final gear oil level check bolt, the final gear oil drain
bolt and their gasket to drain the oil from the
final gear case.
4. Install the drain bolt and its new gasket, and then tighten the bolt to the specified torque.
1. Final gear oil filler bolt
2. GasketTightening torques:Final gear oil level check bolt:10 N·m (1.0 kgf·m, 7.4 lb·ft)
Final gear oil filler bolt: 23 N·m (2.3 kgf·m, 17 lb·ft)
1
2
1. Final gear oil drain bolt
2. Gasket
12
UB5K63E0.book Page 25 Monday, October 12, 2020 4:59 PM
Page 121 of 176
![YAMAHA KODIAK 700 2021 User Guide 9-26
9
5. Refill with the recommended final gear oil to
the brim of the check hole as shown.
NOTICE: Be sure no foreign material en-
ters the final gear case.
[ECB00422]
6. Check the oil level check YAMAHA KODIAK 700 2021 User Guide 9-26
9
5. Refill with the recommended final gear oil to
the brim of the check hole as shown.
NOTICE: Be sure no foreign material en-
ters the final gear case.
[ECB00422]
6. Check the oil level check](/img/51/50554/w960_50554-120.png)
9-26
9
5. Refill with the recommended final gear oil to
the brim of the check hole as shown.
NOTICE: Be sure no foreign material en-
ters the final gear case.
[ECB00422]
6. Check the oil level check bolt gasket and the oil filler bolt gasket for damage, and replace
them if necessary.
7. Install the oil level check bolt, the oil filler bolt and their gasket, and then tighten the bolts to
the specified torques.
8. Check the final gear case for oil leakage. If oil is leaking, check for the cause.EBU23429Differential gear oilThe differential gear case must be checked for oil
leakage before each ride. If any leakage is found,
have a Yamaha dealer check and repair the ATV.
In addition, the differential gear oil level must be
checked and the oil changed as follows at the in-
tervals specified in the periodic maintenance
chart.
Tightening torque:
Final gear oil drain bolt:23 N·m (2.3 kgf·m, 17 lb·ft)
1. Final gear oil
2. Gasket
3. Final gear oil level check bolt
4. Correct oil levelRecommended final gear oil: See page 11-1.
1
243
Tightening torquesWFinal gear oil level check bolt:10 N
Page 122 of 176
9-27
9To check the differential gear oil level
1. Park the ATV on a level surface.
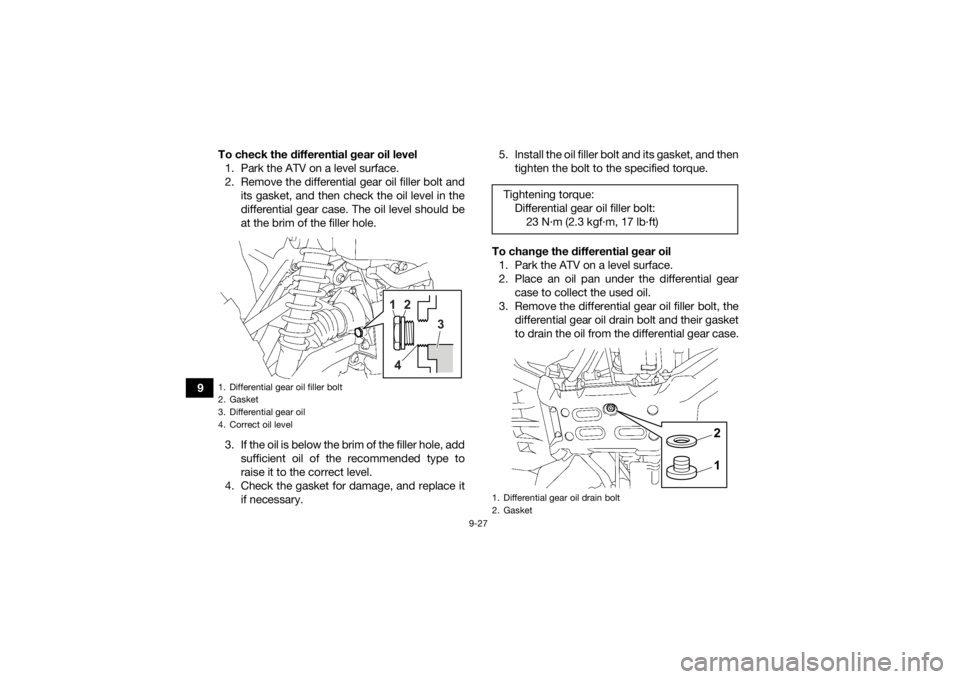
2. Remove the differential gear oil filler bolt and its gasket, and then check the oil level in the
differential gear case. The oil level should be
at the brim of the filler hole.
3. If the oil is below the brim of the filler hole, add sufficient oil of the recommended type to
raise it to the correct level.
4. Check the gasket for damage, and replace it if necessary. 5. Install the oil filler bolt and its gasket, and then
tighten the bolt to the specified torque.
To change the differential gear oil 1. Park the ATV on a level surface.
2. Place an oil pan under the differential gear case to collect the used oil.
3. Remove the differential gear oil filler bolt, the differential gear oil drain bolt and their gasket
to drain the oil from the differential gear case.
1. Differential gear oil filler bolt
2. Gasket
3. Differential gear oil
4. Correct oil level
1
2
3
4
Tightening torque: Differential gear oil filler bolt:23 N
Page 123 of 176
9-28
9
4. Install the drain bolt and its new gasket, and
then tighten the bolt to the specified torque.
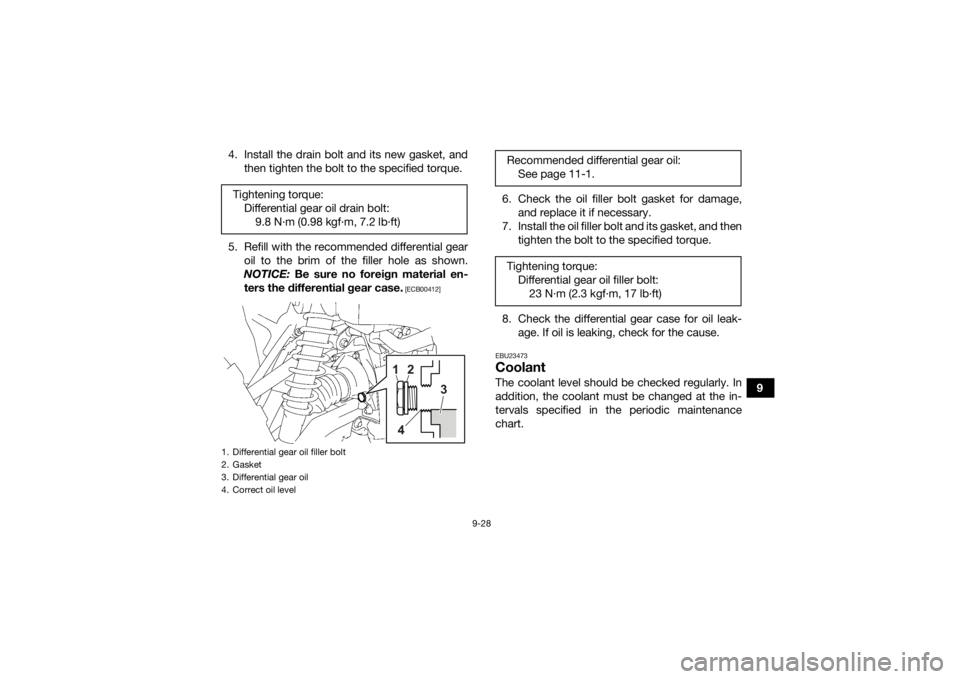
5. Refill with the recommended differential gear oil to the brim of the filler hole as shown.
NOTICE: Be sure no foreign material en-
ters the differential gear case.
[ECB00412]
6. Check the oil filler bolt gasket for damage, and replace it if necessary.
7. Install the oil filler bolt and its gasket, and then tighten the bolt to the specified torque.
8. Check the differential gear case for oil leak- age. If oil is leaking, check for the cause.EBU23473CoolantThe coolant level should be checked regularly. In
addition, the coolant must be changed at the in-
tervals specified in the periodic maintenance
chart.
Tightening torque:
Differential gear oil drain bolt:9.8 N·m (0.98 kgf·m, 7.2 lb·ft)
1. Differential gear oil filler bolt
2. Gasket
3. Differential gear oil
4. Correct oil level
1
2
3
4
Recommended differential gear oil: See page 11-1.
Tightening torque: Differential gear oil filler bolt:23 N
Page 133 of 176
9-38
9
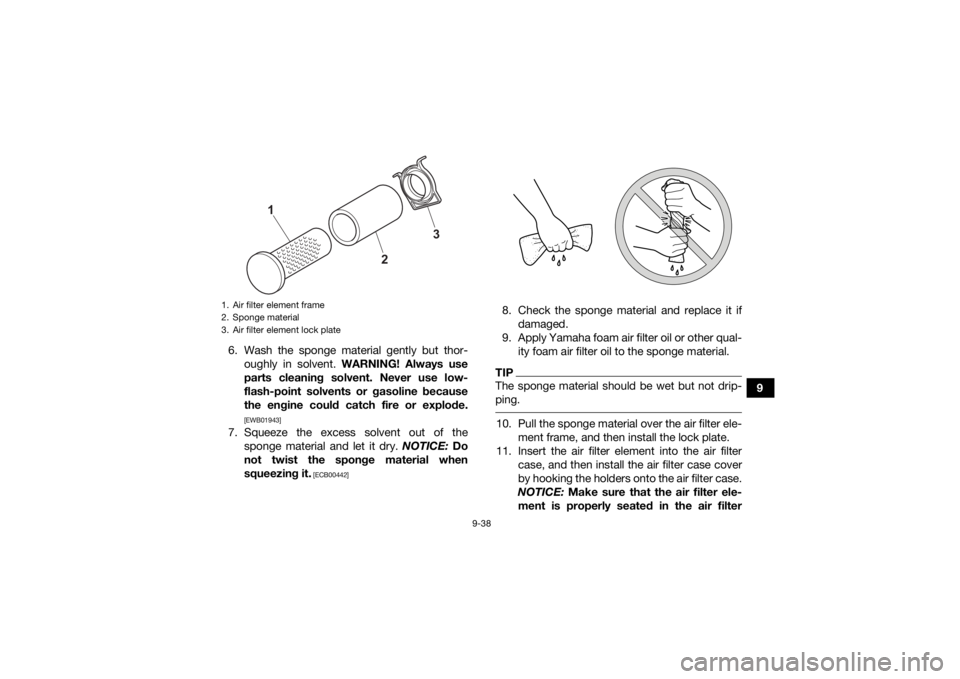
6. Wash the sponge material gently but thor-
oughly in solvent. WARNING! Always use
parts cleaning solvent. Never use low-
flash-point solvents or gasoline because
the engine could catch fire or explode.
[EWB01943]
7. Squeeze the excess solvent out of the sponge material and let it dry. NOTICE: Do
not twist the sponge material when
squeezing it.
[ECB00442]
8. Check the sponge material and replace it if damaged.
9. Apply Yamaha foam air filter oil or other qual- ity foam air filter oil to the sponge material.TIPThe sponge material should be wet but not drip-
ping. 10. Pull the sponge material over the air filter ele- ment frame, and then install the lock plate.
11. Insert the air filter element into the air filter case, and then install the air filter case cover
by hooking the holders onto the air filter case.
NOTICE: Make sure that the air filter ele-
ment is properly seated in the air filter
1. Air filter element frame
2. Sponge material
3. Air filter element lock plate
3
2
1
UB5K63E0.book Page 38 Monday, October 12, 2020 4:59 PM
Page 139 of 176
9-44
9
Refill with the same type of brake fluid. Add-
ing a brake fluid other than DOT 4 may result
in a harmful chemical reaction.
Be careful that water does not enter the
brake fluid reservoir when refilling. Water will
significantly lower the boiling point of the flu-
id and may result in vapor lock.
EBU24284Changing the brake fluidHave a Yamaha dealer change the brake fluid at
the intervals specified in the periodic maintenance
chart. In addition, have the oil seals of the brake
master cylinder and calipers as well as the brake
hoses replaced at the intervals listed below or
whenever they are damaged or leaking.
Oil seals: Replace every two years.
Brake hoses: Replace every four years.
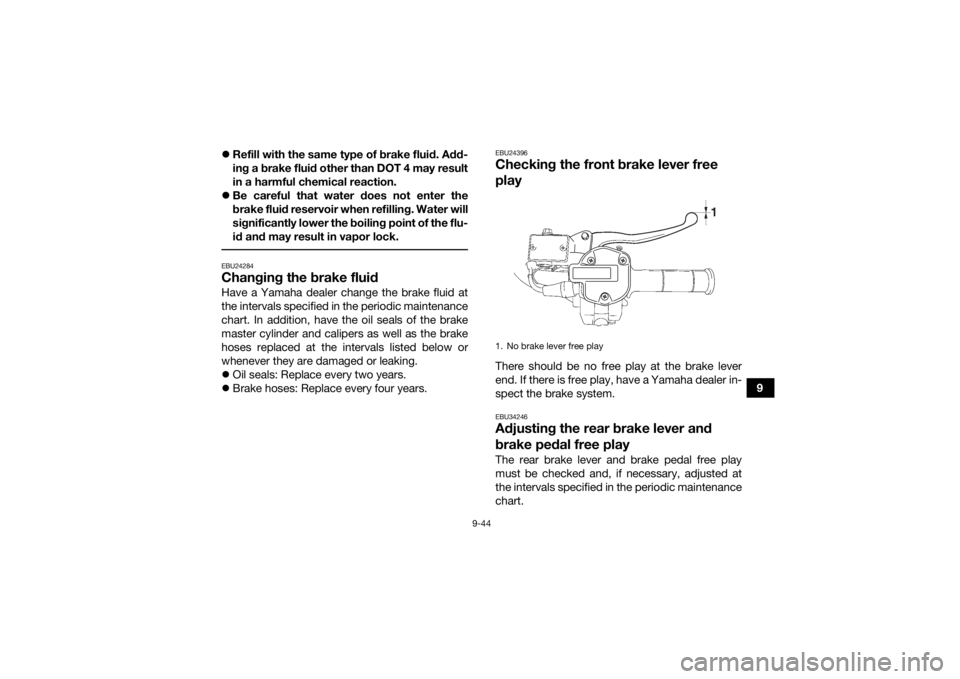
EBU24396Checking the front brake lever free
playThere should be no free play at the brake lever
end. If there is free play, have a Yamaha dealer in-
spect the brake system.EBU34246Adjusting the rear brake lever and
brake pedal free playThe rear brake lever and brake pedal free play
must be checked and, if necessary, adjusted at
the intervals specified in the periodic maintenance
chart.1. No brake lever free play
UB5K63E0.book Page 44 Monday, October 12, 2020 4:59 PM
Page 148 of 176
9-53
9
TIPFor parts equipped with a grease nipple, use a
grease gun. EBU2904FBatteryThis model is equipped with a 12-volt VRLA
(valve-regulated lead-acid) battery. There is no
need to check the electrolyte or add distilled wa-
ter. However, the battery lead connections need
to be checked and tightened, and the battery ter-
minals cleaned if corroded. If the battery seems to
have discharged, recharge it as soon as possible.TIPWear gloves and eye protection in a ventilated
area away from sparks and open flames. Wash
hands after handling.
It is recommended to have the battery serviced
by a Yamaha dealer.
WARNING
EWB02161Battery electrolyte is poisonous and danger-
ous, as it contains sulfuric acid, which can
cause severe burns. Avoid contact with skin,
eyes or clothing. Always shield your eyes when
working near batteries.
Antidote:
EXTERNAL: Flush with water.
INTERNAL: Drink large quantities of water or
milk. Follow with milk of magnesia, beaten egg
or vegetable oil. Call a physician immediately.
EYES: Flush with water for 15 minutes and get
prompt medical attention.
Batteries produce explosive gases. Keep
sparks, flame, cigarettes or other sources of
ignition away. Ventilate when charging or using
in an enclosed space.
KEEP OUT OF REACH OF CHILDREN. To remove the battery
1. Remove panel A. (See page 9-9.)
2. Remove the front carrier by removing the bolts.
UB5K63E0.book Page 53 Monday, October 12, 2020 4:59 PM
Page 173 of 176

13-1
13
INDEX
AAccessories and loading ................................................ 7-5
Accessories, DC jack ................................................... 5-30
Air filter element, cleaning ........................................... 9-36
Axle boots .................................................................... 9-47BBattery ......................................................................... 9-53
Battery voltage warning light ......................................... 5-3
Brake fluid, changing ................................................... 9-44
Brake fluid level, checking ........................................... 9-43
Brake lever free play, checking the front ..................... 9-44
Brake lever, front ......................................................... 5-19
Brake levers, checking and lubricating ........................ 9-49
Brake light switches ..................................................... 9-48
Brake pads and friction plates, checking .................... 9-42
Brake pedal and rear brake lever ................................. 5-20
Brake pedal, checking and lubricating ........................ 9-50
Brakes .......................................................................... 9-41
Brakes, front and rear .................................................... 6-3
Brake/tail light bulb, replacing ..................................... 9-63CCables, checking and lubricating ................................ 9-48
Carrier, front ................................................................. 5-26
Carrier, rear .................................................................. 5-26
Chassis fasteners .......................................................... 6-7
Cleaning ....................................................................... 10-1
Coolant .................................................................6-3, 9-28
Coolant temperature warning light ................................ 5-3
DDifferential gear lock, indicators (YFM700FWBD) ......... 5-5
Differential gear oil ................................................6-3, 9-26
Drive lever 2WD/4WD (YFM700FWB) .......................... 5-17
Drive select lever ......................................................... 5-21
Drive select lever and driving in reverse ........................ 7-2EEmissions Certification label (for Europe) .................... 12-1
Engine break-in .............................................................. 7-4
Engine oil ....................................................................... 6-3
Engine oil and oil filter cartridge .................................. 9-19
Engine stop switch ...................................................... 5-13
Engine trouble warning light .......................................... 5-4
EPS warning light (YFM700FWBD) ................................ 5-4FFinal gear oil ......................................................... 6-3, 9-24
Four-wheel drive icon (YFM700FWBD) ......................... 5-5
Four-wheel drive indicator light (YFM700FWB) ............. 5-5
Four-wheel drive switch (On-Command 4WD) (YFM700FWBD) ......................................................... 5-15
Fuel ....................................................................... 5-22, 6-3
Fuel level warning light (YFM700FWB) .......................... 5-4
Fuel tank cap ............................................................... 5-21
Fuses, replacing .......................................................... 9-56HHandlebar switches ..................................................... 5-12
Headlight beam, adjusting ........................................... 9-62
Headlight bulb, replacing ............................................. 9-59
High beam indicator light ............................................... 5-3
UB5K63E0.book Page 1 Monday, October 12, 2020 4:59 PM