fuel YAMAHA MAJESTY 250 2003 User Guide
[x] Cancel search | Manufacturer: YAMAHA, Model Year: 2003, Model line: MAJESTY 250, Model: YAMAHA MAJESTY 250 2003Pages: 116, PDF Size: 2.07 MB
Page 49 of 116
5-4
OPERATION AND IMPORTANT RIDING POINTS
5
EAU04755
Tips for reducing fuel
consumption
Fuel consumption, tips for reducingFuel consumption depends largely on
your riding style. Consider the follow-
ing tips to reduce fuel consumption:
8Avoid high engine speeds during
acceleration.
8Avoid high engine speeds with
no load on the engine.
8Turn the engine off instead of let-
ting it idle for an extended length
of time (e.g., in traffic jams, at
traffic lights or at railroad cross-
ings).
EAU01128
Engine break-inEngine break-inThere is never a more important peri-
od in the life of your engine than the
period between 0 and 1,600 km. For
this reason, you should read the fol-
lowing material carefully.
Since the engine is brand new, do
not put an excessive load on it for the
first 1,600 km. The various parts in
the engine wear and polish them-
selves to the correct operating clear-
ances. During this period, prolonged
full-throttle operation or any condition
that might result in engine overheat-
ing must be avoided.
EAU04590
0–1,000 km
Avoid prolonged operation above
4,000 r/min.
1,000–1,600 km
Avoid prolonged operation above
5,000 r/min.
ECA00138
cC
After 1,000 km of operation, be
sure to replace the engine oil and
final transmission oil.
1,600 km and beyond
The vehicle can now be operated
normally.
ECA00137
cC
8
8
Keep the engine speed below
8,500 r/min.
8 8
If any engine trouble should
occur during the engine break-
in period, immediately have a
Yamaha dealer check the vehi-
cle.
5SJ-28199-E1 7/11/02 11:03 AM Page 47
Page 54 of 116

6-3
PERIODIC MAINTENANCE AND MINOR REPAIR
6
EAU03685
Periodic maintenance and lubrication chartPeriodic maintenance and lubrication chartNOTE:
8 8
The annual checks must be performed every year, except if a kilometer-based maintenance is performed instead.
8From 50,000 km, repeat the maintenance intervals starting from 10,000 km.
8Items marked with an asterisk should be performed by a Yamaha dealer as they require special tools, data and
technical skills.
NO. ITEM CHECK OR MAINTENANCE JOBODOMETER READING (× 1,000 km)
ANNUAL
CHECK
1 10203040
1
*Fuel line•Check fuel hoses and vacuum hose for cracks or damage.√√√√ √
2 Spark plug•Check condition.
•Clean and regap.√√
•Replace.√√
3
*Valves•Check valve clearance.
•Adjust.√√
4 Air filter element•Clean.√√
•Replace.√√
5V-belt case air filter
element•Clean.√√√√
6
*Front brake•Check operation, fluid level and vehicle for fluid leakage.
(See NOTE on page 6-5.)√√√√√ √
•Replace brake pads.Whenever worn to the limit
7
*Rear brake•Check operation, fluid level and vehicle for fluid leakage.
(See NOTE on page 6-5.)√√√√√ √
•Replace brake pads.Whenever worn to the limit
5SJ-28199-E1 7/11/02 11:03 AM Page 52
Page 74 of 116
6-23
PERIODIC MAINTENANCE AND MINOR REPAIR
6
EAU03094
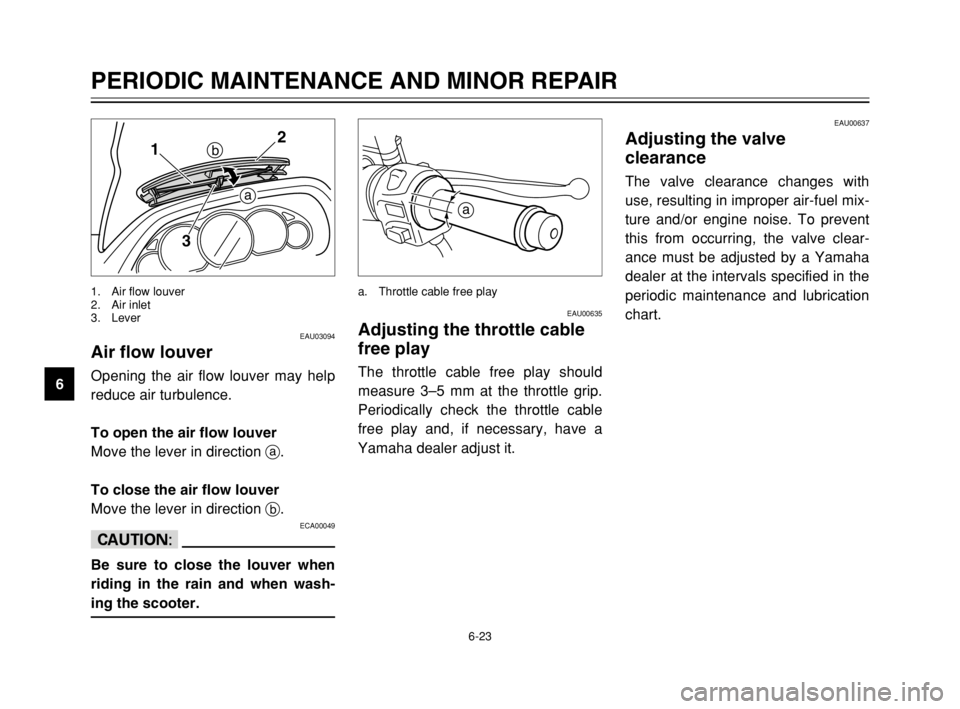
Air flow louverAir flow louverOpening the air flow louver may help
reduce air turbulence.
To open the air flow louver
Move the lever in direction a.
To close the air flow louver
Move the lever in direction b.
ECA00049
cC
Be sure to close the louver when
riding in the rain and when wash-
ing the scooter.
12
b
3a
1. Air flow louver
2. Air inlet
3. Lever
EAU00637
Adjusting the valve
clearance
Valve clearance, adjustingThe valve clearance changes with
use, resulting in improper air-fuel mix-
ture and/or engine noise. To prevent
this from occurring, the valve clear-
ance must be adjusted by a Yamaha
dealer at the intervals specified in the
periodic maintenance and lubrication
chart.
EAU00635
Adjusting the throttle cable
free play
Throttle cable free play, adjustingThe throttle cable free play should
measure 3–5 mm at the throttle grip.
Periodically check the throttle cable
free play and, if necessary, have a
Yamaha dealer adjust it.
a
a. Throttle cable free play
5SJ-28199-E1 7/11/02 11:03 AM Page 72
Page 93 of 116
6-42
PERIODIC MAINTENANCE AND MINOR REPAIR
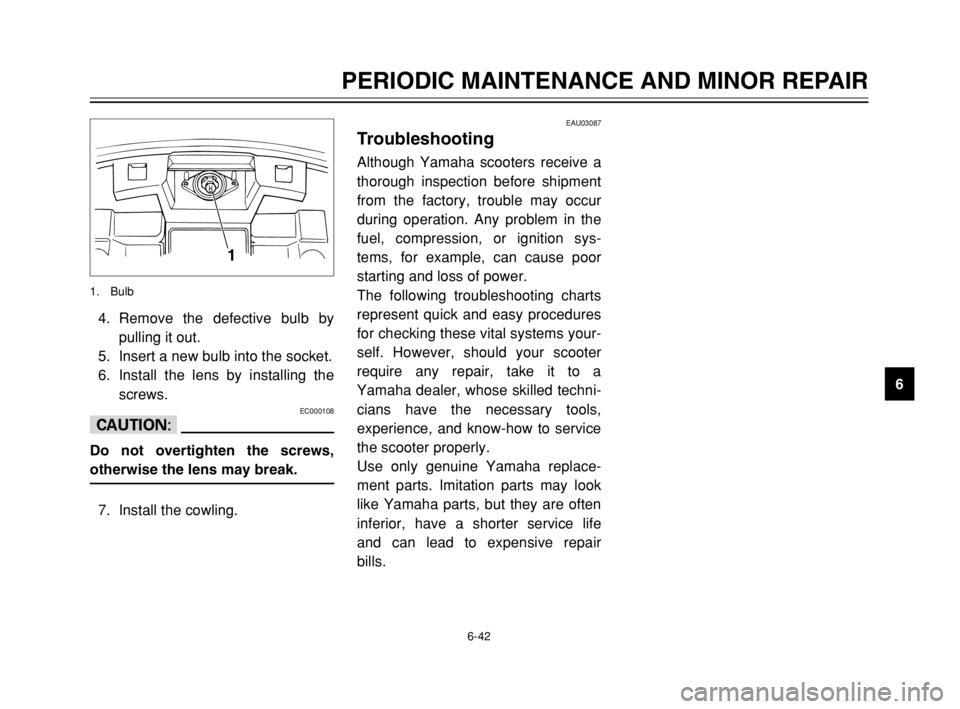
6 4. Remove the defective bulb by
pulling it out.
5. Insert a new bulb into the socket.
6. Install the lens by installing the
screws.
EC000108
cC
Do not overtighten the screws,
otherwise the lens may break.
7. Install the cowling.
1
1. Bulb
EAU03087
TroubleshootingTroubleshootingAlthough Yamaha scooters receive a
thorough inspection before shipment
from the factory, trouble may occur
during operation. Any problem in the
fuel, compression, or ignition sys-
tems, for example, can cause poor
starting and loss of power.
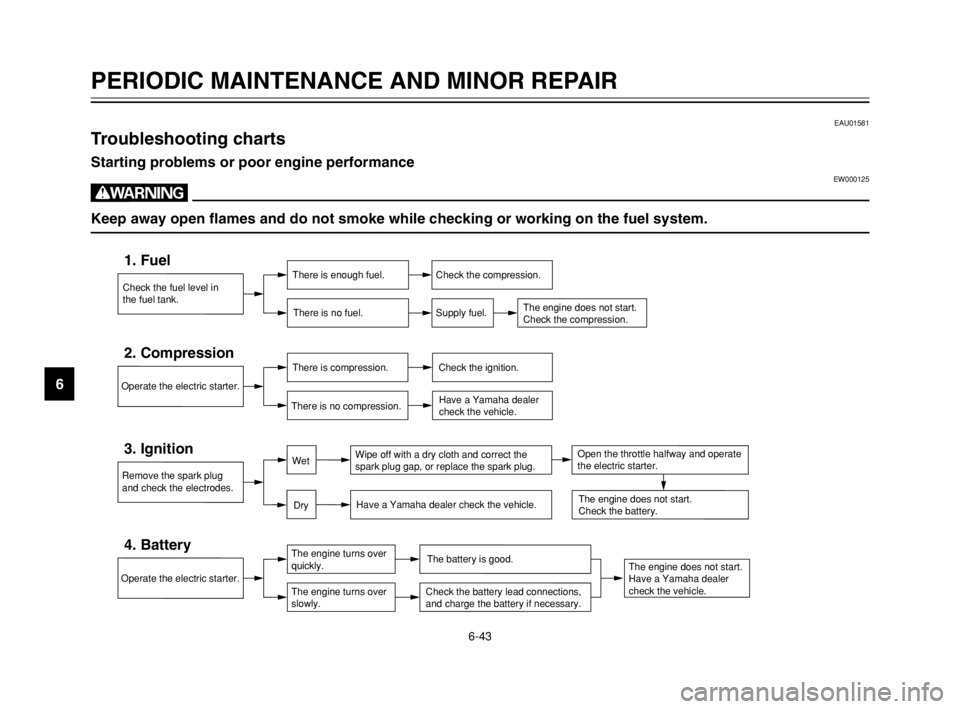
The following troubleshooting charts
represent quick and easy procedures
for checking these vital systems your-
self. However, should your scooter
require any repair, take it to a
Yamaha dealer, whose skilled techni-
cians have the necessary tools,
experience, and know-how to service
the scooter properly.
Use only genuine Yamaha replace-
ment parts. Imitation parts may look
like Yamaha parts, but they are often
inferior, have a shorter service life
and can lead to expensive repair
bills.
5SJ-28199-E1 7/11/02 11:03 AM Page 91
Page 94 of 116
6-43
PERIODIC MAINTENANCE AND MINOR REPAIR
6
EAU01581
Troubleshooting chartsTroubleshooting chartsStarting problems or poor engine performanceEW000125
w
Keep away open flames and do not smoke while checking or working on the fuel system.
Check the fuel level in
the fuel tank.
1. FuelThere is enough fuel.
There is no fuel.Check the compression.
Supply fuel.
The engine does not start.
Check the compression.
Operate the electric starter.
2. CompressionThere is compression.
There is no compression.Check the ignition.
Have a Yamaha dealer
check the vehicle.
Remove the spark plug
and check the electrodes.
3. IgnitionWipe off with a dry cloth and correct the
spark plug gap, or replace the spark plug.
Have a Yamaha dealer check the vehicle.
The engine does not start.
Have a Yamaha dealer
check the vehicle.
The engine does not start.
Check the battery.
Operate the electric starter.
4. BatteryThe engine turns over
quickly.
The engine turns over
slowly.The battery is good.
Check the battery lead connections,
and charge the battery if necessary.
Dry
WetOpen the throttle halfway and operate
the electric starter.
5SJ-28199-E1 7/11/02 11:03 AM Page 92
Page 99 of 116
7-2
SCOOTER CARE AND STORAGE
7 8 8
Do not use any harsh chemical
products on plastic parts. Be
sure to avoid using cloths or
sponges which have been in
contact with strong or abra-
sive cleaning products, sol-
vent or thinner, fuel (gasoline),
rust removers or inhibitors,
brake fluid, antifreeze or elec-
trolyte.
8 8
Do not use high-pressure
washers or steam-jet cleaners
since they cause water seep-
age and deterioration in the
following areas: seals (of
wheel and swingarm bearings,
fork and brakes), electric com-
ponents (couplers, connec-
tors, instruments, switches
and lights), breather hoses
and vents.8 8
For scooters equipped with a
windshield: Do not use strong
cleaners or hard sponges as
they will cause dulling or
scratching. Some cleaning
compounds for plastic may
leave scratches on the wind-
shield. Test the product on a
small hidden part of the wind-
shield to make sure that it
does not leave any marks. If
the windshield is scratched,
use a quality plastic polishing
compound after washing.After normal use
Remove dirt with warm water, a mild
detergent, and a soft, clean sponge,
and then rinse thoroughly with clean
water. Use a toothbrush or bottle-
brush for hard-to-reach areas.
Stubborn dirt and insects will come
off more easily if the area is covered
with a wet cloth for a few minutes
before cleaning.After riding in the rain, near the sea
or on salt-sprayed roads
Since sea salt or salt sprayed on the
roads during winter are extremely
corrosive in combination with water,
carry out the following steps after
each ride in the rain, near the sea or
on salt-sprayed roads.
NOTE:
Salt sprayed on roads in the winter
may remain well into spring.
1. Clean the scooter with cold water
and a mild detergent after the
engine has cooled down.
ECA00012
cC
Do not use warm water since it
increases the corrosive action of
the salt.
2. Apply a corrosion protection
spray on all metal, including
chrome- and nickel-plated, sur-
faces to prevent corrosion.
5SJ-28199-E1 7/11/02 11:03 AM Page 97
Page 101 of 116
7-4
SCOOTER CARE AND STORAGE
7
StorageStorageShort-term
Always store your scooter in a cool,
dry place and, if necessary, protect it
against dust with a porous cover.
ECA00015
cC
8
8
Storing the scooter in a poorly
ventilated room or covering it
with a tarp, while it is still wet,
will allow water and humidity
to seep in and cause rust.
8 8
To prevent corrosion, avoid
damp cellars, stables (because
of the presence of ammonia)
and areas where strong chemi-
cals are stored.
Long-term
Before storing your scooter for sever-
al months:
1. Follow all the instructions in the
“Care” section of this chapter.
2. Drain the carburetor float cham-
ber by loosening the drain bolt;
this will prevent fuel deposits
from building up. Pour the
drained fuel into the fuel tank.
3. Fill up the fuel tank and add fuel
stabilizer (if available) to prevent
the fuel tank from rusting and the
fuel from deteriorating.
4. Perform the following steps to
protect the cylinder, piston rings,
etc. from corrosion.a. Remove the spark plug cap
and spark plug.
b. Pour a teaspoonful of engine
oil into the spark plug bore.
c. Install the spark plug cap onto
the spark plug, and then place
the spark plug on the cylinder
head so that the electrodes
are grounded. (This will limit
sparking during the next step.)
d. Turn the engine over several
times with the starter. (This
will coat the cylinder wall with
oil.)
e. Remove the spark plug cap
from the spark plug, and then
install the spark plug and the
spark plug cap.
EWA00003
w
To prevent damage or injury from
sparking, make sure to ground the
spark plug electrodes while turn-
ing the engine over.
5SJ-28199-E1 7/11/02 11:03 AM Page 99
Page 104 of 116
8-1
EAU01038
SPECIFICATIONS
8
SpecificationsSpecificationsModel YP250A
Dimensions
Overall length 2,145 mm
Overall width 770 mm
Overall height 1,350 mm
Seat height 730 mm
Wheelbase 1,535 mm
Ground clearance 120 mm
Minimum turning radius 2,700 mm
Basic weight (with oil and full
fuel tank)177 kg
Engine
Engine type Liquid-cooled 4-stroke, SOHC
Cylinder arrangement Forward inclined single
cylinder
Displacement 249 cm
3
Bore ×Stroke 69.0 ×66.8 mm
Compression ratio 10:1
Starting system Electric starter
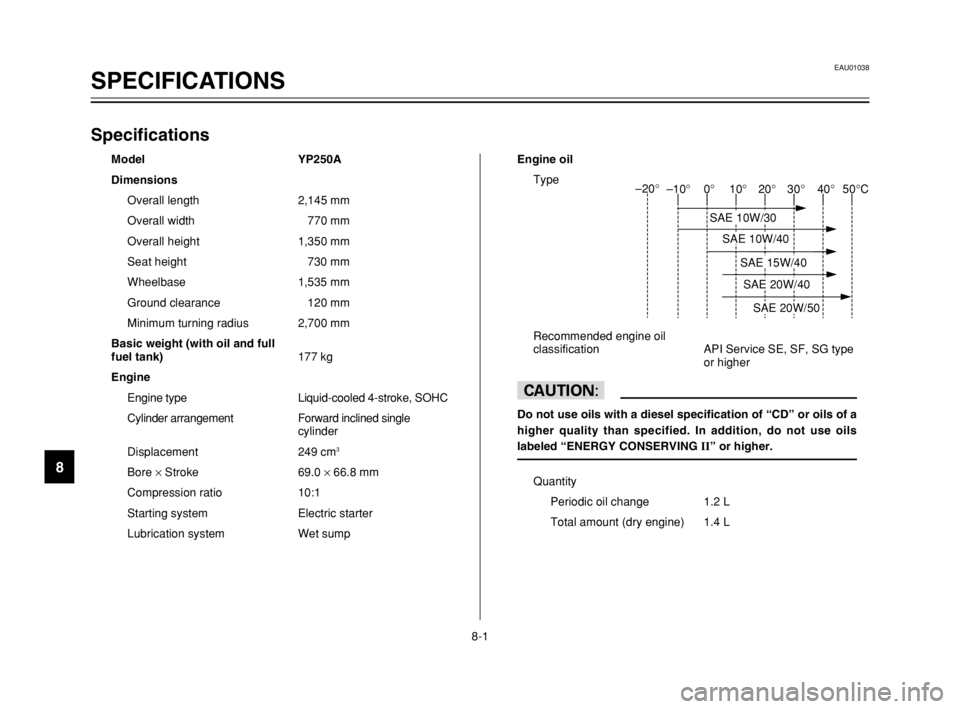
Lubrication system Wet sumpEngine oil
Type
Recommended engine oil
classification API Service SE, SF, SG type
or higher
cC
Do not use oils with a diesel specification of “CD” or oils of a
higher quality than specified. In addition, do not use oils
labeled “ENERGY CONSERVING II” or higher.
Quantity
Periodic oil change 1.2 L
Total amount (dry engine) 1.4 L
–10° 0° 10° 20° 30°
40°
SAE 10W/30
SAE 10W/40
SAE 20W/40
SAE 20W/50
–20°
SAE 15W/40 50°C
5SJ-28199-E1 7/11/02 11:03 AM Page 102
Page 105 of 116

8-2
SPECIFICATIONS
8
Final transmission oil
Type Engine oil SAE 10W-30
(API SE)
Total amount 0.25 L
Radiator capacity
(including all routes)1.4 L
Air filterWet type element
Fuel
Type REGULAR UNLEADED
GASOLINE ONLY
Fuel tank capacity 12 L
Carburetor
Manufacturer TEIKEI
Model × quantity Y28V-1E × 1
Spark plug
Manufacturer/model NGK/DR8EA
Spark plug gap 0.6–0.7 mm
Clutch typeDry, centrifugal automatic
Transmission
Primary reduction system Helical gear
Primary reduction ratio 40/15 (2.666)
Secondary reduction system Helical gear
Secondary reduction ratio 38/15 (2.533)Transmission type V-belt automatic
Operation Centrifugal automatic type
Chassis
Frame type Steel tube underbone
Caster angle 28°
Trail 103 mm
Tires
Front
Type Tubeless
Size 110/90-12 64L
Manufacturer/ IRC/MB67
model MICHELIN/BOPPER
Rear
Type Tubeless
Size 130/70-12 62L
Manufacturer/ IRC/MB67
model MICHELIN/BOPPER
Maximum load* 178 kg
Air pressure (cold tire)
up to 90 kg load*
Front175 kPa (1.75 kgf/cm
2, 1.75 bar)
Rear 200 kPa (2.00 kgf/cm
2, 2.00 bar)
5SJ-28199-E1 7/11/02 11:03 AM Page 103
Page 112 of 116
INDEX
D
Display, multi-function ............................3-5
E
Engine break-in ......................................5-4
Engine oil ..............................................6-14
F
Final transmission oil ............................6-18
Front and rear brake lever free play,
adjusting ...........................................6-27
Front and rear brake pads, checking ....6-28
Front fork, checking ..............................6-32
Fuel ......................................................3-16
Fuel consumption, tips for reducing .......5-4
Fuel gauge .............................................3-5
Fuel tank cap ........................................3-15
Fuses, replacing ...................................6-36
H
Handlebar switches ..............................3-10
Dimmer switch ..................................3-10
Engine stop switch ............................3-11
Horn switch .......................................3-10
Pass switch .......................................3-10
Start switch .......................................3-11
Turn signal switch .............................3-10
Headlight bulb, replacing ......................6-37I
Identification numbers ............................9-1
Ignition circuit cut-off system ................3-22
Indicator and warning lights ....................3-2
ABS warning light ................................3-2
High beam indicator light .....................3-3
Oil change indicator light .....................3-3
Turn signal indicator lights ...................3-2
K
Key identification number .......................9-1
L
License plate light bulb, replacing ........6-41
M
Main switch/steering lock .......................3-1
Model label .............................................9-2
P
Parking ...................................................5-5
Part locations ..........................................2-1
Periodic maintenance and lubrication
chart .....................................................6-3
Pre-operation check list ..........................4-1
R
Rider seat .............................................3-18
Rider seat, adjusting .............................3-18A
ABS ......................................................3-13
Acceleration and deceleration ................5-3
Air filter and V-belt case air filter
elements, cleaning ............................6-21
Air flow louver .......................................6-23
Anti-theft alarm (optional) .....................3-10
B
Battery ..................................................6-34
Battery cover removal ..........................6-34
Brake fluid level, checking ....................6-29
Brake fluid, changing ............................6-30
Brake lever, front ..................................3-11
Brake lever, rear ...................................3-12
Brake levers, lubricating .......................6-31
Braking ...................................................5-3
C
Cables, checking and lubricating ..........6-30
Care ........................................................7-1
Catalytic converter ................................3-17
Centerstand and sidestand, checking
and lubricating ..................................6-31
Conversion table ....................................8-5
Coolant .................................................6-19
Coolant temperature gauge ....................3-5
Cowlings and panel, removing and
installing ..............................................6-6
5SJ-28199-E1 7/11/02 11:03 AM Page 110