oil level YAMAHA MAJESTY 250 2003 Owners Manual
[x] Cancel search | Manufacturer: YAMAHA, Model Year: 2003, Model line: MAJESTY 250, Model: YAMAHA MAJESTY 250 2003Pages: 116, PDF Size: 2.07 MB
Page 15 of 116
2-2
DESCRIPTION
2
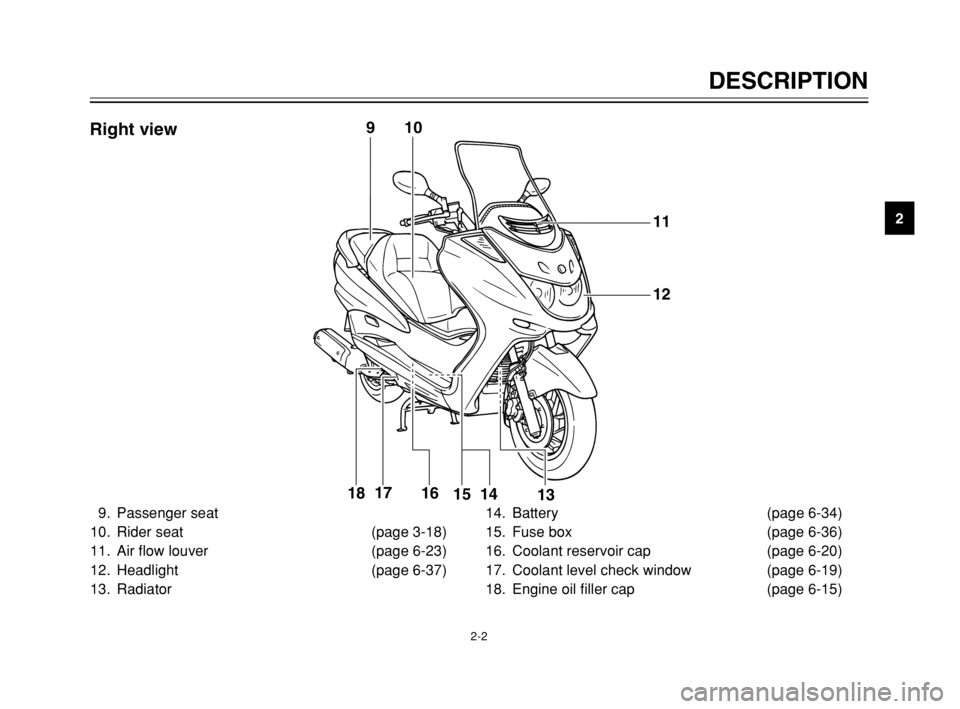
9. Passenger seat
10. Rider seat (page 3-18)
11. Air flow louver (page 6-23)
12. Headlight (page 6-37)
13. Radiator 14. Battery (page 6-34)
15. Fuse box (page 6-36)
16. Coolant reservoir cap (page 6-20)
17. Coolant level check window (page 6-19)
18. Engine oil filler cap (page 6-15)11
12
13 16 17
18
14 15
109Right view
5SJ-28199-E1 7/11/02 11:03 AM Page 13
Page 42 of 116

4-1
EAU01114
PRE-OPERATION CHECKS
4The condition of a vehicle is the owner’s responsibility. Vital components can start to deteriorate quickly and unexpect-
edly, even if the vehicle remains unused (for example, as a result of exposure to the elements). Any damage, fluid leak-
age or loss of tire air pressure could have serious consequences. Therefore, it is very important, in addition to a thor-
ough visual inspection, to check the following points before each ride.
EAU03439
Pre-operation check listPre-operation check list
ITEM CHECKS PAGE
Fuel•Check fuel level in fuel tank.
•Refuel if necessary.
•Check fuel line for leakage.3-5, 3-16– 3-17
Engine oil•Check oil level in engine.
•If necessary, add recommended oil to specified level.
•Check vehicle for oil leakage.6-14–6-17
Final transmission oil•Check vehicle for oil leakage. 6-18–6-19
Coolant•Check coolant level in reservoir.
•If necessary, add recommended coolant to specified level.
•Check cooling system for leakage.3-5, 6-19–6-20
Front brake•Check operation.
•If soft or spongy, have Yamaha dealer bleed hydraulic system.
•Check lever free play.
•Adjust if necessary.
•Check fluid level in reservoir.
•If necessary, add recommended brake fluid to specified level.
•Check hydraulic system for leakage.3-11, 6-27–6-30
5SJ-28199-E1 7/11/02 11:03 AM Page 40
Page 51 of 116
PERIODIC MAINTENANCE AND MINOR REPAIR
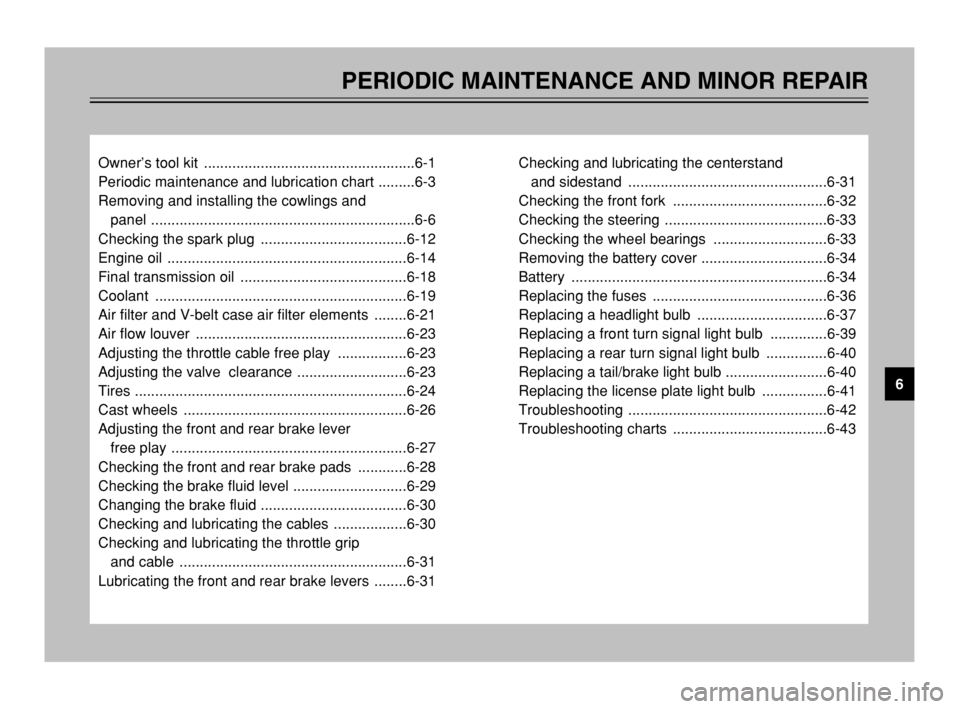
Owner’s tool kit ....................................................6-1
Periodic maintenance and lubrication chart .........6-3
Removing and installing the cowlings and
panel .................................................................6-6
Checking the spark plug ....................................6-12
Engine oil ...........................................................6-14
Final transmission oil .........................................6-18
Coolant ..............................................................6-19
Air filter and V-belt case air filter elements ........6-21
Air flow louver ....................................................6-23
Adjusting the throttle cable free play .................6-23
Adjusting the valve clearance ...........................6-23
Tires ...................................................................6-24
Cast wheels .......................................................6-26
Adjusting the front and rear brake lever
free play ..........................................................6-27
Checking the front and rear brake pads ............6-28
Checking the brake fluid level ............................6-29
Changing the brake fluid ....................................6-30
Checking and lubricating the cables ..................6-30
Checking and lubricating the throttle grip
and cable ........................................................6-31
Lubricating the front and rear brake levers ........6-31Checking and lubricating the centerstand
and sidestand .................................................6-31
Checking the front fork ......................................6-32
Checking the steering ........................................6-33
Checking the wheel bearings ............................6-33
Removing the battery cover ...............................6-34
Battery ...............................................................6-34
Replacing the fuses ...........................................6-36
Replacing a headlight bulb ................................6-37
Replacing a front turn signal light bulb ..............6-39
Replacing a rear turn signal light bulb ...............6-40
Replacing a tail/brake light bulb .........................6-40
Replacing the license plate light bulb ................6-41
Troubleshooting .................................................6-42
Troubleshooting charts ......................................6-43
6
5SJ-28199-E1 7/11/02 11:03 AM Page 49
Page 55 of 116

6-4
PERIODIC MAINTENANCE AND MINOR REPAIR
6
8*Brake hoses•Check for cracks or damage.√√√√ √
•Replace. (See NOTE on page 6-5.)Every 4 years
9
*Wheels•Check runout and for damage.√√√√
10
*Tires•Check tread depth and for damage.
•Replace if necessary.
•Check air pressure.
•Correct if necessary.√√√√ √
11
*Wheel bearings•Check bearing for looseness or damage.√√√√
12
*Steering bearings•Check bearing play and steering for roughness.√√√√√
•Lubricate with lithium-soap-based grease.Every 20,000 km
13
*Chassis fasteners•Make sure that all nuts, bolts and screws are properly tightened.√√√√ √
14 Sidestand, centerstand•Check operation.
•Lubricate.√√√√ √
15
*Sidestand switch•Check operation.√√√√√ √
16
*Front fork•Check operation and for oil leakage.√√√√
17
*Shock absorber
assemblies•Check operation and shock absorbers for oil leakage.√√√√
18
*Carburetor•Adjust engine idling speed.√√√√√ √
19 Engine oil•Change. (See page 3-3 and 6-17 for more information
about the oil change indicator light.)√When the oil change indicator light comes on
(every 3,000 km)
•Check oil level and vehicle for oil leakage.Every 3,000 km√ NO. ITEM CHECK OR MAINTENANCE JOBODOMETER READING (× 1,000 km)
ANNUAL
CHECK
1 10203040
5SJ-28199-E1 7/11/02 11:03 AM Page 53
Page 56 of 116

6-5
PERIODIC MAINTENANCE AND MINOR REPAIR
6
EAU03884
NOTE:
8The air filter needs more frequent service if you are riding in unusually wet or dusty areas.
8Hydraulic brake service
9Regularly check and, if necessary, correct the brake fluid level.
9Every two years replace the internal components of the brake master cylinders and calipers, and change the
brake fluid.
9Replace the brake hoses every four years and if cracked or damaged.
20*Engine oil strainer•Clean.√
21
*Cooling system•Check coolant level and vehicle for coolant leakage.√√√√ √
•Change.Every 3 years
22 Final transmission oil•Check vehicle for oil leakage.√√ √
•Change.√√√
23
*V-belt•Replace.Every 20,000 km
24
*Front and rear brake
switches•Check operation.√√√√√ √
25 Moving parts and cables•Lubricate.√√√√ √
26
*Throttle grip housing
and cable•Check operation and free play.
•Adjust the throttle cable free play if necessary.
•Lubricate the throttle grip housing and cable.√√√√ √
27
*Lights, signals and
switches•Check operation.
•Adjust headlight beam.√√√√√ √ NO. ITEM CHECK OR MAINTENANCE JOBODOMETER READING (× 1,000 km)
ANNUAL
CHECK
1 10203040
5SJ-28199-E1 7/11/02 11:03 AM Page 54
Page 65 of 116
6-14
PERIODIC MAINTENANCE AND MINOR REPAIR
6
NOTE:
If a torque wrench is not available
when installing a spark plug, a good
estimate of the correct torque is
1/4–1/2 turn past finger tight.
However, the spark plug should be
tightened to the specified torque as
soon as possible.
4. Install the spark plug cap.
5. Install the cowling.To check the engine oil level
1. Place the scooter on the center-
stand.
NOTE:
Make sure that the scooter is posi-
tioned straight up when checking the
oil level. A slight tilt to the side can
result in a false reading.
2. Start the engine, warm it up for
several minutes, and then turn it
off.
EAU04611
Engine oilEngine oilThe engine oil level should be
checked before each ride. In addition,
the oil must be changed at the inter-
vals specified in the periodic mainte-
nance and lubrication chart and when
the oil change indicator light comes
on. Tightening torque:
Spark plug:
17.5 Nm (1.75 m·kgf)
5SJ-28199-E1 7/11/02 11:03 AM Page 63
Page 66 of 116
6-15
PERIODIC MAINTENANCE AND MINOR REPAIR
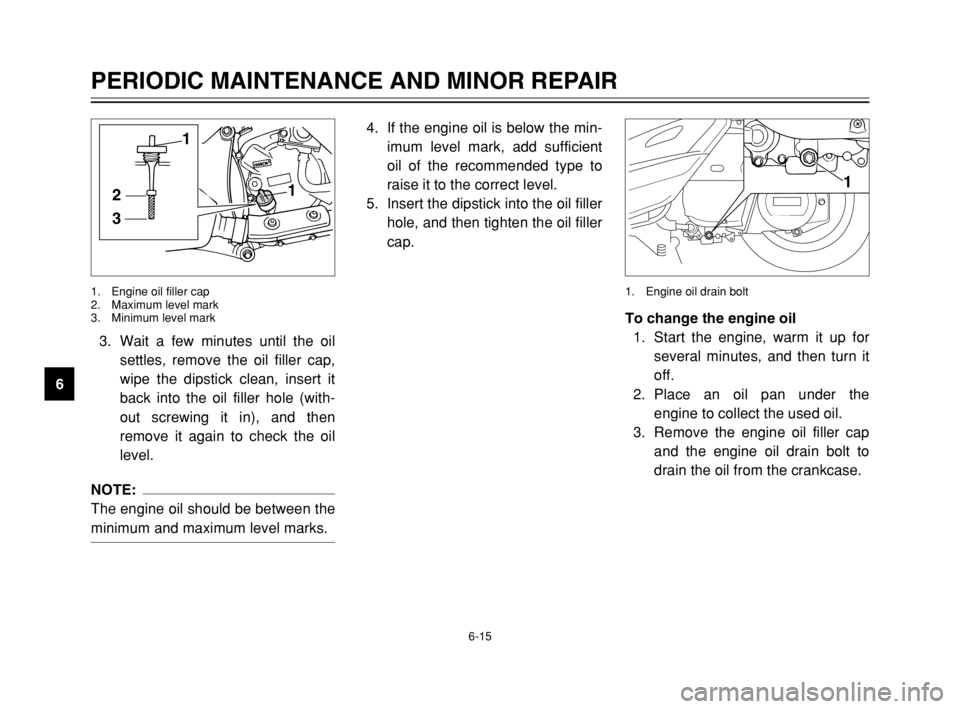
63. Wait a few minutes until the oil
settles, remove the oil filler cap,
wipe the dipstick clean, insert it
back into the oil filler hole (with-
out screwing it in), and then
remove it again to check the oil
level.
NOTE:
The engine oil should be between the
minimum and maximum level marks.
31
21
1. Engine oil filler cap
2. Maximum level mark
3. Minimum level mark
To change the engine oil
1. Start the engine, warm it up for
several minutes, and then turn it
off.
2. Place an oil pan under the
engine to collect the used oil.
3. Remove the engine oil filler cap
and the engine oil drain bolt to
drain the oil from the crankcase.
1
1. Engine oil drain bolt
4. If the engine oil is below the min-
imum level mark, add sufficient
oil of the recommended type to
raise it to the correct level.
5. Insert the dipstick into the oil filler
hole, and then tighten the oil filler
cap.
5SJ-28199-E1 7/11/02 11:03 AM Page 64
Page 70 of 116
6-19
PERIODIC MAINTENANCE AND MINOR REPAIR
67. Check the final transmission
case for oil leakage. If oil is leak-
ing, check for the cause.
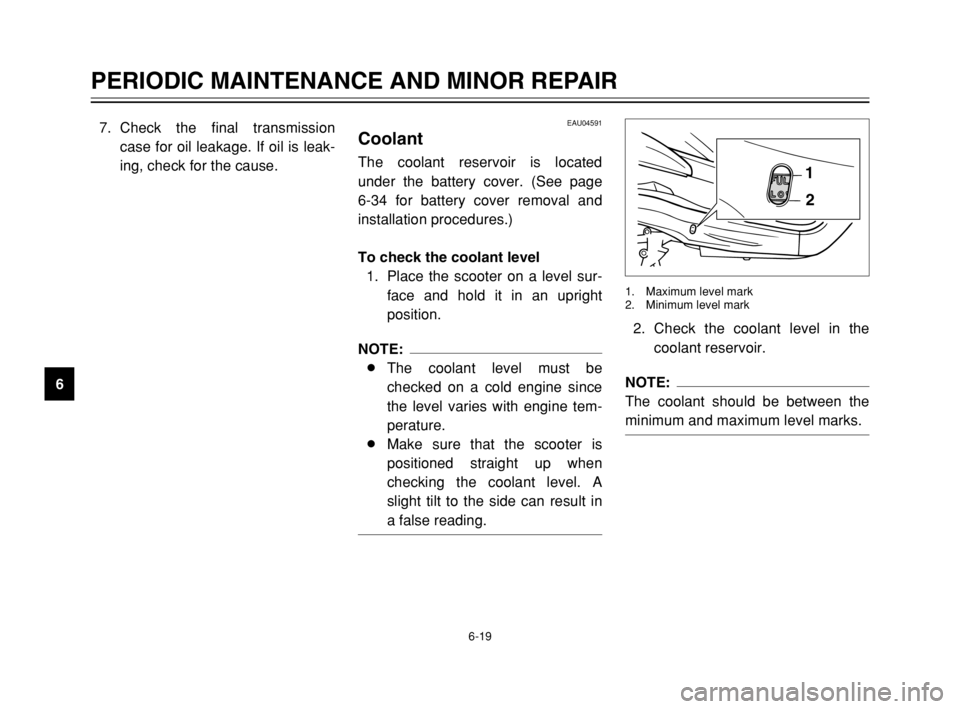
2. Check the coolant level in the
coolant reservoir.NOTE:
The coolant should be between the
minimum and maximum level marks.
1
2
1. Maximum level mark
2. Minimum level mark
EAU04591
CoolantCoolantThe coolant reservoir is located
under the battery cover. (See page
6-34 for battery cover removal and
installation procedures.)
To check the coolant level
1. Place the scooter on a level sur-
face and hold it in an upright
position.
NOTE:
8The coolant level must be
checked on a cold engine since
the level varies with engine tem-
perature.
8Make sure that the scooter is
positioned straight up when
checking the coolant level. A
slight tilt to the side can result in
a false reading.
5SJ-28199-E1 7/11/02 11:03 AM Page 68
Page 81 of 116
6-30
PERIODIC MAINTENANCE AND MINOR REPAIR
6 8Refill with the same type of brake
fluid. Mixing fluids may result in a
harmful chemical reaction and
lead to poor braking perfor-
mance.
8Be careful that water or dust
does not enter the brake fluid
reservoir when refilling. Water
will significantly lower the boiling
point of the fluid and may result
in vapor lock, and dirt may clog
the ABS hydraulic unit valves.
8Brake fluid may deteriorate paint-
ed surfaces or plastic parts.
Always clean up spilled fluid
immediately.
8As the brake pads wear, it is nor-
mal for the brake fluid level to
gradually go down. However, if
the brake fluid level goes down
suddenly, have a Yamaha dealer
check the cause.
EAU02962
Checking and lubricating the
cables
Cables, checking and lubricatingThe operation of all control cables
and the condition of the cables
should be checked before each ride,
and the cables and cable ends
should be lubricated if necessary. If
a cable is damaged or does not move
smoothly, have a Yamaha dealer
check or replace it.
EW000112
w
Damage to the outer sheath may
interfere with proper cable opera-
tion and will cause the inner cable
to rust. Replace a damaged cable
as soon as possible to prevent
unsafe conditions.
EAU03976
Changing the brake fluidBrake fluid, changingHave a Yamaha dealer change the
brake fluid at the intervals specified in
the NOTE after the periodic mainte-
nance and lubrication chart. In addi-
tion, have the oil seals of the master
cylinders and calipers as well as the
brake hoses replaced at the intervals
listed below or whenever they are
damaged or leaking.
8Oil seals: Replace every two
years.
8Brake hoses: Replace every four
years.Recommended lubricant:
Engine oil
5SJ-28199-E1 7/11/02 11:03 AM Page 79
Page 83 of 116
6-32
PERIODIC MAINTENANCE AND MINOR REPAIR
6
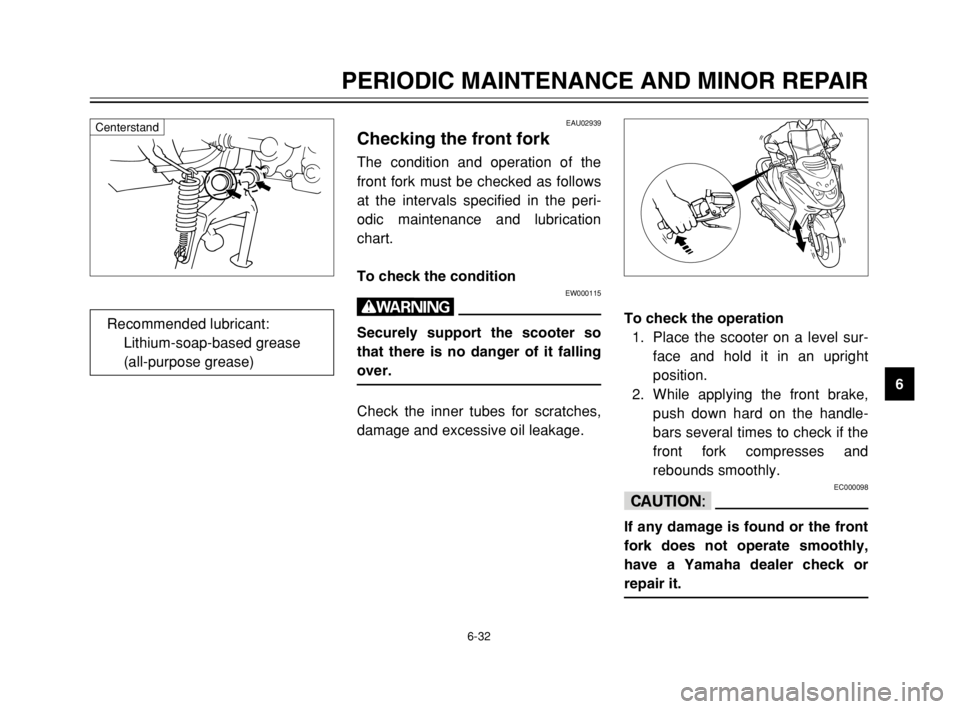
To check the operation
1. Place the scooter on a level sur-
face and hold it in an upright
position.
2. While applying the front brake,
push down hard on the handle-
bars several times to check if the
front fork compresses and
rebounds smoothly.
EC000098
cC
If any damage is found or the front
fork does not operate smoothly,
have a Yamaha dealer check or
repair it.
EAU02939
Checking the front forkFront fork, checkingThe condition and operation of the
front fork must be checked as follows
at the intervals specified in the peri-
odic maintenance and lubrication
chart.
To check the condition
EW000115
w
Securely support the scooter so
that there is no danger of it falling
over.
Check the inner tubes for scratches,
damage and excessive oil leakage.
Centerstand
Recommended lubricant:
Lithium-soap-based grease
(all-purpose grease)
5SJ-28199-E1 7/11/02 11:03 AM Page 81