check engine YAMAHA MT-07 2018 Owner's Manual
[x] Cancel search | Manufacturer: YAMAHA, Model Year: 2018, Model line: MT-07, Model: YAMAHA MT-07 2018Pages: 100, PDF Size: 5.44 MB
Page 60 of 100
Periodic maintenance an d a djustment
6-11
6
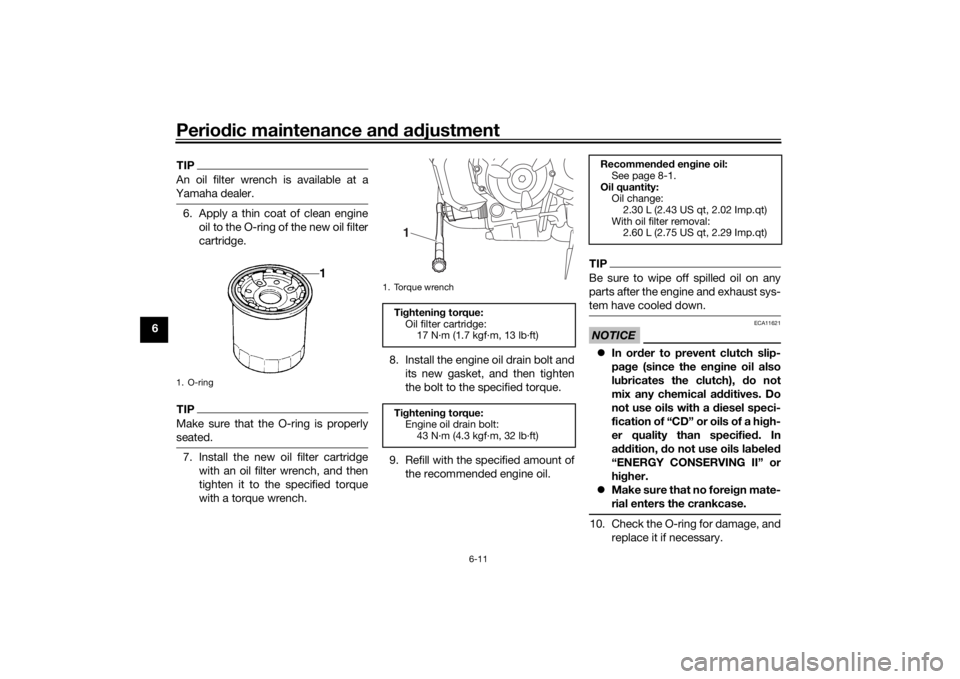
TIPAn oil filter wrench is available at a
Yamaha dealer.6. Apply a thin coat of clean engine oil to the O-ring of the new oil filter
cartridge.TIPMake sure that the O-ring is properly
seated.7. Install the new oil filter cartridgewith an oil filter wrench, and then
tighten it to the specified torque
with a torque wrench. 8. Install the engine oil drain bolt and
its new gasket, and then tighten
the bolt to the specified torque.
9. Refill with the specified amount of the recommended engine oil.
TIPBe sure to wipe off spilled oil on any
parts after the engine and exhaust sys-
tem have cooled down.NOTICE
ECA11621
In or der to prevent clutch slip-
pa ge (since the en gine oil also
lu bricates the clutch), do not
mix any chemical additives. Do
not use oils with a diesel speci-
fication of “CD” or oils of a hi gh-
er quality than specifie d. In
a ddition, do not use oils la beled
“ENERGY CONSERVING II” or
hi gher.
Make sure that no forei gn mate-
rial enters the crankcase.10. Check the O-ring for damage, and replace it if necessary.
1. O-ring
1. Torque wrenchTightenin g torque:
Oil filter cartridge: 17 N·m (1.7 kgf·m, 13 lb·ft)
Ti ghtenin g torque:
Engine oil drain bolt:
43 N·m (4.3 kgf·m, 32 lb·ft)1
Recommen ded en gine oil:
See page 8-1.
Oil quantity: Oil change:
2.30 L (2.43 US qt, 2.02 Imp.qt)
With oil filter removal: 2.60 L (2.75 US qt, 2.29 Imp.qt)
UB4CE0E0.book Page 11 Monday, December 11, 2017 3:53 PM
Page 61 of 100
Periodic maintenance an d a djustment
6-12
6
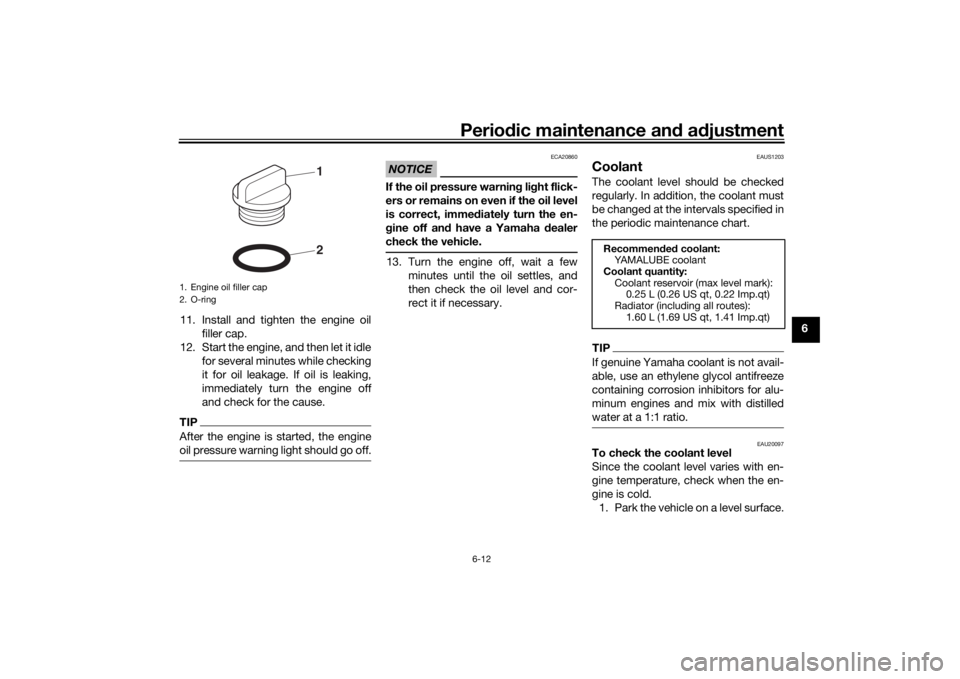
11. Install and tighten the engine oil
filler cap.
12. Start the engine, and then let it idle for several minutes while checking
it for oil leakage. If oil is leaking,
immediately turn the engine off
and check for the cause.
TIPAfter the engine is started, the engine
oil pressure warning light should go off.
NOTICE
ECA20860
If the oil pressure warnin g li ght flick-
ers or remains on even if the oil level
is correct, imme diately turn the en-
g ine off an d have a Yamaha dealer
check the vehicle.13. Turn the engine off, wait a few minutes until the oil settles, and
then check the oil level and cor-
rect it if necessary.
EAUS1203
CoolantThe coolant level should be checked
regularly. In addition, the coolant must
be changed at the intervals specified in
the periodic maintenance chart.TIPIf genuine Yamaha coolant is not avail-
able, use an ethylene glycol antifreeze
containing corrosion inhibitors for alu-
minum engines and mix with distilled
water at a 1:1 ratio.
EAU20097
To check the coolant level
Since the coolant level varies with en-
gine temperature, check when the en-
gine is cold.1. Park the vehicle on a level surface.
1. Engine oil filler cap
2. O-ring
21
Recommen ded coolant:
YAMALUBE coolant
Coolant quantity: Coolant reservoir (max level mark): 0.25 L (0.26 US qt, 0.22 Imp.qt)
Radiator (including all routes): 1.60 L (1.69 US qt, 1.41 Imp.qt)
UB4CE0E0.book Page 12 Monday, December 11, 2017 3:53 PM
Page 64 of 100
Periodic maintenance an d a djustment
6-15
6
EAU21403
Valve clearanceThe valves are an important engine
component, and since valve clearance
changes with use, they must be
checked and adjusted at the intervals
specified in the periodic maintenance
chart. Unadjusted valves can result in
improper air-fuel mixture, engine
noise, and eventually engine damage.
To prevent this from occurring, have
your Yamaha dealer check and adjust
the valve clearance at regular intervals.TIPThis service must be performed when
the engine is cold.
EAU64410
TiresTires are the only contact between the
vehicle and the road. Safety in all con-
ditions of riding depends on a relatively
small area of road contact. Therefore, it
is essential to maintain the tires in good
condition at all times and replace them
at the appropriate time with the speci-
fied tires.
Tire air pressure
The tire air pressure should be
checked and, if necessary, adjusted
before each ride.
WARNING
EWA10504
Operation of this vehicle with im-
proper tire pressure may cause se-
vere injury or death from loss of
control. The tire air pressure must be
checked and a djuste d on col d
tires (i.e., when the temperature
of the tires equals the am bient
temperature).
The tire air pressure must be
a d juste d in accor dance with the
ri din g speed and with the total wei
ght of ri der, passen ger, car-
g o, an d accessories approve d
for this mo del.
WARNING
EWA10512
Never overloa d your vehicle. Opera-
tion of an overload ed vehicle coul d
cause an acci dent.Tire air pressure (measure d on col d
tires): 1 person:Front:
225 kPa (2.25 kgf/cm², 33 psi)
Rear: 250 kPa (2.50 kgf/cm², 36 psi)
2 persons: Front:225 kPa (2.25 kgf/cm², 33 psi)
Rear: 250 kPa (2.50 kgf/cm², 36 psi)
Maximum load *:
172 kg (379 lb)
* Total weight of rider, passenger, car- go and accessories
UB4CE0E0.book Page 15 Monday, December 11, 2017 3:53 PM
Page 85 of 100
Periodic maintenance an d a djustment
6-36
6
EAU42365
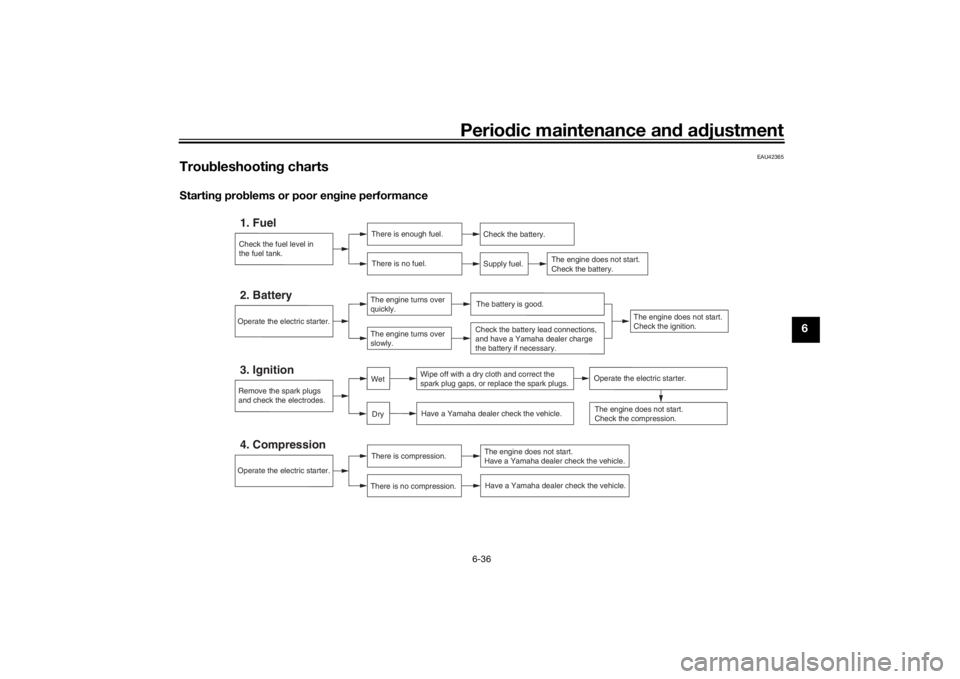
Trou bleshootin g chartsStartin g prob lems or poor en gine performance
Check the fuel level in
the fuel tank.1. Fuel
There is enough fuel.
There is no fuel.
Check the battery.
Supply fuel.
The engine does not start.
Check the battery.
Remove the spark plugs
and check the electrodes.3. Ignition
Wipe off with a dry cloth and correct the
spark plug gaps, or replace the spark plugs.
Have a Yamaha dealer check the vehicle.
Operate the electric starter.4. Compression
There is compression.
There is no compression.
The engine does not start.
Have a Yamaha dealer check the vehicle.Have a Yamaha dealer check the vehicle.
The engine does not start.
Check the compression.
Operate the electric starter.2. Battery
The engine turns over
quickly.
The engine turns over
slowly.
The engine does not start.
Check the ignition.
The battery is good.Check the battery lead connections,
and have a Yamaha dealer charge
the battery if necessary.
DryWet
Operate the electric starter.
UB4CE0E0.book Page 36 Monday, December 11, 2017 3:53 PM
Page 86 of 100

Periodic maintenance an d a djustment
6-37
6 En
gine overheatin g
WARNING
EWA10401
Do not remove the ra diator cap when the en gine an d ra diator are hot. Scal din g hot flui d an d steam may be
b lown out un der pressure, which coul d cause serious injury. Be sure to wait until the en gine has coole d.
After removin g the ra diator cap retainin g b olt, place a thick ra g, like a towel, over the rad iator cap, and then
slowly rotate the cap counterclockwise to the d etent to allow any residual pressure to escape. When the hiss-
in g soun d has stoppe d, press d own on the cap while turnin g it counterclockwise, an d then remove the cap.TIPIf coolant is not available, tap water can be temporarily used instead, provided that it is changed to the recommended cool-
ant as soon as possible.
Wait until the
engine has cooled.
Check the coolant level in the
reservoir and radiator.
The coolant level
is OK.The coolant level is low.
Check the cooling system
for leakage.
Have a Yamaha dealer checkand repair the cooling system.Add coolant. (See TIP.)
Start the engine. If the engine overheats again,
have a
Yamaha dealer check
and repair the cooling system.
There is
leakage.
There is
no leakage.
UB4CE0E0.book Page 37 Monday, December 11, 2017 3:53 PM
Page 90 of 100
Motorcycle care and stora ge
7-4
7 2. Fill up the fuel tank and add fuel
stabilizer (if available) to prevent
the fuel tank from rusting and the
fuel from deteriorating.
3. Perform the following steps to protect the cylinders, piston rings,
etc. from corrosion.a. Remove the spark plug caps and spark plugs.
b. Pour a teaspoonful of engine oil into each spark plug bore.
c. Install the spark plug caps onto the spark plugs, and then
place the spark plugs on the
cylinder head so that the elec-
trodes are grounded. (This will
limit sparking during the next
step.)
d. Turn the engine over several times with the starter. (This will
coat the cylinder walls with oil.)
WARNING! To prevent d am-
a g e or injury from sparkin g,
make sure to groun d the
spark plu g electro des while
turnin g the en gine over.
[EWA10952]
e. Remove the spark plug caps
from the spark plugs, and then
install the spark plugs and the
spark plug caps.
4. Lubricate all control cables and the pivoting points of all levers and
pedals as well as of the side-
stand/centerstand.
5. Check and, if necessary, correct the tire air pressure, and then lift
the motorcycle so that both of its
wheels are off the ground. Alterna-
tively, turn the wheels a little every
month in order to prevent the tires
from becoming degraded in one
spot.
6. Cover the muffler outlet with a plastic bag to prevent moisture
from entering it.
7. Remove the battery and fully charge it. Store it in a cool, dry
place and charge it once a month.
Do not store the battery in an ex-
cessively cold or warm place [less
than 0 °C (30 °F) or more than 30
°C (90 °F)]. For more information
on storing the battery, see page
6-28.
TIPMake any necessary repairs before
storing the motorcycle.
UB4CE0E0.book Page 4 Monday, December 11, 2017 3:53 PM
Page 95 of 100
Consumer information
9-2
9
The model label is affixed to the frame
under the passenger seat. (See page
3-19.) Record the information on this
label in the space provided. This infor-
mation will be needed when ordering
spare parts from a Yamaha dealer.
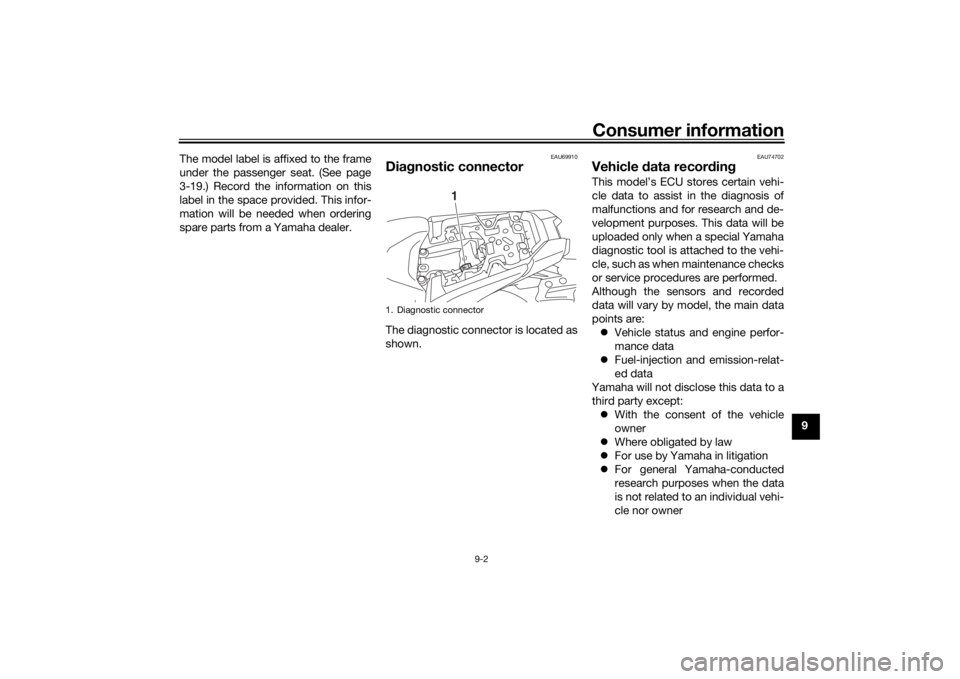
EAU69910
Dia
gnostic connectorThe diagnostic connector is located as
shown.
EAU74702
Vehicle data recor din gThis model’s ECU stores certain vehi-
cle data to assist in the diagnosis of
malfunctions and for research and de-
velopment purposes. This data will be
uploaded only when a special Yamaha
diagnostic tool is attached to the vehi-
cle, such as when maintenance checks
or service procedures are performed.
Although the sensors and recorded
data will vary by model, the main data
points are:
Vehicle status and engine perfor-
mance data
Fuel-injection and emission-relat-
ed data
Yamaha will not disclose this data to a
third party except: With the consent of the vehicle
owner
Where obligated by law
For use by Yamaha in litigation
For general Yamaha-conducted
research purposes when the data
is not related to an individual vehi-
cle nor owner
1. Diagnostic connector
1
UB4CE0E0.book Page 2 Monday, December 11, 2017 3:53 PM
Page 96 of 100

10-1
10
IndexAABS ....................................................... 3-15
ABS warning light ................................... 3-5
Air filter element and check hose,
replacing and cleaning ....................... 6-14
Auxiliary DC connector ......................... 3-25
Auxiliary light bulb, replacing ................ 6-32BBattery .................................................. 6-28
Brake and clutch levers, checking and lubricating ........................................... 6-25
Brake and shift pedals, checking and
lubricating ........................................... 6-25
Brake fluid, changing ............................ 6-21
Brake fluid level, checking .................... 6-20
Brake lever ............................................ 3-14
Brake lever free play, checking............. 6-18
Brake light switches.............................. 6-19
Brake pedal........................................... 3-14
Brake/tail light ....................................... 6-33CCables, checking and lubricating ......... 6-24
Canister................................................... 6-9
Care ........................................................ 7-1
Catalytic converter ................................ 3-19
Clutch lever ........................................... 3-13
Clutch lever free play, adjusting ........... 6-18
Coolant ................................................. 6-12
Coolant temperature warning light ......... 3-4DData recording, vehicle ........................... 9-2
Diagnostic connector.............................. 9-2
Dimmer switch ...................................... 3-13
Drive chain, cleaning and lubricating .... 6-23 Drive chain slack .................................. 6-22
EEngine break-in ...................................... 5-3
Engine oil and oil filter
cartridge ............. 6-9
Engine serial number .............................. 9-1
Engine trouble warning light ................... 3-5FFront and rear brake pads, checking ... 6-19
Front fork, checking ............................. 6-27
Fuel ....................................................... 3-16
Fuel consumption, tips for reducing ...... 5-3
Fuel tank cap ........................................ 3-16
Fuel tank overflow hose ....................... 3-18
Fuses, replacing ................................... 6-29HHandlebar switches .............................. 3-12
Hazard switch....................................... 3-13
Headlight bulb, replacing ..................... 6-31
Helmet holding cable ........................... 3-21
High beam indicator light ....................... 3-4
Horn switch .......................................... 3-13IIdentification numbers ............................ 9-1
Ignition circuit cut-off system ............... 3-26
Immobilizer system ................................ 3-1
Immobilizer system indicator light .......... 3-5
Indicator lights and warning lights ......... 3-4LLicense plate light bulb, replacing........ 6-34
Luggage strap holders ......................... 3-24MMain switch/steering lock....................... 3-2
Maintenance and lubrication, periodic ... 6-4 Maintenance, emission control
system ..................................................6-3
Matte color, caution ................................7-1
Model label .............................................9-1
Multi-function meter unit .........................3-6
NNeutral indicator light ..............................3-4OOil pressure warning light .......................3-4PParking ....................................................5-4
Part locations ..........................................2-1
Pass switch ...........................................3-13SSafety information ...................................1-1
Seats .....................................................3-19
Shifting ....................................................5-2
Shift pedal .............................................3-14
Shock absorber assembly, adjusting ....3-23
Sidestand ..............................................3-25
Sidestand, checking and lubricating.....6-26
Spark plugs, checking ............................6-8
Specifications .........................................8-1
Start/Engine stop switch .......................3-13
Starting the engine ..................................5-1
Steering, checking ................................6-27
Storage ...................................................7-3
Storage compartment ...........................3-22
Supporting the motorcycle ...................6-35
Swingarm pivots, lubricating ................6-26TThrottle grip and cable, checking and lubricating ...........................................6-24
Throttle grip free play, checking ...........6-14
UB4CE0E0.book Page 1 Monday, December 11, 2017 3:53 PM