light YAMAHA MT-07 2020 Owner's Manual
[x] Cancel search | Manufacturer: YAMAHA, Model Year: 2020, Model line: MT-07, Model: YAMAHA MT-07 2020Pages: 100, PDF Size: 5.73 MB
Page 58 of 100

Periodic maintenance an d a djustment
6-10
6
EAU76882
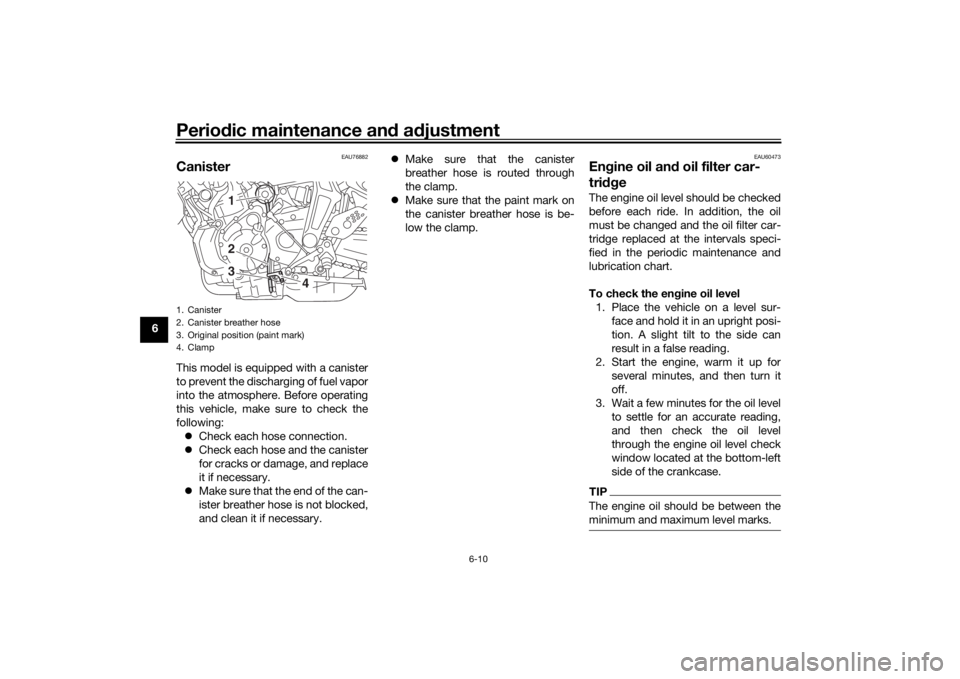
Canister This model is equipped with a canister
to prevent the discharging of fuel vapor
into the atmosphere. Before operating
this vehicle, make sure to check the
following:
Check each hose connection.
Check each hose and the canister
for cracks or damage, and replace
it if necessary.
Make sure that the end of the can-
ister breather hose is not blocked,
and clean it if necessary.
Make sure that the canister
breather hose is routed through
the clamp.
Make sure that the paint mark on
the canister breather hose is be-
low the clamp.
EAU60473
Engine oil an d oil filter car-
tri dg eThe engine oil level should be checked
before each ride. In addition, the oil
must be changed and the oil filter car-
tridge replaced at the intervals speci-
fied in the periodic maintenance and
lubrication chart.
To check the en gine oil level
1. Place the vehicle on a level sur- face and hold it in an upright posi-
tion. A slight tilt to the side can
result in a false reading.
2. Start the engine, warm it up for several minutes, and then turn it
off.
3. Wait a few minutes for the oil level to settle for an accurate reading,
and then check the oil level
through the engine oil level check
window located at the bottom-left
side of the crankcase.TIPThe engine oil should be between the
minimum and maximum level marks.
1. Canister
2. Canister breather hose
3. Original position (paint mark)
4. Clamp
321
4
UB4CE1E0.book Page 10 Friday, August 3, 2018 10:57 AM
Page 61 of 100

Periodic maintenance an d a djustment
6-13
6
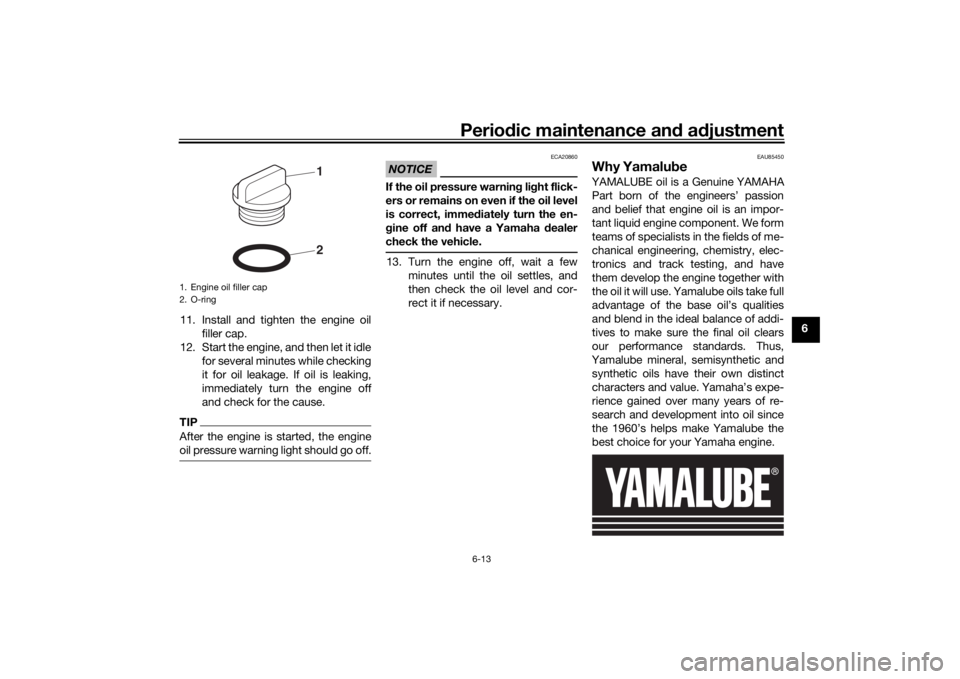
11. Install and tighten the engine oil
filler cap.
12. Start the engine, and then let it idle for several minutes while checking
it for oil leakage. If oil is leaking,
immediately turn the engine off
and check for the cause.
TIPAfter the engine is started, the engine
oil pressure warning light should go off.
NOTICE
ECA20860
If the oil pressure warnin g li ght flick-
ers or remains on even if the oil level
is correct, imme diately turn the en-
g ine off an d have a Yamaha dealer
check the vehicle.13. Turn the engine off, wait a few minutes until the oil settles, and
then check the oil level and cor-
rect it if necessary.
EAU85450
Why Yamalu beYAMALUBE oil is a Genuine YAMAHA
Part born of the engineers’ passion
and belief that engine oil is an impor-
tant liquid engine component. We form
teams of specialists in the fields of me-
chanical engineering, chemistry, elec-
tronics and track testing, and have
them develop the engine together with
the oil it will use. Yamalube oils take full
advantage of the base oil’s qualities
and blend in the ideal balance of addi-
tives to make sure the final oil clears
our performance standards. Thus,
Yamalube mineral, semisynthetic and
synthetic oils have their own distinct
characters and value. Yamaha’s expe-
rience gained over many years of re-
search and development into oil since
the 1960’s helps make Yamalube the
best choice for your Yamaha engine.
1. Engine oil filler cap
2. O-ring
21
UB4CE1E0.book Page 13 Friday, August 3, 2018 10:57 AM
Page 68 of 100

Periodic maintenance an d a djustment
6-20
6
EAU37914
Checkin g the brake lever free
playThere should be no free play at the
brake lever end. If there is free play,
have a Yamaha dealer inspect the
brake system.
WARNING
EWA14212
A soft or spon gy feelin g in the b rake
lever can in dicate the presence of
air in the hy draulic system. If there is
air in the hy draulic system, have a
Yamaha dealer blee d the system be-
fore operatin g the vehicle. Air in the
hy draulic system will diminish the b
rakin g performance, which may re-
sult in loss of control and an acci-
d ent.
EAU36505
Brake li ght switchesThe brake light should come on just
before braking takes effect. The brake
light is activated by switches connect-
ed to the brake lever and brake pedal.
Since the brake light switches are
components of the anti-lock brake sys-
tem, they should only be serviced by a
Yamaha dealer.
1. No brake lever free play
1
UB4CE1E0.book Page 20 Friday, August 3, 2018 10:57 AM
Page 79 of 100

Periodic maintenance an d a djustment
6-31
6
EAU59872
Replacin g the fusesThe main fuse and the fuse boxes,
which contain the fuses for the individ-
ual circuits, are located under the rider
seat. (See page 3-19.)TIPTo access the main fuse, remove the
starter relay cover as shown.
If a fuse is blown, replace it as follows.
1. Turn the key to “OFF” and turn off the electrical circuit in question.
2. Remove the blown fuse, and then install a new fuse of the specified
amperage. WARNING! Do not
use a fuse of a hi gher ampera ge ratin
g than recommen ded to
avoi d causin g extensive dam-
a g e to the electrical system an d
possi bly a fire.
[EWA15132]
1. Starter relay cover
2. Fuse box
3. Spare main fuse
4. Main fuse
2
3
4
1
1. Ignition fuse
2. Signaling system fuse
3. Headlight fuse
4. Backup fuse 2 (for ECU)
5. Backup fuse (for clock and immobilizer sys-
tem)
6. Radiator fan motor fuse
7. ABS solenoid fuse
8. ABS motor fuse
9. Parking lighting fuse
10.Auxiliary fuse
11.ABS control unit fuse
12.Spare fuse
7
8
9
10
11
1
2
3
4
5
61212
Specified fuses:
Main fuse: 30.0 A
Auxiliary fuse:
2.0 A
Headlight fuse: 15.0 A
Signaling system fuse: 10.0 A
Ignition fuse:
10.0 A
Parking lighting fuse: 7.5 A
Radiator fan motor fuse: 10.0 A
ABS motor fuse:
30.0 A
ABS solenoid fuse: 20.0 A
ABS control unit fuse: 7.5 A
Backup fuse:
7.5 A
Backup fuse 2: 10.0 A
UB4CE1E0.book Page 31 Friday, August 3, 2018 10:57 AM
Page 80 of 100

Periodic maintenance an d a djustment
6-32
6 3. Turn the key to “ON” and turn on
the electrical circuit in question to
check if the device operates.
4. If the fuse immediately blows again, have a Yamaha dealer
check the electrical system.
EAU84110
Replacin g the hea dlig ht bul bThis model is equipped with a halogen
bulb headlight. If the headlight bulb
burns out, replace it as follows.NOTICE
ECA10651
Take care not to damag e the follow-
in g parts:
Hea dlig ht bul b
Do not touch the glass part of
the hea dlig ht bul b to keep it free
from oil, otherwise the transpar-
ency of the glass, the luminosity
of the b ulb, an d the bul b life will
b e ad versely affected . Thor-
ou ghly clean off any dirt an d fin-
g erprints on the head lig ht bul b
usin g a cloth moistene d with al-
cohol or thinner.
Hea dlig ht lens
Do not affix any type of tinted
film or stickers to the hea dlig ht
lens.
Do not use a hea dlig ht bul b of a
wattag e higher than specifie d.
1. Remove the headlight unit by re-
moving the bolt and washer on
each side.1. Do not touch the glass part of the bulb.
1. Bolt and washer
1
UB4CE1E0.book Page 32 Friday, August 3, 2018 10:57 AM
Page 81 of 100

Periodic maintenance an d a djustment
6-33
6
2. Disconnect the headlight coupler,
and then remove the headlight
bulb cover.
3. Unhook the headlight bulb holder, then remove the burnt-out bulb. 4. Place a new headlight bulb into
position, then secure it with the
bulb holder.
5. Install the headlight bulb cover, then connect the coupler.
TIPWhen installing the headlight bulb cov-
er, make sure the arrow mark faces up-
wards.
6. Install the headlight unit as shown,and then install the washer and
bolt on each side.
7. Have a Yamaha dealer adjust the headlight beam if necessary.
1. Bolt and washer
1. Headlight coupler
2. Headlight bulb cover
112
1. Headlight bulb holder
2. Headlight bulb
1
2
1. Arrow mark
1
UB4CE1E0.book Page 33 Friday, August 3, 2018 10:57 AM
Page 82 of 100

Periodic maintenance an d a djustment
6-34
6
EAU83660
Replacin g an auxiliary li ght
b ul bThis model is equipped with two auxil-
iary lights. If an auxiliary light bulb
burns out, replace it as follows.
1. Remove the headlight unit. (See page 6-32.)
2. Remove the auxiliary light bulb socket (together with the bulb) by
turning it counterclockwise.
3. Remove the burnt-out bulb by pulling it out of the socket. 4. Insert a new bulb into the socket.
5. Install the socket (together with
the bulb) by turning it clockwise.
6. Install the headlight unit.
EAU70540
Brake/tail li ghtThis model is equipped with an LED-
type brake/tail light.
If the brake/tail light does not come on,
have a Yamaha dealer check it.
1. Auxiliary light bulb socket
1
1. Auxiliary light bulb
1
UB4CE1E0.book Page 34 Friday, August 3, 2018 10:57 AM
Page 83 of 100

Periodic maintenance an d a djustment
6-35
6
EAU24205
Replacin g a turn sig nal light
b ul b1. Remove the turn signal light lens
by removing the screw.
2. Remove the burnt-out bulb by pushing it in and turning it coun-
terclockwise. 3. Insert a new bulb into the socket,
push it in, and then turn it clock-
wise until it stops.
4. Install the lens by installing the screw. NOTICE: Do not over-
ti g hten the screw, otherwise the
lens may break.
[ECA11192] EAU59890
Replacin
g the license plate
lig ht bul b1. Remove the license plate light unit
by removing the nuts, washers
and collars, and then remove the
license plate light bulb socket (to-
gether with the bulb) by pulling it
out.
2. Remove the burnt-out bulb by pulling it out.
1. Turn signal light lens
2. Screw
1
2
1. Turn signal light bulb
1
1. License plate light unit
2. Collar
3. Washer
4. Nut
5. License plate light bulb socket
1
22
53
4
3
4
UB4CE1E0.book Page 35 Friday, August 3, 2018 10:57 AM
Page 84 of 100

Periodic maintenance an d a djustment
6-36
6 3. Insert a new bulb into the socket.
4. Install the socket (together with
the bulb) by pushing it in, and then
install the license plate light unit by
installing the collars, washers and
nuts.
EAU67131
Supportin g the motorcycleSince this model is not equipped with a
centerstand, use maintenance stands
when removing the front or rear wheel
or when performing other maintenance
that requires the motorcycle to stand
up right.
Check that the motorcycle is in a stable
and level position before starting any
maintenance.
EAU25872
Trou bleshootin gAlthough Yamaha motorcycles receive
a thorough inspection before shipment
from the factory, trouble may occur
during operation. Any problem in the
fuel, compression, or ignition systems,
for example, can cause poor starting
and loss of power.
The following troubleshooting charts
represent quick and easy procedures
for checking these vital systems your-
self. However, should your motorcycle
require any repair, take it to a Yamaha
dealer, whose skilled technicians have
the necessary tools, experience, and
know-how to service the motorcycle
properly.
Use only genuine Yamaha replace-
ment parts. Imitation parts may look
like Yamaha parts, but they are often
inferior, have a shorter service life and
can lead to expensive repair bills.
WARNING
EWA15142
When checkin g the fuel system, do
not smoke, an d make sure there are
no open flames or sparks in the ar-
ea, inclu din g pilot li ghts from water
1. License plate light bulb
1
1. Maintenance stand (example)
1
UB4CE1E0.book Page 36 Friday, August 3, 2018 10:57 AM
Page 89 of 100

Motorcycle care and stora ge
7-2
7
chemicals such as, solvents,
g
asoline, rust removers, b rake
flui d, or antifreeze, etc.
Before washin g
1. Park the vehicle out of direct sun- light and allow it to cool. This will
help avoid water spots.
2. Make sure all caps, covers, elec- trical couplers and connectors are
tightly installed.
3. Cover the muffler end with a plas- tic bag and a strong rubber band.
4. Pre-soak stubborn stains like in- sects or bird droppings with a wet
towel for a few minutes.
5. Remove road grime and oil stains with a quality degreasing agent
and a plastic-bristle brush or
sponge. NOTICE: Do not use
d eg reasin g a gent on areas re-
quirin g lu brication such as
seals, gaskets, an d wheel axles.
Follow pro duct instructions.
[ECA26290]
Washin g
1. Rinse off any degreaser and spray down the vehicle with a garden
hose. Use only enough pressure
to do the job. Avoid spraying wa-
ter directly into the muffler, instru-
ment panel, air inlet, or other inner
areas such as underseat storage
compartments.
2. Wash the vehicle with a quality au- tomotive-type detergent mixed
with cool water and a soft, clean
towel or sponge. Use an old tooth-
brush or plastic-bristle brush for
hard-to-reach places. NOTICE:
Use col d water if the vehicle has
b een exposed to salt. Warm wa-
ter will increase salt’s corrosive
properties.
[ECA26301]
3. For windshield-equipped vehicles: Clean the windshield with a soft
towel or sponge dampened with
water and a pH neutral detergent.
If necessary, use a high-quality
windshield cleaner or polish for
motorcycles. NOTICE: Never use
any stron g chemicals to clean
the wind shield. Additionally,
some cleanin g compoun ds for plastic may scratch the win
d-
shiel d, so b e sure to test all
cleanin g pro ducts before gen-
eral application.
[ECA26310]
4. Rinse off thoroughly with clean water. Be sure to remove all deter-
gent residues, as they can be
harmful to plastic parts.
After washin g
1. Dry the vehicle with a chamois or absorbent towel, preferably mi-
crofiber terrycloth.
2. For drive chain-equipped models: Dry and then lubricate the drive
chain to prevent rust.
3. Use a chrome polish to shine chrome, aluminum, and stainless
steel parts. Often the thermally in-
duced discoloring of stainless
steel exhaust systems can be re-
moved through polishing.
4. Apply a corrosion protection spray on all metal parts including
chrome or nickel-plated surfaces.
WARNING! Do not apply sili- cone or oil spray to seats, han d
g rips, ru bber foot pe gs or tire
trea ds. Otherwise these parts
UB4CE1E0.book Page 2 Friday, August 3, 2018 10:57 AM