lock YAMAHA MT-09 2014 User Guide
[x] Cancel search | Manufacturer: YAMAHA, Model Year: 2014, Model line: MT-09, Model: YAMAHA MT-09 2014Pages: 110, PDF Size: 3.21 MB
Page 36 of 110
INSTRUMENT AND CONTROL FUNCTIONS
3-21
3
NOTICE
ECA10702
Use only unleaded g asoline. The use
of lead ed g asoline will cause unre-
pairab le damag e to the catalytic
converter.
EAU57991
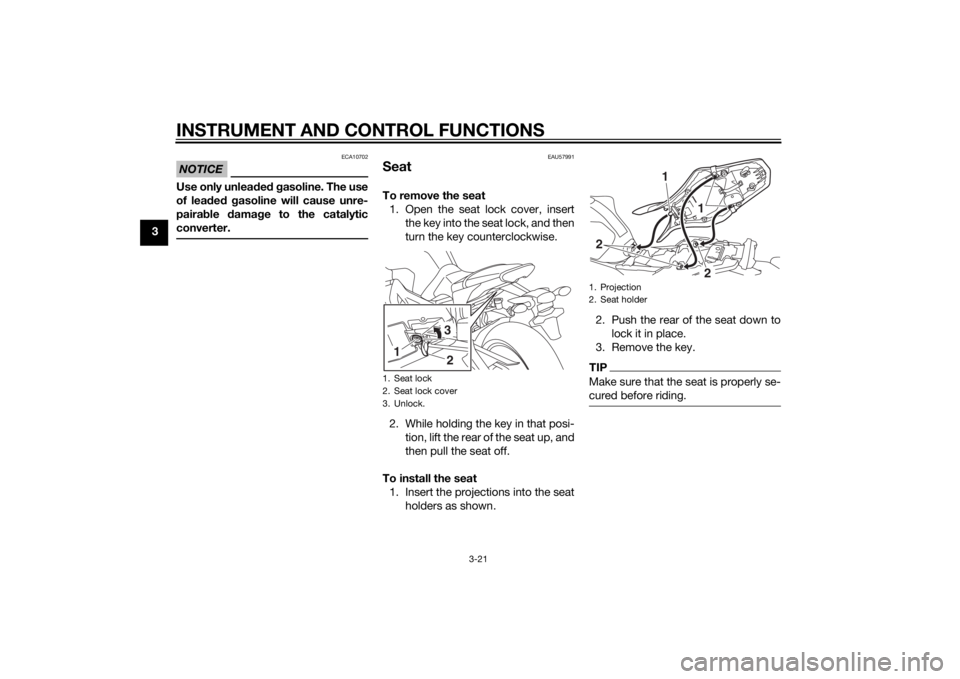
SeatTo remove the seat 1. Open the seat lock cover, insert the key into the seat lock, and then
turn the key counterclockwise.
2. While holding the key in that posi- tion, lift the rear of the seat up, and
then pull the seat off.
To install the seat 1. Insert the projections into the seat holders as shown. 2. Push the rear of the seat down to
lock it in place.
3. Remove the key.
TIPMake sure that the seat is properly se-
cured before riding.
1. Seat lock
2. Seat lock cover
3. Unlock.1
32
1. Projection
2. Seat holder
1
2
21
U1RCELE0.book Page 21 Monday, May 12, 2014 8:51 AM
Page 73 of 110
PERIODIC MAINTENANCE AND ADJUSTMENT
6-22
6
Use only the specifie d b rake flu-
i d ; otherwise, the ru bber seals
may deteriorate, causin g leak-
a g e.
Refill with the same type of
brake flui d. A ddin g a brake flui d
other than DOT 4 may result in a
harmful chemical reaction.
Be careful that water or dust
d oes not enter the brake flui d
reservoir when refillin g. Water
will si gnificantly lower the boil-
in g point of the flui d an d may re-
sult in vapor lock, an d d irt may
clo g the ABS hy draulic unit
valves.
NOTICE
ECA17641
Brake flui d may d amage painte d
surfaces or plastic parts. Always
clean up spille d flui d imme diately.As the brake pads wear, it is normal for
the brake fluid level to gradually go
down. A low brake fluid level may indi-
cate worn brake pads and/or brake
system leakage; therefore, be sure to
check the brake pads for wear and the
brake system for leakage. If the brake fluid level goes down suddenly, have a
Yamaha dealer check the cause before
further riding.
EAU22733
Chan
gin g the brake flui dHave a Yamaha dealer change the
brake fluid at the intervals specified in
the periodic maintenance and lubrica-
tion chart. In addition, have the oil seals
of the master cylinders and calipers as
well as the brake hoses replaced at the
intervals listed below or whenever they
are damaged or leaking.
Oil seals: Replace every two
years.
Brake hoses: Replace every four
years.
U1RCELE0.book Page 22 Monday, May 12, 2014 8:51 AM
Page 74 of 110
PERIODIC MAINTENANCE AND ADJUSTMENT
6-23
6
EAU22762
Drive chain slackThe drive chain slack should be
checked before each ride and adjusted
if necessary.
EAU22775
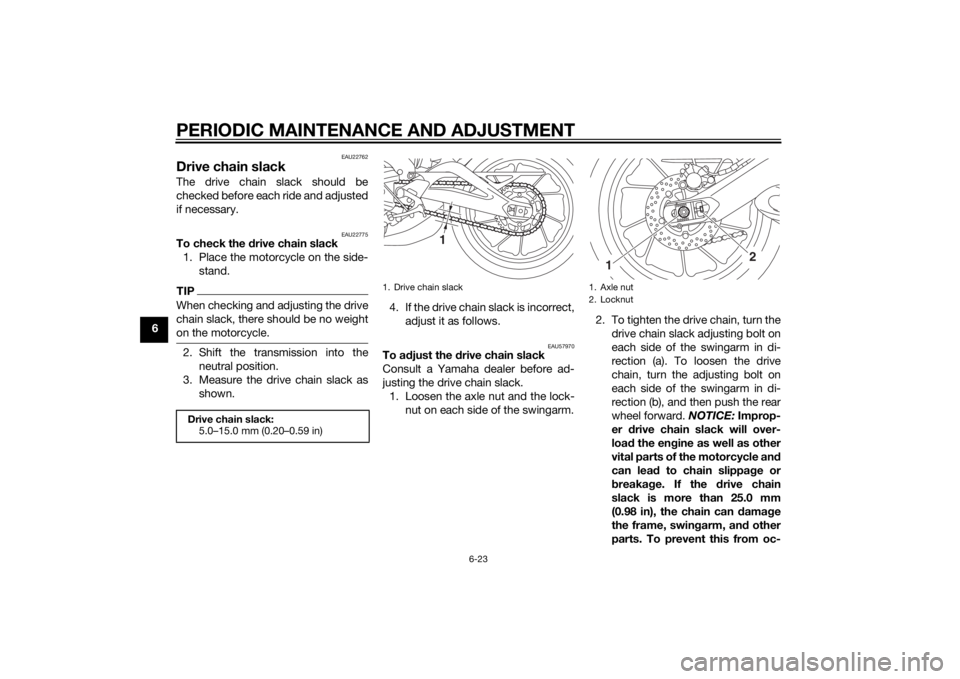
To check the drive chain slack
1. Place the motorcycle on the side- stand.TIPWhen checking and adjusting the drive
chain slack, there should be no weight
on the motorcycle.2. Shift the transmission into theneutral position.
3. Measure the drive chain slack as shown. 4. If the drive chain slack is incorrect,
adjust it as follows.
EAU57970
To a djust the drive chain slack
Consult a Yamaha dealer before ad-
justing the drive chain slack. 1. Loosen the axle nut and the lock- nut on each side of the swingarm. 2. To tighten the drive chain, turn the
drive chain slack adjusting bolt on
each side of the swingarm in di-
rection (a). To loosen the drive
chain, turn the adjusting bolt on
each side of the swingarm in di-
rection (b), and then push the rear
wheel forward. NOTICE: Improp-
er drive chain slack will over-
loa d the en gine as well as other
vital parts of the motorcycle an d
can lead to chain slippa ge or
b reakag e. If the drive chain
slack is more than 25.0 mm
(0.98 in), the chain can damag e
the frame, swin garm, an d other
parts. To prevent this from oc-
Drive chain slack: 5.0–15.0 mm (0.20–0.59 in)
1. Drive chain slack
1
1. Axle nut
2. Locknut
2
1
U1RCELE0.book Page 23 Monday, May 12, 2014 8:51 AM
Page 75 of 110
![YAMAHA MT-09 2014 User Guide PERIODIC MAINTENANCE AND ADJUSTMENT
6-24
6
currin
g, keep the d rive chain
slack within the specified limits.
[ECA17791]
TIPUsing the alignment marks and notch
on each side of the swingarm, make
sure YAMAHA MT-09 2014 User Guide PERIODIC MAINTENANCE AND ADJUSTMENT
6-24
6
currin
g, keep the d rive chain
slack within the specified limits.
[ECA17791]
TIPUsing the alignment marks and notch
on each side of the swingarm, make
sure](/img/51/50895/w960_50895-74.png)
PERIODIC MAINTENANCE AND ADJUSTMENT
6-24
6
currin
g, keep the d rive chain
slack within the specified limits.
[ECA17791]
TIPUsing the alignment marks and notch
on each side of the swingarm, make
sure that both drive chain pullers are in
the same position for proper wheel
alignment.
3. Tighten the axle nut, then the lock-
nuts to their specified torques.
4. Make sure that the drive chain pullers are in the same position,
the drive chain slack is correct,
and the drive chain moves
smoothly.
EAU23026
Cleanin g an d lu bricatin g the
d rive chainThe drive chain must be cleaned and
lubricated at the intervals specified in
the periodic maintenance and lubrica-
tion chart, otherwise it will quickly wear
out, especially when riding in dusty or
wet areas. Service the drive chain as
follows.NOTICE
ECA10584
The drive chain must b e lubricate d
after washin g the motorcycle, ri din g
in the rain or ri din g in wet areas.1. Clean the drive chain with kero-
sene and a small soft brush.
NOTICE: To prevent d amaging
the O-rin gs, do not clean the
d rive chain with steam cleaners,
hi gh-pressure washers or inap-
propriate solvents.
[ECA11122]
2. Wipe the drive chain dry.
3. Thoroughly lubricate the drive chain with a special O-ring chain
lubricant. NOTICE: Do not use
en gine oil or any other lu bri-
cants for the drive chain, as they
1. Drive chain slack adjusting bolt
(a)(b)
1
1. Notch
2. Alignment marks
3. Drive chain puller
Ti ghtenin g torques:
Axle nut:
150 Nm (15 m·kgf, 108 ft·lbf)
Locknut: 16 Nm (1.6 m·kgf, 12 ft·lbf)
3
12
U1RCELE0.book Page 24 Monday, May 12, 2014 8:51 AM
Page 83 of 110
PERIODIC MAINTENANCE AND ADJUSTMENT
6-32
6
MT09A
3. Place the panel in the original po- sition.
4. Install the bolt and quick fasten- ers.
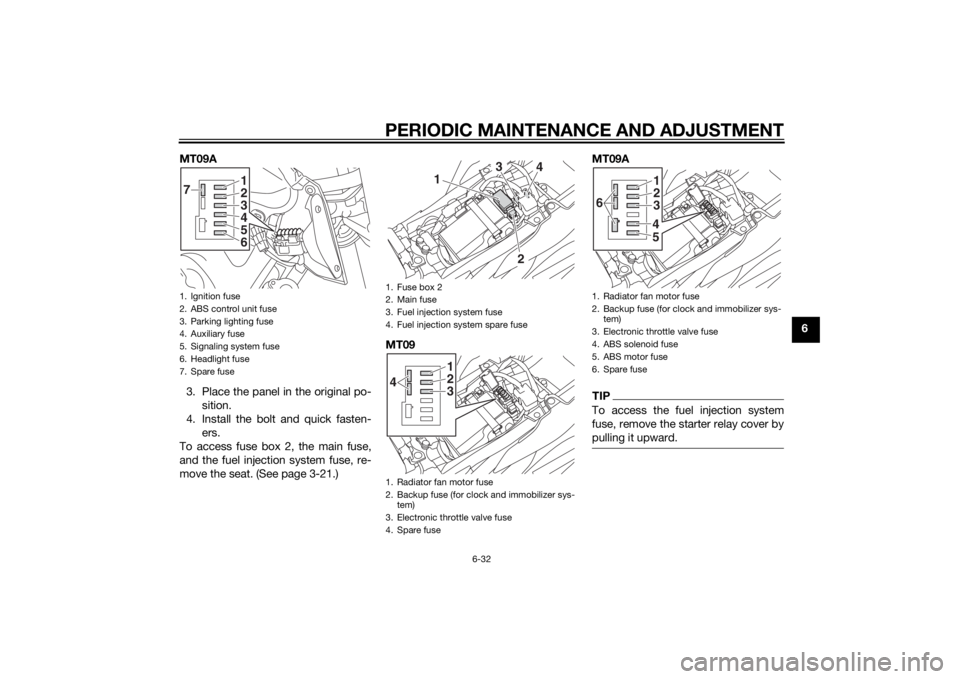
To access fuse box 2, the main fuse,
and the fuel injection system fuse, re-
move the seat. (See page 3-21.) MT09 MT09A
TIPTo access the fuel injection system
fuse, remove the starter relay cover by
pulling it upward.
1. Ignition fuse
2. ABS control unit fuse
3. Parking lighting fuse
4. Auxiliary fuse
5. Signaling system fuse
6. Headlight fuse
7. Spare fuse
123
7
456
1. Fuse box 2
2. Main fuse
3. Fuel injection system fuse
4. Fuel injection system spare fuse
1. Radiator fan motor fuse
2. Backup fuse (for clock and immobilizer sys-
tem)
3. Electronic throttle valve fuse
4. Spare fuse
2
3
4
1
123
4
1. Radiator fan motor fuse
2. Backup fuse (for clock and immobilizer sys-
tem)
3. Electronic throttle valve fuse
4. ABS solenoid fuse
5. ABS motor fuse
6. Spare fuse
123
6
45
U1RCELE0.book Page 32 Monday, May 12, 2014 8:51 AM
Page 87 of 110
PERIODIC MAINTENANCE AND ADJUSTMENT
6-36
6
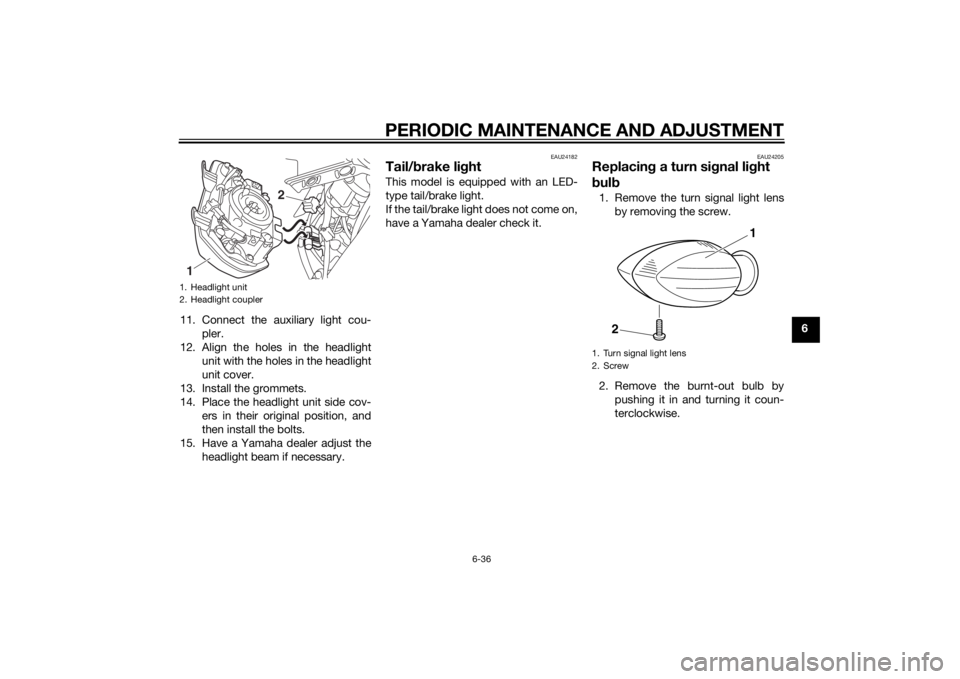
11. Connect the auxiliary light cou-
pler.
12. Align the holes in the headlight unit with the holes in the headlight
unit cover.
13. Install the grommets.
14. Place the headlight unit side cov- ers in their original position, and
then install the bolts.
15. Have a Yamaha dealer adjust the headlight beam if necessary.
EAU24182
Tail/b rake li ghtThis model is equipped with an LED-
type tail/brake light.
If the tail/brake light does not come on,
have a Yamaha dealer check it.
EAU24205
Replacin g a turn sig nal light
b ul b1. Remove the turn signal light lens
by removing the screw.
2. Remove the burnt-out bulb by pushing it in and turning it coun-
terclockwise.
1. Headlight unit
2. Headlight coupler1
2
1. Turn signal light lens
2. Screw
1
2
U1RCELE0.book Page 36 Monday, May 12, 2014 8:51 AM
Page 88 of 110
PERIODIC MAINTENANCE AND ADJUSTMENT
6-37
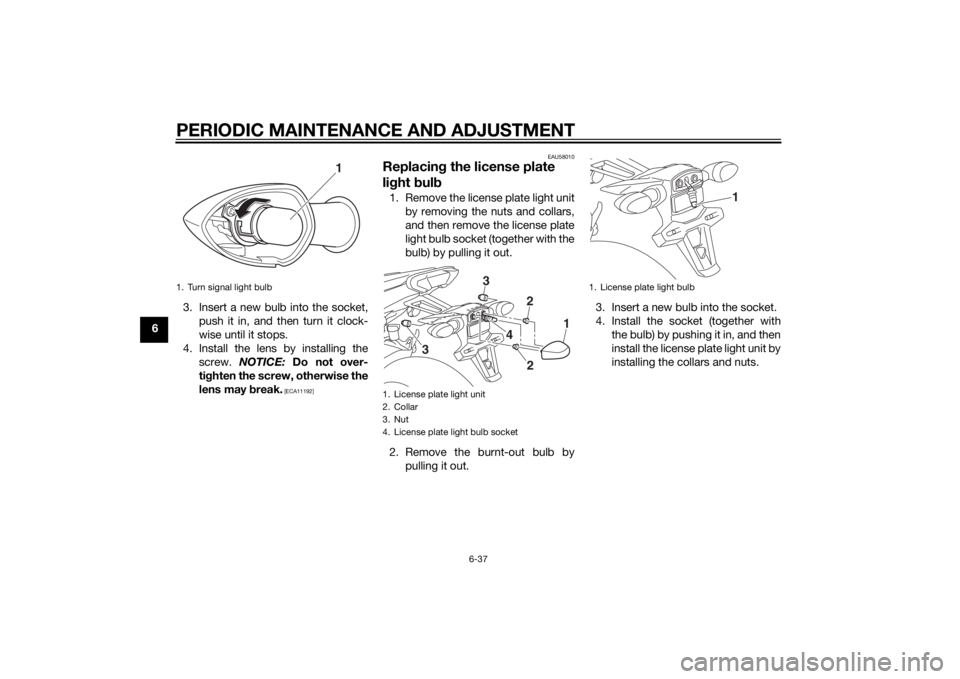
63. Insert a new bulb into the socket,
push it in, and then turn it clock-
wise until it stops.
4. Install the lens by installing the screw. NOTICE: Do not over-
ti g hten the screw, otherwise the
lens may break.
[ECA11192] EAU58010
Replacin
g the license plate
li g ht bul b1. Remove the license plate light unit
by removing the nuts and collars,
and then remove the license plate
light bulb socket (together with the
bulb) by pulling it out.
2. Remove the burnt-out bulb by pulling it out. 3. Insert a new bulb into the socket.
4. Install the socket (together with
the bulb) by pushing it in, and then
install the license plate light unit by
installing the collars and nuts.
1. Turn signal light bulb
1
1. License plate light unit
2. Collar
3. Nut
4. License plate light bulb socket
1
22
4
3
3
1. License plate light bulb
1
U1RCELE0.book Page 37 Monday, May 12, 2014 8:51 AM
Page 89 of 110
PERIODIC MAINTENANCE AND ADJUSTMENT
6-38
6
EAU58021
Replacing an auxiliary li ght
b ul bThis model is equipped with two auxil-
iary lights. If an auxiliary light bulb
burns out, replace it as follows.
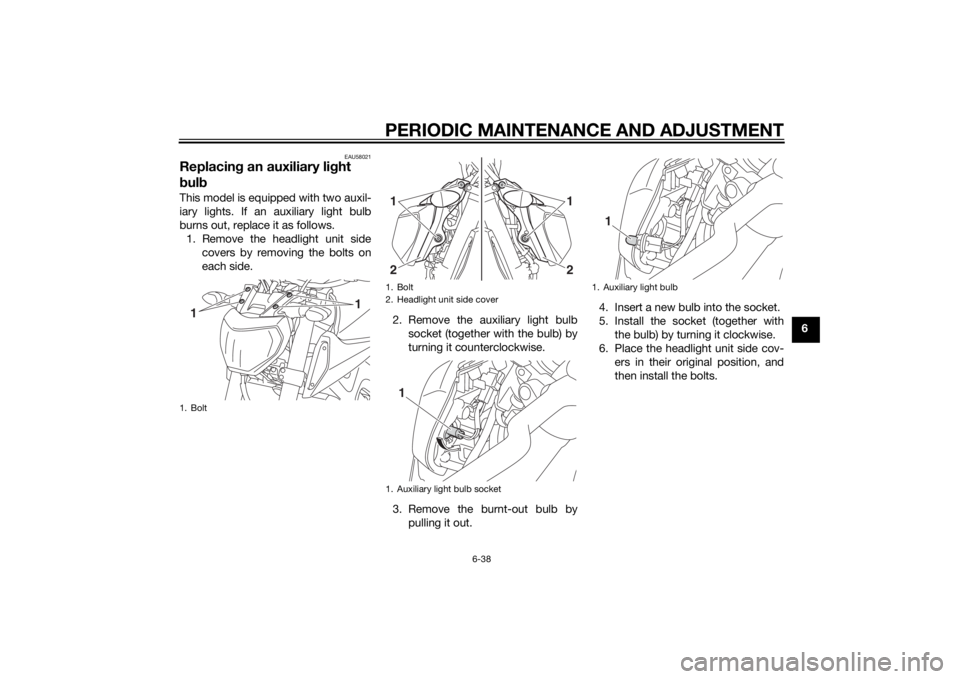
1. Remove the headlight unit side covers by removing the bolts on
each side.
2. Remove the auxiliary light bulbsocket (together with the bulb) by
turning it counterclockwise.
3. Remove the burnt-out bulb by pulling it out. 4. Insert a new bulb into the socket.
5. Install the socket (together with
the bulb) by turning it clockwise.
6. Place the headlight unit side cov- ers in their original position, and
then install the bolts.1. Bolt
1
1
1. Bolt
2. Headlight unit side cover
1. Auxiliary light bulb socket1
1
2
2
1
1. Auxiliary light bulb
1
U1RCELE0.book Page 38 Monday, May 12, 2014 8:51 AM
Page 92 of 110
PERIODIC MAINTENANCE AND ADJUSTMENT
6-41
6
EAU44802
Rear wheel (for non-ABS
models)
WARNING
EWA14841
For the ABS mo del, have a Yamaha
d ealer remove an d install the wheel.
EAU56701
To remove the rear wheel
WARNING
EWA10822
To avoi d injury, securely support the
vehicle so there is no dan ger of it
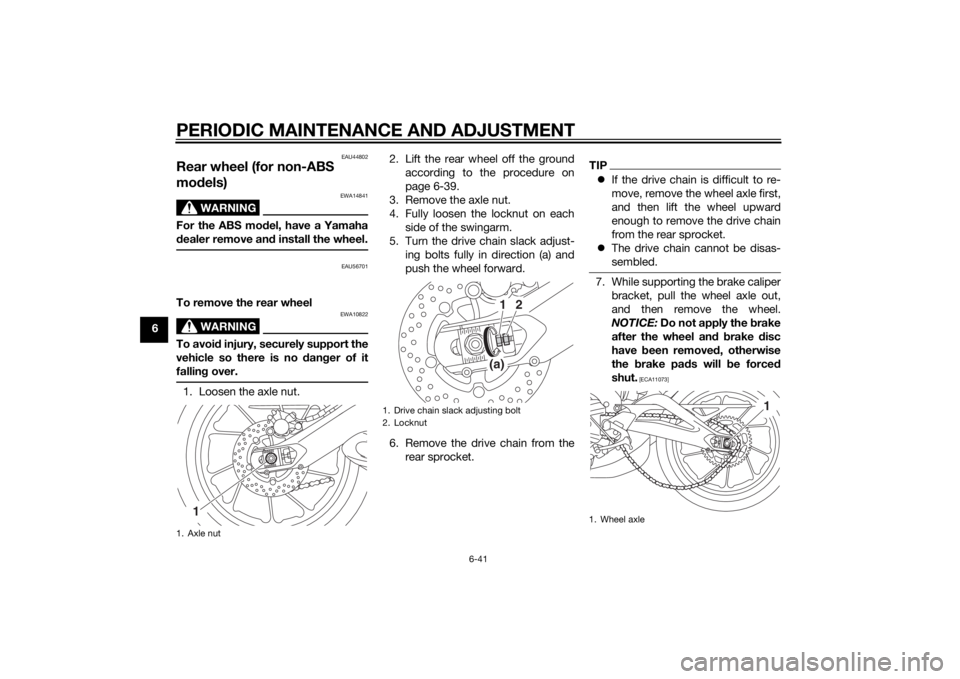
fallin g over.1. Loosen the axle nut. 2. Lift the rear wheel off the ground
according to the procedure on
page 6-39.
3. Remove the axle nut.
4. Fully loosen the locknut on each side of the swingarm.
5. Turn the drive chain slack adjust- ing bolts fully in direction (a) and
push the wheel forward.
6. Remove the drive chain from the rear sprocket.
TIPIf the drive chain is difficult to re-
move, remove the wheel axle first,
and then lift the wheel upward
enough to remove the drive chain
from the rear sprocket.
The drive chain cannot be disas-
sembled.7. While supporting the brake caliper
bracket, pull the wheel axle out,
and then remove the wheel.
NOTICE: Do not apply the b rake
after the wheel an d b rake disc
have been removed , otherwise
the brake pa ds will be forced
shut.
[ECA11073]
1. Axle nut
1
1. Drive chain slack adjusting bolt
2. Locknut
(a)1
2
1. Wheel axle
1
U1RCELE0.book Page 41 Monday, May 12, 2014 8:51 AM
Page 93 of 110
PERIODIC MAINTENANCE AND ADJUSTMENT
6-42
6
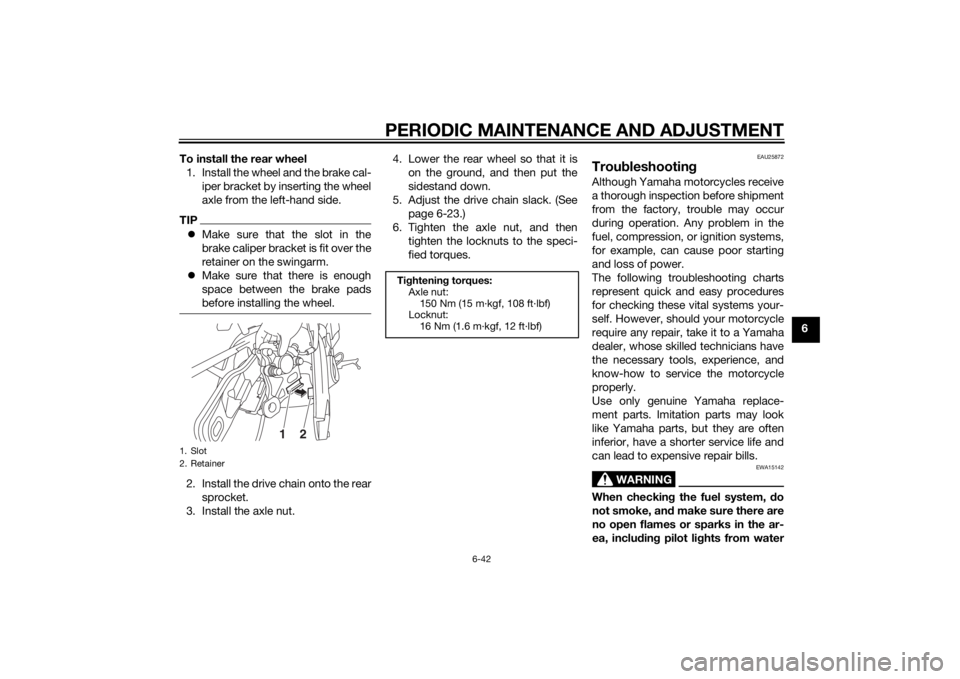
To install the rear wheel
1. Install the wheel and the brake cal- iper bracket by inserting the wheel
axle from the left-hand side.
TIPMake sure that the slot in the
brake caliper bracket is fit over the
retainer on the swingarm.
Make sure that there is enough
space between the brake pads
before installing the wheel.2. Install the drive chain onto the rear
sprocket.
3. Install the axle nut. 4. Lower the rear wheel so that it is
on the ground, and then put the
sidestand down.
5. Adjust the drive chain slack. (See page 6-23.)
6. Tighten the axle nut, and then tighten the locknuts to the speci-
fied torques.
EAU25872
Trou bleshootin gAlthough Yamaha motorcycles receive
a thorough inspection before shipment
from the factory, trouble may occur
during operation. Any problem in the
fuel, compression, or ignition systems,
for example, can cause poor starting
and loss of power.
The following troubleshooting charts
represent quick and easy procedures
for checking these vital systems your-
self. However, should your motorcycle
require any repair, take it to a Yamaha
dealer, whose skilled technicians have
the necessary tools, experience, and
know-how to service the motorcycle
properly.
Use only genuine Yamaha replace-
ment parts. Imitation parts may look
like Yamaha parts, but they are often
inferior, have a shorter service life and
can lead to expensive repair bills.
WARNING
EWA15142
When checkin g the fuel system, d o
not smoke, an d make sure there are
no open flames or sparks in the ar-
ea, inclu din g pilot li ghts from water
1. Slot
2. Retainer
2
1
Ti ghtenin g torques:
Axle nut: 150 Nm (15 m·kgf, 108 ft·lbf)
Locknut:
16 Nm (1.6 m·kgf, 12 ft·lbf)
U1RCELE0.book Page 42 Monday, May 12, 2014 8:51 AM