AUX YAMAHA MT-09 2014 Owners Manual
[x] Cancel search | Manufacturer: YAMAHA, Model Year: 2014, Model line: MT-09, Model: YAMAHA MT-09 2014Pages: 110, PDF Size: 3.21 MB
Page 6 of 110

TABLE OF CONTENTSSAFETY INFORMATION.................. 1-1
DESCRIPTION .................................. 2-1
Left view ......................................... 2-1
Right view ....................................... 2-2
Controls and instruments ............... 2-3
INSTRUMENT AND CONTROL
FUNCTIONS ...................................... 3-1
Immobilizer system......................... 3-1
Main switch/steering lock............... 3-2
Indicator lights and warning lights............................................ 3-3
Multi-function meter unit ................ 3-6
D-mode (drive mode).................... 3-13
Handlebar switches ...................... 3-14
Clutch lever .................................. 3-16
Shift pedal .................................... 3-16
Brake lever.................................... 3-16
Brake pedal .................................. 3-17
ABS (for ABS models) .................. 3-17
Fuel tank cap ................................ 3-18
Fuel ............................................... 3-19
Fuel tank breather hose and
overflow hose ............................ 3-20
Catalytic converter ....................... 3-20
Seat .............................................. 3-21
Storage compartment .................. 3-22
Adjusting the front fork ................. 3-22
Adjusting the shock absorber
assembly ................................... 3-24 Luggage strap holders .................. 3-25
Sidestand ...................................... 3-26
Ignition circuit cut-off system ....... 3-26
Auxiliary DC connector ................. 3-28
FOR YOUR SAFETY –
PRE-OPERATION CHECKS ............. 4-1
OPERATION AND IMPORTANT
RIDING POINTS ................................ 5-1
Starting the engine .......................... 5-1
Shifting ............................................ 5-2
Tips for reducing fuel consumption ................................ 5-4
Engine break-in ............................... 5-4
Parking ............................................ 5-5
PERIODIC MAINTENANCE AND
ADJUSTMENT ................................... 6-1
Owner’s tool kit ............................... 6-2
Periodic maintenance chart for the
emission control system .............. 6-3
General maintenance and
lubrication chart ........................... 6-4
Checking the spark plugs ............... 6-8
Engine oil and oil filter cartridge...... 6-9
Coolant.......................................... 6-11
Air filter element ............................ 6-14
Checking the engine idling speed ......................................... 6-14 Checking the throttle grip free
play ............................................ 6-15
Valve clearance............................. 6-15
Tires .............................................. 6-15
Cast wheels .................................. 6-18
Adjusting the clutch lever free play ............................................ 6-18
Checking the brake lever free
play ............................................ 6-19
Brake light switches ..................... 6-20
Checking the front and rear brake pads .......................................... 6-20
Checking the brake fluid level ...... 6-21
Changing the brake fluid .............. 6-22
Drive chain slack........................... 6-23
Cleaning and lubricating the drive chain.......................................... 6-24
Checking and lubricating the cables ........................................ 6-25
Checking and lubricating the
throttle grip and cable ............... 6-25
Checking and lubricating the brake and shift pedals............... 6-26
Checking and lubricating the brake and clutch levers ............. 6-26
Checking and lubricating the
sidestand................................... 6-27
Lubricating the swingarm pivots......................................... 6-27
Checking the front fork ................. 6-28
Checking the steering................... 6-28U1RCELE0.book Page 1 Monday, May 12, 2014 8:51 AM
Page 7 of 110

TABLE OF CONTENTS
Checking the wheel bearings ........6-29
Battery ...........................................6-29
Replacing the fuses .......................6-31
Replacing the headlight bulb.........6-34
Tail/brake light ...............................6-36
Replacing a turn signal light bulb ............................................6-36
Replacing the license plate light
bulb ............................................6-37
Replacing an auxiliary light bulb....6-38
Supporting the motorcycle............6-39
Front wheel (for non-ABS models).................6-39
Rear wheel
(for non-ABS models).................6-41
Troubleshooting ............................6-42
Troubleshooting charts .................6-44
MOTORCYCLE CARE AND
STORAGE ..........................................7-1
Matte color caution .........................7-1
Care .................................................7-1
Storage ............................................7-3
SPECIFICATIONS ..............................8-1
CONSUMER INFORMATION ............9-1
Identification numbers .....................9-1
INDEX ...............................................10-1
U1RCELE0.book Page 2 Monday, May 12, 2014 8:51 AM
Page 17 of 110
INSTRUMENT AND CONTROL FUNCTIONS
3-2
3
Keep other immo bilizer system
keys away from the main switch
as they may cause si gnal inter-
ference.
EAU10473
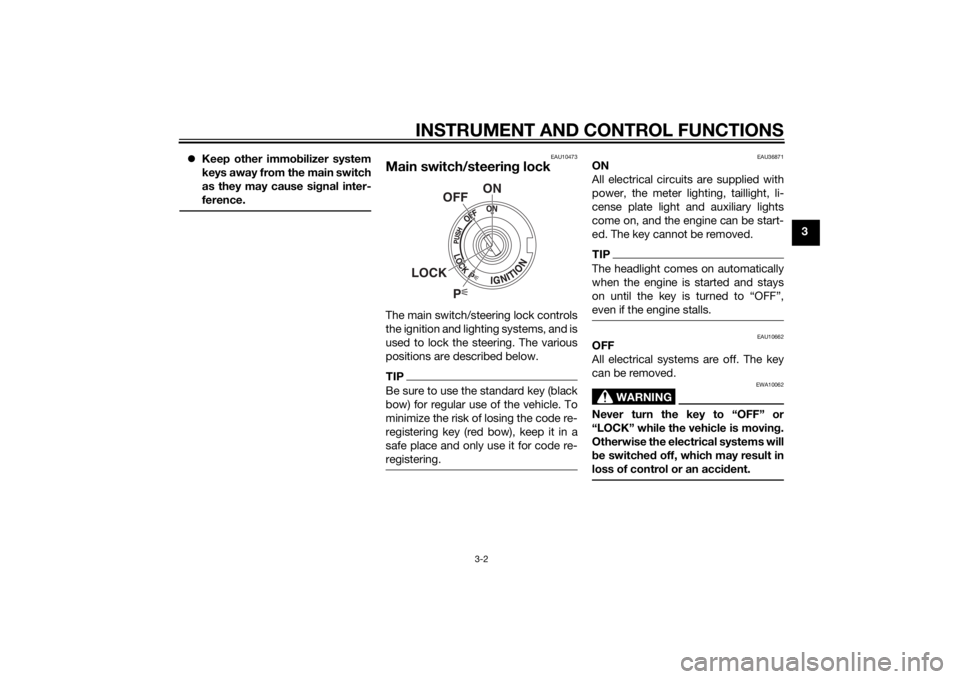
Main switch/steerin g lockThe main switch/steering lock controls
the ignition and lighting systems, and is
used to lock the steering. The various
positions are described below.TIPBe sure to use the standard key (black
bow) for regular use of the vehicle. To
minimize the risk of losing the code re-
registering key (red bow), keep it in a
safe place and only use it for code re-
registering.
EAU36871
ON
All electrical circuits are supplied with
power, the meter lighting, taillight, li-
cense plate light and auxiliary lights
come on, and the engine can be start-
ed. The key cannot be removed.TIPThe headlight comes on automatically
when the engine is started and stays
on until the key is turned to “OFF”,
even if the engine stalls.
EAU10662
OFF
All electrical systems are off. The key
can be removed.
WARNING
EWA10062
Never turn the key to “OFF” or
“LOCK” while the vehicle is movin g.
Otherwise the electrical systems will
b e switche d off, which may result in
loss of control or an acci dent.
P
ON
OFF
LOCK
U1RCELE0.book Page 2 Monday, May 12, 2014 8:51 AM
Page 43 of 110
INSTRUMENT AND CONTROL FUNCTIONS
3-28
3
EAU58262
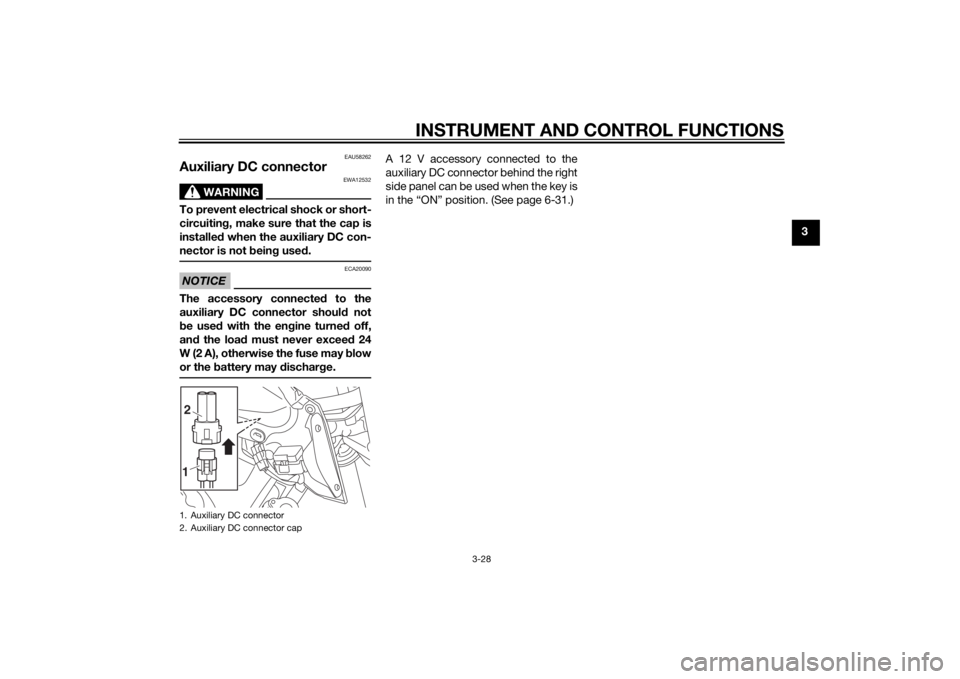
Auxiliary DC connector
WARNING
EWA12532
To prevent electrical shock or short-
circuiting, make sure that the cap is
installe d when the auxiliary DC con-
nector is not bein g use d.NOTICE
ECA20090
The accessory connected to the
auxiliary DC connector shoul d not
b e used with the en gine turne d off,
an d the loa d must never exceed 24
W (2 A), otherwise the fuse may blow
or the battery may dischar ge.
A 12 V accessory connected to the
auxiliary DC connector behind the right
side panel can be used when the key is
in the “ON” position. (See page 6-31.)
1. Auxiliary DC connector
2. Auxiliary DC connector cap21
U1RCELE0.book Page 28 Monday, May 12, 2014 8:51 AM
Page 82 of 110
PERIODIC MAINTENANCE AND ADJUSTMENT
6-31
6
EAU57983
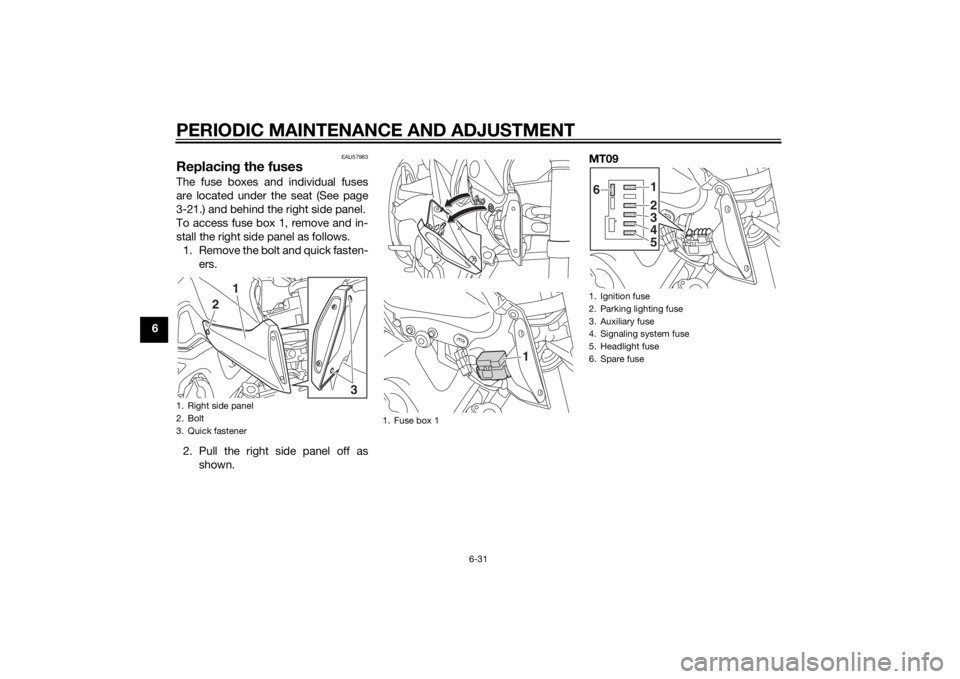
Replacing the fusesThe fuse boxes and individual fuses
are located under the seat (See page
3-21.) and behind the right side panel.
To access fuse box 1, remove and in-
stall the right side panel as follows.
1. Remove the bolt and quick fasten- ers.
2. Pull the right side panel off as shown. MT091. Right side panel
2. Bolt
3. Quick fastener
1
3
2
1. Fuse box 1
1
1. Ignition fuse
2. Parking lighting fuse
3. Auxiliary fuse
4. Signaling system fuse
5. Headlight fuse
6. Spare fuse
12
6
345
U1RCELE0.book Page 31 Monday, May 12, 2014 8:51 AM
Page 83 of 110
PERIODIC MAINTENANCE AND ADJUSTMENT
6-32
6
MT09A
3. Place the panel in the original po- sition.
4. Install the bolt and quick fasten- ers.
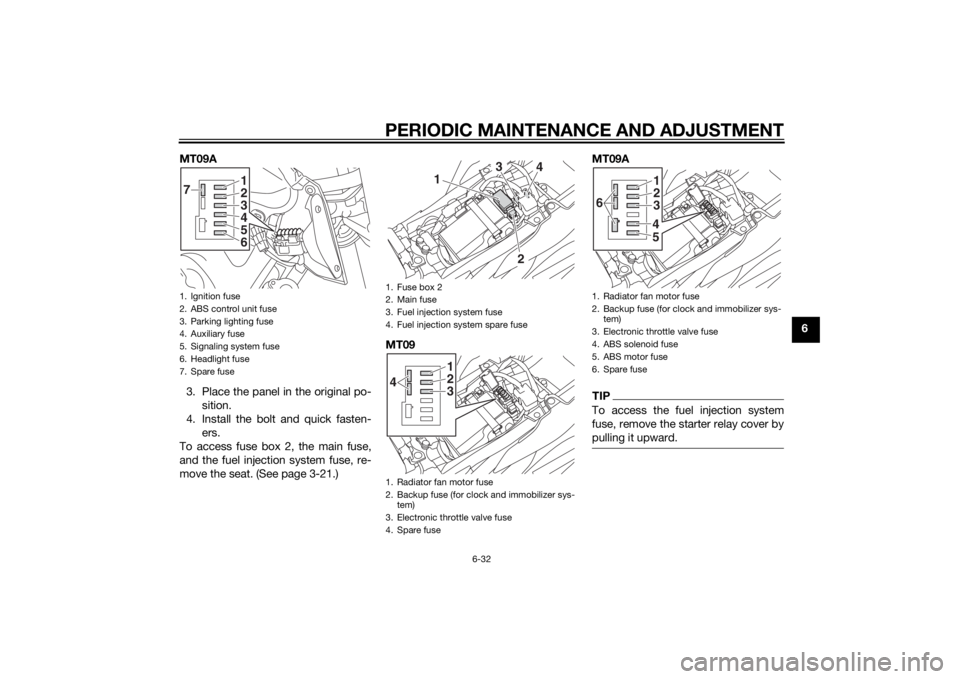
To access fuse box 2, the main fuse,
and the fuel injection system fuse, re-
move the seat. (See page 3-21.) MT09 MT09A
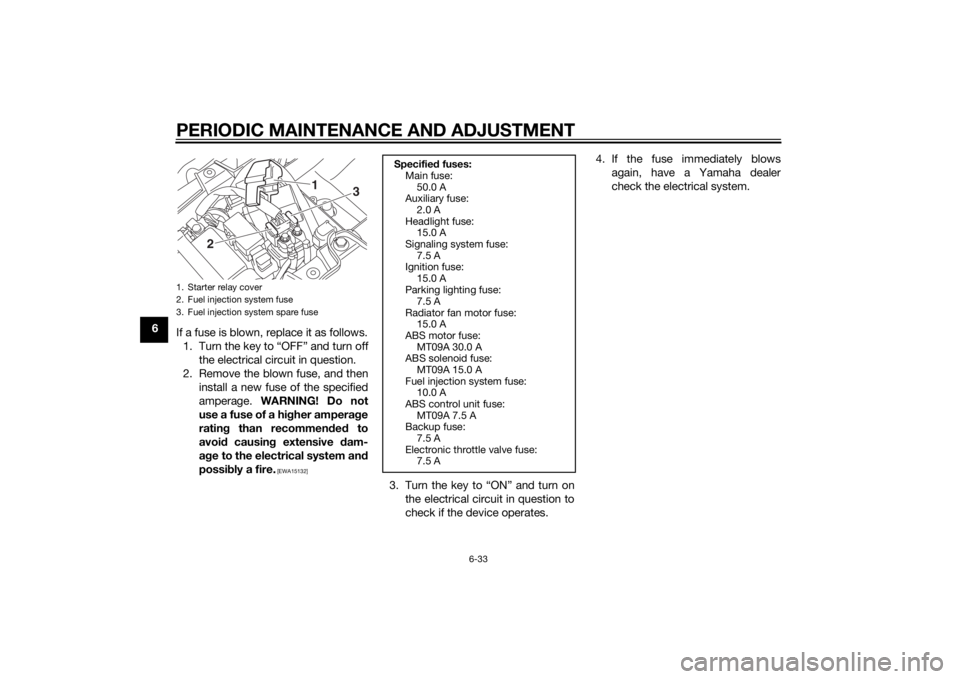
TIPTo access the fuel injection system
fuse, remove the starter relay cover by
pulling it upward.
1. Ignition fuse
2. ABS control unit fuse
3. Parking lighting fuse
4. Auxiliary fuse
5. Signaling system fuse
6. Headlight fuse
7. Spare fuse
123
7
456
1. Fuse box 2
2. Main fuse
3. Fuel injection system fuse
4. Fuel injection system spare fuse
1. Radiator fan motor fuse
2. Backup fuse (for clock and immobilizer sys-
tem)
3. Electronic throttle valve fuse
4. Spare fuse
2
3
4
1
123
4
1. Radiator fan motor fuse
2. Backup fuse (for clock and immobilizer sys-
tem)
3. Electronic throttle valve fuse
4. ABS solenoid fuse
5. ABS motor fuse
6. Spare fuse
123
6
45
U1RCELE0.book Page 32 Monday, May 12, 2014 8:51 AM
Page 84 of 110
PERIODIC MAINTENANCE AND ADJUSTMENT
6-33
6If a fuse is blown, replace it as follows.
1. Turn the key to “OFF” and turn off the electrical circuit in question.
2. Remove the blown fuse, and then install a new fuse of the specified
amperage. WARNING! Do not
use a fuse of a hi gher ampera ge
ratin g than recommen ded to
avoi d causin g extensive d am-
a g e to the electrical system an d
possi bly a fire.
[EWA15132]
3. Turn the key to “ON” and turn on
the electrical circuit in question to
check if the device operates. 4. If the fuse immediately blows
again, have a Yamaha dealer
check the electrical system.
1. Starter relay cover
2. Fuel injection system fuse
3. Fuel injection system spare fuse
1
2
3
Specifie d fuses:
Main fuse:
50.0 A
Auxiliary fuse:
2.0 A
Headlight fuse: 15.0 A
Signaling system fuse: 7.5 A
Ignition fuse:
15.0 A
Parking lighting fuse: 7.5 A
Radiator fan motor fuse: 15.0 A
ABS motor fuse:
MT09A 30.0 A
ABS solenoid fuse: MT09A 15.0 A
Fuel injection system fuse: 10.0 A
ABS control unit fuse:
MT09A 7.5 A
Backup fuse: 7.5 A
Electronic throttle valve fuse: 7.5 A
U1RCELE0.book Page 33 Monday, May 12, 2014 8:51 AM
Page 86 of 110
PERIODIC MAINTENANCE AND ADJUSTMENT
6-35
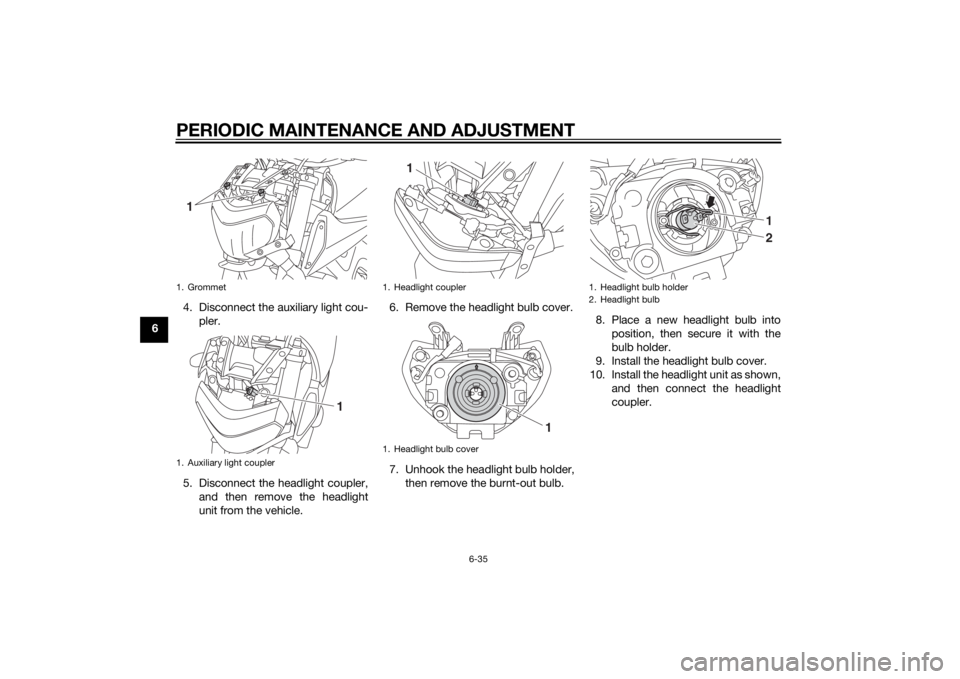
64. Disconnect the auxiliary light cou-
pler.
5. Disconnect the headlight coupler, and then remove the headlight
unit from the vehicle. 6. Remove the headlight bulb cover.
7. Unhook the headlight bulb holder,
then remove the burnt-out bulb. 8. Place a new headlight bulb into
position, then secure it with the
bulb holder.
9. Install the headlight bulb cover.
10. Install the headlight unit as shown, and then connect the headlight
coupler.
1. Grommet
1. Auxiliary light coupler1
1
1. Headlight coupler
1. Headlight bulb cover
1
1
1. Headlight bulb holder
2. Headlight bulb
12
U1RCELE0.book Page 35 Monday, May 12, 2014 8:51 AM
Page 87 of 110
PERIODIC MAINTENANCE AND ADJUSTMENT
6-36
6
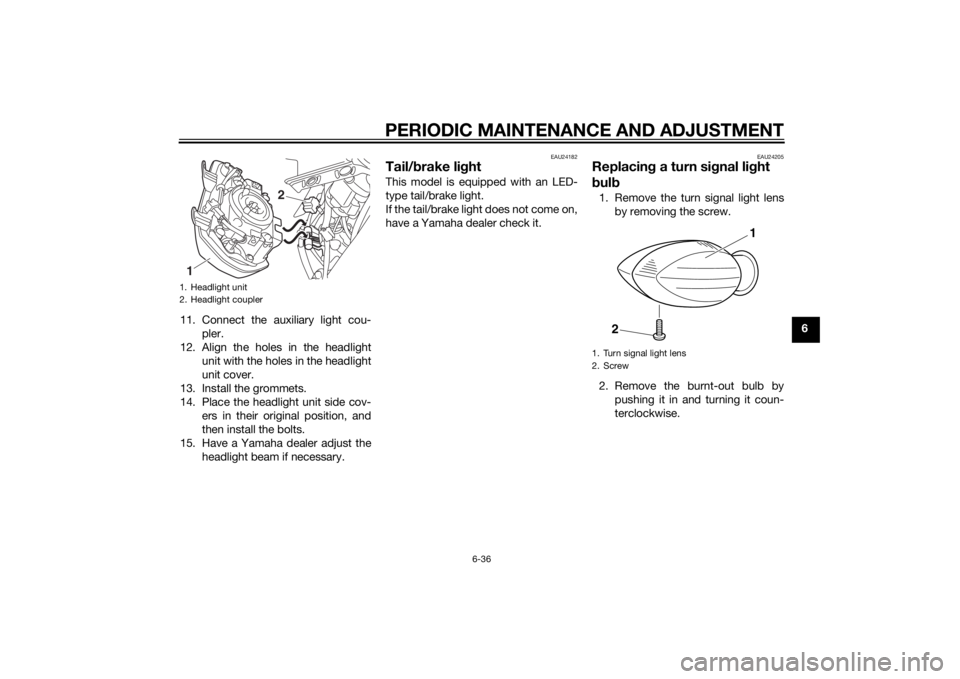
11. Connect the auxiliary light cou-
pler.
12. Align the holes in the headlight unit with the holes in the headlight
unit cover.
13. Install the grommets.
14. Place the headlight unit side cov- ers in their original position, and
then install the bolts.
15. Have a Yamaha dealer adjust the headlight beam if necessary.
EAU24182
Tail/b rake li ghtThis model is equipped with an LED-
type tail/brake light.
If the tail/brake light does not come on,
have a Yamaha dealer check it.
EAU24205
Replacin g a turn sig nal light
b ul b1. Remove the turn signal light lens
by removing the screw.
2. Remove the burnt-out bulb by pushing it in and turning it coun-
terclockwise.
1. Headlight unit
2. Headlight coupler1
2
1. Turn signal light lens
2. Screw
1
2
U1RCELE0.book Page 36 Monday, May 12, 2014 8:51 AM
Page 89 of 110
PERIODIC MAINTENANCE AND ADJUSTMENT
6-38
6
EAU58021
Replacing an auxiliary li ght
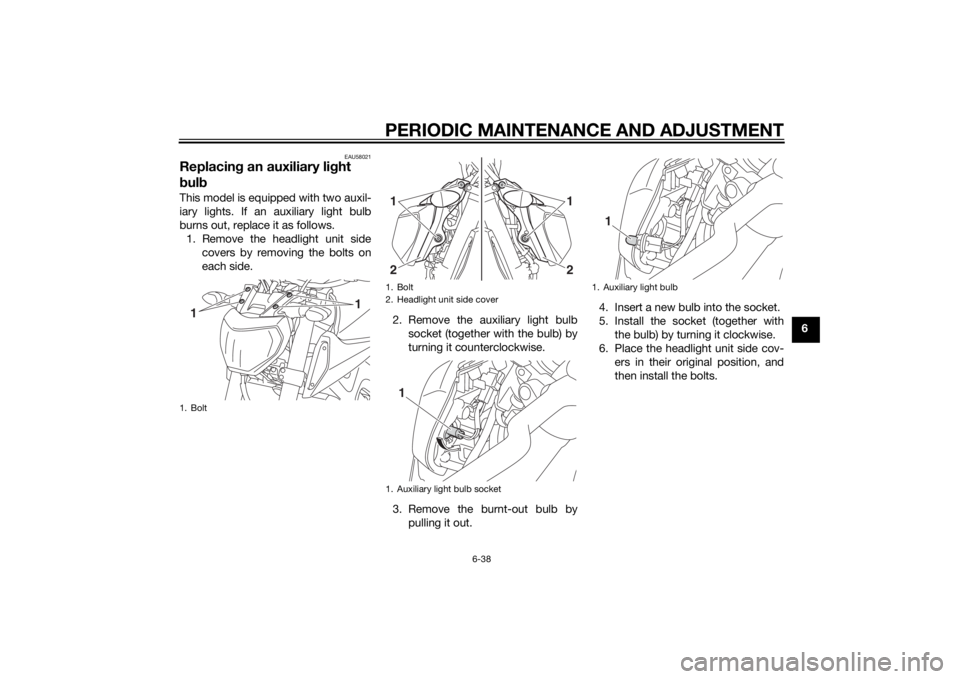
b ul bThis model is equipped with two auxil-
iary lights. If an auxiliary light bulb
burns out, replace it as follows.
1. Remove the headlight unit side covers by removing the bolts on
each side.
2. Remove the auxiliary light bulbsocket (together with the bulb) by
turning it counterclockwise.
3. Remove the burnt-out bulb by pulling it out. 4. Insert a new bulb into the socket.
5. Install the socket (together with
the bulb) by turning it clockwise.
6. Place the headlight unit side cov- ers in their original position, and
then install the bolts.1. Bolt
1
1
1. Bolt
2. Headlight unit side cover
1. Auxiliary light bulb socket1
1
2
2
1
1. Auxiliary light bulb
1
U1RCELE0.book Page 38 Monday, May 12, 2014 8:51 AM