traction control YAMAHA MT-09 2016 Owners Manual
[x] Cancel search | Manufacturer: YAMAHA, Model Year: 2016, Model line: MT-09, Model: YAMAHA MT-09 2016Pages: 114, PDF Size: 4.24 MB
Page 6 of 114

Table of contentsSafety information............................ 1-1
Description ........................................ 2-1
Left view .......................................... 2-1
Right view ........................................ 2-2
Controls and instrument s................. 2-3
Instrument and co ntrol functions.... 3-1
Immobilizer system ....... ................... 3-1
Main switch/steering lock................. 3-2
Indicator lights and warning lights ... 3-4
Multi-function meter unit .................. 3-7
D-mode (drive mode)..................... 3-15
Handlebar switches ....................... 3-16
Clutch lever.................................... 3-18
Shift pedal....... ............................. .. 3-18
Brake lever .................................... 3-19
Brake pedal ................................... 3-19
ABS (for ABS models) .. ................. 3-20
Traction control system
(for equipped models) ................ 3-21
Fuel tank cap ................................. 3-22
Fuel................................................ 3-23
Fuel tank breather hose and overflow hose ............................. 3-24
Catalytic converter ......................... 3-24
Seat ............................................... 3-25
Storage compartment .................... 3-26
Adjusting the front fork................... 3-26
Adjusting the shock absorber assembly .................................... 3-28 Luggage strap holders .
................. 3-29
Sidestand ...................................... 3-30
Ignition circuit cut- off system ......... 3-30
Auxiliary DC connector.................. 3-32
For your safety – pre-operation
checks ............................................... 4-1
Operation and important riding
points ................................................. 5-1
Starting the engine .......................... 5-2
Shifting ............................................ 5-3
Tips for reducing fuel consumption ................................ 5-4
Engine break-in ............................... 5-5
Parking ............................................ 5-5
Periodic maintenance and
adjustment ........................................ 6-1
Owner’s tool kit................................ 6-2
Periodic maintenance chart for the emission control system .............. 6-3
General maintenance and
lubrication chart ........................... 6-4
Checking the spark plugs ................ 6-8
Engine oil and oil filter cartridge ...... 6-9
Coolant .......................................... 6-11
Air filter element ............................ 6-14
Checking the engine idling speed ......................................... 6-15 Checking the throttle grip free
play ............................................. 6-15
Valve clearance ............................. 6-15
Tires ............................................... 6-16
Cast wheels ................................... 6-18
Adjusting the clutch lever free play ............................................. 6-19
Checking the brake lever free
play ............................................. 6-19
Brake light switches ....................... 6-20
Checking the front and rear brake
pads............................................ 6-21
Checking the brake fluid level ........ 6-21
Changing the brake fluid ................ 6-23
Drive chain slack............................ 6-23
Cleaning and lubricating the drive chain ........................................... 6-25
Checking and lubricating the cables ................................... 6-25
Checking and lubricating
the throttle grip and cable ........... 6-26
Checking and lubricating the brake and shift pedals ........ .................. 6-26
Checking and lubricating the brake and clutch levers ........................ 6-27
Checking and lubricating the sidestand .............................. 6-27
Lubricating the swingarm pivots .... 6-28
Checking the front fork................... 6-28
Checking the steering .................... 6-29
Checking the wheel bearings......... 6-29B87-9-E0_1.book 1 ページ 2015年12月16日 水曜日 午前10時21分
Page 19 of 114

Instrument and control functions
3-4
1
234
5
6
7
8
9
10
11
12
EAU49398
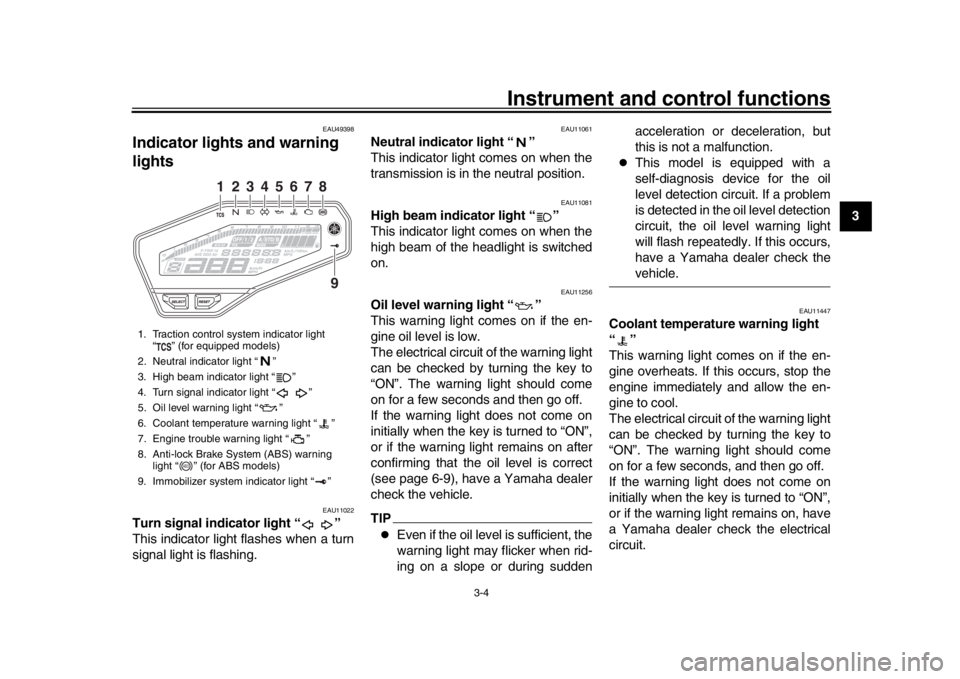
Indicator lights and warning
lights
EAU11022
Turn signal indicator light “ ”
This indicator light flashes when a turn
signal light is flashing.
EAU11061
Neutral indicator light “ ”
This indicator light comes on when the
transmission is in the neutral position.
EAU11081
High beam indicator light “ ”
This indicator light comes on when the
high beam of the headlight is switched
on.
EAU11256
Oil level warning light “ ”
This warning light comes on if the en-
gine oil level is low.
The electrical circuit of the warning light
can be checked by turning the key to
“ON”. The warning light should come
on for a few seconds and then go off.
If the warning light does not come on
initially when the key is turned to “ON”,
or if the warning light remains on after
confirming that the oil level is correct
(see page 6-9), have a Yamaha dealer
check the vehicle.TIP
Even if the oil level is sufficient, the
warning light may flicker when rid-
ing on a slope or during sudden acceleration or deceleration, but
this is not a malfunction.
This model is equipped with a
self-diagnosis device for the oil
level detection circuit. If a problem
is detected in the oil level detection
circuit, the oil level warning light
will flash repeatedly. If this occurs,
have a Yamaha dealer check thevehicle.
EAU11447
Coolant temperature warning light
“”
This warning light comes on if the en-
gine overheats. If this occurs, stop the
engine immediately and allow the en-
gine to cool.
The electrical circuit of the warning light
can be checked by turning the key to
“ON”. The warning light should come
on for a few seconds, and then go off.
If the warning light does not come on
initially when the key is turned to “ON”,
or if the warning light remains on, have
a Yamaha dealer check the electrical
circuit.
1. Traction control system indicator light
“ ” (for equipped models)
2. Neutral indicator light “ ”
3. High beam indicator light “ ”
4. Turn signal indicator light “ ”
5. Oil level warning light “ ”
6. Coolant temperature warning light “ ”
7. Engine trouble warning light “ ”
8. Anti-lock Brake System (ABS) warning light “ ” (for ABS models)
9. Immobilizer system indicator light “ ”
2
1
3
4
5
6
7
89
ABS
B87-9-E0_1.book 4 ページ 2015年12月16日 水曜日 午前10時21分
Page 21 of 114

Instrument and control functions
3-6
1
234
5
6
7
8
9
10
11
12
EAU73380
Traction control system indicator
light “ ” (for equipped models)
In normal operation, this indicator light
flashes when traction control has en-
gaged.
If the traction control system (page
3-21) becomes disabled while riding,
this indicator light and the engine trou-
ble warning light will come on.
The electrical circuit of this indicator
light can be checked by turning the key
to “ON”. The light should come on for a
few seconds, and then go off.
If the light does not come on initially
when the key is turned to “ON”, or if the
light remains on, have a Yamaha deal-
er check the electrical circuit.
EAU73510
Immobilizer system indicator light
“”
When the key is turned to “OFF” and 30
seconds have passed, the indicator
light will flash steadily to indicate the im-
mobilizer system is enabled. After 24
hours have passed, the indicator light
will stop flashing, however the immobi-
lizer system is still enabled. The electrical circuit of the indicator
light can be checked by turning the key
to “ON”. The indicator light should
come on for a few seconds, and then
go off.
If the indicator light does not come on
initially when the key is turned to “ON”,
or if the indicator light remains on, have
a Yamaha dealer check the vehicle.
MT09
The self-diagnosis device detects prob-
lems in the immobilizer system circuits.
(See page 3-14 for an explanation of
the self-diagnosis mode.)
MT09A
If a problem is detected in the immobi-
lizer system, the indicator light will flash
in a pattern. Have a Yamaha dealer
check the vehicle.
TIPIf the immobilizer system indicator light
flashes in the pattern, slowly 5 times
then quickly 2 time
s, this could be
caused by transponder interference. Ifthis occurs, try the following.
1. Make sure there are no other im- mobilizer keys close to the main
switch. Other immobilizer system
keys may cause signal interfer-
ence and prevent the engine from
starting.
2. Use the code re-registering key to start the engine.
3. If the engine starts, turn it off, and try starting the engine with the
standard keys.
4. If one or both of the standard keys do not start the engine, take the
vehicle and all 3 keys to a Yamaha
dealer to have the standard keys
re-registered.
B87-9-E0_1.book 6 ページ 2015年12月16日 水曜日 午前10時21分
Page 25 of 114

Instrument and control functions
3-10
1
234
5
6
7
8
9
10
11
12
indicator goes off when the vehicle is
stopped.
TIPConsider the following tips to reduce
fuel consumption:
Avoid high engine speeds during
acceleration.
Travel at a constant speed.
Select the transmission gear that
is appropriate for the vehiclespeed.
Transmission gear display
This display shows the selected gear.
The neutral position is indicated by “ ” and by the neutral indicator light.
Drive mode display
MT09
MT09A
This display indicates which drivemode has been selected: “STD”, “A” or
“B”. For more details on the modes and
on how to select them, see pages 3-15
and 3-17.
TCS display (for equipped models)
MT09A
This display indicates which traction
control system setting has been select-
ed: “1”, “2” or “OFF”. For more details
on the TCS settings and on how to se-
lect them, see page 3-21.
1. Transmission gear display
2. Neutral indicator light “ ”1
2
1. Drive mode display
1. Drive mode display
11
1. TCS display
1
B87-9-E0_1.book 10 ページ 2015年12月16日 水曜日 午前10時21分
Page 31 of 114

Instrument and control functions
3-16
1
234
5
6
7
8
9
10
11
12
EAU1234K
Handlebar switchesLeft (MT09) Left (MT09A) Right
EAU12352
Pass switch “ ”
Press this switch to flash the headlight.TIPWhen the dimmer switch is set to “ ”,the passing switch has no effect.
EAU12401
Dimmer switch “ / ”
Set this switch to “ ” for the high
beam and to “ ” for the low beam.
1. Pass switch “ ”
2. Dimmer switch “ / ”
3. Turn signal switch “ / ”
4. Horn switch “ ”
2341
1. Pass switch “ ”
2. Dimmer switch “ / ”
3. Turn signal switch “ / ”
4. Horn switch “ ”
5. Traction control system switch “TCS”
2341
5
1. Start/Engine stop switch “ / / ”
2. Drive mode switch “MODE”
3. Hazard switch “ ”
123
B87-9-E0_1.book 16 ページ 2015年12月16日 水曜日 午前10時21分
Page 32 of 114

Instrument and control functions
3-17
1
23
4
5
6
7
8
9
10
11
12
EAU12461
Turn signal switch “ / ”
To signal a right-hand turn, push this
switch to “ ”. To signal a left-hand
turn, push this switch to “ ”. When re-
leased, the switch returns to the center
position. To cancel the turn signal
lights, push the switch in after it has re-
turned to the center position.
EAU12501
Horn switch “ ”
Press this switch to sound the horn.
EAU73441
Traction control system switch
“TCS” (for equipped models)
With the throttle closed, push this
switch down to change from TCS “1” to
“2”. Push up to change from TCS “2” to
“1”.
With the vehicle stopped, push this
switch up for two seconds to turn the
system off. Push down to turn the sys-
tem on.TIP
The current TCS setting is shown
in the TCS display (page 3-10).
See page 3-21 for an explanation of the traction control system and
the TCS settings.
EAU54212
Stop/Run/Start switch “ / / ”
To crank the engine with the starter, set
this switch to “ ”, and then push the
switch down towards “ ”. See page
5-2 for starting instructions prior to
starting the engine.
Set this switch to “ ” to stop the engine
in case of an emergency, such as when
the vehicle overturns or when the throt-
tle cable is stuck.
EAU41701
The engine trouble warning light will
come on when the key is turned to “ON”
and the start switch is pushed, but this
does not indicate a malfunction.
EAU12735
Hazard switch “ ”
With the key in the “ON” or “ ” posi-
tion, use this switch to turn on the haz-
ard lights (simultaneous flashing of all
turn signal lights).
The hazard lights are used in case of
an emergency or to warn other drivers
when your vehicle is stopped where it
might be a traffic hazard.
NOTICE
ECA10062
Do not use the hazard lights for an
extended length of time with the en-
gine not running, otherwise the bat-tery may discharge.
EAU47496
Drive mode switch “MODE”
WARNING
EWA15341
Do not change the D-mode while thevehicle is moving.
Using this switch changes the drive
mode to “STD”, “A”, or “B” in the follow-
ing order:
STD
A B STD
The throttle grip must be completely
closed in order to change the drive
mode. (See page 3-15 for an explana-
tion of each drive mode.)TIP
The mode is set to “STD” by de-
fault. The mode resets to “STD”
when the key is turned to “OFF”.
B87-9-E0_1.book 17 ページ 2015年12月16日 水曜日 午前10時21分
Page 36 of 114

Instrument and control functions
3-21
1
23
4
5
6
7
8
9
10
11
12
EAU73141
Traction control system
(for equipped models)The traction control system (TCS)
helps maintain traction when accelerat-
ing on slippery surfaces, such as un-
paved or wet roads. If sensors detect
that the rear wheel is starting to slip (un-
controlled spinning), the traction control
system assists by regulating engine
power as needed until traction is re-
stored.
WARNING
EWA15432
The traction control system is not a
substitute for riding appropriately
for the conditions. Traction control
cannot prevent loss of traction due
to excessive speed when entering
turns, when accelerating hard at a
sharp lean angle, or while braking,
and cannot prevent front wheel slip-
ping. As with any motorcycle, ap-
proach surfaces that may be
slippery with caution and avoid es-pecially slippery surfaces.
The “ ” indicator light flashes when
traction control has engaged. You may notice slight changes in engine and ex-
haust sounds when the system has en-
gaged.
In certain conditions, the traction con-
trol system may be automatically dis-
abled. Should this happen, the “ ”
indicator light and the “ ” warning
light will come on.
The TCS display (page 3-10) indicates
the current TCS setting. There are
three settings.
TCS “OFF”
TCS “OFF” turns the traction control
system off.
TCS “1”
TCS “1” minimizes traction control sys-
tem assist.
TCS “2”
TCS “2” maximizes traction control as-
sist; wheel spin is most strongly con-
trolled.
TIP
Use the traction control switch
(page 3-17) to change TCS set-
tings.
Traction control can be turned on
or off only when the vehicle is
stopped.
When the key is turned to “ON”,
traction control is turned on and
set to TCS “1” or “2” (whichever
was last selected).
Turn the traction control system off
to help free the rear wheel if the ve-
hicle gets stuck in mud, sand, orother soft surfaces.
NOTICE
ECA16801
Use only the specified tires. (See
page 6-16.) Using different sized
tires will prevent the traction control
system from controlling tire rotationaccurately.
Resetting the traction control sys-
tem
The traction control system will auto-
matically disable when:
the front wheel or rear wheel
comes off the ground while riding.
excessive rear wheel spin is de-
tected while riding.
either wheel is rotated with the key
B87-9-E0_1.book 21 ページ 2015年12月16日 水曜日 午前10時21分
Page 37 of 114

Instrument and control functions
3-22
1
234
5
6
7
8
9
10
11
12
turned to “ON” (such as when per-
forming maintenance).
If the traction control system is dis-
abled, both the “ ” indicator light and
the “ ” warning light will come on.
Should this occur, try resetting the sys-
tem as follows. 1. Stop the vehicle and turn the key to “OFF”.
2. Wait a few seconds and then turn key back “ON”.
3. The “ ” indicator light should turn off and the system be enabled.
4. The “ ” warning light should go off after the vehicle reaches a trav-
eling speed of 20 km/h (12 mi/h).
TIPIf the “ ” indicator light or the “ ”
warning light remains on after resetting,
the vehicle may still be ridden; howev-
er, have a Yamaha dealer check thevehicle as soon as possible.
EAU13075
Fuel tank capTo open the fuel tank cap
Open the fuel tank cap lock cover, in-
sert the key into the lock, and then turn
it 1/4 turn clockwise. The lock will be re-
leased and the fuel tank cap can be
opened.
To close the fuel tank cap1. Push the fuel tank cap into position with the key inserted in the lock.
2. Turn the key counterclockwise to the original position, remove it, and
then close the lock cover.
TIPThe fuel tank cap cannot be closed un-
less the key is in the lock. In addition,
the key cannot be removed if the cap isnot properly closed and locked.
WARNING
EWA11092
Make sure that the fuel tank cap is
properly closed after filling fuel.Leaking fuel is a fire hazard.
1. Unlock.
2. Fuel tank cap lock cover
2
1
B87-9-E0_1.book 22 ページ 2015年12月16日 水曜日 午前10時21分
Page 52 of 114

Operation and important riding points
5-2
1
2
3
45
6
7
8
9
10
11
12
EAU58031
Starting the engineIn order for the ignition circuit cut-off
system to enable starting, one of the
following conditions must be met:
The transmission is in the neutral
position.
The transmission is in gear with
the clutch lever pulled and the sid-
estand up. (See page 3-30.)
1. Turn the key to “ON” and set the start/engine stop switch to “ ”.
The following warning lights and
indicator light should come on for a
few seconds, then go off.
Oil level warning light
Coolant temperature warning
light
Engine trouble warning light
Immobilizer system indicator
light
Traction control system indica-
tor light (for equipped models)
NOTICE
ECA17671
If the above warning lights or indica-
tor light do not come on initially
when the key is turned to “ON”, or if
a warning or indicator light remains on, see page 3-4 for the correspond-
ing warning and indicator light cir-
cuit check.
For ABS models:
The ABS warning light should
come on when the key is turned to
“ON”, and then go off after travel-
ing at a speed of 10 km/h (6 mi/h)
or higher.
NOTICE
ECA17682
If the ABS warning light does not
come on and then go off as ex-
plained above, see page 3-4 for thewarning light circuit check.2. Shift the transmission into the neu- tral position. The neutral indicator
light should come on. If not, ask a
Yamaha dealer to check the elec-
trical circuit.
3. Start the engine by pushing the “ ” side of the start/engine stop
switch.
If the engine fails to start, release
the start/engine stop switch, wait a
few seconds, and then try again.
Each starting attempt should be as
short as possible to preserve the battery. Do not crank the engine
more than 10 seconds on any one
attempt.
NOTICE
ECA11043
For maximum engine life, never ac-
celerate hard when the engine iscold!
B87-9-E0_1.book 2 ページ 2015年12月16日 水曜日 午前10時21分
Page 54 of 114

Operation and important riding points
5-4
1
2
3
45
6
7
8
9
10
11
12 clutch lever in, use the brakes to
slow the motorcycle, and continue
to downshift as necessary.
4. Once the motorcycle has stopped, the transmission can be shifted
into the neutral position. The neu-
tral indicator light should come on
and then the clutch lever can be
released.
WARNING
EWA17380
Improper braking can cause
loss of control or traction. Al-
ways use both brakes and apply
them smoothly.
Make sure that the motorcycle
and the engine have sufficiently
slowed before shifting to a low-
er gear. Engaging a lower gear
when the vehicle or engine
speed is too high could make
the rear wheel lose traction or
the engine to over-rev. This
could cause loss of control, an
accident and injury. It could also
cause engine or drive train dam-age.
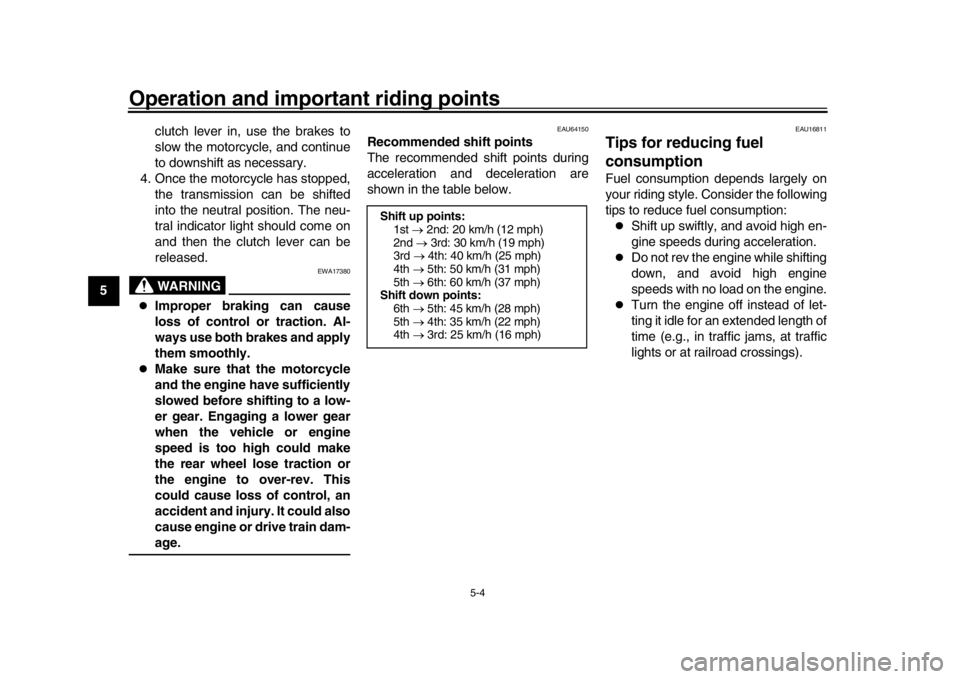
EAU64150
Recommended shift points
The recommended shift points during
acceleration and deceleration are
shown in the table below.
EAU16811
Tips for reducing fuel
consumptionFuel consumption depends largely on
your riding style. Consider the following
tips to reduce fuel consumption:
Shift up swiftly, and avoid high en-
gine speeds during acceleration.
Do not rev the engine while shifting
down, and avoid high engine
speeds with no load on the engine.
Turn the engine off instead of let-
ting it idle for an extended length of
time (e.g., in traffic jams, at traffic
lights or at railroad crossings).
Shift up points:1st 2nd: 20 km/h (12 mph)
2nd 3rd: 30 km/h (19 mph)
3rd 4th: 40 km/h (25 mph)
4th 5th: 50 km/h (31 mph)
5th 6th: 60 km/h (37 mph)
Shift down points:
6th 5th: 45 km/h (28 mph)
5th 4th: 35 km/h (22 mph)
4th 3rd: 25 km/h (16 mph)
B87-9-E0_1.book 4 ページ 2015年12月16日 水曜日 午前10時21分