clock YAMAHA MT-09 2019 Owners Manual
[x] Cancel search | Manufacturer: YAMAHA, Model Year: 2019, Model line: MT-09, Model: YAMAHA MT-09 2019Pages: 104, PDF Size: 7.14 MB
Page 26 of 104

Instrument and control functions
4-8
1
2
34
5
6
7
8
9
10
11
12
WARNING
EWA12423
Be sure to stop the vehicle before
making any setting changes to the
multi-function meter unit. Changing
settings while riding can distract the
operator and increase the risk of anaccident.
The multi-function meter unit is equipped with the following:
a speedometer
a tachometer
a clock
a fuel meter
an eco indicator
a transmission gear display
a drive mode display
a TCS display
a multi-function display
TIPThe multi-function meter unit can be
switched between kilometers and
miles. Set the multi-function display to
the odometer or a tripmeter mode, and
then press the “SELECT” button forone second.
Speedometer
The speedometer shows the vehicle’s
traveling speed.
Tachometer
1. Transmission gear display
2. Tachometer
3. Eco indicator “ECO”
4. TCS display
5. Drive mode display
6. Fuel meter
7. Multi-function display
8. Clock
9. Speedometer1
2
4
3
5
6
7
8
9
1. Speedometer
1. Tachometer
2. Tachometer red zone
1
2
1
BS2-9-E2.book 8 ページ 2018年8月10日 金曜日 午前9時36分
Page 27 of 104

Instrument and control functions
4-9
1
2
345
6
7
8
9
10
11
12
The tachometer allows the rider to
monitor the engine speed and keep it
within the ideal power range.
NOTICE
ECA10032
Do not operate the engine in the ta-
chometer red zone.Red zone: 11250 r/min and above
Clock
The clock uses a 12-hour time system.
When the key is not in the “ON” posi-
tion, the clock can be viewed by push-
ing the “SELECT” button.
To set the clock1. Turn the key to “ON”. 2. Push the “SELECT” button and the
“RESET” button for two seconds.
3. When the hour digits start flashing, use the “RESET” button to set the
hours.
4. Push the “SELECT” button, and the minute digits will start flashing.
5. Use the “RESET” button to set the minutes.
6. Push the “SELECT” button to con- firm the settings and start the
clock.
Fuel meter
The fuel meter indicates the amount of
fuel in the fuel tank. The display seg-
ments of the fuel meter disappear from “F” (full) towards “E” (empty) as the fuel
level decreases. When the last seg-
ment starts flashing, refuel as soon as
possible.
TIPIf a problem is detected in the electrical
circuit, the fuel level segments and “ ”
will flash repeatedly. If this occurs, havea Yamaha dealer check vehicle.
Eco indicator
This indicator comes on when the vehi-
cle is being operated in an environmen-
tally friendly, fuel-efficient manner. The
indicator goes off when the vehicle is
stopped.
1. Clock
1
1. Fuel meter
1
1. Eco indicator “ECO”
1
BS2-9-E2.book 9 ページ 2018年8月10日 金曜日 午前9時36分
Page 34 of 104

Instrument and control functions
4-16
1
2
34
5
6
7
8
9
10
11
12
TIP
The ABS performs a self-diagno-
sis test each time the vehicle first
starts off after the key is turned to
“ON” and the vehicle has traveled
at a speed of 10 km/h (6 mi/h) or
higher. During this test, a “clicking”
noise can be heard from the hy-
draulic control unit, and if the brake
lever or brake pedal is even slight-
ly applied, a vibration can be felt at
the lever and pedal, but these do
not indicate a malfunction.
This ABS has a test mode which
allows the owner to experience the
pulsation at the brake lever or
brake pedal when the ABS is oper-
ating. However, special tools are
required, so please consult yourYamaha dealer.
NOTICE
ECA20100
Be careful not to damage the wheel
sensor or wheel sensor rotor; other-
wise, improper performance of theABS will result.
EAU13076
Fuel tank capTo open the fuel tank cap
Open the fuel tank cap lock cover, in-
sert the key into the lock, and then turn
it 1/4 turn clockwise. The lock will be re-
leased and the fuel tank cap can be
opened.
To close the fuel tank cap
With the key still inserted in the lock,
push down the fuel tank cap. Turn the
key 1/4 turn counterclockwise, remove
it, and then close the lock cover.TIPThe fuel tank cap cannot be closed un-
1. Front wheel sensor
2. Front wheel sensor rotor
1. Rear wheel sensor
2. Rear wheel sensor rotor
1
2
1
2
1. Fuel tank cap lock cover
2. Unlock.
1
2
BS2-9-E2.book 16 ページ 2018年8月10日 金曜日 午前9時36分
Page 38 of 104

Instrument and control functions
4-20
1
2
34
5
6
7
8
9
10
11
12
EAU57991
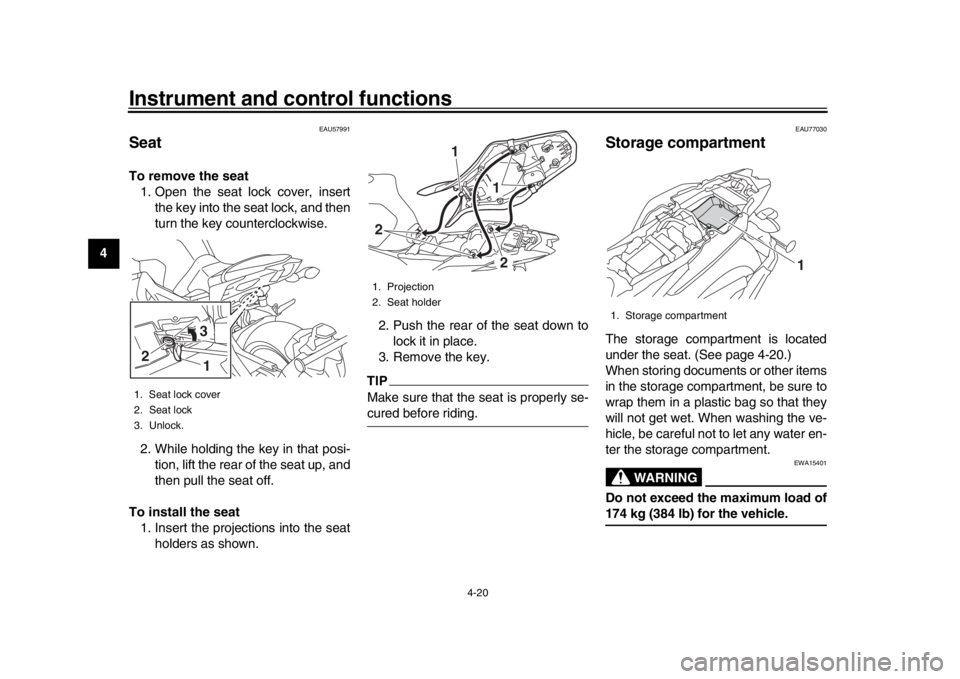
SeatTo remove the seat 1. Open the seat lock cover, insert the key into the seat lock, and then
turn the key counterclockwise.
2. While holding the key in that posi- tion, lift the rear of the seat up, and
then pull the seat off.
To install the seat 1. Insert the projections into the seat holders as shown. 2. Push the rear of the seat down to
lock it in place.
3. Remove the key.
TIPMake sure that the seat is properly se-cured before riding.
EAU77030
Storage compartmentThe storage compartment is located
under the seat. (See page 4-20.)
When storing documents or other items
in the storage compartment, be sure to
wrap them in a plastic bag so that they
will not get wet. When washing the ve-
hicle, be careful not to let any water en-
ter the storage compartment.
WARNING
EWA15401
Do not exceed the maximum load of174 kg (384 lb) for the vehicle.
1. Seat lock cover
2. Seat lock
3. Unlock.2
31
1. Projection
2. Seat holder
1
2
21
1. Storage compartment
1
BS2-9-E2.book 20 ページ 2018年8月10日 金曜日 午前9時36分
Page 86 of 104

Periodic maintenance and adjustment
7-34
1
2
3
4
5
67
8
9
10
11
12
EAU76271
Vehicle lightsExcept for the turn signal lights, this
model is equipped with full-LED light-
ing. If a light does not come on, check
the fuses and then have a Yamaha
dealer check the vehicle.
If a turn signal light does not come,
check and replace the bulb. (See
page 7-34.)TIPWhen the dimmer switch is set to high
beam or the passing switch is pushed,all four headlights come on.
NOTICE
ECA16581
Do not affix any type of tinted film orstickers to the headlight lens.
EAU24205
Replacing a turn signal light
bulb1. Remove the turn signal light lens by removing the screw.
2. Remove the burnt-out bulb by pushing it in and turning it counter-
clockwise.
1. Headlight (low beam)
2. Headlight (high beam)
3. Auxiliary light
12
3
1. Turn signal light lens
2. Screw
1
2
BS2-9-E2.book 34 ページ 2018年8月10日 金曜日 午前9時36分
Page 87 of 104

Periodic maintenance and adjustment7-35
1
2
3
4
5
678
9
10
11
12
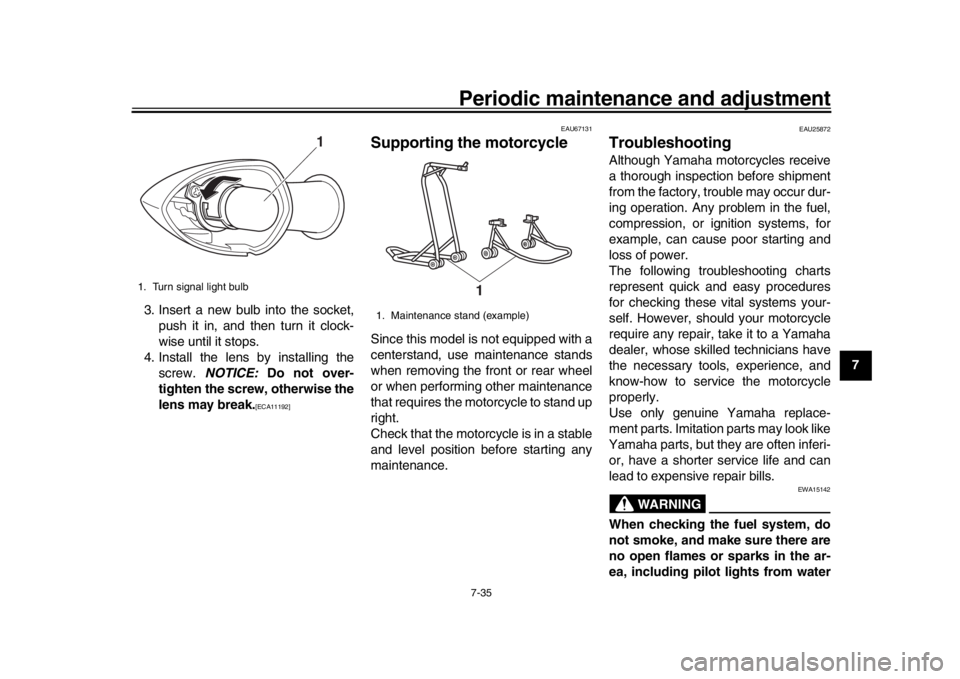
3. Insert a new bulb into the socket,
push it in, and then turn it clock-
wise until it stops.
4. Install the lens by installing the screw. NOTICE: Do not over-
tighten the screw, otherwise the
lens may break.
[ECA11192] EAU67131
Supporting the motorcycleSince this model is not equipped with a
centerstand, use maintenance stands
when removing the front or rear wheel
or when performing other maintenance
that requires the motorcycle to stand up
right.
Check that the motorcycle is in a stable
and level position before starting any
maintenance.
EAU25872
TroubleshootingAlthough Yamaha motorcycles receive
a thorough inspection before shipment
from the factory, trouble may occur dur-
ing operation. Any problem in the fuel,
compression, or ignition systems, for
example, can cause poor starting and
loss of power.
The following troubleshooting charts
represent quick and easy procedures
for checking these vital systems your-
self. However, should your motorcycle
require any repair, take it to a Yamaha
dealer, whose skilled technicians have
the necessary tools, experience, and
know-how to service the motorcycle
properly.
Use only genuine Yamaha replace-
ment parts. Imitation parts may look like
Yamaha parts, but they are often inferi-
or, have a shorter service life and can
lead to expensive repair bills.
WARNING
EWA15142
When checking the fuel system, do
not smoke, and make sure there are
no open flames or sparks in the ar-
ea, including pilot lights from water
1. Turn signal light bulb
1
1. Maintenance stand (example)
1
BS2-9-E2.book 35 ページ 2018年8月10日 金曜日 午前9時36分
Page 90 of 104

Periodic maintenance and adjustment
7-38
1
2
3
4
5
67
8
9
10
11
12 Engine overheating
WARNING
EWA10401
Do not remove the radiator cap when the engine and radiator are hot. Scalding hot fluid and steam may be
blown out under pressure, which could cause serious injury. Be sure to wait until the engine has cooled.
After removing the radiator cap retaining bolt, place a thick rag, like a towel, over the radiator cap, and then
slowly rotate the cap counterclockwise to the detent to allow any residual pressure to escape. When the hissingsound has stopped, press down on the cap while turning it counterclockwise, and then remove the cap.
TIPIf coolant is not available, tap water can be temporarily us
ed instead, provided that it is changed to the recommended coolantas soon as possible.
Wait until the
engine has cooled.
Check the coolant level in the
reservoir and radiator.
The coolant level
is OK.The coolant level is low.
Check the cooling system
for leakage.
Have a Yamaha dealer checkand repair the cooling system.Add coolant. (See TIP.)
Start the engine. If the engine overheats again,
have a
Yamaha dealer check
and repair the cooling system.
There is
leakage.
There is
no leakage.
BS2-9-E2.book 38 ページ 2018年8月10日 金曜日 午前9時36分