fuel tank YAMAHA MT-09 2021 Owners Manual
[x] Cancel search | Manufacturer: YAMAHA, Model Year: 2021, Model line: MT-09, Model: YAMAHA MT-09 2021Pages: 108, PDF Size: 3.75 MB
Page 6 of 108
Table of contentsSafety information ............................ 1-1
Description ....................................... 2-1
Left view ......................................... 2-1
Right view ....................................... 2-2
Controls and instruments ............... 2-3
Special features .............................. 3-1
“D-MODE” ...................................... 3-1
“TCS-MODE”.................................. 3-1
QSS ................................................ 3-3
BC................................................... 3-4
Instrument an d control functions ... 4-1
Immobilizer system......................... 4-1
Main switch/steering lock............... 4-2
Handlebar switches ........................ 4-3
Indicator lights and warning lights............................................ 4-5
Display ............................................ 4-9
Settings MENU ............................. 4-14
Clutch lever .................................. 4-18
Shift pedal .................................... 4-18
Brake lever.................................... 4-19
Brake pedal .................................. 4-19
Brake control system (BC)............ 4-20
Fuel tank cap ................................ 4-21
Fuel ............................................... 4-22
Fuel tank overflow hose ............... 4-23
Catalytic converter ....................... 4-24
Seat .............................................. 4-24 Rider footrest position .................. 4-25
Handlebar position ....................... 4-25
Adjusting the front fork ................. 4-26
Adjusting the shock absorber
assembly.................................... 4-28
Luggage strap holders .................. 4-30
Auxiliary DC connectors ............... 4-30
Sidestand ...................................... 4-30
Ignition circuit cut-off system ....... 4-31
For your safety – pre-operation
checks ............................................... 5-1
Operation an d important ri din g
points ................................................. 6-1
Engine break-in ............................... 6-1
Starting the engine .......................... 6-2
Shifting ............................................ 6-3
Tips for reducing fuel consumption ................................ 6-4
Parking ............................................ 6-5
Perio dic maintenance an d
a d justment ........................................ 7-1
Tool kit ............................................ 7-2
Periodic maintenance charts .......... 7-3
Periodic maintenance chart for the emission control system .............. 7-3
General maintenance and
lubrication chart ........................... 7-5
Checking the spark plugs ............... 7-9 Canister ........................................ 7-10
Engine oil ...................................... 7-10
Why Yamalube.............................. 7-12
Coolant ......................................... 7-13
Air filter element ............................ 7-14
Checking the engine idling
speed ........................................ 7-14
Valve clearance............................. 7-15
Tires .............................................. 7-15
Cast wheels .................................. 7-17
Adjusting the clutch lever free
play ............................................ 7-18
Checking the brake lever free play ............................................ 7-18
Brake light switches ..................... 7-19
Checking the front and rear brake pads ................................ 7-19
Checking the brake fluid level ...... 7-20
Changing the brake fluid .............. 7-21
Drive chain slack........................... 7-22
Cleaning and lubricating the drive chain ................................. 7-24
Checking and lubricating the
cables ........................................ 7-24
Checking and lubricating the throttle grip ................................ 7-25
Checking and lubricating the brake and shift pedals............... 7-25
Checking and lubricating the
brake and clutch levers ............. 7-26UB7NE0E0.book Page 1 Friday, October 2, 2020 4:38 PM
Page 14 of 108
Description
2-2
2
EAU10421
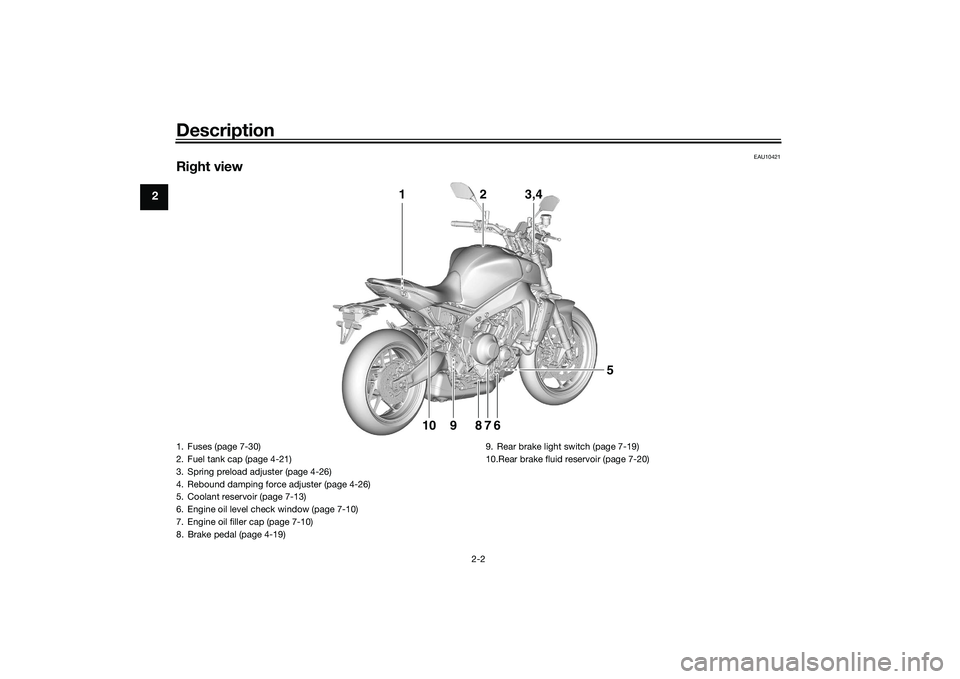
Right view
1 2 3,4
5
9
10 6
78
1. Fuses (page 7-30)
2. Fuel tank cap (page 4-21)
3. Spring preload adjuster (page 4-26)
4. Rebound damping force adjuster (page 4-26)
5. Coolant reservoir (page 7-13)
6. Engine oil level check window (page 7-10)
7. Engine oil filler cap (page 7-10)
8. Brake pedal (page 4-19) 9. Rear brake light switch (page 7-19)
10.Rear brake fluid reservoir (page 7-20)UB7NE0E0.book Page 2 Friday, October 2, 2020 4:38 PM
Page 29 of 108

Instrument and control functions
4-10
4
Tachometer
The tachometer shows the engine
speed, as measured by the rotational
velocity of the crankshaft, in revolu-
tions per minute (r/min).
NOTICE
ECA10032
Do not operate the en
gine in the ta-
chometer red zone.
Re d zone: 10600 r/min an d a boveVehicle information displays
The two vehicle information displays
can be individually set to show the fol-
lowing items: ODO: odometer
F-TRIP: fuel reserve tripmeter
TRIP1: tripmeter
TRIP2: tripmeter
F.AVE: average fuel economy
F.CRNT: instantaneous fuel econ-
omy
A.TEMP: air temperature
C.TEMP: coolant temperature
Fuel meter
FUELCON: amount of fuel con-
sumed
TRIPTIME: running time
Operate the vehicle information display
as follows:
Rotate the wheel switch to move the
cursor over a display.
Push the wheel switch inward and the
selected display will highlight grey.
Rotate the wheel switch to choose a
different display item.
Push the wheel switch inward to con-
firm the new display item.
TIP ODO will lock at 999999 and can-
not be reset.
TRIP1 and TRIP2 will reset to 0
and begin counting again after
9999.9 has been reached.
When the fuel tank reserve level
has been reached, F-TRIP ap-
pears automatically and begins
recording distance traveled from
that point.
After refueling and traveling some
distance, F-TRIP will automatically
disappear.
See “Unit” on page 4-17 to chan-
ge the fuel consumption units.
The air temperature is displayed
from –9 °C (16 °F) to 50 °C (122 °F)
in 1 °C (1 °F) increments.
The air temperature displayed
may vary from the actual ambient
temperature.
In LAP TIME mode, the vehicle in-
formation display is replaced by
the lap information.
TRIP1, TRIP2, F-TRIP, F.AVE, FU-
ELCON and TRIPTIME items can
be individually reset.
If the vehicle coolant temperature
is below 40 °C (104 °F) the coolant
temperature display will read “Lo”
1. Vehicle information displays
1
UB7NE0E0.book Page 10 Friday, October 2, 2020 4:38 PM
Page 40 of 108
Instrument and control functions
4-21
4
EAU13077
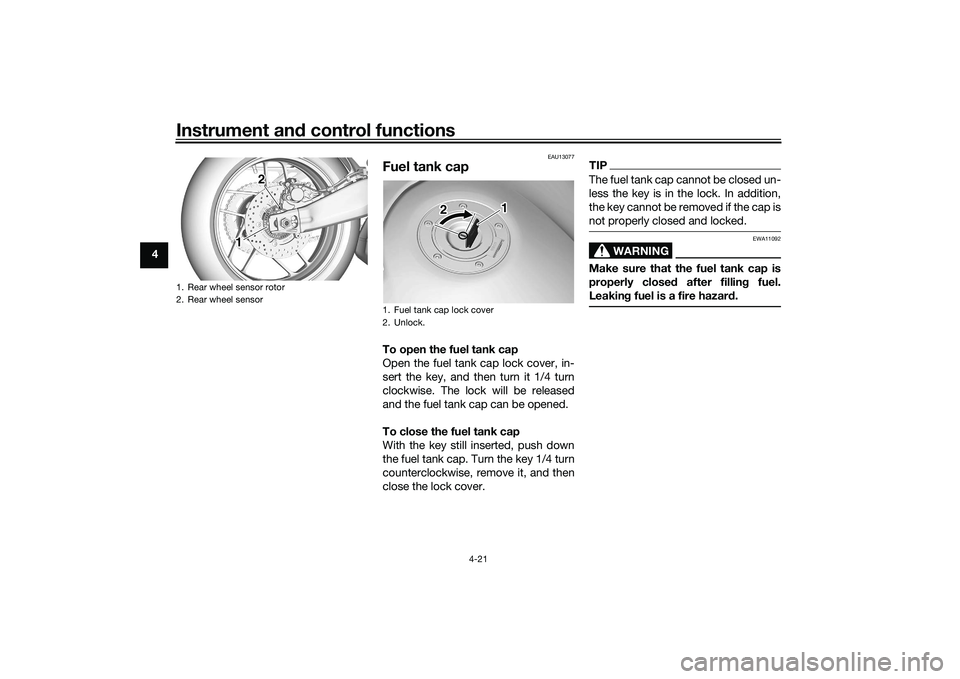
Fuel tank capTo open the fuel tank cap
Open the fuel tank cap lock cover, in-
sert the key, and then turn it 1/4 turn
clockwise. The lock will be released
and the fuel tank cap can be opened.
To close the fuel tank cap
With the key still inserted, push down
the fuel tank cap. Turn the key 1/4 turn
counterclockwise, remove it, and then
close the lock cover.
TIPThe fuel tank cap cannot be closed un-
less the key is in the lock. In addition,
the key cannot be removed if the cap is
not properly closed and locked.
WARNING
EWA11092
Make sure that the fuel tank cap is
properly close d after fillin g fuel.
Leakin g fuel is a fire hazar d.
1. Rear wheel sensor rotor
2. Rear wheel sensor
1 1 1 2 2
1. Fuel tank cap lock cover
2. Unlock.
1
2
UB7NE0E0.book Page 21 Friday, October 2, 2020 4:38 PM
Page 41 of 108
Instrument and control functions
4-22
4
EAU13222
FuelMake sure there is sufficient gasoline in
the tank.
WARNING
EWA10882
Gasoline an d gasoline vapors are
extremely flammab le. To avoid fires
an d explosions an d to re duce the
risk of injury when refueling , follow
these instructions.1. Before refueling, turn off the en- gine and be sure that no one is sit-
ting on the vehicle. Never refuel
while smoking, or while in the vi-
cinity of sparks, open flames, or
other sources of ignition such as
the pilot lights of water heaters
and clothes dryers.
2. Do not overfill the fuel tank. When refueling, be sure to insert the
pump nozzle into the fuel tank filler
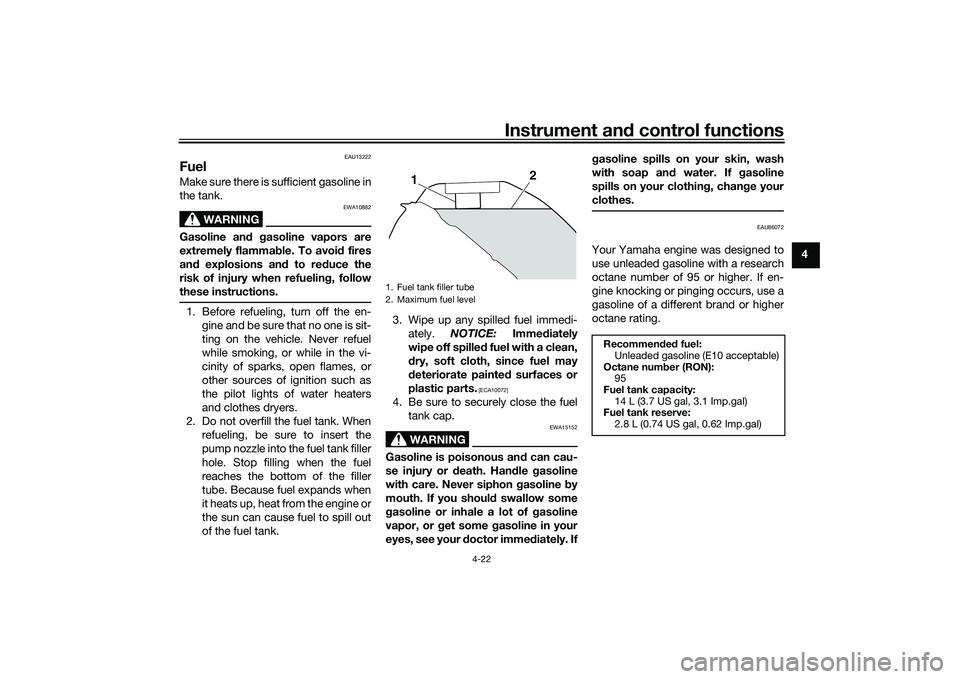
hole. Stop filling when the fuel
reaches the bottom of the filler
tube. Because fuel expands when
it heats up, heat from the engine or
the sun can cause fuel to spill out
of the fuel tank. 3. Wipe up any spilled fuel immedi-
ately. NOTICE: Immediately
wipe off spille d fuel with a clean,
d ry, soft cloth, since fuel may
d eteriorate painte d surfaces or
plastic parts.
[ECA10072]
4. Be sure to securely close the fuel tank cap.
WARNING
EWA15152
Gasoline is poisonous an d can cau-
se injury or death. Han dle gasoline
with care. Never siphon gasoline by
mouth. If you shoul d swallow some
g asoline or inhale a lot of gasoline
vapor, or get some g asoline in your
eyes, see your d octor immediately. If g
asoline spills on your skin, wash
with soap an d water. If g asoline
spills on your clothin g, chan ge your
clothes.
EAU86072
Your Yamaha engine was designed to
use unleaded gasoline with a research
octane number of 95 or higher. If en-
gine knocking or pinging occurs, use a
gasoline of a different brand or higher
octane rating.
1. Fuel tank filler tube
2. Maximum fuel level
1
2
Recommen ded fuel:
Unleaded gasoline (E10 acceptable)
Octane num ber (RON):
95
Fuel tank capacity: 14 L (3.7 US gal, 3.1 Imp.gal)
Fuel tank reserve:
2.8 L (0.74 US gal, 0.62 Imp.gal)
UB7NE0E0.book Page 22 Friday, October 2, 2020 4:38 PM
Page 42 of 108

Instrument and control functions
4-23
4
TIP This mark identifies the recom-
mended fuel for this vehicle as
specified by European regulation
(EN228).
Confirm the gasoline pump nozzle
has the same fuel identification
mark.Gasohol
There are two types of gasohol: gaso-
hol containing ethanol and that con-
taining methanol. Gasohol containing
ethanol can be used if the ethanol con-
tent does not exceed 10% (E10). Gas-
ohol containing methanol is not
recommended by Yamaha because it
can cause damage to the fuel system
or vehicle performance problems.
NOTICE
ECA11401
Use only unlea ded g asoline. The use
of lea ded g asoline will cause severe
d amag e to internal en gine parts,
such as the valves an d piston rin gs,
as well as to the exhaust system.
EAU86160
Fuel tank overflow hoseThe overflow hose drains excess gaso-
line and directs it safely away from the
vehicle.
Before operating the vehicle: Check the fuel tank overflow hose
connection.
Check the fuel tank overflow hose
for cracks or damage, and replace
it if necessary.
Make sure that the fuel tank over-
flow hose is not blocked, and
clean it if necessary.
Make sure that the fuel tank over-
flow hose is positioned as shown.
E5
E10
1. Fuel tank overflow hose
2. White mark
3. Clamp
111
32
22
UB7NE0E0.book Page 23 Friday, October 2, 2020 4:38 PM
Page 52 of 108

For your safety – pre-operation checks
5-1
5
EAU1559B
Inspect your vehicle each time you use it to make sure the vehicle is in safe operating condition. Always follow the inspection
and maintenance procedures and schedules described in the Owner’s Manual.
WARNING
EWA11152
Failure to inspect or maintain the vehicle properly increases the possibility of an acci dent or equipment damag e.
Do not operate the vehicle if you fin d any pro blem. If a pro blem cannot b e corrected b y the proce dures provi ded in
this manual, have the vehicle inspecte d b y a Yamaha dealer.Before using this vehicle, check the following points:
ITEM CHECKS PAGE
Fuel • Check fuel level in fuel tank.
• Refuel if necessary.
• Check fuel line for leakage.
• Check fuel tank overflow hose for obstructions, cracks or damage, and check
hose connection. 4-22, 4-23
En gine oil • Check oil level in engine.
• If necessary, add recommended oil to specified level.
• Check vehicle for oil leakage. 7-10
Coolant • Check coolant level in reservoir.
• If necessary, add recommended coolant to specified level.
• Check cooling system for leakage. 7-13
Front brake • Check operation.
• If soft or spongy, have Yamaha dealer bleed hydraulic system.
• Check brake pads for wear.
• Replace if necessary.
• Check fluid level in reservoir.
• If necessary, add specified brake fluid to specified level.
• Check hydraulic system for leakage. 7-19, 7-20
UB7NE0E0.book Page 1 Friday, October 2, 2020 4:38 PM
Page 69 of 108

Periodic maintenance an d a djustment
7-10
7
EAU36113
CanisterThis model is equipped with a canister
to prevent the discharging of fuel vapor
into the atmosphere. Before operating
this vehicle, make sure to check the
following:
Check each hose connection.
Check each hose and canister for
cracks or damage. Replace if
damaged.
Make sure that the canister
breather is not blocked, and if
necessary, clean it.
EAU1990G
Engine oilThe engine oil level should be checked
regularly. In addition, the oil must be
changed and the oil filter cartridge re-
placed at the intervals specified in the
periodic maintenance chart.NOTICE
ECA11621
In or der to prevent clutch slip-
pa ge (since the en gine oil also
lu bricates the clutch), do not
mix any chemical add itives. Do
not use oils with a diesel speci-
fication of “CD” or oils of a hi gh-
er quality than specified . In
a dd ition, do not use oils lab eled
“ENERGY CONSERVING II” or
hi gher.
Make sure that no forei gn mate-
rial enters the crankcase.
To check the en gine oil level
1. After warming up the engine, wait a few minutes for the oil level to
settle for an accurate reading.
2. With the vehicle on a level surface, hold it upright for an accurate
reading.
3. Look at the check window located at the bottom-right side of the
crankcase.TIPThe engine oil should be between the
minimum and maximum level marks.
1. Canister
2. Canister breather
3. Fuel tank overflow hose
1 1
2
3 123
Recommen
ded en gine oil:
See page 9-1.
Oil quantity: Oil change:2.80 L (2.96 US qt, 2.46 Imp.qt)
With oil filter removal: 3.20 L (3.38 US qt, 2.82 Imp.qt)
1. Engine oil filler cap
2. Engine oil level check window
3. Maximum level mark
4. Minimum level mark
1 1
2
1
2
34
UB7NE0E0.book Page 10 Friday, October 2, 2020 4:38 PM
Page 93 of 108

Periodic maintenance an d a djustment
7-34
7
EAU86350
Trou bleshootin g chart
Check the fuel level in
the fuel tank.1. Fuel
There is enough fuel.
There is no fuel.
Check the battery.
Supply fuel.
The engine does not start.
Check the battery.
Try starting the engine.4. Compression
There is compression.
There is no compression.
The engine does not start.
Have a Yamaha dealer check the vehicle.Have a Yamaha dealer check the vehicle.
Remove the spark plug
and check the electrodes.3. Ignition
Wipe off with a dry cloth and correct the
spark plug gap, or replace the spark plug(s). Have a Yamaha dealer check the vehicle.
The engine does not start.
Check the compression.
Operate the electric starter.2. Battery
The engine turns over
quickly.
The engine turns over
slowly.
The battery is good.
DryWet
Try starting the engine.
Check the battery lead connections,
and charge the battery if necessary.
The engine does not start.
Check the ignition.
UB7NE0E0.book Page 34 Friday, October 2, 2020 4:38 PM
Page 98 of 108

Motorcycle care and stora ge
8-4
8 1. Make all necessary repairs and
perform any outstanding mainte-
nance.
2. Follow all instructions in the Care section of this chapter.
3. Fill up the fuel tank, adding fuel stabilizer according to product in-
structions. Run the engine for 5
minutes to distribute treated fuel
through the fuel system.
4. For vehicles equipped with a fuel cock: Turn the fuel cock lever to
the off position.
5. For vehicles with a carburetor: To prevent fuel deposits from build-
ing up, drain the fuel in the carbu-
retor float chamber into a clean
container. Retighten the drain bolt
and pour the fuel back into the fuel
tank.
6. Use a quality engine fogging oil according to product instructions
to protect internal engine compo-
nents from corrosion. If engine
fogging oil is not available, per-
form the following steps for each
cylinder:a. Remove the spark plug cap and spark plug. b. Pour a teaspoonful of engine
oil into the spark plug bore.
c. Install the spark plug cap onto the spark plug, and then place
the spark plug on the cylinder
head so that the electrodes are
grounded. (This will limit spark-
ing during the next step.)
d. Turn the engine over several times with the starter. (This will
coat the cylinder wall with oil.)
WARNING! To prevent d am-
a g e or injury from sparkin g,
make sure to groun d the
spark plu g electro des while
turnin g the en gine over.
[EWA10952]
e. Remove the spark plug cap
from the spark plug, and then
install the spark plug and the
spark plug cap.
7. Lubricate all control cables, piv- ots, levers and pedals, as well as
the sidestand and centerstand (if
equipped).
8. Check and correct the tire air pressure, and then lift the vehicle
so that all wheels are off the
ground. Otherwise, turn the wheels a little once a month in or-
der to prevent the tires from be-
coming degraded in one spot.
9. Cover the muffler outlet with a plastic bag to prevent moisture
from entering it.
10. Remove the battery and fully char- ge it, or attach a maintenance
charger to keep the battery opti-
mally charged. NOTICE: Confirm
that the battery an d its char ger
are compati ble. Do not char ge a
VRLA battery with a convention-
al char ger.
[ECA26330]
TIP If the battery will be removed,
charge it once a month and store
it in a temperate location between
0-30 °C (32-90 °F).
See page 7-28 for more informa-
tion on charging and storing the
battery.
UB7NE0E0.book Page 4 Friday, October 2, 2020 4:38 PM