fuel tank remov YAMAHA MT-09 2021 Owners Manual
[x] Cancel search | Manufacturer: YAMAHA, Model Year: 2021, Model line: MT-09, Model: YAMAHA MT-09 2021Pages: 108, PDF Size: 3.75 MB
Page 40 of 108
Instrument and control functions
4-21
4
EAU13077
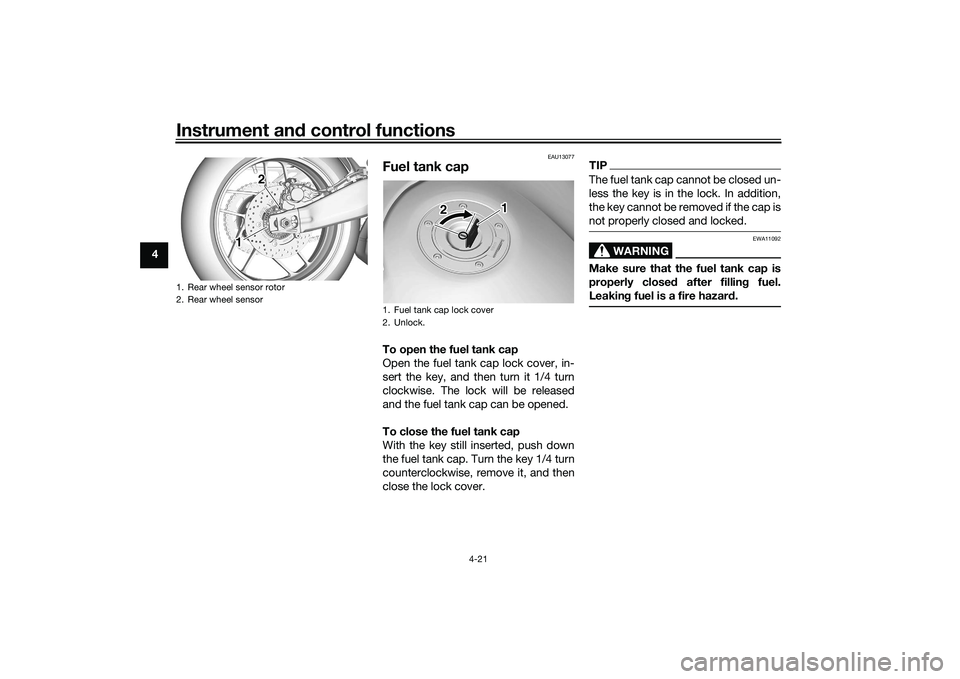
Fuel tank capTo open the fuel tank cap
Open the fuel tank cap lock cover, in-
sert the key, and then turn it 1/4 turn
clockwise. The lock will be released
and the fuel tank cap can be opened.
To close the fuel tank cap
With the key still inserted, push down
the fuel tank cap. Turn the key 1/4 turn
counterclockwise, remove it, and then
close the lock cover.
TIPThe fuel tank cap cannot be closed un-
less the key is in the lock. In addition,
the key cannot be removed if the cap is
not properly closed and locked.
WARNING
EWA11092
Make sure that the fuel tank cap is
properly close d after fillin g fuel.
Leakin g fuel is a fire hazar d.
1. Rear wheel sensor rotor
2. Rear wheel sensor
1 1 1 2 2
1. Fuel tank cap lock cover
2. Unlock.
1
2
UB7NE0E0.book Page 21 Friday, October 2, 2020 4:38 PM
Page 69 of 108

Periodic maintenance an d a djustment
7-10
7
EAU36113
CanisterThis model is equipped with a canister
to prevent the discharging of fuel vapor
into the atmosphere. Before operating
this vehicle, make sure to check the
following:
Check each hose connection.
Check each hose and canister for
cracks or damage. Replace if
damaged.
Make sure that the canister
breather is not blocked, and if
necessary, clean it.
EAU1990G
Engine oilThe engine oil level should be checked
regularly. In addition, the oil must be
changed and the oil filter cartridge re-
placed at the intervals specified in the
periodic maintenance chart.NOTICE
ECA11621
In or der to prevent clutch slip-
pa ge (since the en gine oil also
lu bricates the clutch), do not
mix any chemical add itives. Do
not use oils with a diesel speci-
fication of “CD” or oils of a hi gh-
er quality than specified . In
a dd ition, do not use oils lab eled
“ENERGY CONSERVING II” or
hi gher.
Make sure that no forei gn mate-
rial enters the crankcase.
To check the en gine oil level
1. After warming up the engine, wait a few minutes for the oil level to
settle for an accurate reading.
2. With the vehicle on a level surface, hold it upright for an accurate
reading.
3. Look at the check window located at the bottom-right side of the
crankcase.TIPThe engine oil should be between the
minimum and maximum level marks.
1. Canister
2. Canister breather
3. Fuel tank overflow hose
1 1
2
3 123
Recommen
ded en gine oil:
See page 9-1.
Oil quantity: Oil change:2.80 L (2.96 US qt, 2.46 Imp.qt)
With oil filter removal: 3.20 L (3.38 US qt, 2.82 Imp.qt)
1. Engine oil filler cap
2. Engine oil level check window
3. Maximum level mark
4. Minimum level mark
1 1
2
1
2
34
UB7NE0E0.book Page 10 Friday, October 2, 2020 4:38 PM
Page 93 of 108

Periodic maintenance an d a djustment
7-34
7
EAU86350
Trou bleshootin g chart
Check the fuel level in
the fuel tank.1. Fuel
There is enough fuel.
There is no fuel.
Check the battery.
Supply fuel.
The engine does not start.
Check the battery.
Try starting the engine.4. Compression
There is compression.
There is no compression.
The engine does not start.
Have a Yamaha dealer check the vehicle.Have a Yamaha dealer check the vehicle.
Remove the spark plug
and check the electrodes.3. Ignition
Wipe off with a dry cloth and correct the
spark plug gap, or replace the spark plug(s). Have a Yamaha dealer check the vehicle.
The engine does not start.
Check the compression.
Operate the electric starter.2. Battery
The engine turns over
quickly.
The engine turns over
slowly.
The battery is good.
DryWet
Try starting the engine.
Check the battery lead connections,
and charge the battery if necessary.
The engine does not start.
Check the ignition.
UB7NE0E0.book Page 34 Friday, October 2, 2020 4:38 PM
Page 98 of 108

Motorcycle care and stora ge
8-4
8 1. Make all necessary repairs and
perform any outstanding mainte-
nance.
2. Follow all instructions in the Care section of this chapter.
3. Fill up the fuel tank, adding fuel stabilizer according to product in-
structions. Run the engine for 5
minutes to distribute treated fuel
through the fuel system.
4. For vehicles equipped with a fuel cock: Turn the fuel cock lever to
the off position.
5. For vehicles with a carburetor: To prevent fuel deposits from build-
ing up, drain the fuel in the carbu-
retor float chamber into a clean
container. Retighten the drain bolt
and pour the fuel back into the fuel
tank.
6. Use a quality engine fogging oil according to product instructions
to protect internal engine compo-
nents from corrosion. If engine
fogging oil is not available, per-
form the following steps for each
cylinder:a. Remove the spark plug cap and spark plug. b. Pour a teaspoonful of engine
oil into the spark plug bore.
c. Install the spark plug cap onto the spark plug, and then place
the spark plug on the cylinder
head so that the electrodes are
grounded. (This will limit spark-
ing during the next step.)
d. Turn the engine over several times with the starter. (This will
coat the cylinder wall with oil.)
WARNING! To prevent d am-
a g e or injury from sparkin g,
make sure to groun d the
spark plu g electro des while
turnin g the en gine over.
[EWA10952]
e. Remove the spark plug cap
from the spark plug, and then
install the spark plug and the
spark plug cap.
7. Lubricate all control cables, piv- ots, levers and pedals, as well as
the sidestand and centerstand (if
equipped).
8. Check and correct the tire air pressure, and then lift the vehicle
so that all wheels are off the
ground. Otherwise, turn the wheels a little once a month in or-
der to prevent the tires from be-
coming degraded in one spot.
9. Cover the muffler outlet with a plastic bag to prevent moisture
from entering it.
10. Remove the battery and fully char- ge it, or attach a maintenance
charger to keep the battery opti-
mally charged. NOTICE: Confirm
that the battery an d its char ger
are compati ble. Do not char ge a
VRLA battery with a convention-
al char ger.
[ECA26330]
TIP If the battery will be removed,
charge it once a month and store
it in a temperate location between
0-30 °C (32-90 °F).
See page 7-28 for more informa-
tion on charging and storing the
battery.
UB7NE0E0.book Page 4 Friday, October 2, 2020 4:38 PM
Page 99 of 108

Specifications
9-1
9
Dimensions:Overall length:2090 mm (82.3 in)
Overall width:
795 mm (31.3 in)
Overall height: 1190 mm (46.9 in)
Seat height: 825 mm (32.5 in)
Wheelbase:
1430 mm (56.3 in)
Ground clearance: 140 mm (5.51 in)
Minimum turning radius: 3.4 m (11.16 ft)Wei ght:Curb weight:
189 kg (417 lb)Engine:Combustion cycle:
4-stroke
Cooling system: Liquid cooled
Valve train: DOHC
Cylinder arrangement:
Inline
Number of cylinders: 3-cylinder
Displacement: 890 cm³
Bore × stroke:
78.0 × 62.1 mm (3.07 × 2.44 in) Starting system:
Electric starter
Engine oil:Recommended brand:
SAE viscosity grades:
10W-40
Recommended engine oil grade:
API service SG type or higher, JASO
standard MA
Engine oil quantity:
Oil change:2.80 L (2.96 US qt, 2.46 Imp.qt)
With oil filter removal:
3.20 L (3.38 US qt, 2.82 Imp.qt)Coolant quantity:Coolant reservoir (up to the maximum level
mark):0.28 L (0.30 US qt, 0.25 Imp.qt)
Radiator (including all routes): 1.72 L (1.82 US qt, 1.51 Imp.qt)Fuel:Recommended fuel:Unleaded gasoline (E10 acceptable)
Octane number (RON): 95
Fuel tank capacity:
14 L (3.7 US gal, 3.1 Imp.gal)
Fuel reserve amount: 2.8 L (0.74 US gal, 0.62 Imp.gal)
Fuel injection:Throttle body:ID mark:B7N1Drivetrain:Gear ratio:
1st: 2.571 (36/14)
2nd:
1.947 (37/19)
3rd: 1.619 (34/21)
4th: 1.381 (29/21)
5th:
1.190 (25/21)
6th: 1.037 (28/27)Front tire:Type:
Tubeless
Size: 120/70ZR17M/C (58W)
Manufacturer/model: BRIDGESTONE/BATTLAX HYPERSPORT S22FRear tire:Type:
Tubeless
Size: 180/55ZR17M/C (73W)
Manufacturer/model: BRIDGESTONE/BATTLAX HYPERSPORT S22R
UB7NE0E0.book Page 1 Friday, October 2, 2020 4:38 PM