clock YAMAHA MT-09 2022 Owners Manual
[x] Cancel search | Manufacturer: YAMAHA, Model Year: 2022, Model line: MT-09, Model: YAMAHA MT-09 2022Pages: 110, PDF Size: 3.8 MB
Page 30 of 110
Instrument and control functions
4-9
4
EAU91447
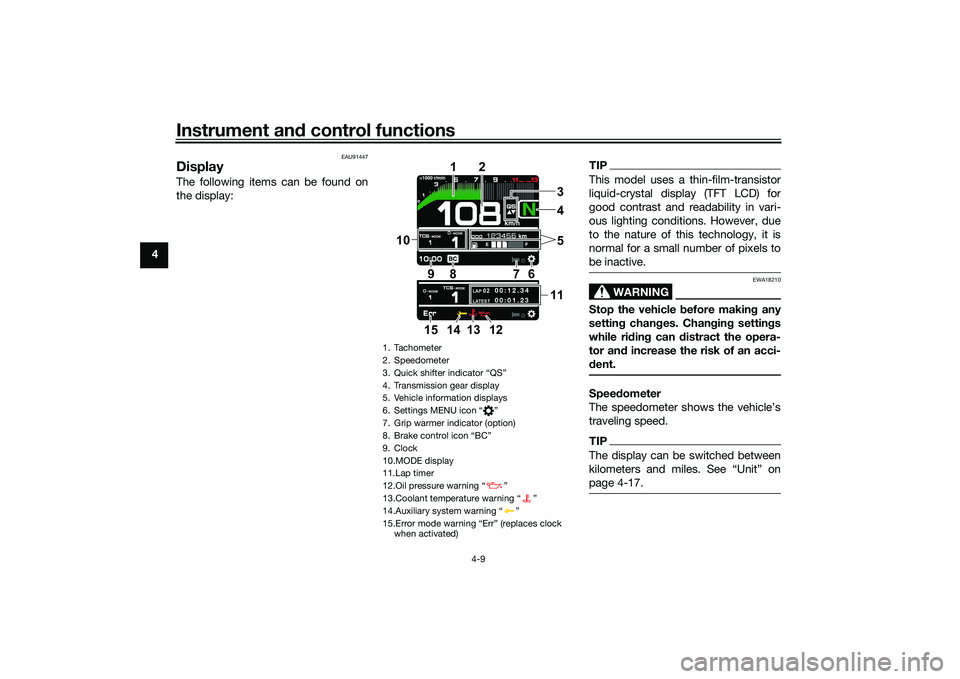
DisplayThe following items can be found on
the display:
TIPThis model uses a thin-film-transistor
liquid-crystal display (TFT LCD) for
good contrast and readability in vari-
ous lighting conditions. However, due
to the nature of this technology, it is
normal for a small number of pixels to
be inactive.
WARNING
EWA18210
Stop the vehicle b efore making any
settin g chan ges. Chan gin g settin gs
while ri din g can d istract the opera-
tor an d increase the risk of an acci-
d ent.Speed ometer
The speedometer shows the vehicle’s
traveling speed.TIPThe display can be switched between
page 4-17.
1. Tachometer
2. Speedometer
3.
4. Transmission gear display
5. Vehicle information displays
6. Settings MENU icon Ž
7. Grip warmer indicator (option)
8.
9. Clock
10.MODE display
11.Lap timer
12.Oil pressure warning Ž
13.Coolant temperature warning Ž
14.Auxiliary system warning Ž
when activated)
LAP 02LATEST
00:12.3 4
00:01.23
4
1
2
7
6
9
10
8
1135
14 13
12
15
UB7NE1E0.book Page 9 Friday, September 3, 2021 11:25 AM
Page 32 of 110
Instrument and control functions
4-11
4
If the vehicle coolant temperature
is above 124 °C (255 °F) the cool-
ant temperature display will read
“Hi”
To reset information display items1. Rotate the wheel switch to select
one of the two vehicle information
displays.
2. Press the wheel switch inward to highlight the information display.
3. Rotate the wheel switch to select the desired information display
item.
4. Press and hold the wheel switch inward until the highlighted dis-
play item is reset.
Transmission gear display
This shows which gear the transmis-
sion is in. This model has 6 gears and a
neutral position. The neutral position is
indicated by the neutral indicator
light “ ” and by the transmission gear
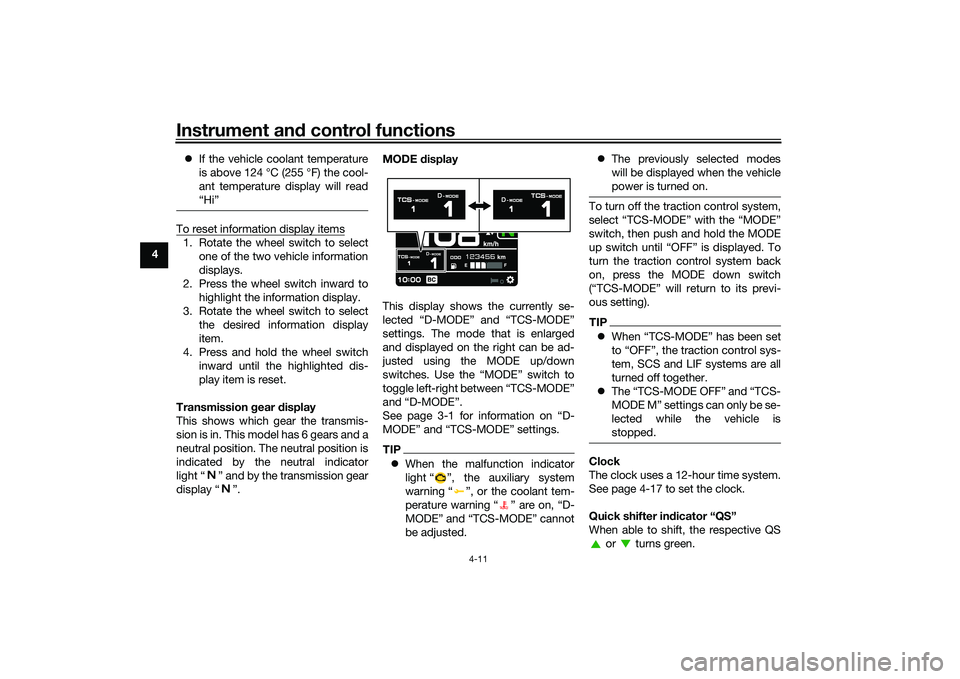
display “ ”. MODE
display
This display shows the currently se-
lected “D-MODE” and “TCS-MODE”
settings. The mode that is enlarged
and displayed on the right can be ad-
justed using the MODE up/down
switches. Use the “MODE” switch to
toggle left-right between “TCS-MODE”
and “D-MODE”.
See page 3-1 for information on “D-
MODE” and “TCS-MODE” settings.
TIP When the malfunction indicator
light “ ”, the auxiliary system
warning “ ”, or the coolant tem-
perature warning “ ” are on, “D-
MODE” and “TCS-MODE” cannot
be adjusted.
The previously selected modes
will be displayed when the vehicle
power is turned on.
To turn off the traction control system,
select “TCS-MODE” with the “MODE”
switch, then push and hold the MODE
up switch until “OFF” is displayed. To
turn the traction control system back
on, press the MODE down switch
(“TCS-MODE” will return to its previ-
ous setting).TIPWhen “TCS-MODE” has been set
to “OFF”, the traction control sys-
tem, SCS and LIF systems are all
turned off together.
The “TCS-MODE OFF” and “TCS-
M OD E M ” se t ti ng s c a n o n l y b e s e -
lected while the vehicle is
stopped.Clock
The clock uses a 12-hour time system.
See page 4-17 to set the clock.
Quick shifter in dicator “QS”
When able to shift, the respective QS or turns green.
UB7NE1E0.book Page 11 Friday, September 3, 2021 11:25 AM
Page 38 of 110
Instrument and control functions
4-17
4 r/min value by increments of 200 r/min.
“IND Stop” is settable between 6200 -
13000 r/min.
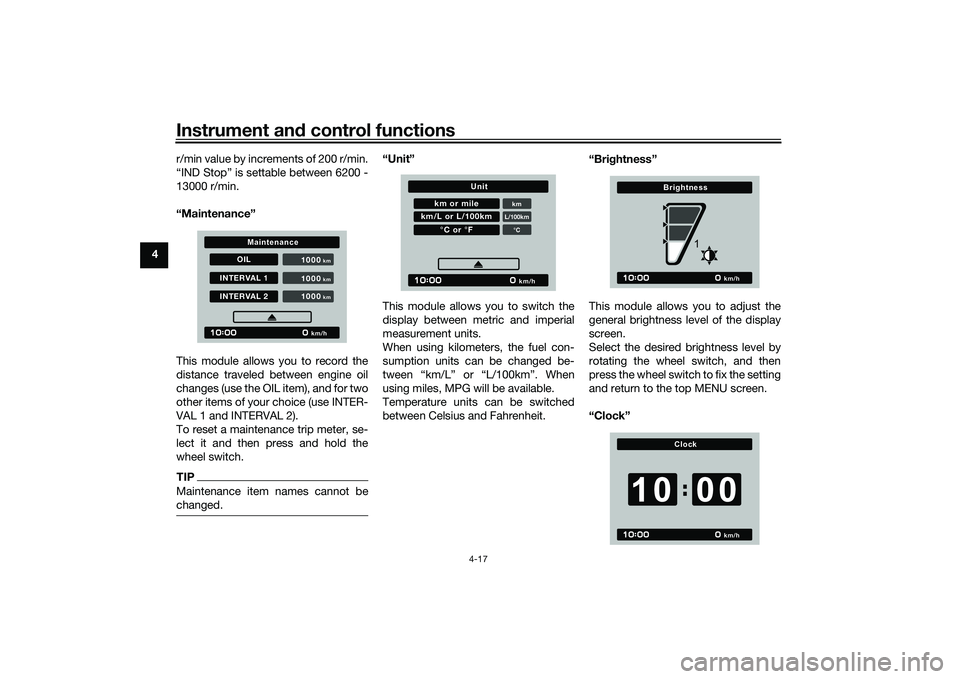
“Maintenance”
This module allows you to record the
distance traveled between engine oil
changes (use the OIL item), and for two
other items of your choice (use INTER-
VAL 1 and INTERVAL 2).
To reset a maintenance trip meter, se-
lect it and then press and hold the
wheel switch.
TIPMaintenance item names cannot be
changed.
“Unit”
This module allows you to switch the
display between metric and imperial
measurement units.
When using kilometers, the fuel con-
sumption units can be changed be-
tween “km/L” or “L/100km”. When
using miles, MPG will be available.
Temperature units can be switched
between Celsius and Fahrenheit. “Brig
htness”
This module allows you to adjust the
general brightness level of the display
screen.
Select the desired brightness level by
rotating the wheel switch, and then
press the wheel switch to fix the setting
and return to the top MENU screen.
“Clock”
OIL
INTERVAL 1INTERVAL 2 1000
km/h
km
1000
km
1000
km
Maintenance
km or mile
kmL/100km
Page 39 of 110

Instrument and control functions
4-18
4
This module allows you to set the
clock.
When the clock module is selected, the
hours will be highlighted.
Set the hours by rotating the wheel
switch. Push the switch to confirm and
highlight the minutes.
After confirming the minutes, you will
be returned to the top MENU screen.
“All Reset”
This module resets all settings items
(except the odometer and clock) to
their default or factory presets.
Select YES to reset all items. After se-
lecting YES, all items will be reset and
the screen will automatically return to
the top MENU screen.
EAU12823
Clutch leverTo disengage the drivetrain from the
engine, such as when shifting gears,
pull the clutch lever toward to the han-
dlebar. Release the lever to engage the
clutch and transmit power to the rear
wheel.TIPThe lever should be pulled rapidly and
released slowly for smooth shifting.
(See page 6-3.)
EAU83692
Shift pe
dalThe shift pedal is located on the left
side of the motorcycle. To shift the
transmission to a higher gear, move
the shift pedal up. To shift the trans-
mission to a lower gear, move the shift
pedal down. (See page 6-3.)
The shift rod is equipped with a shift
sensor, which is part of the quick shift-
er. The shift sensor reads up and down
movement, as well as the strength of
the input force when the shift pedal is
moved.
NOYES
km/h
All Reset
1. Clutch lever
1 1 1
1. Shift pedal
2. Shift rod
1 1 1
2 2
UB7NE1E0.book Page 18 Friday, September 3, 2021 11:25 AM
Page 42 of 110
Instrument and control functions
4-21
4
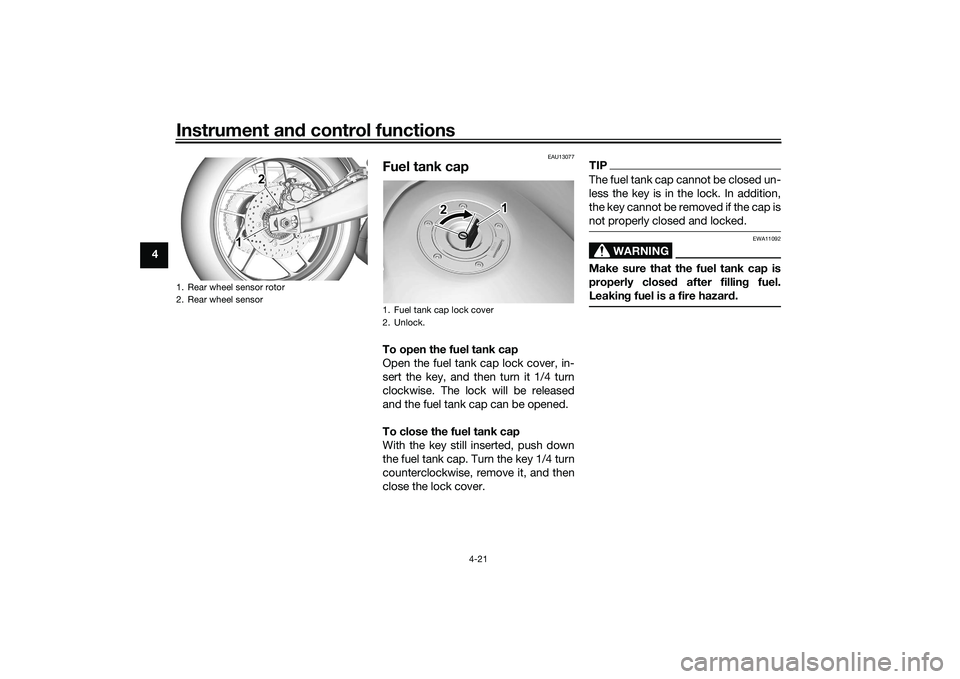
EAU13077
Fuel tank capTo open the fuel tank cap
Open the fuel tank cap lock cover, in-
sert the key, and then turn it 1/4 turn
clockwise. The lock will be released
and the fuel tank cap can be opened.
To close the fuel tank cap
With the key still inserted, push down
the fuel tank cap. Turn the key 1/4 turn
counterclockwise, remove it, and then
close the lock cover.
TIPThe fuel tank cap cannot be closed un-
less the key is in the lock. In addition,
the key cannot be removed if the cap is
not properly closed and locked.
WARNING
EWA11092
Make sure that the fuel tank cap is
properly close d after fillin g fuel.
Leakin g fuel is a fire hazar d.
1. Rear wheel sensor rotor
2. Rear wheel sensor
1 1 1 2 2
1. Fuel tank cap lock cover
2. UnlockK
1
2
UB7NE1E0.book Page 21 Friday, September 3, 2021 11:25 AM
Page 45 of 110
Instrument and control functions
4-24
4
TIPSee page 7-10 for canister information.
EAU13435
Catalytic converterThe exhaust system contains catalytic
converter(s) to reduce harmful exhaust
emissions.
WARNING
EWA10863
The exhaust system is hot after op-
eration. To prevent a fire hazar d or
b urns:
Do not park the vehicle near
possi ble fire hazar ds such as
g rass or other materials that
easily burn.
Park the vehicle in a place
where pe destrians or child ren
are not likely to touch the hot
exhaust system.
Make sure that the exhaust sys-
tem has cooled down before
d oin g any maintenance work.
Do not allow the en gine to id le
more than a few minutes. Lon g
i d lin g can cause a buil d-up of
heat.
EAU57992
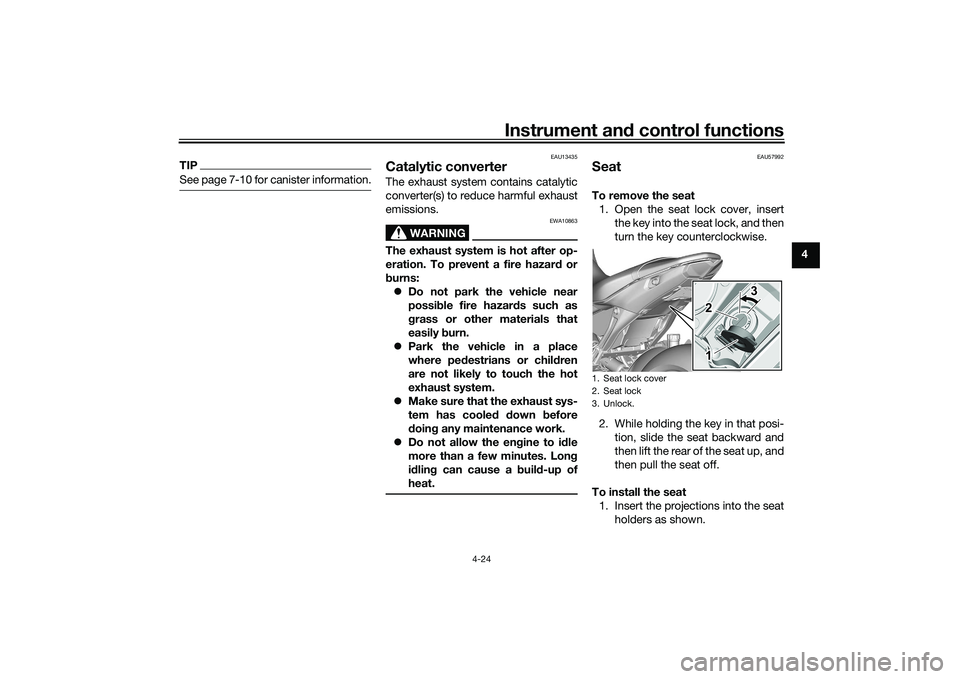
SeatTo remove the seat 1. Open the seat lock cover, insert the key into the seat lock, and then
turn the key counterclockwise.
2. While holding the key in that posi- tion, slide the seat backward and
then lift the rear of the seat up, and
then pull the seat off.
To install the seat 1. Insert the projections into the seat holders as shown.1. Seat lock cover
2. Seat lock
3. Unlock.
3 3
1 2 3
1
2
UB7NE1E0.book Page 24 Friday, September 3, 2021 11:25 AM
Page 96 of 110
Periodic maintenance an d a djustment
7-35
7
EAU86420
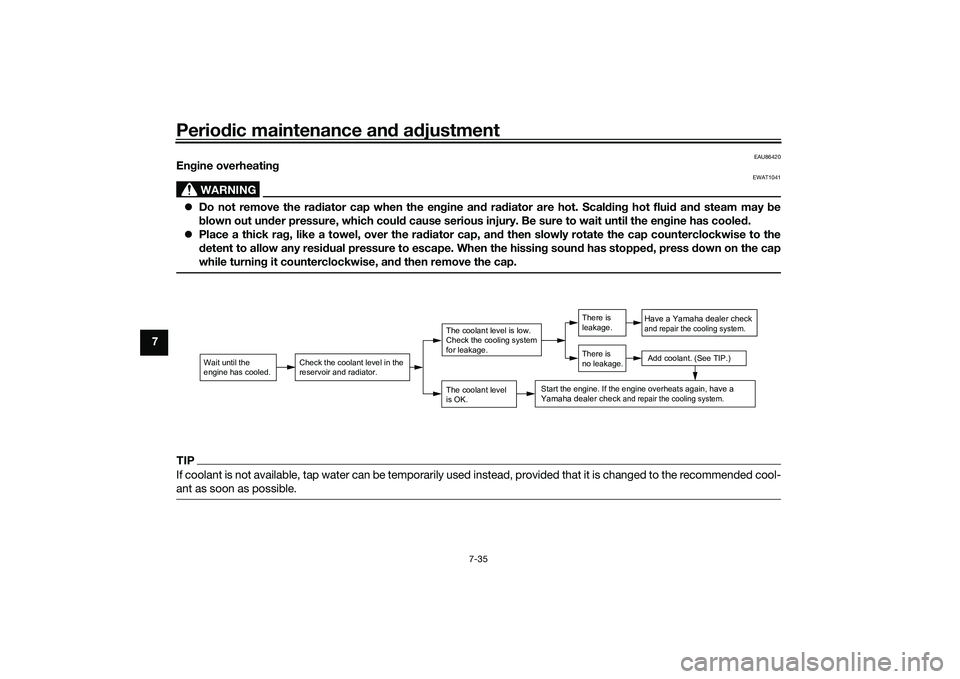
En gine overheatin g
WARNING
EWAT1041
Do not remove the ra diator cap when the en gine an d ra diator are hot. Scal din g hot flui d an d steam may be
b lown out un der pressure, which coul d cause serious injury. Be sure to wait until the en gine has coole d.
Place a thick ra g, like a towel, over the ra diator cap, an d then slowly rotate the cap counterclockwise to the
d etent to allow any resi dual pressure to escape. When the hissin g soun d has stoppe d, press d own on the cap
while turnin g it counterclockwise, an d then remove the cap.TIPIf coolant is not available, tap water can be temporarily used instead, provided that it is changed to the recommended cool-
ant as soon as possible.
Wait until the
engine has cooled.
Check the coolant level in the
reservoir and radiator.
The coolant level
is OK.The coolant level is low.
Check the cooling system
for leakage.
Have a Yamaha dealer checkand repair the cooling system.Add coolant. (See TIP.)
Start the engine. If the engine overheats again,
have a
Yamaha dealer check
and repair the cooling system.
There is
leakage.
There is
no leakage.
UB7NE1E0.book Page 35 Friday, September 3, 2021 11:25 AM