engine oil YAMAHA MT-09 2022 Owners Manual
[x] Cancel search | Manufacturer: YAMAHA, Model Year: 2022, Model line: MT-09, Model: YAMAHA MT-09 2022Pages: 110, PDF Size: 3.8 MB
Page 8 of 110
Table of contentsSafety information ............................ 1-1
Description ....................................... 2-1
Left view ......................................... 2-1
Right view ....................................... 2-2
Controls and instruments ............... 2-3
Special features .............................. 3-1
“D-MODE” ...................................... 3-1
“TCS-MODE”.................................. 3-1
Quick shifter ................................... 3-3
BC................................................... 3-4
Instrument an d control functions ... 4-1
Immobilizer system......................... 4-1
Main switch/steering lock............... 4-2
Handlebar switches ........................ 4-3
Indicator lights and warning lights............................................ 4-5
Display ............................................ 4-9
Settings MENU ............................. 4-14
Clutch lever .................................. 4-18
Shift pedal .................................... 4-18
Brake lever.................................... 4-19
Brake pedal .................................. 4-19
Brake control system (BC)............ 4-20
Fuel tank cap ................................ 4-21
Fuel ............................................... 4-22
Fuel tank overflow hose ............... 4-23
Catalytic converter ....................... 4-24
Seat .............................................. 4-24 Rider footrest position .................. 4-25
Handlebar position ....................... 4-25
Adjusting the front fork ................. 4-26
Adjusting the shock absorber
assembly.................................... 4-28
Luggage strap holders .................. 4-30
Auxiliary DC connectors ............... 4-30
Sidestand ...................................... 4-30
Ignition circuit cut-off system ....... 4-31
For your safety – pre-operation
checks ............................................... 5-1
Operation an d important ri din g
points ................................................. 6-1
Engine break-in ............................... 6-1
Starting the engine .......................... 6-2
Shifting ............................................ 6-3
Tips for reducing fuel consumption ................................ 6-4
Parking ............................................ 6-5
Perio dic maintenance an d
a d justment ........................................ 7-1
Tool kit ............................................ 7-2
Periodic maintenance charts .......... 7-3
Periodic maintenance chart for the emission control system .............. 7-3
General maintenance and
lubrication chart ........................... 7-5
Checking the spark plugs ............... 7-9 Canister ........................................ 7-10
Engine oil ...................................... 7-10
Why Yamalube.............................. 7-12
Coolant ......................................... 7-13
Air filter element ............................ 7-14
Checking the engine idling
speed ........................................ 7-14
Valve clearance............................. 7-15
Tires .............................................. 7-15
Cast wheels .................................. 7-17
Adjusting the clutch lever free
play ............................................ 7-18
Checking the brake lever free play ............................................ 7-18
Brake light switches ..................... 7-19
Checking the front and rear brake pads ................................ 7-19
Checking the brake fluid level ...... 7-20
Changing the brake fluid .............. 7-21
Drive chain slack........................... 7-22
Cleaning and lubricating the drive chain ................................. 7-24
Checking and lubricating the
cables ........................................ 7-24
Checking and lubricating the throttle grip ................................ 7-25
Checking and lubricating the brake and shift pedals............... 7-25
Checking and lubricating the
brake and clutch levers ............. 7-26UB7NE1E0.book Page 1 Friday, September 3, 2021 11:25 AM
Page 15 of 110
Description
2-1
2
EAU10411
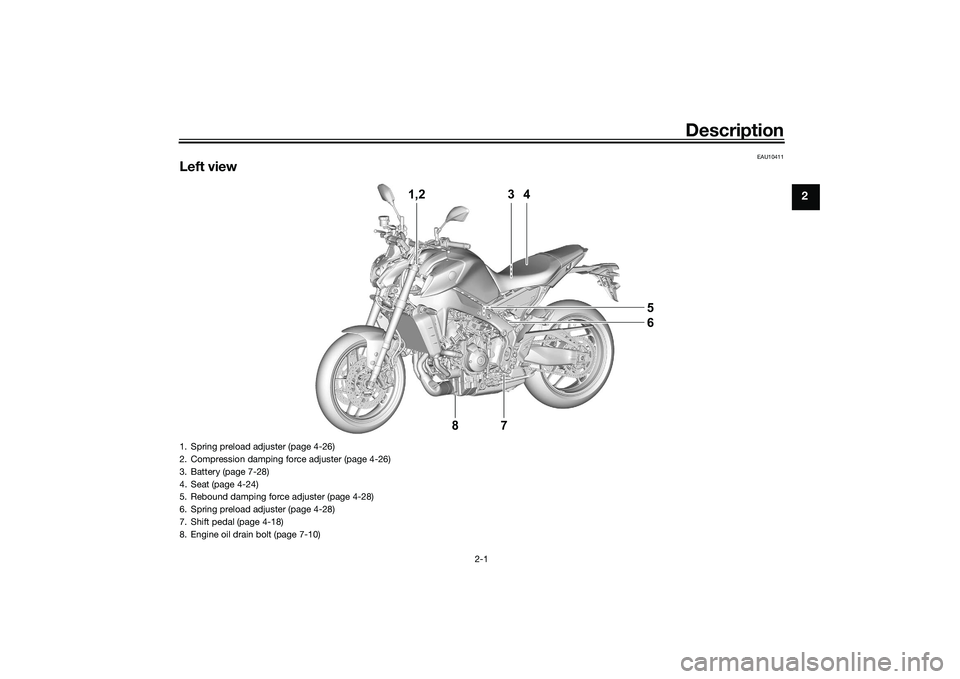
Left view
1,24
3
6
5
87
1. Spring preload adjuster (page 4-26)
2. Compression damping force adjuster (page 4-26)
3. Battery (page 7-28)
4. Seat (page 4-24)
5. Rebound damping force adjuster (page 4-28)
6. Spring preload adjuster (page 4-28)
7. Shift pedal (page 4-18)
8. Engine oil drain bolt (page 7-10)
UB7NE1E0.book Page 1 Friday, September 3, 2021 11:25 AM
Page 16 of 110
Description
2-2
2
EAU10421
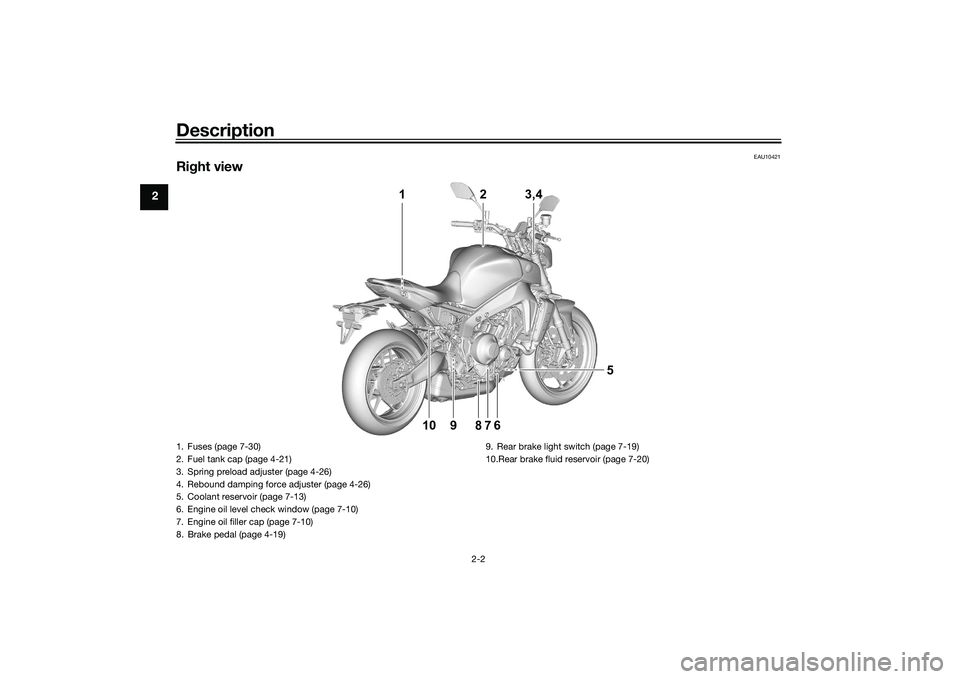
Right view
1 2 3,4
5
9
10 6
78
1. Fuses (page 7-30)
2. Fuel tank cap (page 4-21)
3. Spring preload adjuster (page 4-26)
4. Rebound damping force adjuster (page 4-26)
5. Coolant reservoir (page 7-13)
6. Engine oil level check window (page 7-10)
7. Engine oil filler cap (page 7-10)
8. Brake pedal (page 4-19) 9. Rear brake light switch (page 7-19)
10.Rear brake fluid reservoir (page 7-20)UB7NE1E0.book Page 2 Friday, September 3, 2021 11:25 AM
Page 29 of 110
Instrument and control functions
4-8
4
TIPWhen the vehicle is turned on, this light
should come on for a few seconds and
then go off. If the light does not come
on, or if the light remains on, have a
Yamaha dealer check the vehicle.NOTICE
ECA27222
When turnin g the main switch on,
avoi d any movement or vi bration of
the vehicle as it may interfere with
the initialization of the IMU. If this
occurs, the traction control system
will not operate an d the “TCS-
MODE” display will read “OFF” until
the IMU can initialize.
EAU88362
Oil pressure an d Coolant tempera-
ture warnin g li ght “ ”
This warning light comes on if the en-
gine oil pressure is low or if the coolant
temperature is high. If this occurs, stop
the engine immediately.TIP When the vehicle is first turned on,
this light should come on until the
engine is started.
If a malfunction is detected, this
light will come on and the oil pres-
sure icon will flash.
NOTICE
ECA22441
If the oil pressure an d coolant warn-
in g li ght does not g o off after start-
in g the en gine or if it comes on while
the en gine is runnin g, stop the vehi-
cle an d en gine imme diately.
If the en gine is overheatin g, the
coolant temperature warnin g
icon will come on. Let the en-
g ine cool. Check the coolant
level (see pa ge 7-35).
If the en gine oil pressure is low,
the oil pressure warnin g icon
will come on. Check the oil level
(see pa ge 7-10).
If the warnin g lig ht remains on
after lettin g the en gine cool an d
confirmin g the proper oil level,
have a Yamaha d ealer check
the vehicle. Do not continue to
operate the vehicle!
EAU88370
Auxiliary system warnin g lig ht “ ”
This warning light comes on if a prob-
lem is detected in a non-engine-related
system.TIPWhen the vehicle is turned on, this light
should come on for a few seconds and
then go off. Otherwise, have a Yamaha
dealer check the vehicle.
UB7NE1E0.book Page 8 Friday, September 3, 2021 11:25 AM
Page 34 of 110
Instrument and control functions
4-13
4 To start the timer, press the pass
switch.
Each press of the pass switch will in-
crease the lap count by 1 and reset the
current lap timer.
To pause the lap timer, press the wheel
switch inward.
To unpause the timer, press the pass
switch and the timer will resume with-
out counting a new lap.
To exit the lap time mode, turn it off in
the settings MENU. (See page 4-14.)
TIP
The engine must be running to
start the lap timer.
The headlight will flash when the
pass switch is pressed.
Whenever the lap timer is paused,
it can be resumed using the pass
switch.Brake control icon “BC”
This icon is replaced by the auxiliary
system warning and coolant tempera-
ture warning indicators when they are
activated.
For more information on the BC sys-
tem see “BC” on page 3-4. Error mo
de warnin g “Err”
When an internal error occurs (e.g.,
communication with a system control-
ler has been cut off), the error mode
warning will appear as follows.
“Err” and “ ” indicator light indicates
an ECU error.
“Err” only indicates an ABS ECU error.
TIPDepending on the nature of the error,
the display may not function properly
and the traction control system set-
tings may be impossible to change.
Additionally, ABS may not function
properly. Use extra care when braking
and have a Yamaha dealer check the
vehicle immediately.Auxiliary system warnin g“”
This icon appears if a problem is de-
tected in a non-engine-related system.
Coolant temperature warnin g“”
This icon appears if the coolant tem-
perature reaches 116 °C (241 °F) or
higher. Stop the vehicle and turn off the
engine. Allow the engine to cool.
NOTICE
ECA10022
Do not continue to operate the en-
g ine if it is overheatin g.Oil pressure warnin g“”
This icon appears when the engine oil
pressure is low. When the vehicle is
first turned on, engine oil pressure has
yet to build, so this icon will come on
and stay on until the engine has been
started.TIPIf a malfunction is detected, the oil
pressure warning icon will flash repeat-
edly.NOTICE
ECA26410
Do not continue to operate the en-
g ine if the oil pressure is low.
UB7NE1E0.book Page 13 Friday, September 3, 2021 11:25 AM
Page 38 of 110
Instrument and control functions
4-17
4 r/min value by increments of 200 r/min.
“IND Stop” is settable between 6200 -
13000 r/min.
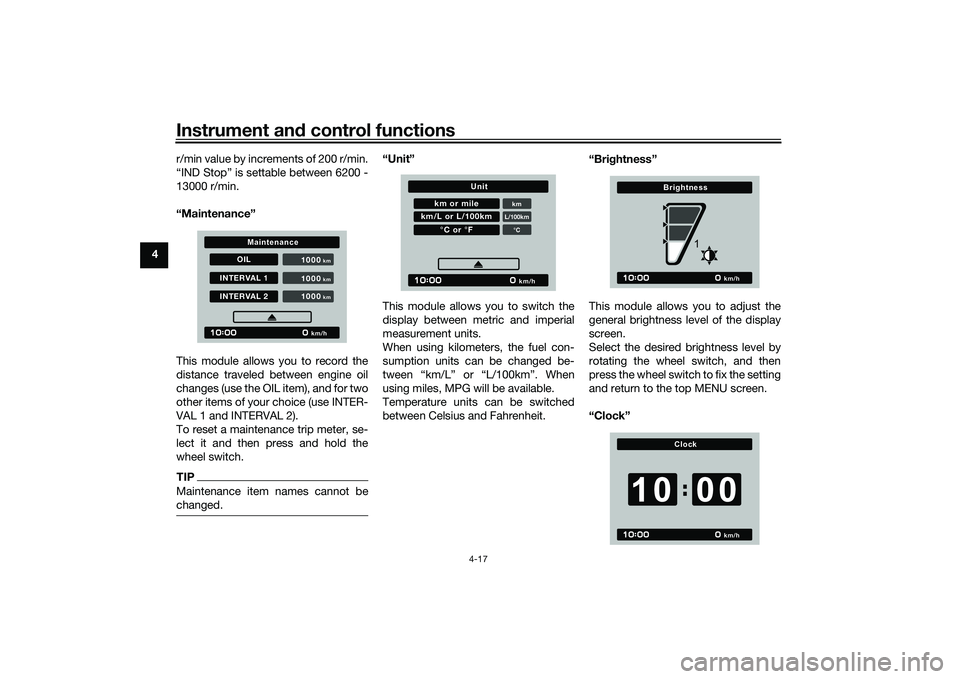
“Maintenance”
This module allows you to record the
distance traveled between engine oil
changes (use the OIL item), and for two
other items of your choice (use INTER-
VAL 1 and INTERVAL 2).
To reset a maintenance trip meter, se-
lect it and then press and hold the
wheel switch.
TIPMaintenance item names cannot be
changed.
“Unit”
This module allows you to switch the
display between metric and imperial
measurement units.
When using kilometers, the fuel con-
sumption units can be changed be-
tween “km/L” or “L/100km”. When
using miles, MPG will be available.
Temperature units can be switched
between Celsius and Fahrenheit. “Brig
htness”
This module allows you to adjust the
general brightness level of the display
screen.
Select the desired brightness level by
rotating the wheel switch, and then
press the wheel switch to fix the setting
and return to the top MENU screen.
“Clock”
OIL
INTERVAL 1INTERVAL 2 1000
km/h
km
1000
km
1000
km
Maintenance
km or mile
kmL/100km
Page 54 of 110
For your safety – pre-operation checks
5-1
5
EAU1559B
Inspect your vehicle each time you use it to make sure the vehicle is in safe operating condition. Always follow the inspection
and maintenance procedures and schedules described in the Owner’s Manual.
WARNING
EWA11152
Failure to inspect or maintain the vehicle properly increases the possibility of an acci dent or equipment damag e.
Do not operate the vehicle if you fin d any pro blem. If a pro blem cannot b e corrected b y the proce dures provi ded in
this manual, have the vehicle inspecte d b y a Yamaha dealer.Before using this vehicle, check the following points:
ITEM CHECKS PAGE
Fuel • Check fuel level in fuel tank.
• Refuel if necessary.
• Check fuel line for leakage.
• Check fuel tank overflow hose for obstructions, cracks or damage, and check
hose connection. 4-22, 4-23
En gine oil • Check oil level in engine.
• If necessary, add recommended oil to specified level.
• Check vehicle for oil leakage. 7-10
Coolant • Check coolant level in reservoir.
• If necessary, add recommended coolant to specified level.
• Check cooling system for leakage. 7-13
Front brake • Check operation.
• If soft or spongy, have Yamaha dealer bleed hydraulic system.
• Check brake pads for wear.
• Replace if necessary.
• Check fluid level in reservoir.
• If necessary, add specified brake fluid to specified level.
• Check hydraulic system for leakage. 7-19, 7-20
UB7NE1E0.book Page 1 Friday, September 3, 2021 11:25 AM
Page 57 of 110
Operation and important ri din g points
6-1
6
EAU15952
Read the Owner’s Manual carefully to
become familiar with all controls. If
there is a control or function you do not
understand, ask your Yamaha dealer.
WARNING
EWA10272
Failure to familiarize yourself with
the controls can lead to loss of con-
trol, which coul d cause an acci dent
or injury.
EAU16842
En gine break-inThere is never a more important period
in the life of your engine than the period
between 0 and 1600 km (1000 mi). For
this reason, you should read the fol-
lowing material carefully.
Since the engine is brand new, do not
put an excessive load on it for the first
1600 km (1000 mi). The various parts in
the engine wear and polish themselves
to the correct operating clearances.
During this period, prolonged full-throt-
tle operation or any condition that
might result in engine overheating
must be avoided.
EAU17094
0–1000 km (0–600 mi)
Avoid prolonged operation above 5300
r/min. NOTICE: After 1000 km (600
mi) of operation, the en gine oil must
b e chan ged an d the oil filter car-
tri dge or element replace d.
[ECA10303]
1000–1600 km (600–1000 mi)
Avoid prolonged operation above 6300
r/min. 1600 km (1000 mi) an
d b eyon d
The vehicle can now be operated nor-
mally.
NOTICE
ECA10311
Keep the en gine spee d out of
the tachometer red zone.
If any en gine trou ble shoul d oc-
cur during the en gine break-in
perio d, imme diately have a
Yamaha dealer check the vehi-
cle.
UB7NE1E0.book Page 1 Friday, September 3, 2021 11:25 AM
Page 58 of 110
Operation and important rid ing points
6-2
6
EAU91411
Startin g the eng ineThe ignition circuit cut-off system will
enable starting when:
the transmission is in the neutral
position or
the transmission is in gear, the
sidestand is up, and the clutch le-
ver is pulled.
To start the engine1. Turn the main switch on and set the engine stop switch to the run
position.
2. Confirm the indicator and warning light(s) come on for a few sec-
onds, and then go off. (See page
4-5.)TIPDo not start the engine if the mal-
function indicator light remains on.
The oil pressure and coolant tem-
perature warning light should
come on and stay on until the en-
gine is started.
The ABS warning light should
come on and stay on until the ve-
hicle reaches a speed of 5 km/h (3
mi/h).
NOTICE
ECA24110
If a warnin g or in dicator li ght does
not work as d escribed a bove, have a
Yamaha dealer check the vehicle.3. Shift the transmission into the
neutral position.
4. Start the engine by pushing the start switch.
5. Release the start switch when the engine starts, or after 5 seconds.
Wait 10 seconds before pressing
the switch again to allow battery
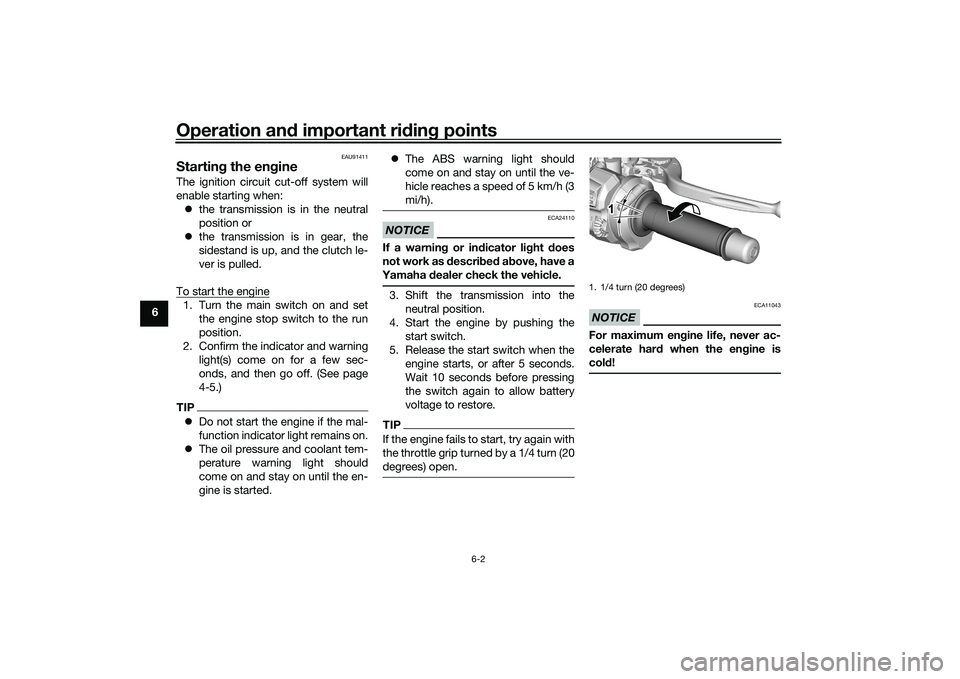
voltage to restore.TIPIf the engine fails to start, try again with
the throttle grip turned by a 1/4 turn (20
degrees) open.
NOTICE
ECA11043
For maximum en gine life, never ac-
celerate har d when the en gine is
col d!1. 1/4 turn (20 degrees)
1 1 1
UB7NE1E0.book Page 2 Friday, September 3, 2021 11:25 AM
Page 68 of 110
Periodic maintenance an d a djustment
7-7
7
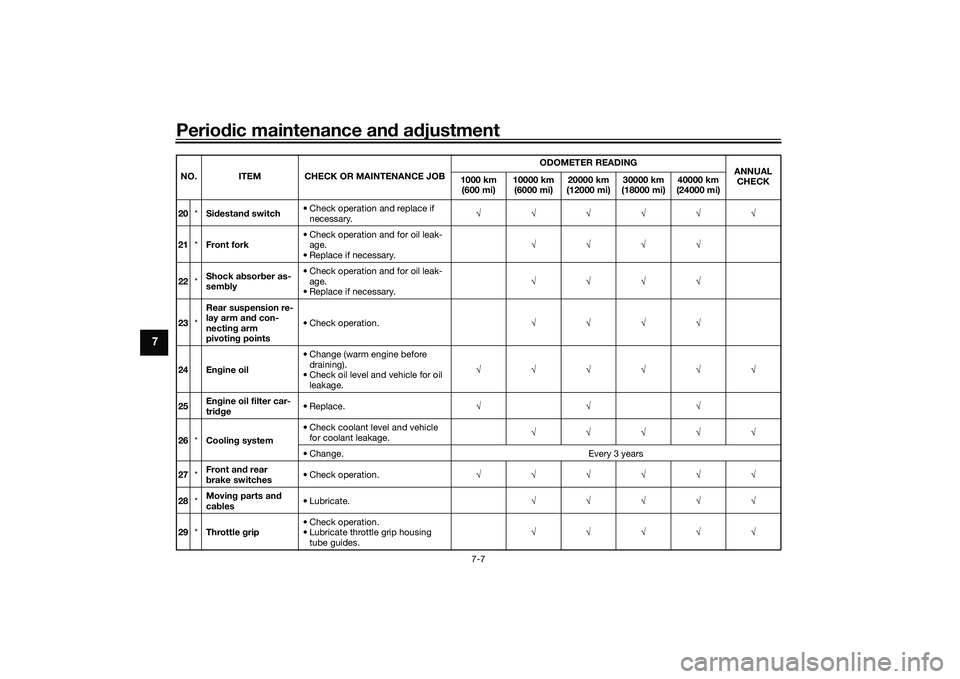
20 *Sidestan d switch • Check operation and replace if
necessary. √√√√√√
21 *Front fork • Check operation and for oil leak-
age.
• Replace if necessary. √√√√
22 *Shock a
bsor ber as-
sem bly • Check operation and for oil leak-
age.
• Replace if necessary. √√√√
23 *Rear suspension re-
lay arm an
d con-
nectin g arm
pivotin g points • Check operation.
√√√√
24 En gine oil • Change (warm engine before
draining).
• Check oil level and vehicle for oil leakage. √√√√√√
25 En
gine oil filter car-
tri dge • Replace.
√√√
26 *Coolin g system • Check coolant level and vehicle
for coolant leakage. √√√√√
• Change. Every 3 years
27 *Front an
d rear
b rake switches • Check operation.
√√√√√√
28 *Movin
g parts an d
cab les • Lubricate.
√√√√√
29 *Throttle grip • Check operation.
• Lubricate throttle grip housing
tube guides. √√√√√
NO. ITEM CHECK OR MAINTENANCE JOB
OD
OM E TER READING
ANNUAL
CHECK
1000 km
(600 mi) 10000 km
(6000 mi) 20000 km
(12000 mi) 30000 km
(18000 mi) 40000 km
(24000 mi)
UB7NE1E0.book Page 7 Friday, September 3, 2021 11:25 AM