check oil YAMAHA MT-125 2018 Owners Manual
[x] Cancel search | Manufacturer: YAMAHA, Model Year: 2018, Model line: MT-125, Model: YAMAHA MT-125 2018Pages: 96, PDF Size: 7.1 MB
Page 5 of 96

Table of contents
Safety information............................1-1
Description........................................2-1
Left view ..........................................2-1
Right view........................................2-2
Controls and instruments ................2-3
Instrument and control functions....3-1
Main switch/steering lock ...............3-1
Indicator lights and warning
lights ............................................3-2
Multi-function meter unit .................3-4
Handlebar switches.......................3-12
Clutch lever ...................................3-13
Shift pedal .....................................3-14
Brake lever ....................................3-14
Brake pedal ...................................3-15
ABS ...............................................3-15
Fuel tank cap.................................3-16
Fuel................................................3-17
Catalytic converter ........................3-18
Rider seat ......................................3-19
Sidestand ......................................3-20
Ignition circuit cut-off system........3-20
For your safety – pre-operation
checks...............................................4-1
Operation and important riding
points.................................................5-1
Starting the engine ..........................5-2
Shifting ............................................5-3
Tips for reducing fuel
consumption ................................5-4
Engine break-in ...............................5-4
Parking ............................................5-5
Periodic maintenance and
adjustment........................................6-1
Owner’s tool kit ...............................6-2
Periodic maintenance chart for the
emission control system ..............6-3
General maintenance and
lubrication chart ...........................6-4
Removing and installing cowlings ...6-7
Checking the spark plug .................6-8Engine oil and oil filter element ....... 6-9
Coolant ......................................... 6-12
Replacing the air filter element
and cleaning the check hose..... 6-14
Checking the engine idling
speed......................................... 6-14
Adjusting the throttle grip free
play ............................................ 6-15
Valve clearance ............................. 6-16
Tires .............................................. 6-16
Cast wheels .................................. 6-19
Adjusting the clutch lever free
play ............................................ 6-19
Checking the front brake lever
free play ..................................... 6-20
Adjusting the brake pedal free
play ............................................ 6-21
Brake light switches ...................... 6-21
Checking the front and rear brake
pads........................................... 6-22
Checking the brake fluid level....... 6-23
Changing the brake fluid............... 6-24
Drive chain slack ........................... 6-24
Cleaning and lubricating the drive
chain .......................................... 6-26
Checking and lubricating the
cables ........................................ 6-26
Checking and lubricating the
throttle grip and cable ............... 6-27
Checking and lubricating the
brake and clutch levers ............. 6-27
Checking and lubricating the
brake pedal................................ 6-28
Checking and lubricating the
sidestand ................................... 6-28
Lubricating the swingarm
pivots ......................................... 6-29
Checking the front fork ................. 6-29
Checking the steering ................... 6-30
Checking the wheel bearings ....... 6-30
Battery .......................................... 6-31
Replacing the fuses ...................... 6-32
Replacing the headlight bulb ........ 6-33
Auxiliary lights ............................... 6-35
Tail/brake light .............................. 6-35
UBR3E1E0.book Page 1 Wednesday, August 10, 2016 9:45 AM
Page 18 of 96
Instrument and control functions
3-4
3come on to indicate that the function is
activated or the light will go off to indi-
cate that the function is deactivated.
EAUM3423
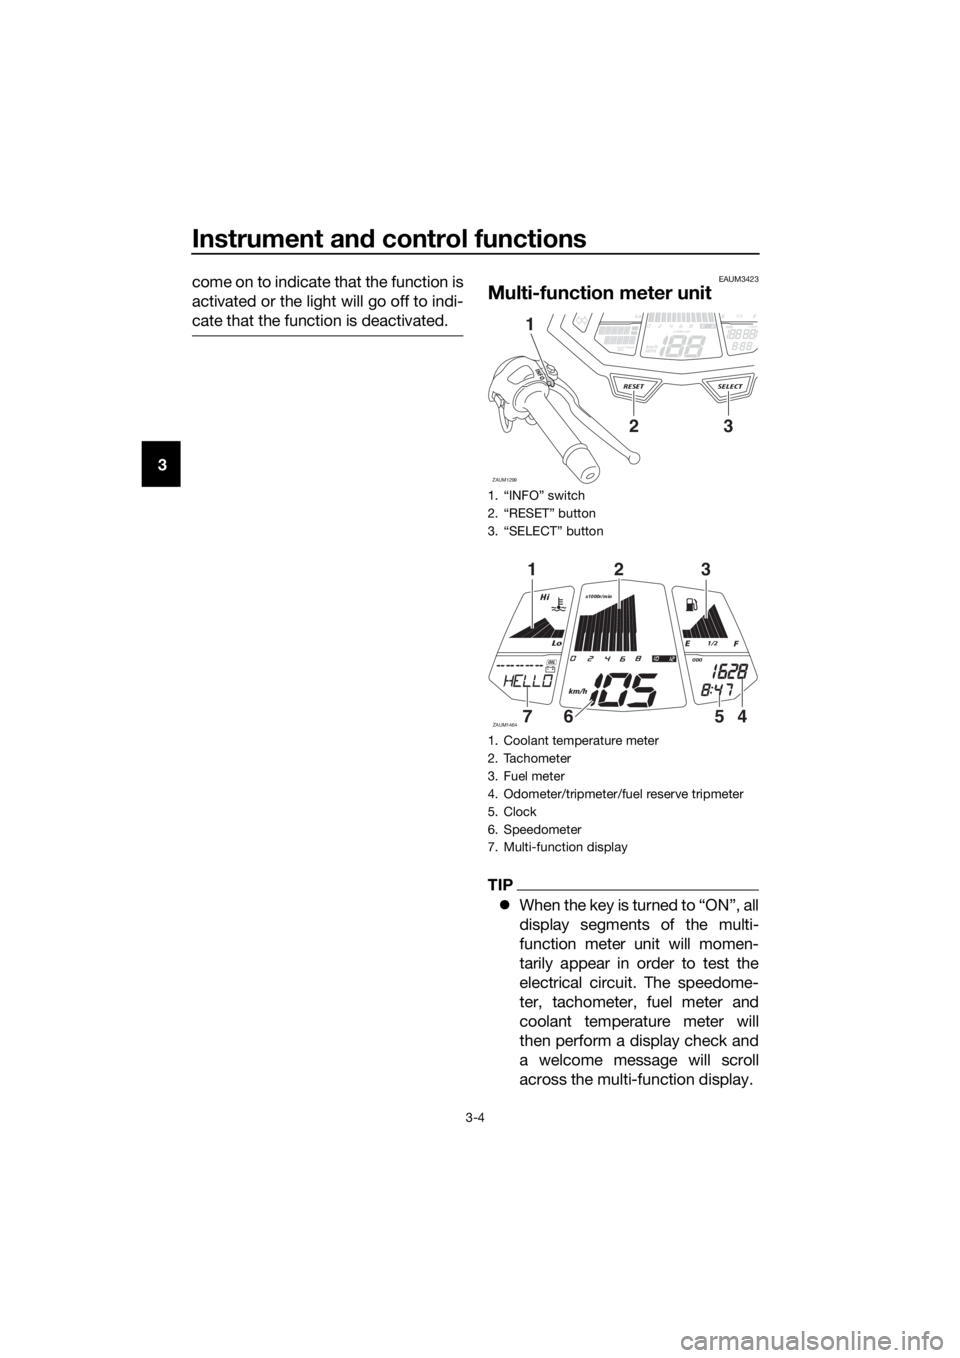
Multi-function meter unit
TIP
When the key is turned to “ON”, all
display segments of the multi-
function meter unit will momen-
tarily appear in order to test the
electrical circuit. The speedome-
ter, tachometer, fuel meter and
coolant temperature meter will
then perform a display check and
a welcome message will scroll
across the multi-function display.
1. “INFO” switch
2. “RESET” button
3. “SELECT” button
1. Coolant temperature meter
2. Tachometer
3. Fuel meter
4. Odometer/tripmeter/fuel reserve tripmeter
5. Clock
6. Speedometer
7. Multi-function display
Lo1/2ODO
ZAUM1299
SELECTRESET
INFO
km/L/100kmMPGkm/h
MPH
ODOFTRIPx1000r/minOILOIL
23
1
Lo
Hi
1/2
x1000r/min
ZAUM1464
km/h
ODOOIL
123
4567
UBR3E1E0.book Page 4 Wednesday, August 10, 2016 9:45 AM
Page 25 of 96
Instrument and control functions
3-11
3 15 seconds. “OIL SERV” message and
the oil change tripmeter will also be re-
set.
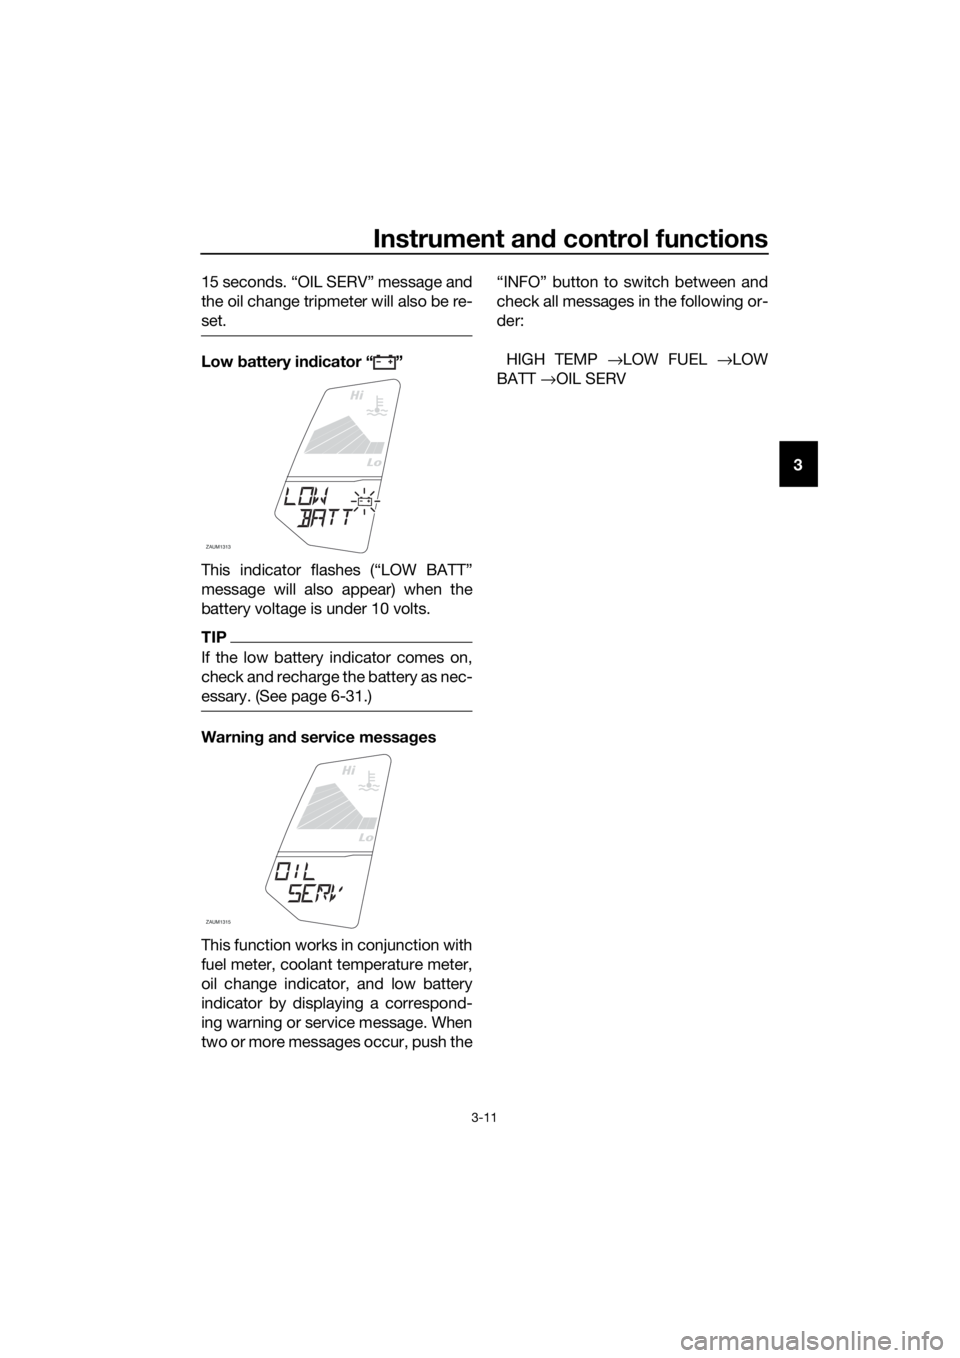
Low battery indicator “ ”
This indicator flashes (“LOW BATT”
message will also appear) when the
battery voltage is under 10 volts.
TIP
If the low battery indicator comes on,
check and recharge the battery as nec-
essary. (See page 6-31.)
Warning and service messages
This function works in conjunction with
fuel meter, coolant temperature meter,
oil change indicator, and low battery
indicator by displaying a correspond-
ing warning or service message. When
two or more messages occur, push the“INFO” button to switch between and
check all messages in the following or-
der:
HIGH TEMP →LOW FUEL →LOW
BATT →OIL SERV
Lo
Hi
ZAUM1313
Lo
Hi
ZAUM1315
UBR3E1E0.book Page 11 Wednesday, August 10, 2016 9:45 AM
Page 36 of 96
For your safety – pre-operation checks
4-1
4
EAU63440
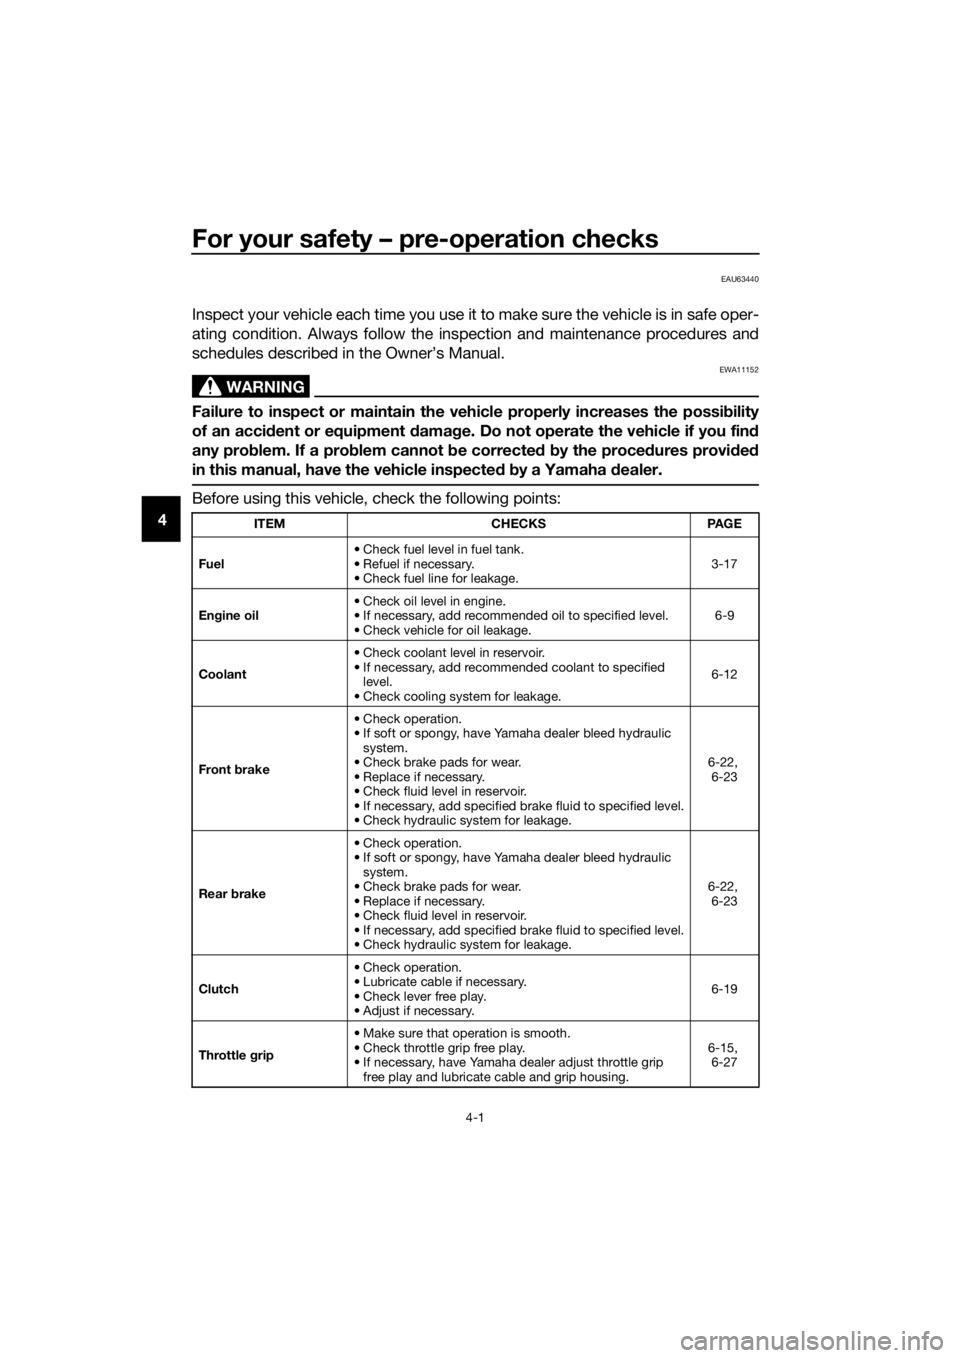
Inspect your vehicle each time you use it to make sure the vehicle is in safe oper-
ating condition. Always follow the inspection and maintenance procedures and
schedules described in the Owner’s Manual.
WARNING
EWA11152
Failure to inspect or maintain the vehicle properly increases the possibility
of an accident or equipment damage. Do not operate the vehicle if you find
any problem. If a problem cannot be corrected by the procedures provided
in this manual, have the vehicle inspected by a Yamaha dealer.
Before using this vehicle, check the following points:
ITEM CHECKS PAGE
Fuel• Check fuel level in fuel tank.
• Refuel if necessary.
• Check fuel line for leakage.3-17
Engine oil• Check oil level in engine.
• If necessary, add recommended oil to specified level.
• Check vehicle for oil leakage.6-9
Coolant• Check coolant level in reservoir.
• If necessary, add recommended coolant to specified
level.
• Check cooling system for leakage.6-12
Front brake• Check operation.
• If soft or spongy, have Yamaha dealer bleed hydraulic
system.
• Check brake pads for wear.
• Replace if necessary.
• Check fluid level in reservoir.
• If necessary, add specified brake fluid to specified level.
• Check hydraulic system for leakage.6-22,
6-23
Rear brake• Check operation.
• If soft or spongy, have Yamaha dealer bleed hydraulic
system.
• Check brake pads for wear.
• Replace if necessary.
• Check fluid level in reservoir.
• If necessary, add specified brake fluid to specified level.
• Check hydraulic system for leakage.6-22,
6-23
Clutch• Check operation.
• Lubricate cable if necessary.
• Check lever free play.
• Adjust if necessary.6-19
Throttle grip• Make sure that operation is smooth.
• Check throttle grip free play.
• If necessary, have Yamaha dealer adjust throttle grip
free play and lubricate cable and grip housing.6-15,
6-27
UBR3E1E0.book Page 1 Wednesday, August 10, 2016 9:45 AM
Page 47 of 96

Periodic maintenance and adjustment
6-5
6
13*Swingarm pivot
bearings• Check operation and for exces-
sive play.√√√√
• Lubricate with lithium-soap-
based grease.Every 24000 km (14000 mi)
14 Drive chain• Check chain slack, alignment
and condition.
• Adjust and lubricate chain with a
special O-ring chain lubricant
thoroughly.Every 1000 km (600 mi) and af-
ter washing the motorcycle, rid-
ing in the rain or riding in wet
areas
15*Steering bearings• Check bearing assemblies for
looseness.√√√√
• Moderately repack with lithium-
soap-based grease.√
16*Chassis fasteners• Make sure that all nuts, bolts
and screws are properly tight-
ened.√√√√√
17Brake lever pivot
shaft• Lubricate with silicone grease.√√√√√
18Brake pedal pivot
shaft• Lubricate with lithium-soap-
based grease.√√√√√
19Clutch lever pivot
shaft• Lubricate with lithium-soap-
based grease.√√√√√
20 Sidestand• Check operation.
• Lubricate with lithium-soap-
based grease.√√√√√
21*Sidestand switch• Check operation and replace if
necessary.√√√√√√
22*Front fork• Check operation and for oil leak-
age.
• Replace if necessary.√√√√
23*Shock absorber
assembly• Check operation and for oil leak-
age.
• Replace if necessary.√√√√
24*Rear suspension
relay arm and con-
necting arm pivot-
ing points• Check operation.√√√√
• Lubricate with lithium-soap-
based grease.√√ NO. ITEM
X 1000 km CHECK OR
MAINTENANCE JOB
X 1000 mi
ODOMETER
READING
ANNUAL CHECK
16121824
0.63.5710.514
UBR3E1E0.book Page 5 Wednesday, August 10, 2016 9:45 AM
Page 48 of 96

Periodic maintenance and adjustment
6-6
6
EAU72740
TIP
The air filter needs more frequent service if you are riding in unusually wet or
dusty areas.
Hydraulic brake service
• Regularly check and, if necessary, correct the brake fluid level.
• Every two years change the brake fluid.
• Replace the brake hoses every four years and if cracked or damaged.
25 Engine oil• Change (warm engine before
draining).At the initial interval and when
the oil change indicator flashes
or comes on
• Check oil level and vehicle for oil
leakage.Every 3000 km (1800 mi)
26Engine oil filter el-
ement• Replace.√√√
27*Cooling system• Check coolant level and vehicle
for coolant leakage.√√√√√
• Change. Every 3 years
28*Front and rear
brake switches• Check operation.√√√√√√
29*Moving parts and
cables• Lubricate.√√√√√
30*Throttle grip hous-
ing and cable• Check operation and free play.
• Adjust the throttle cable free
play if necessary.
• Lubricate the throttle grip hous-
ing and cable.√√√√√
31*Lights, signals and
switches• Check operation.
• Adjust headlight beam.√√√√√√ NO. ITEM
X 1000 km CHECK OR
MAINTENANCE JOB
X 1000 miODOMETER
READING
ANNUAL CHECK
16121824
0.6 3.5 7 10.5 14
UBR3E1E0.book Page 6 Wednesday, August 10, 2016 9:45 AM
Page 51 of 96

Periodic maintenance and adjustment
6-9
6 To install the spark plug
1. Clean the surface of the spark
plug gasket and its mating sur-
face, and then wipe off any grime
from the spark plug threads.
2. Install the spark plug with the
spark plug wrench, and then tight-
en it to the specified torque.
TIP
If a torque wrench is not available
when installing a spark plug, a good
estimate of the correct torque is 1/4…
1/2 turn past finger tight. However, the
spark plug should be tightened to the
specified torque as soon as possible.
3. Install the spark plug cap.
EAUM3491
Engine oil and oil filter ele-
ment
The engine oil level should be checked
before each ride. In addition, the oil
must be changed and the oil filter ele-
ment replaced at the intervals specified
in the periodic maintenance and lubri-
cation chart.
To check the engine oil level
1. Place the vehicle on a level sur-
face and hold it in an upright posi-
tion. A slight tilt to the side can
result in a false reading.
2. Start the engine, warm it up for
several minutes, and then turn it
off.
3. Wait a few minutes until the oil set-
tles, remove the oil filler cap, wipe
the dipstick clean, insert it back
into the oil filler hole (without
screwing it in), and then remove it
again to check the oil level.
NOTICE: Do not operate the ve-
hicle until you know that the en-
gine oil level is sufficient.
[ECA10012]
TIP
The engine oil should be between the
minimum and maximum level marks.
Tightening torque:
Spark plug:
12.5 N·m (1.25 kgf·m, 9.04 lb·ft)
1. Engine oil filler cap
UBR3E1E0.book Page 9 Wednesday, August 10, 2016 9:45 AM
Page 53 of 96
Periodic maintenance and adjustment
6-11
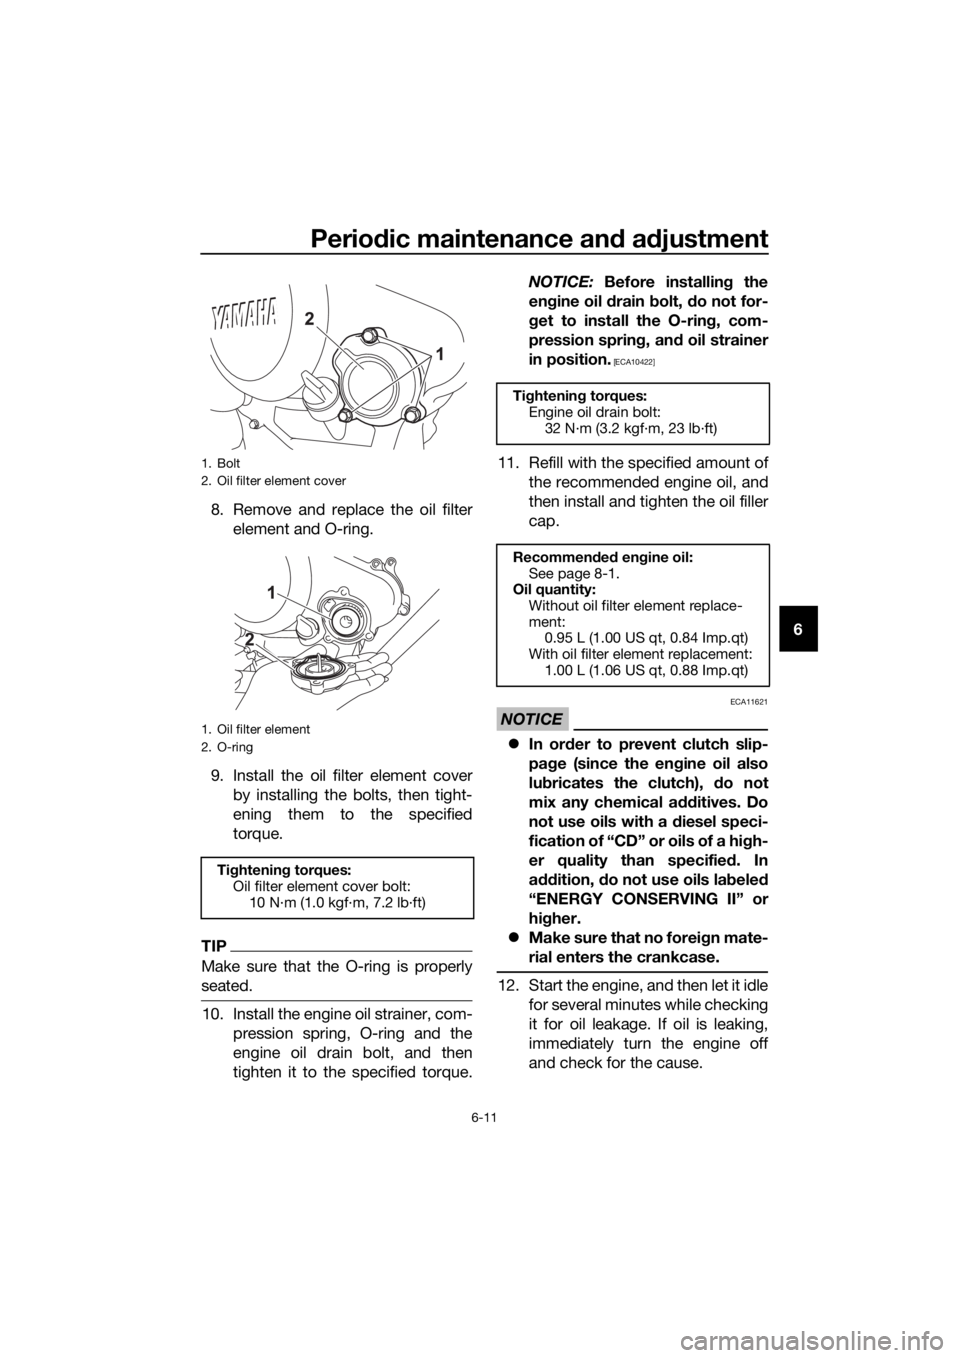
6 8. Remove and replace the oil filter
element and O-ring.
9. Install the oil filter element cover
by installing the bolts, then tight-
ening them to the specified
torque.
TIP
Make sure that the O-ring is properly
seated.
10. Install the engine oil strainer, com-
pression spring, O-ring and the
engine oil drain bolt, and then
tighten it to the specified torque.NOTICE: Before installing the
engine oil drain bolt, do not for-
get to install the O-ring, com-
pression spring, and oil strainer
in position.
[ECA10422]
11. Refill with the specified amount of
the recommended engine oil, and
then install and tighten the oil filler
cap.
NOTICE
ECA11621
In order to prevent clutch slip-
page (since the engine oil also
lubricates the clutch), do not
mix any chemical additives. Do
not use oils with a diesel speci-
fication of “CD” or oils of a high-
er quality than specified. In
addition, do not use oils labeled
“ENERGY CONSERVING II” or
higher.
Make sure that no foreign mate-
rial enters the crankcase.
12. Start the engine, and then let it idle
for several minutes while checking
it for oil leakage. If oil is leaking,
immediately turn the engine off
and check for the cause.
1. Bolt
2. Oil filter element cover
1. Oil filter element
2. O-ring
Tightening torques:
Oil filter element cover bolt:
10 N·m (1.0 kgf·m, 7.2 lb·ft)
Tightening torques:
Engine oil drain bolt:
32 N·m (3.2 kgf·m, 23 lb·ft)
Recommended engine oil:
See page 8-1.
Oil quantity:
Without oil filter element replace-
ment:
0.95 L (1.00 US qt, 0.84 Imp.qt)
With oil filter element replacement:
1.00 L (1.06 US qt, 0.88 Imp.qt)
UBR3E1E0.book Page 11 Wednesday, August 10, 2016 9:45 AM
Page 54 of 96
Periodic maintenance and adjustment
6-12
613. Turn the engine off, and then
check the oil level and correct it if
necessary.
14. Reset the oil change indicator.
(See page 3-10.)
EAU20071
Coolant
The coolant level should be checked
before each ride. In addition, the cool-
ant must be changed at the intervals
specified in the periodic maintenance
and lubrication chart.
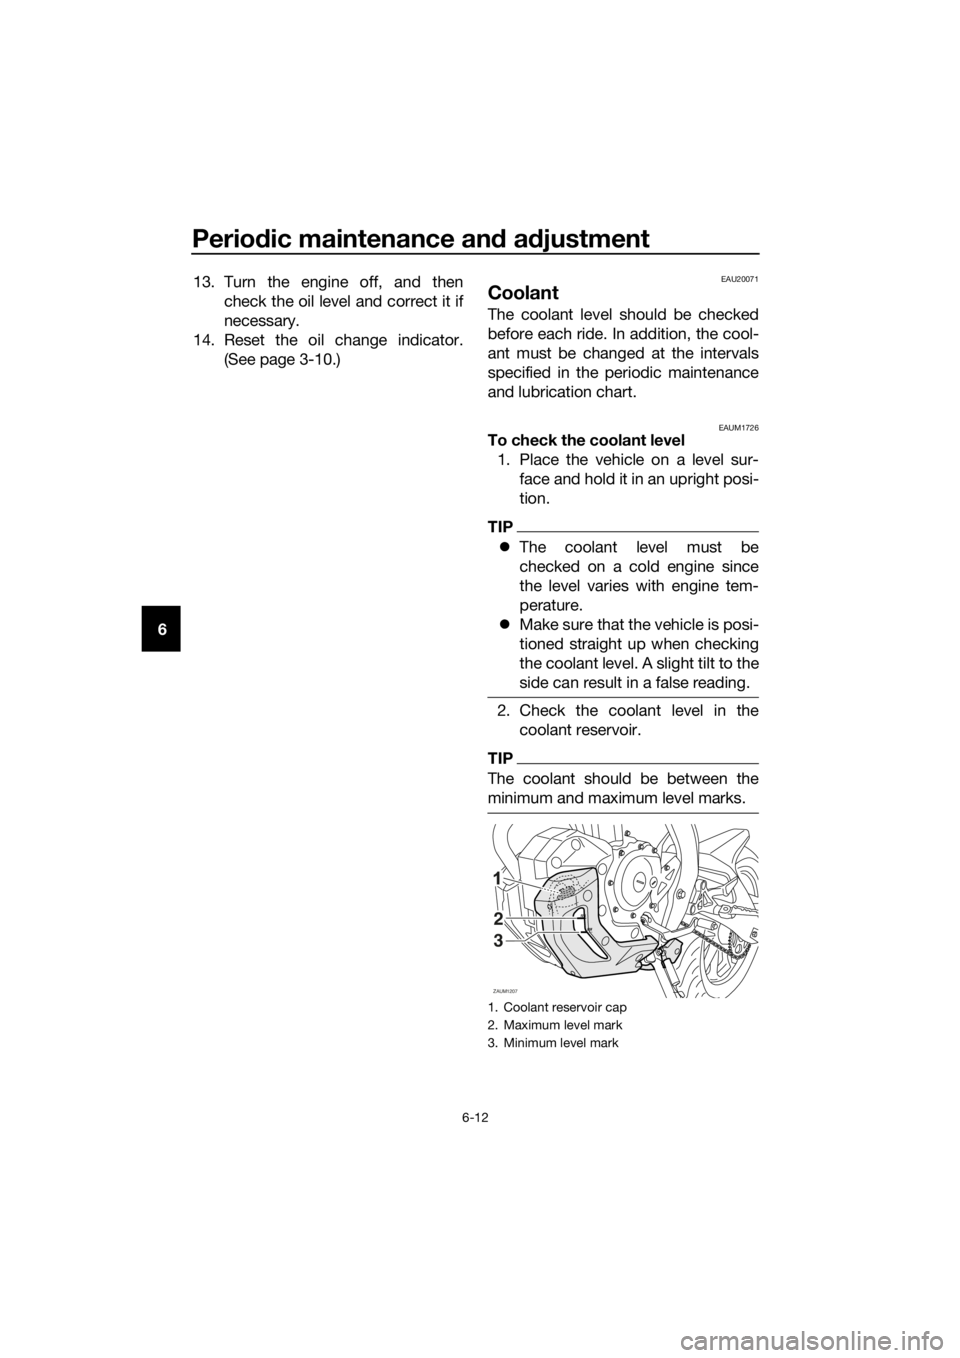
EAUM1726To check the coolant level
1. Place the vehicle on a level sur-
face and hold it in an upright posi-
tion.
TIP
The coolant level must be
checked on a cold engine since
the level varies with engine tem-
perature.
Make sure that the vehicle is posi-
tioned straight up when checking
the coolant level. A slight tilt to the
side can result in a false reading.
2. Check the coolant level in the
coolant reservoir.
TIP
The coolant should be between the
minimum and maximum level marks.
1. Coolant reservoir cap
2. Maximum level mark
3. Minimum level mark
ZAUM1207
FULL
LOW2
3
UBR3E1E0.book Page 12 Wednesday, August 10, 2016 9:45 AM
Page 65 of 96
Periodic maintenance and adjustment
6-23
6
EAU40262
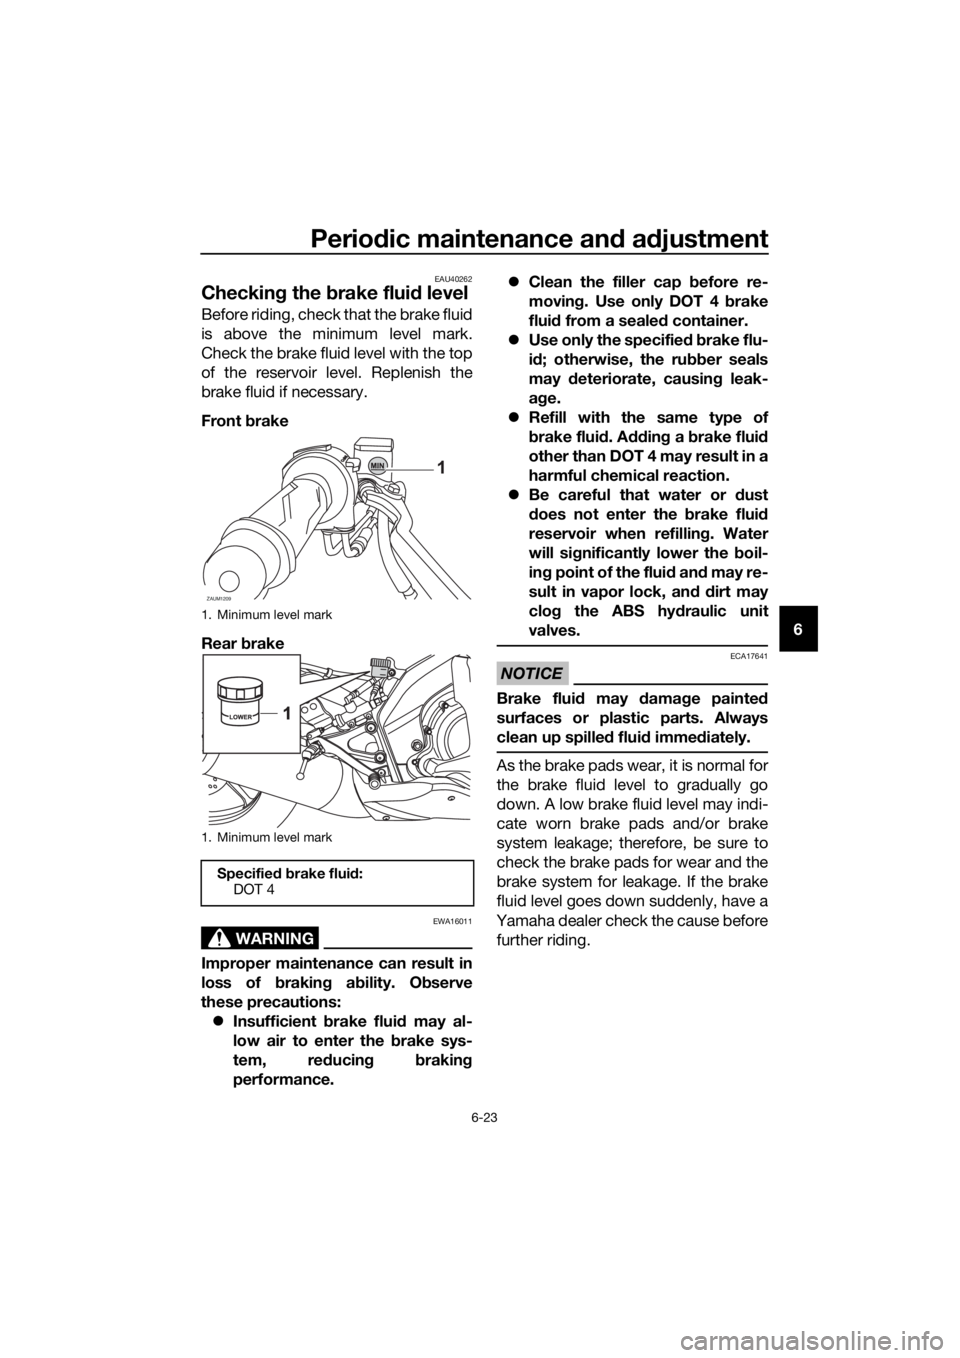
Checking the brake fluid level
Before riding, check that the brake fluid
is above the minimum level mark.
Check the brake fluid level with the top
of the reservoir level. Replenish the
brake fluid if necessary.
Front brake
Rear brake
WARNING
EWA16011
Improper maintenance can result in
loss of braking ability. Observe
these precautions:
Insufficient brake fluid may al-
low air to enter the brake sys-
tem, reducing braking
performance.Clean the filler cap before re-
moving. Use only DOT 4 brake
fluid from a sealed container.
Use only the specified brake flu-
id; otherwise, the rubber seals
may deteriorate, causing leak-
age.
Refill with the same type of
brake fluid. Adding a brake fluid
other than DOT 4 may result in a
harmful chemical reaction.
Be careful that water or dust
does not enter the brake fluid
reservoir when refilling. Water
will significantly lower the boil-
ing point of the fluid and may re-
sult in vapor lock, an
d dirt may
clog the ABS hydraulic unit
valves.
NOTICE
ECA17641
Brake fluid may damage painted
surfaces or plastic parts. Always
clean up spilled fluid immediately.
As the brake pads wear, it is normal for
the brake fluid level to gradually go
down. A low brake fluid level may indi-
cate worn brake pads and/or brake
system leakage; therefore, be sure to
check the brake pads for wear and the
brake system for leakage. If the brake
fluid level goes down suddenly, have a
Yamaha dealer check the cause before
further riding.
1. Minimum level mark
1. Minimum level mark
Specified brake fluid:
DOT 4
ZAUM1209
I
NFOI
NFO
UBR3E1E0.book Page 23 Wednesday, August 10, 2016 9:45 AM