reset YAMAHA MT-125 2018 Owners Manual
[x] Cancel search | Manufacturer: YAMAHA, Model Year: 2018, Model line: MT-125, Model: YAMAHA MT-125 2018Pages: 96, PDF Size: 7.1 MB
Page 16 of 96
Instrument and control functions
3-2
3From the “LOCK” position, push the
key and turn it to “OFF”.
EAU49399
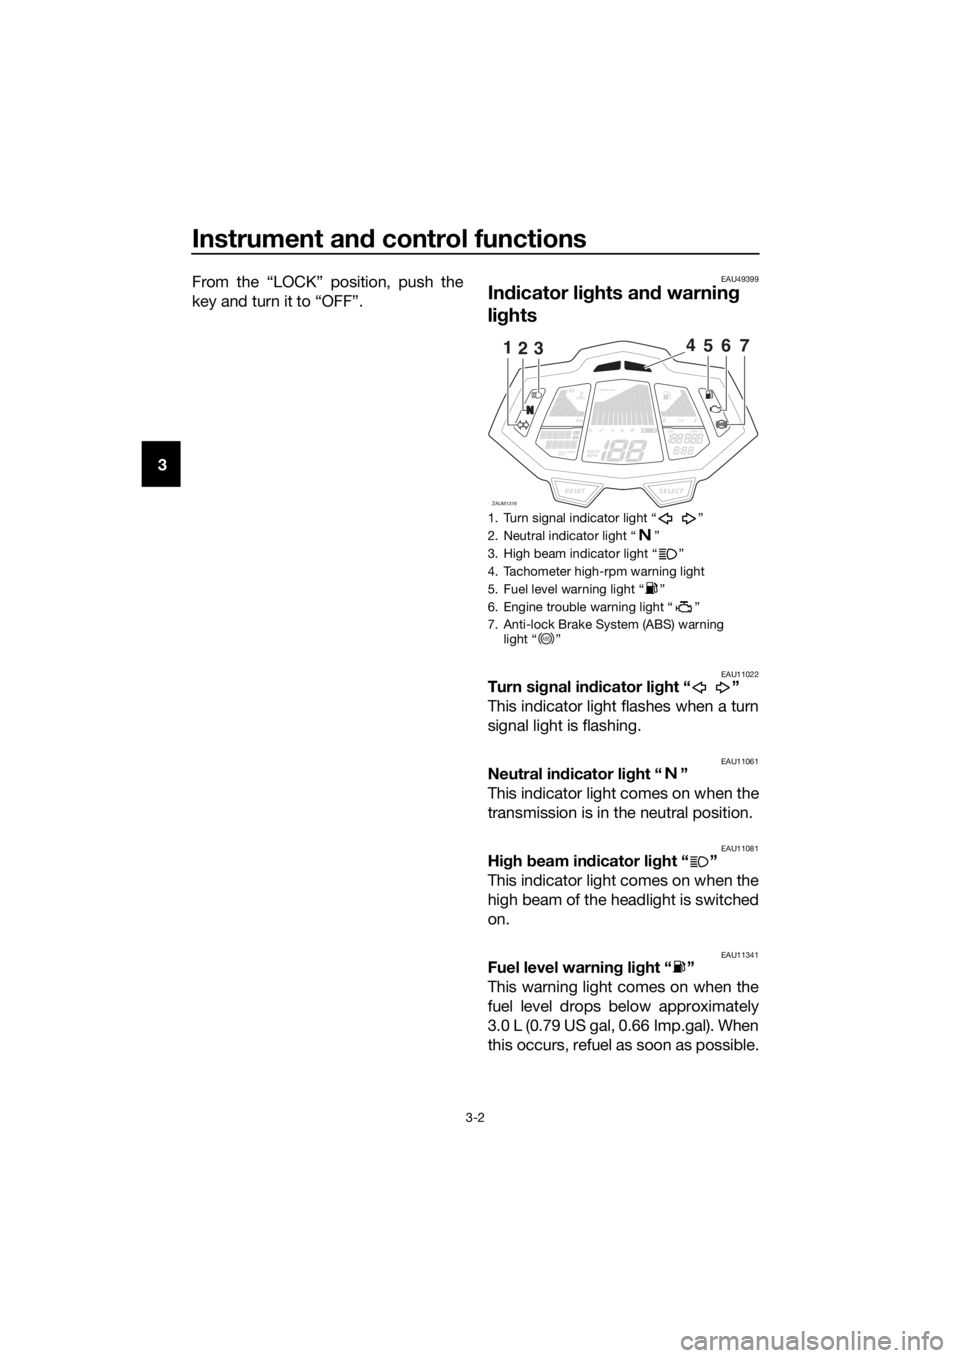
Indicator lights and warning
lights
EAU11022Turn signal indicator light “ ”
This indicator light flashes when a turn
signal light is flashing.
EAU11061Neutral indicator light “ ”
This indicator light comes on when the
transmission is in the neutral position.
EAU11081High beam indicator light “ ”
This indicator light comes on when the
high beam of the headlight is switched
on.
EAU11341Fuel level warning light “ ”
This warning light comes on when the
fuel level drops below approximately
3.0 L (0.79 US gal, 0.66 Imp.gal). When
this occurs, refuel as soon as possible.
1. Turn signal indicator light “ ”
2. Neutral indicator light “ ”
3. High beam indicator light “ ”
4. Tachometer high-rpm warning light
5. Fuel level warning light “ ”
6. Engine trouble warning light “ ”
7. Anti-lock Brake System (ABS) warning
light “ ”
Lo
Hi
1/2
x1000r/min
ZAUM1316SELECTRESET
km/L/100kmMPGkm/h
MPH
ODOFTRIP12OILOIL
1235467
ABS
UBR3E1E0.book Page 2 Wednesday, August 10, 2016 9:45 AM
Page 18 of 96
Instrument and control functions
3-4
3come on to indicate that the function is
activated or the light will go off to indi-
cate that the function is deactivated.
EAUM3423
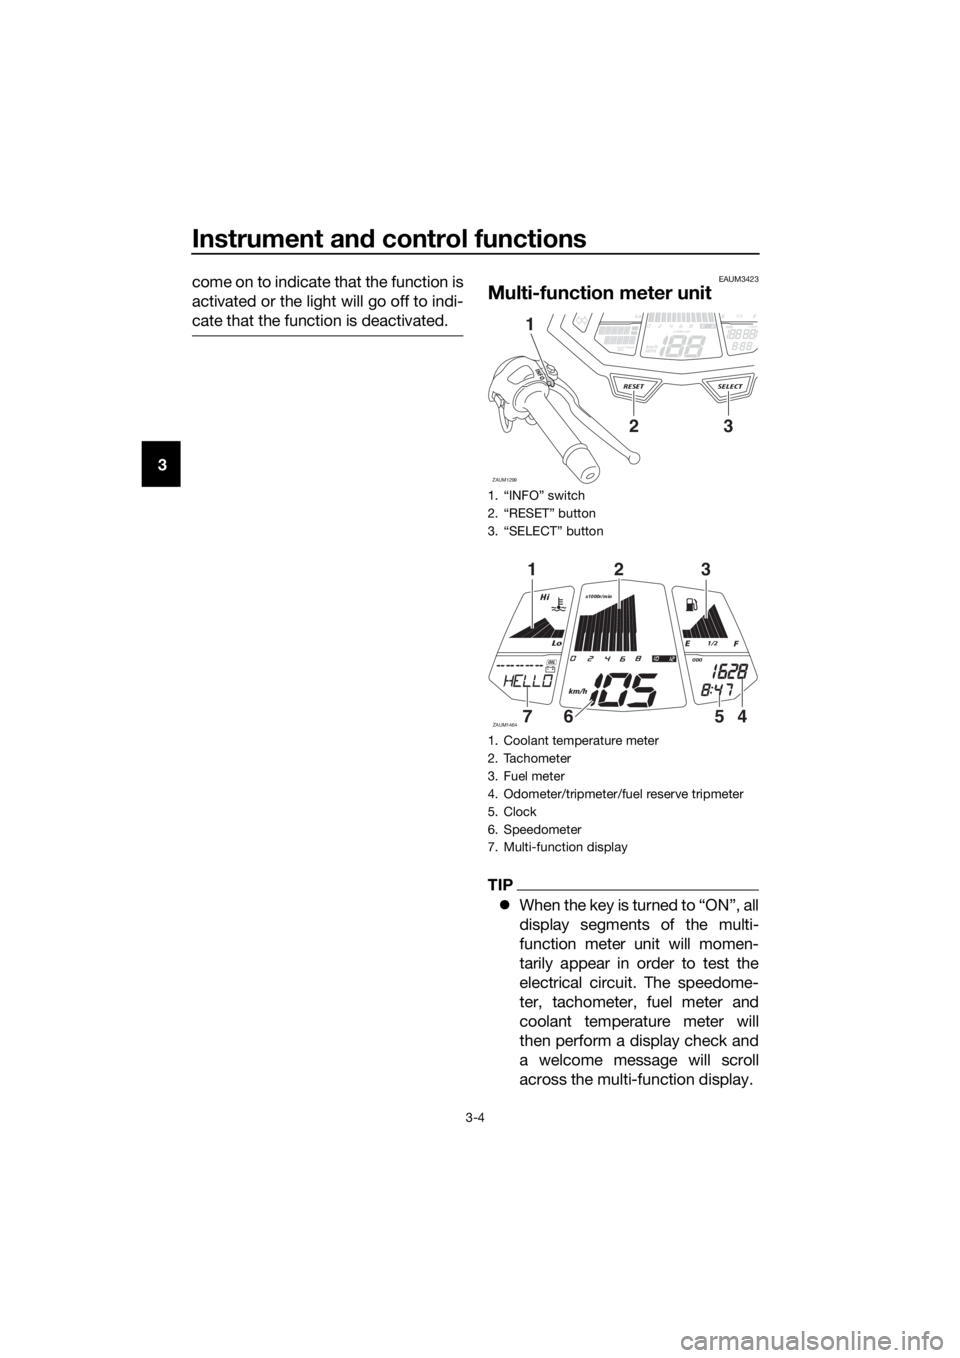
Multi-function meter unit
TIP
When the key is turned to “ON”, all
display segments of the multi-
function meter unit will momen-
tarily appear in order to test the
electrical circuit. The speedome-
ter, tachometer, fuel meter and
coolant temperature meter will
then perform a display check and
a welcome message will scroll
across the multi-function display.
1. “INFO” switch
2. “RESET” button
3. “SELECT” button
1. Coolant temperature meter
2. Tachometer
3. Fuel meter
4. Odometer/tripmeter/fuel reserve tripmeter
5. Clock
6. Speedometer
7. Multi-function display
Lo1/2ODO
ZAUM1299
SELECTRESET
INFO
km/L/100kmMPGkm/h
MPH
ODOFTRIPx1000r/minOILOIL
23
1
Lo
Hi
1/2
x1000r/min
ZAUM1464
km/h
ODOOIL
123
4567
UBR3E1E0.book Page 4 Wednesday, August 10, 2016 9:45 AM
Page 19 of 96
Instrument and control functions
3-5
3 For the UK: the multifunction me-
ter unit can be switched between
kilometers and miles (see “Speed-
ometer”).
WARNING
EWA12423
Be sure to stop the vehicle before
making any setting changes to the
multi-function meter unit. Changing
settings while riding can distract the
operator and increase the risk of an
accident.
Speedometer
The speedometer shows the vehicle's
traveling speed in kilometers per hour
(km/h).
For the UK: to change to MPH (or vice-
versa) do the following.
1. Turn the key to “OFF”.
2. While pressing the “SELECT” but-
ton and the “RESET” button, turn
the key to “ON”, and then release
the buttons.
3. Use the “SELECT” button to
switch between kilometers or
miles, and then press the “SE-
LECT” button for two seconds to
confirm the setting.Tachometer
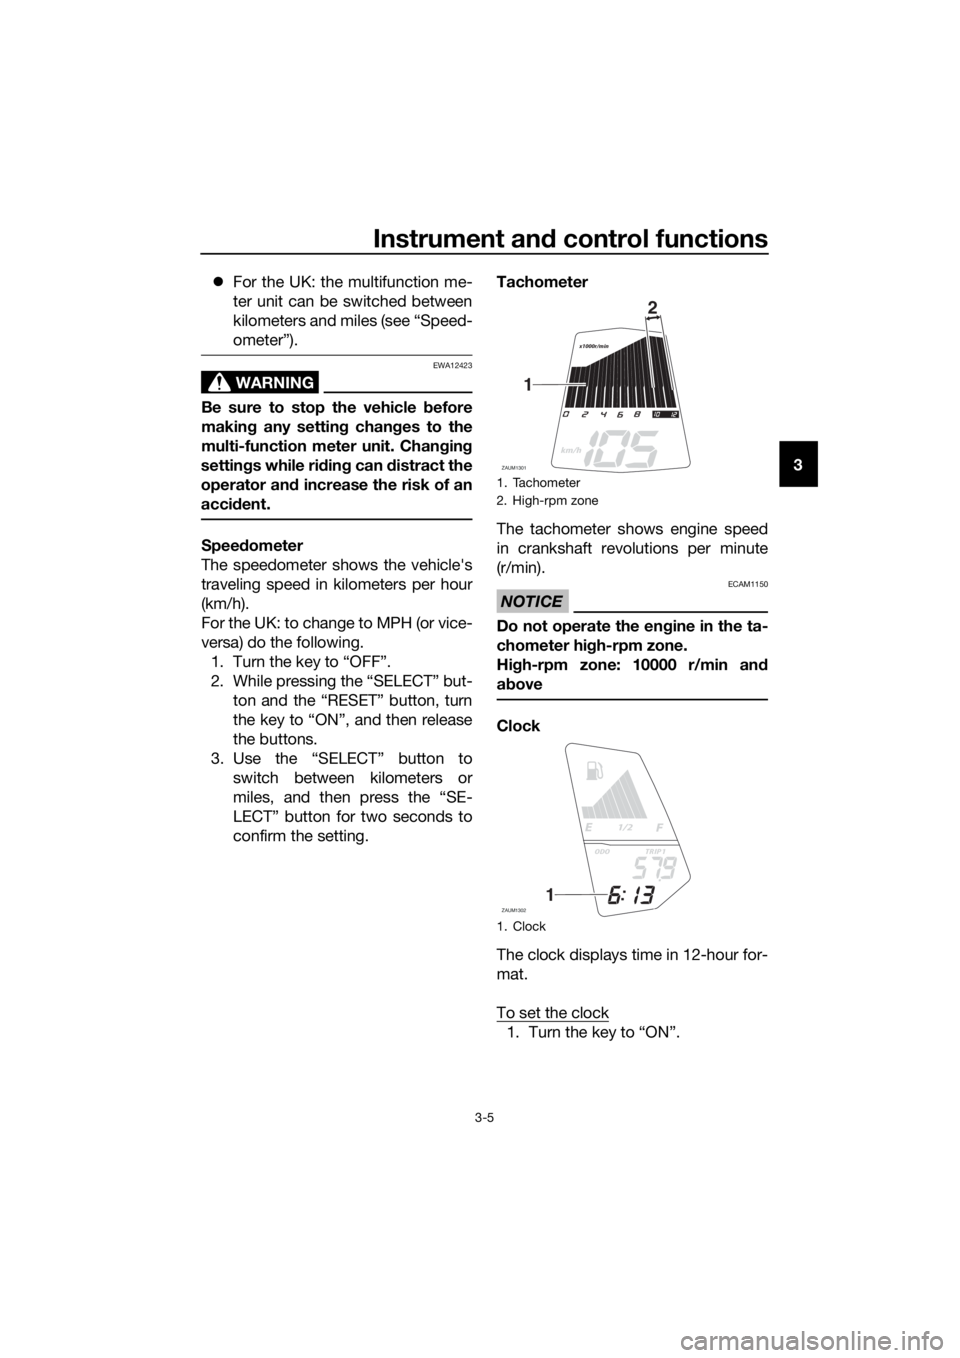
The tachometer shows engine speed
in crankshaft revolutions per minute
(r/min).
NOTICE
ECAM1150
Do not operate the engine in the ta-
chometer high-rpm zone.
High-rpm zone: 10000 r/min and
above
Clock
The clock displays time in 12-hour for-
mat.
To set the clock
1. Turn the key to “ON”.
1. Tachometer
2. High-rpm zone
1. Clock
x1000r/min
ZAUM1301
km/h
1
2
1/2
ZAUM1302
ODOTRIP1
1
UBR3E1E0.book Page 5 Wednesday, August 10, 2016 9:45 AM
Page 20 of 96
Instrument and control functions
3-6
32. Push the “SELECT” button for two
seconds, and the hour digits will
start flashing.
3. Use the “RESET” button to set the
hours.
4. Push the “SELECT” button, and
the minute digits will start flashing.
5. Use the “RESET” button to set the
minutes.
6. Push the “SELECT” button to con-
firm settings and start the clock.
TIP
When setting the hours and minutes, a
creases the increment value one by
one. You may also push and hold the
button to increase the value continu-
ously.
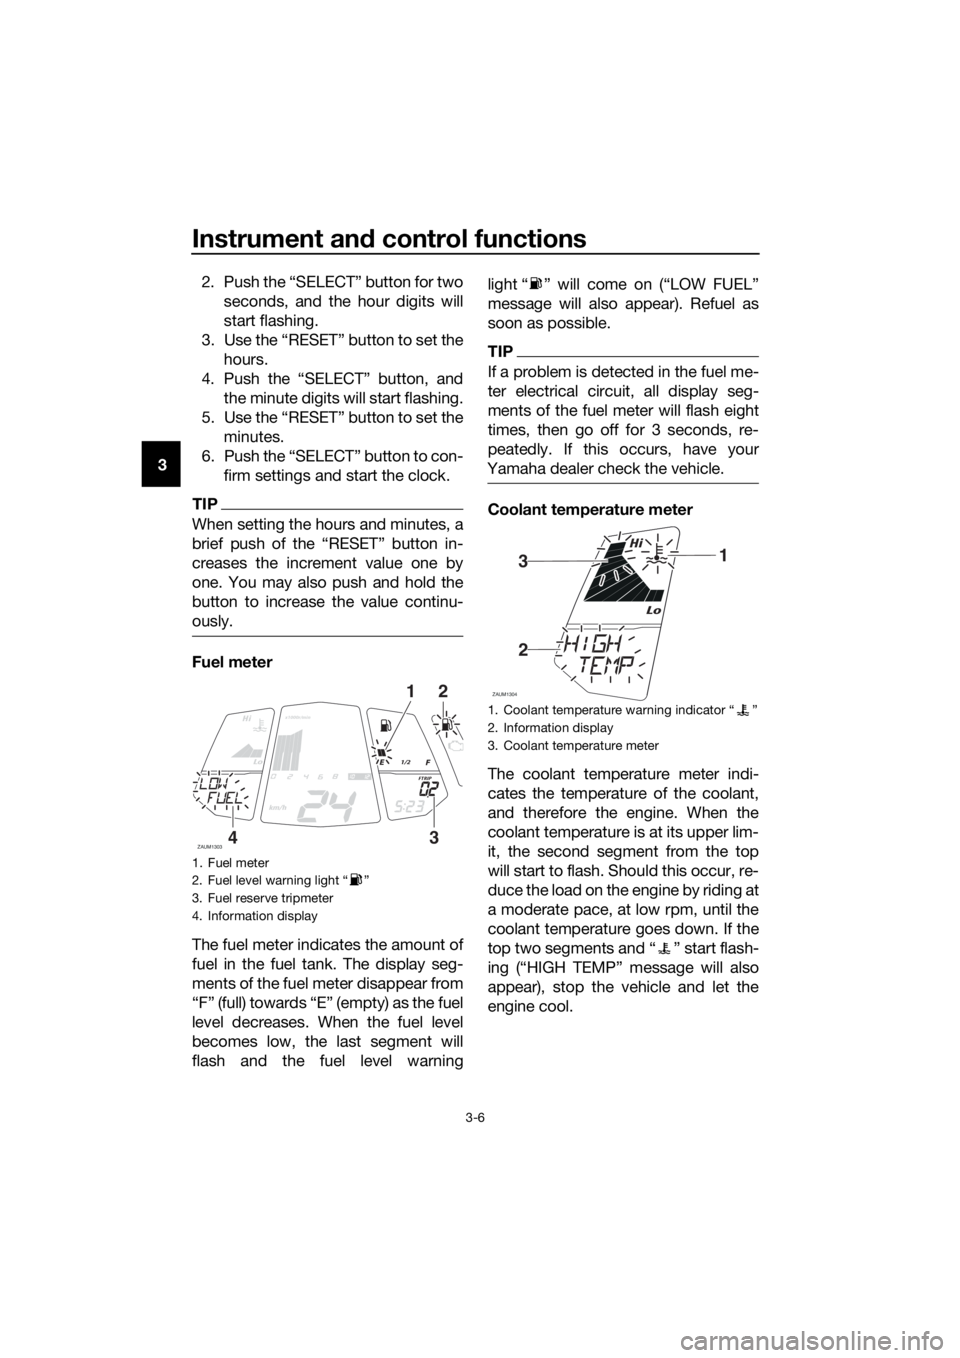
Fuel meter
The fuel meter indicates the amount of
fuel in the fuel tank. The display seg-
ments of the fuel meter disappear from
“F” (full) towards “E” (empty) as the fuel
level decreases. When the fuel level
becomes low, the last segment will
flash and the fuel level warninglight “ ” will come on (“LOW FUEL”
message will also appear). Refuel as
soon as possible.
TIP
If a problem is detected in the fuel me-
ter electrical circuit, all display seg-
ments of the fuel meter will flash eight
times, then go off for 3 seconds, re-
peatedly. If this occurs, have your
Yamaha dealer check the vehicle.
Coolant temperature meter
The coolant temperature meter indi-
cates the temperature of the coolant,
and therefore the engine. When the
coolant temperature is at its upper lim-
it, the second segment from the top
will start to flash. Should this occur, re-
duce the load on the engine by riding at
a moderate pace, at low rpm, until the
coolant temperature goes down. If the
top two segments and “ ” start flash-
ing (“HIGH TEMP” message will also
appear), stop the vehicle and let the
engine cool.
1. Fuel meter
2. Fuel level warning light “ ”
3. Fuel reserve tripmeter
4. Information display
Lo
Hi
1/2
x1000r/min
ZAUM1303
km/h
FTRIP
21
34
1. Coolant temperature warning indicator Ž
2. Information display
3. Coolant temperature meter
Lo
Hi
ZAUM1304
31
2
UBR3E1E0.book Page 6 Wednesday, August 10, 2016 9:45 AM
Page 21 of 96

Instrument and control functions
3-7
3
NOTICE
ECA10022
Do not continue to operate the en-
gine if it is overheating.
TIP
Coolant temperature varies with
changes in the weather and en-
gine load.
The radiator fan will automatically
switch on or off according to the
coolant temperature.
If the engine overheats, see page
6-39 for further instruction.
Odometer and tripmeter display
The odometer and tripmeter display is
equipped with:
an odometer
two tripmeters
a fuel reserve tripmeter
Push the “SELECT” button to switch
between the odometer and the tripme-
ters in the following order:
ODO (odometer) → TRIP 1 (tripmeter)
→ TRIP 2 (tripmeter) → ODO (odome-
ter)When approximately 3.0 L (0.79 US
gal, 0.66 Imp.gal) of fuel remains in the
fuel tank, the display will automatically
change to the fuel reserve tripmeter
mode “F TRIP” and start counting the
distance traveled from that point. In
this case, push the “SELECT” button
to switch the display in the following
order:
F TRIP → ODO → TRIP 1 → TRIP 2 →
F TRIP
To manually reset a tripmeter, select it
with the “SELECT” button, and then
push the “RESET” button for two sec-
onds.
TIP
The fuel reserve tripmeter will re-
set automatically and disappear
after you have refueled and turned
the key to “OFF”.
The tripmeters will automatically
reset and continue counting after
999.9 is reached.
The odometer will lock at 199999
and cannot be reset.
1. Odometer/tripmeter/fuel reserve tripmeter
1/2
ZAUM1305
TRIP1
1
1. Odometer/tripmeter/fuel reserve tripmeter
1/2
ZAUM1306
F TRIP
1
UBR3E1E0.book Page 7 Wednesday, August 10, 2016 9:45 AM
Page 23 of 96
Instrument and control functions
3-9
3
TIP
To reset the average fuel con-
sumption, push the “RESET” but-
ton for two seconds. However, the
odometer and tripmeter display
must be set to “ODO”, otherwise
the tripmeter will be reset instead.
After resetting the average fuel
consumption, “_ _._” is shown un-
til the vehicle has traveled a suffi-
cient distance.
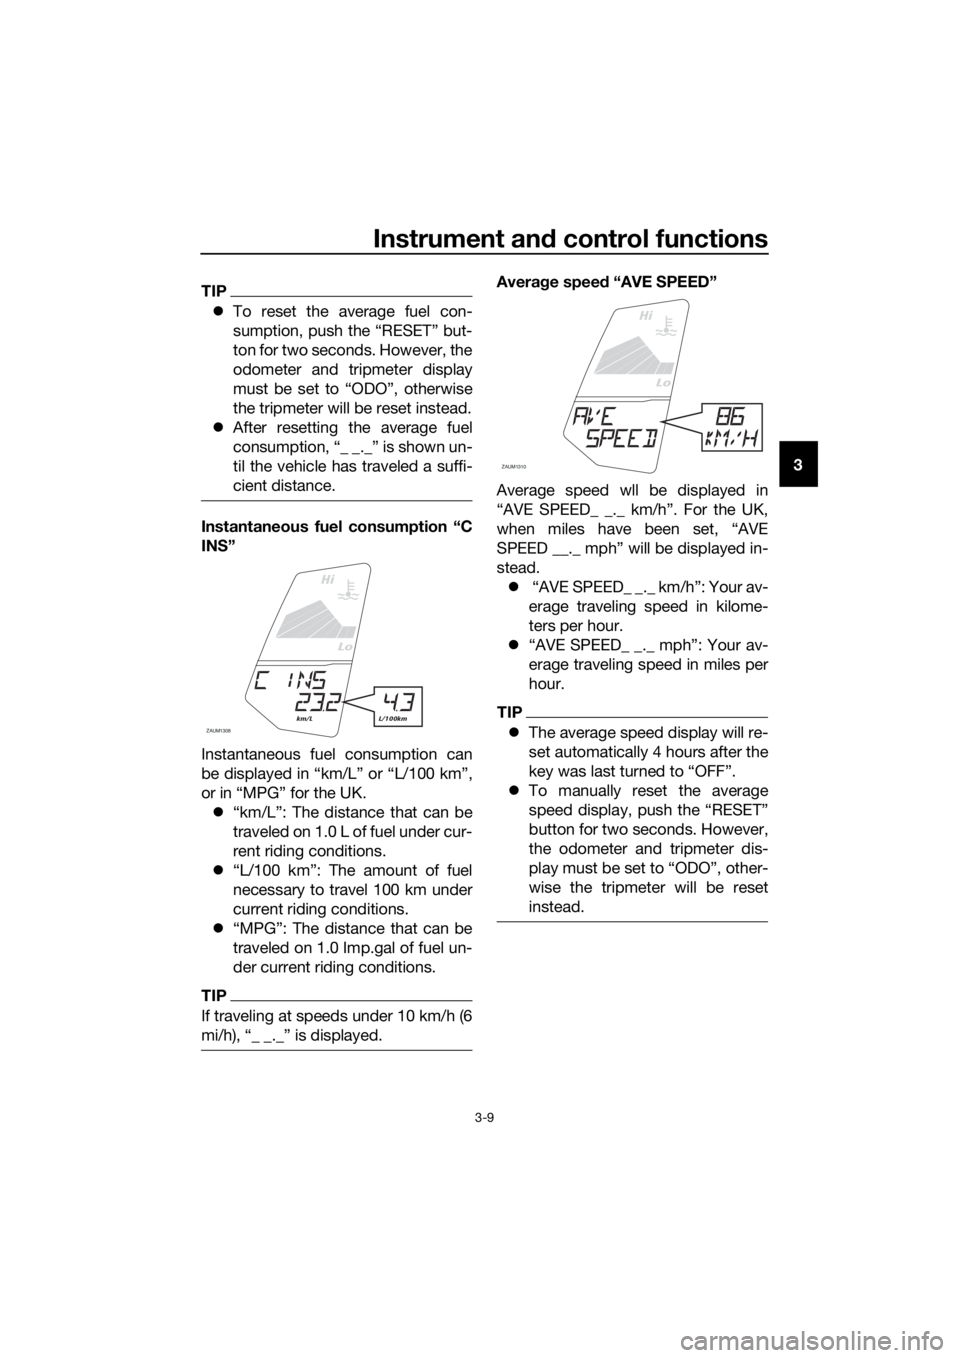
Instantaneous fuel consumption “C
INS”
Instantaneous fuel consumption can
be displayed in “km/L” or “L/100 km”,
or in “MPG” for the UK.
“km/L”: The distance that can be
traveled on 1.0 L of fuel under cur-
rent riding conditions.
“L/100 km”: The amount of fuel
necessary to travel 100 km under
current riding conditions.
“MPG”: The distance that can be
traveled on 1.0 Imp.gal of fuel un-
der current riding conditions.
TIP
If traveling at speeds under 10 km/h (6
Average speed “AVE SPEED”
Average speed wll be displayed in
“AVE SPEED_ _._ km/h”. For the UK,
when miles have been set, “AVE
SPEED __._ mph” will be displayed in-
stead.
“AVE SPEED_ _._ km/h”: Your av-
erage traveling speed in kilome-
ters per hour.
“AVE SPEED_ _._ mph”: Your av-
erage traveling speed in miles per
hour.
TIP
The average speed display will re-
set automatically 4 hours after the
key was last turned to “OFF”.
To manually reset the average
speed display, push the “RESET”
button for two seconds. However,
the odometer and tripmeter dis-
play must be set to “ODO”, other-
wise the tripmeter will be reset
instead.
Lo
Hi
ZAUM1308km/L L/100km
Lo
Hi
ZAUM1310
UBR3E1E0.book Page 9 Wednesday, August 10, 2016 9:45 AM
Page 24 of 96
Instrument and control functions
3-10
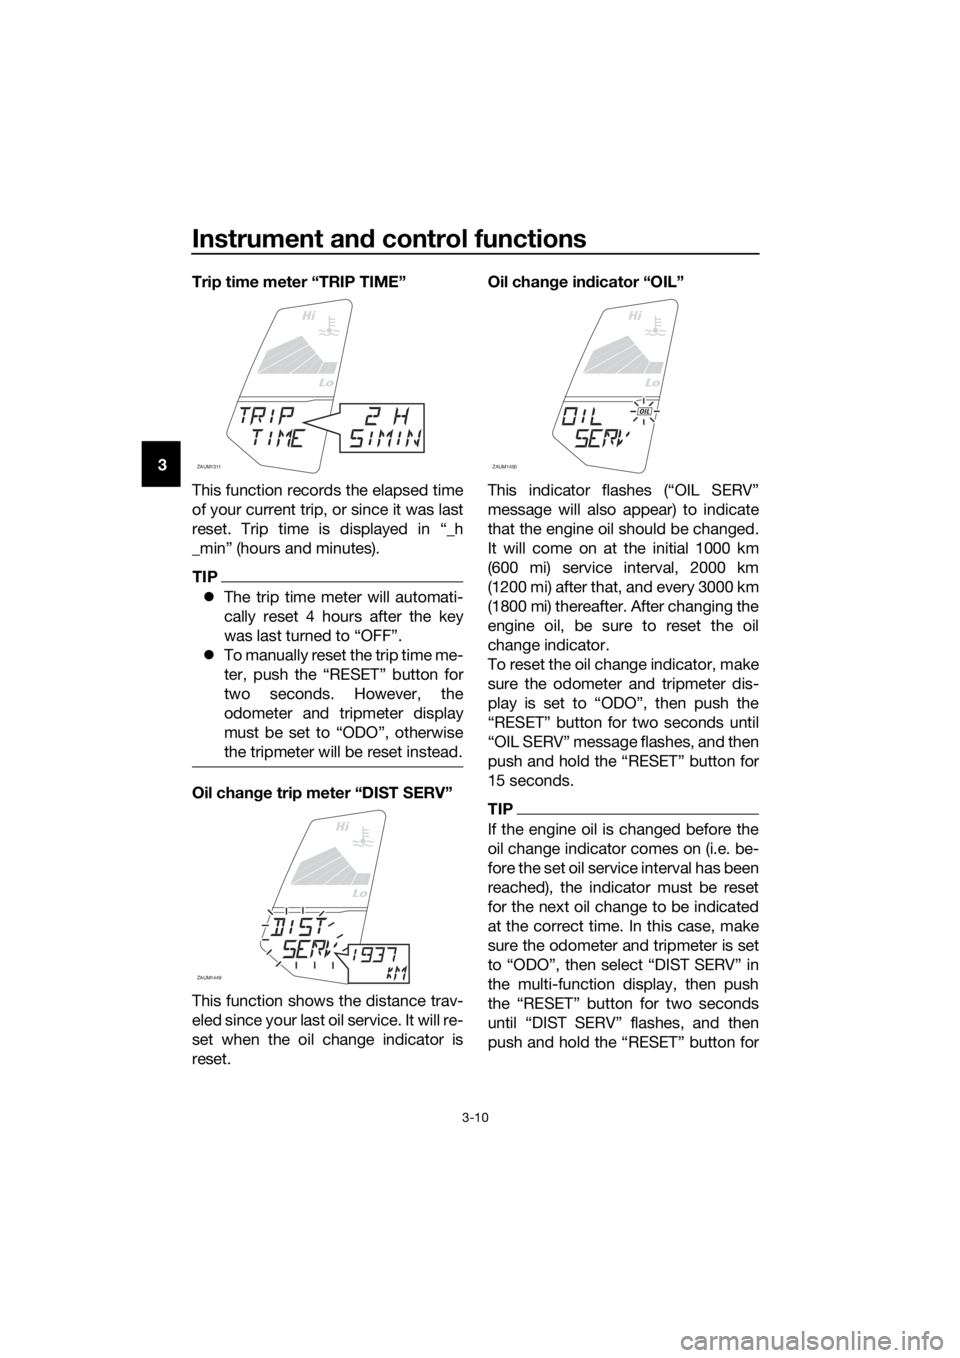
3Trip time meter “TRIP TIME”
This function records the elapsed time
of your current trip, or since it was last
reset. Trip time is displayed in “_h
_min” (hours and minutes).
TIP
The trip time meter will automati-
cally reset 4 hours after the key
was last turned to “OFF”.
To manually reset the trip time me-
ter, push the “RESET” button for
two seconds. However, the
odometer and tripmeter display
must be set to “ODO”, otherwise
the tripmeter will be reset instead.
Oil change trip meter “DIST SERV”
This function shows the distance trav-
eled since your last oil service. It will re-
set when the oil change indicator is
reset.Oil change indicator “OIL”
This indicator flashes (“OIL SERV”
message will also appear) to indicate
that the engine oil should be changed.
It will come on at the initial 1000 km
(600 mi) service interval, 2000 km
(1200 mi) after that, and every 3000 km
(1800 mi) thereafter. After changing the
engine oil, be sure to reset the oil
change indicator.
To reset the oil change indicator, make
sure the odometer and tripmeter dis-
play is set to “ODO”, then push the
“RESET” button for two seconds until
“OIL SERV” message flashes, and then
push and hold the “RESET” button for
15 seconds.
TIP
If the engine oil is changed before the
oil change indicator comes on (i.e. be-
fore the set oil service interval has been
reached), the indicator must be reset
for the next oil change to be indicated
at the correct time. In this case, make
sure the odometer and tripmeter is set
the multi-function display, then push
Lo
Hi
ZAUM1311
ZAUM1449
Lo
Hi
ZAUM1450
Lo
Hi
OIL
UBR3E1E0.book Page 10 Wednesday, August 10, 2016 9:45 AM
Page 54 of 96
Periodic maintenance and adjustment
6-12
613. Turn the engine off, and then
check the oil level and correct it if
necessary.
14. Reset the oil change indicator.
(See page 3-10.)
EAU20071
Coolant
The coolant level should be checked
before each ride. In addition, the cool-
ant must be changed at the intervals
specified in the periodic maintenance
and lubrication chart.
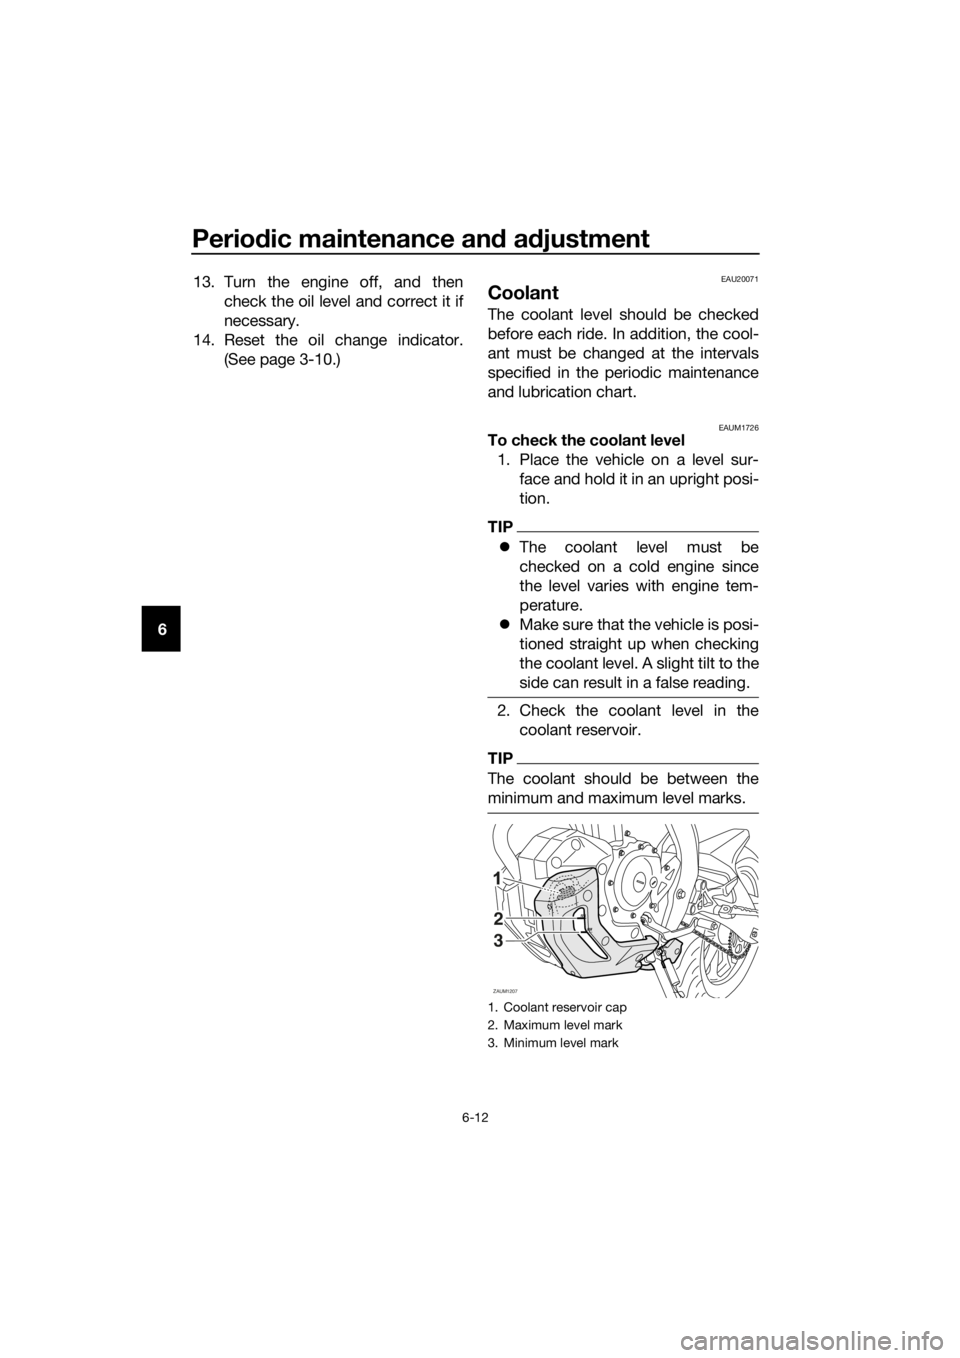
EAUM1726To check the coolant level
1. Place the vehicle on a level sur-
face and hold it in an upright posi-
tion.
TIP
The coolant level must be
checked on a cold engine since
the level varies with engine tem-
perature.
Make sure that the vehicle is posi-
tioned straight up when checking
the coolant level. A slight tilt to the
side can result in a false reading.
2. Check the coolant level in the
coolant reservoir.
TIP
The coolant should be between the
minimum and maximum level marks.
1. Coolant reservoir cap
2. Maximum level mark
3. Minimum level mark
ZAUM1207
FULL
LOW2
3
UBR3E1E0.book Page 12 Wednesday, August 10, 2016 9:45 AM