warning YAMAHA MT07 TRACER 2020 User Guide
[x] Cancel search | Manufacturer: YAMAHA, Model Year: 2020, Model line: MT07 TRACER, Model: YAMAHA MT07 TRACER 2020Pages: 98, PDF Size: 4.6 MB
Page 31 of 98
Instrument and control functions
3-16
3
TIPThe fuel tank cap cannot be closed un-
less the key is in the lock. In addition,
the key cannot be removed if the cap is
not properly closed and locked.
WARNING
EWA11092
Make sure that the fuel tank cap is
properly closed after filling fuel.
Leakin g fuel is a fire hazar d.
EAU13222
FuelMake sure there is sufficient gasoline in
the tank.
WARNING
EWA10882
Gasoline an d gasoline vapors are
extremely flammab le. To avoid fires
an d explosions an d to re duce the
risk of injury when refueling , follow
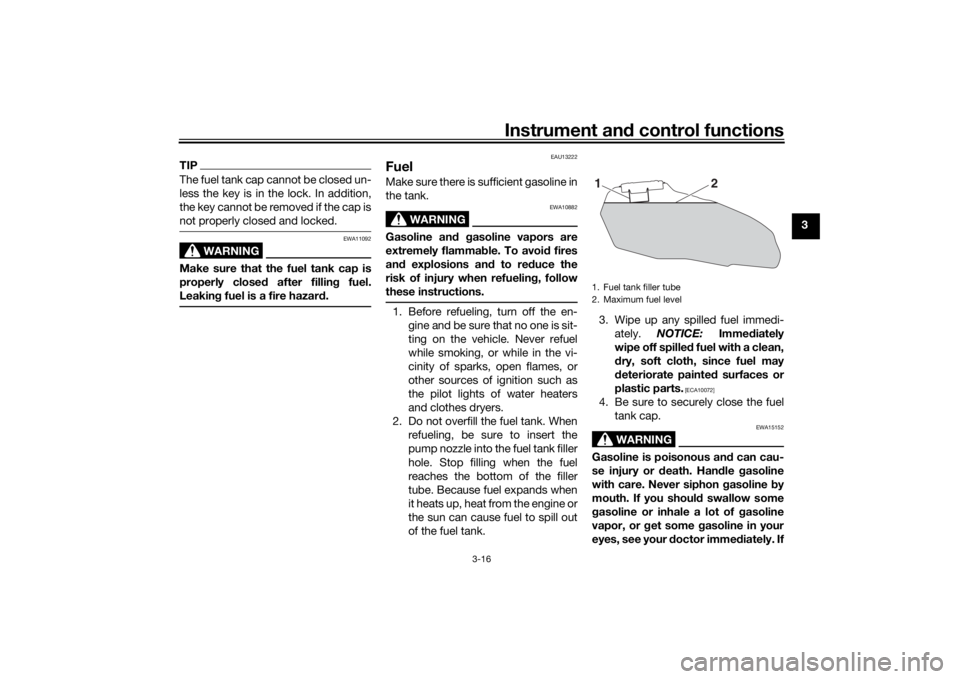
these instructions.1. Before refueling, turn off the en- gine and be sure that no one is sit-
ting on the vehicle. Never refuel
while smoking, or while in the vi-
cinity of sparks, open flames, or
other sources of ignition such as
the pilot lights of water heaters
and clothes dryers.
2. Do not overfill the fuel tank. When refueling, be sure to insert the
pump nozzle into the fuel tank filler
hole. Stop filling when the fuel
reaches the bottom of the filler
tube. Because fuel expands when
it heats up, heat from the engine or
the sun can cause fuel to spill out
of the fuel tank. 3. Wipe up any spilled fuel immedi-
ately. NOTICE: Immediately
wipe off spille d fuel with a clean,
d ry, soft cloth, since fuel may
d eteriorate painte d surfaces or
plastic parts.
[ECA10072]
4. Be sure to securely close the fuel tank cap.
WARNING
EWA15152
Gasoline is poisonous an d can cau-
se injury or death. Han dle gasoline
with care. Never siphon gasoline by
mouth. If you shoul d swallow some
g asoline or inhale a lot of g asoline
vapor, or g et some gasoline in your
eyes, see your d octor immediately. If1. Fuel tank filler tube
2. Maximum fuel level
2
1
UB4TE0E0.book Page 16 Monday, December 9, 2019 3:53 PM
Page 33 of 98
Instrument and control functions
3-18
3
EAU86240
Fuel tank breather hose an d
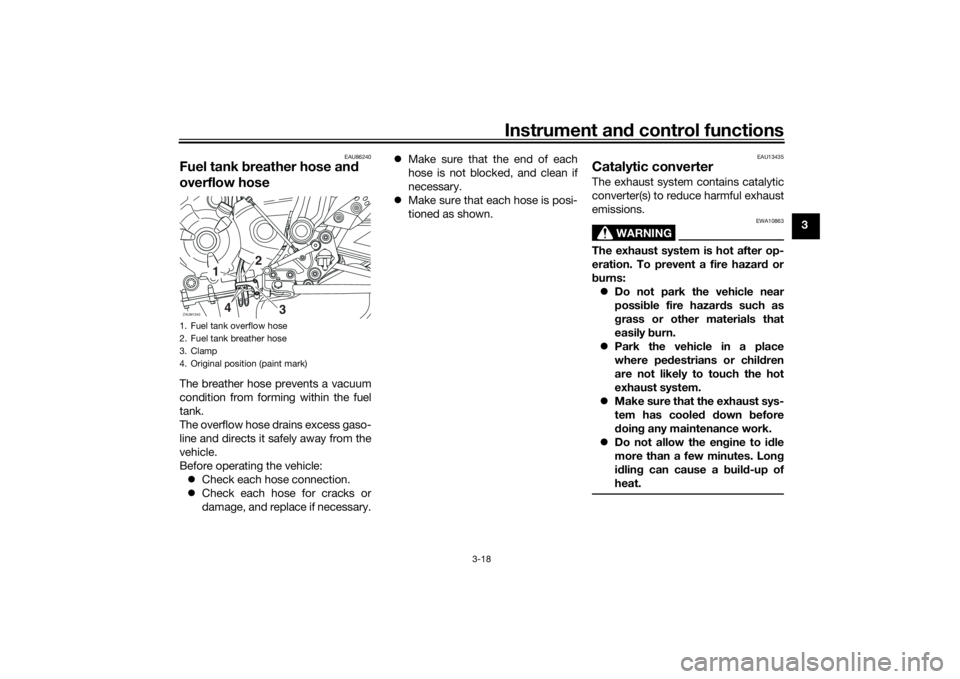
overflow hoseThe breather hose prevents a vacuum
condition from forming within the fuel
tank.
The overflow hose drains excess gaso-
line and directs it safely away from the
vehicle.
Before operating the vehicle:
Check each hose connection.
Check each hose for cracks or
damage, and replace if necessary.
Make sure that the end of each
hose is not blocked, and clean if
necessary.
Make sure that each hose is posi-
tioned as shown.
EAU13435
Catalytic converterThe exhaust system contains catalytic
converter(s) to reduce harmful exhaust
emissions.
WARNING
EWA10863
The exhaust system is hot after op-
eration. To prevent a fire hazar d or
b urns:
Do not park the vehicle near
possi ble fire hazar ds such as
g rass or other materials that
easily burn.
Park the vehicle in a place
where pe destrians or child ren
are not likely to touch the hot
exhaust system.
Make sure that the exhaust sys-
tem has coole d down before
d oin g any maintenance work.
Do not allow the en gine to i dle
more than a few minutes. Lon g
i d lin g can cause a b uild-up of
heat.
1. Fuel tank overflow hose
2. Fuel tank breather hose
3. Clamp
4. Original position (paint mark)ZAUM1343
1
2
3
4
UB4TE0E0.book Page 18 Monday, December 9, 2019 3:53 PM
Page 35 of 98
Instrument and control functions
3-20
3
3. Place the helmet on the left or the
right side of the vehicle or on the
top of the fuel tank, and then in-
stall the seat. WARNING! Never
ride with a helmet attached to
the helmet hol der, since the hel-
met may hit o bjects, causin g
loss of control an d possi bly an
acci dent.
[EWA10162]
To release the helmet from the hel-
met hol din g cab le
Remove the seat, remove the helmet
holding cable from the helmet holder
and the helmet, and then install the
seat.
EAU14465
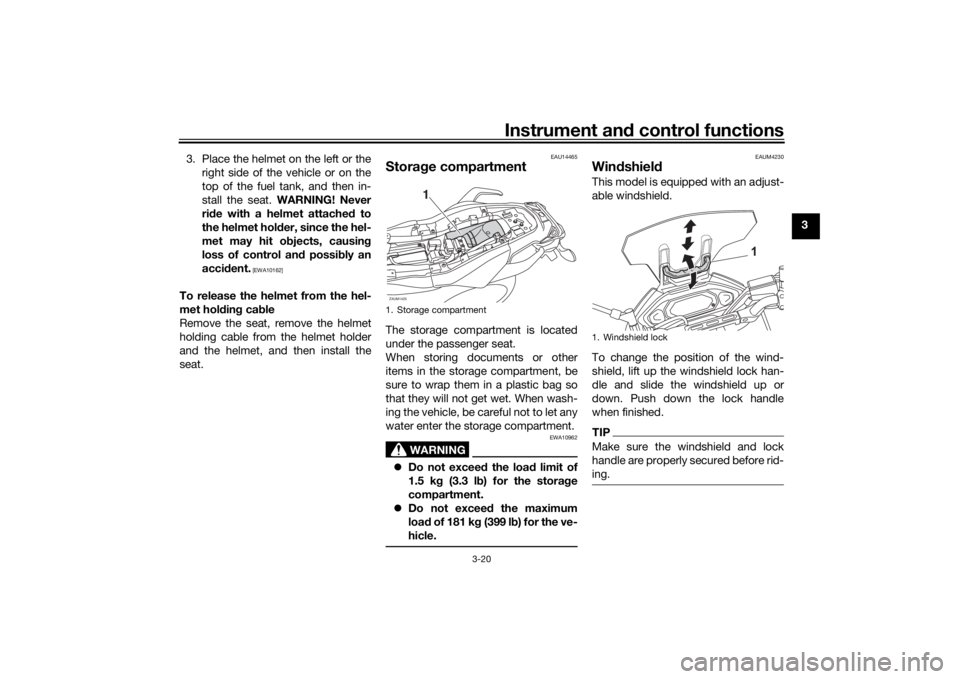
Stora ge compartmentThe storage compartment is located
under the passenger seat.
When storing documents or other
items in the storage compartment, be
sure to wrap them in a plastic bag so
that they will not get wet. When wash-
ing the vehicle, be careful not to let any
water enter the storage compartment.
WARNING
EWA10962
Do not exceed the load limit of
1.5 k g (3.3 l b) for the stora ge
compartment.
Do not exceed the maximum
loa d of 181 k g (399 l b) for the ve-
hicle.
EAUM4230
Win dshield This model is equipped with an adjust-
able windshield.
To change the position of the wind-
shield, lift up the windshield lock han-
dle and slide the windshield up or
down. Push down the lock handle
when finished.TIPMake sure the windshield and lock
handle are properly secured before rid-
ing.
1. Storage compartmentZAUM1425
1
1. Windshield lock
1
UB4TE0E0.book Page 20 Monday, December 9, 2019 3:53 PM
Page 36 of 98
Instrument and control functions
3-21
3
EAUM4241
A djustin g the front forkThe front fork is equipped with spring
preload adjusting bolts and rebound
damping force adjusting screws.NOTICE
ECA10102
To avoi d d amag ing the mechanism,
d o not attempt to turn b eyond the
maximum or minimum setting s.
WARNING
EWA10181
Always adjust both fork le gs equally,
otherwise poor han dlin g an d loss of
stab ility may result.Sprin g preloa d
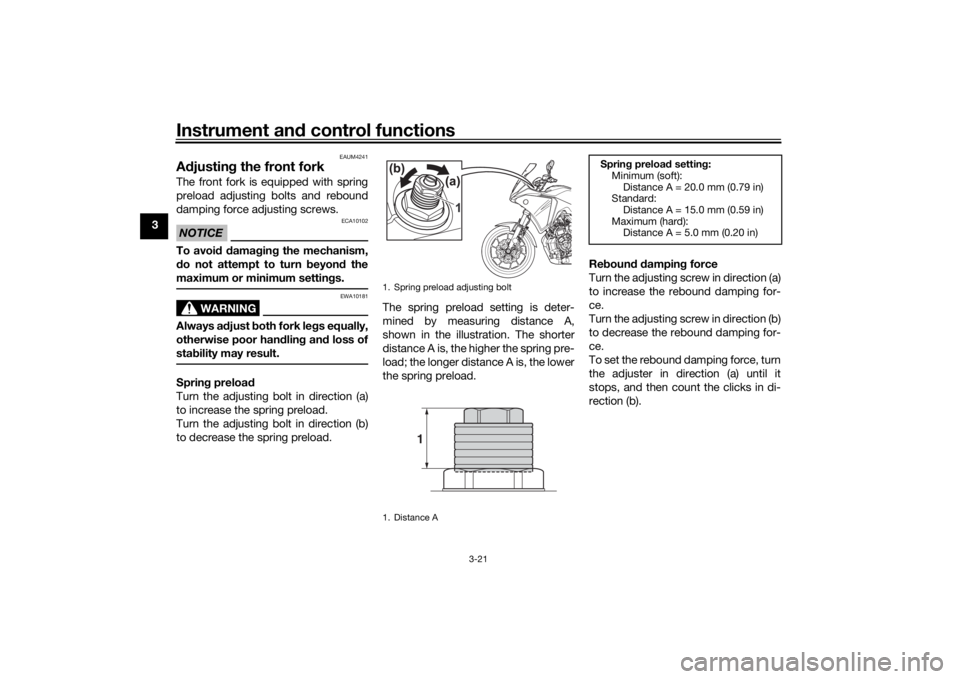
Turn the adjusting bolt in direction (a)
to increase the spring preload.
Turn the adjusting bolt in direction (b)
to decrease the spring preload. The spring preload setting is deter-
mined by measuring distance A,
shown in the illustration. The shorter
distance A is, the higher the spring pre-
load; the longer distance A is, the lower
the spring preload.
Re
boun d d ampin g force
Turn the adjusting screw in direction (a)
to increase the rebound damping for-
ce.
Turn the adjusting screw in direction (b)
to decrease the rebound damping for-
ce.
To set the rebound damping force, turn
the adjuster in direction (a) until it
stops, and then count the clicks in di-
rection (b).
1. Spring preload adjusting bolt
1. Distance A
1
Sprin g preloa d setting :
Minimum (soft):
Distance A = 20.0 mm (0.79 in)
Standard:
Distance A = 15.0 mm (0.59 in)
Maximum (hard): Distance A = 5.0 mm (0.20 in)
UB4TE0E0.book Page 21 Monday, December 9, 2019 3:53 PM
Page 38 of 98
Instrument and control functions
3-23
3
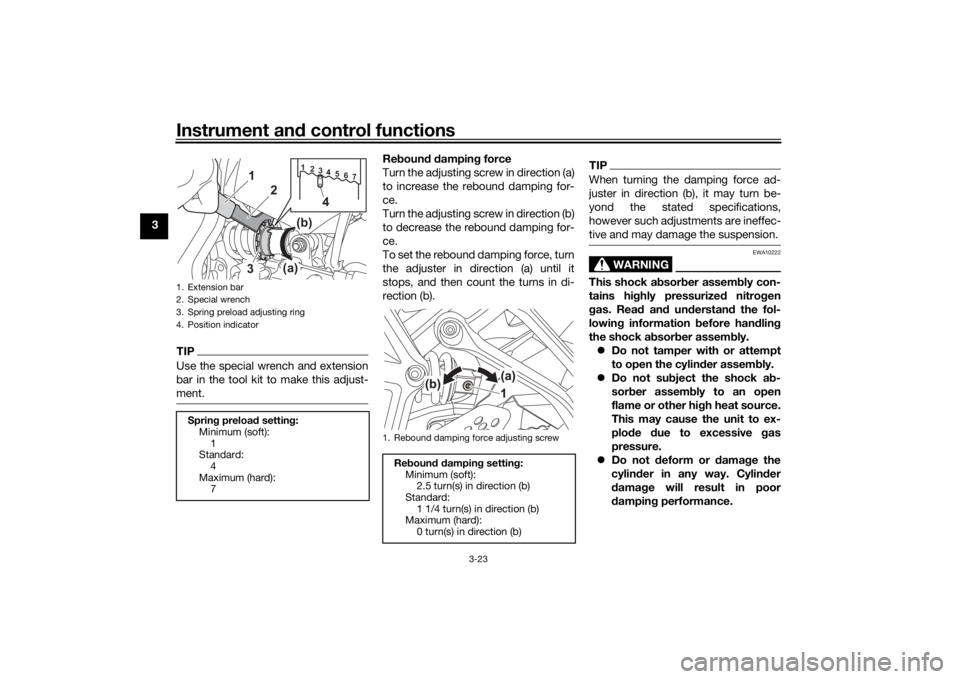
TIPUse the special wrench and extension
bar in the tool kit to make this adjust-
ment.
Re boun d d ampin g force
Turn the adjusting screw in direction (a)
to increase the rebound damping for-
ce.
Turn the adjusting screw in direction (b)
to decrease the rebound damping for-
ce.
To set the rebound damping force, turn
the adjuster in direction (a) until it
stops, and then count the turns in di-
rection (b).
TIPWhen turning the damping force ad-
juster in direction (b), it may turn be-
yond the stated specifications,
however such adjustments are ineffec-
tive and may damage the suspension.
WARNING
EWA10222
This shock a bsor ber assem bly con-
tains hi ghly pressurize d nitro gen
g as. Rea d an d und erstan d the fol-
lowin g information b efore handlin g
the shock a bsor ber assem bly.
Do not tamper with or attempt
to open the cylin der assem bly.
Do not su bject the shock a b-
sor ber assem bly to an open
flame or other hi gh heat source.
This may cause the unit to ex-
plo de due to excessive gas
pressure.
Do not deform or d amage the
cylin der in any way. Cylin der
d amag e will result in poor
d ampin g performance.
1. Extension bar
2. Special wrench
3. Spring preload adjusting ring
4. Position indicatorSprin g preloa d setting :
Minimum (soft): 1
Standard:
4
Maximum (hard): 7
7
6
5
4
3
2
1
3
(a)(b)
2
1
4
1. Rebound damping force adjusting screwRe
boun d d ampin g setting :
Minimum (soft): 2.5 turn(s) in direction (b)
Standard: 1 1/4 turn(s) in direction (b)
Maximum (hard):
0 turn(s) in direction (b)
UB4TE0E0.book Page 23 Monday, December 9, 2019 3:53 PM
Page 40 of 98
Instrument and control functions
3-25
3
EAU15306
Si destan dThe sidestand is located on the left
side of the frame. Raise the sidestand
or lower it with your foot while holding
the vehicle upright.TIPThe built-in sidestand switch is part of
the ignition circuit cut-off system,
which cuts the ignition in certain situa-
tions. (See the following section for an
explanation of the ignition circuit cut-
off system.)
WARNING
EWA10242
The vehicle must not be ri dden with
the si destan d d own, or if the si de-
stan d cannot b e properly move d up
(or does not stay up), otherwise the
si destan d coul d contact the groun d
an d d istract the operator, resultin g
in a possi ble loss of control.
Yamaha’s ig nition circuit cut-off
system has been desi gne d to assist
the operator in fulfillin g the respon-
si bility of raisin g the si destan d b e-
fore startin g off. Therefore, check this system re
gularly an d have a
Yamaha dealer repair it if it does not
function properly.
EAU44895
I g nition circuit cut-off systemThis system prevents in-gear engine
starts unless the clutch lever is pulled
and the sidestand is up. Also, it will
stop the running engine should the
sidestand be lowered while the trans-
mission is in gear.
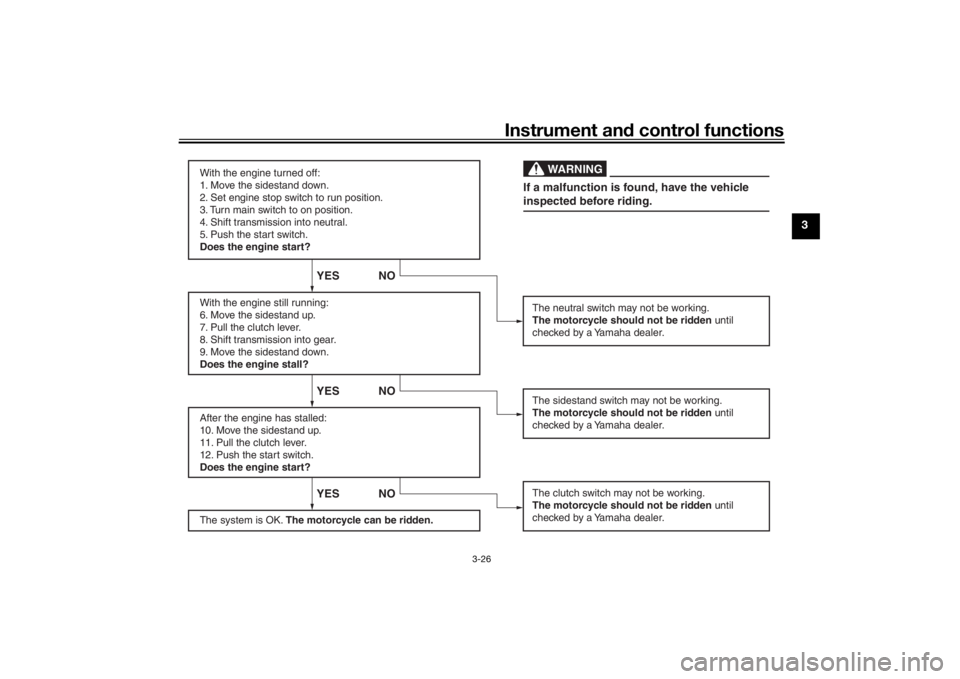
Periodically check the system via the
following procedure.TIP This check is most reliable if per-
formed with a warmed-up engine.
See pages 3-2 and 3-12 for switch
operation information.
UB4TE0E0.book Page 25 Monday, December 9, 2019 3:53 PM
Page 41 of 98
Instrument and control functions
3-26
3
With the engine turned off:
1. Move the sidestand down.
2. Set engine stop switch to run position.
3. Turn main switch to on position.
4. Shift transmission into neutral.
5. Push the start switch.
Does the engine start?
With the engine still running:
6. Move the sidestand up.
7. Pull the clutch lever.
8. Shift transmission into gear.
9. Move the sidestand down.
Does the engine stall?
After the engine has stalled:
10. Move the sidestand up.
11. Pull the clutch lever.
12. Push the start switch.
Does the engine start?
The system is OK. The motorcycle can be ridden.
YES NO YES NO YES NO
The neutral switch may not be working.
The motorcycle should not be ridden until
checked by a Yamaha dealer.
The clutch switch may not be working.
The motorcycle should not be ridden until
checked by a Yamaha dealer.The sidestand switch may not be working.
The motorcycle should not be ridden until
checked by a Yamaha dealer.If a malfunction is found, have the vehicle
inspected before riding.
WARNING
UB4TE0E0.book Page 26 Monday, December 9, 2019 3:53 PM
Page 42 of 98
For your safety – pre-operation checks
4-1
4
EAU1559A
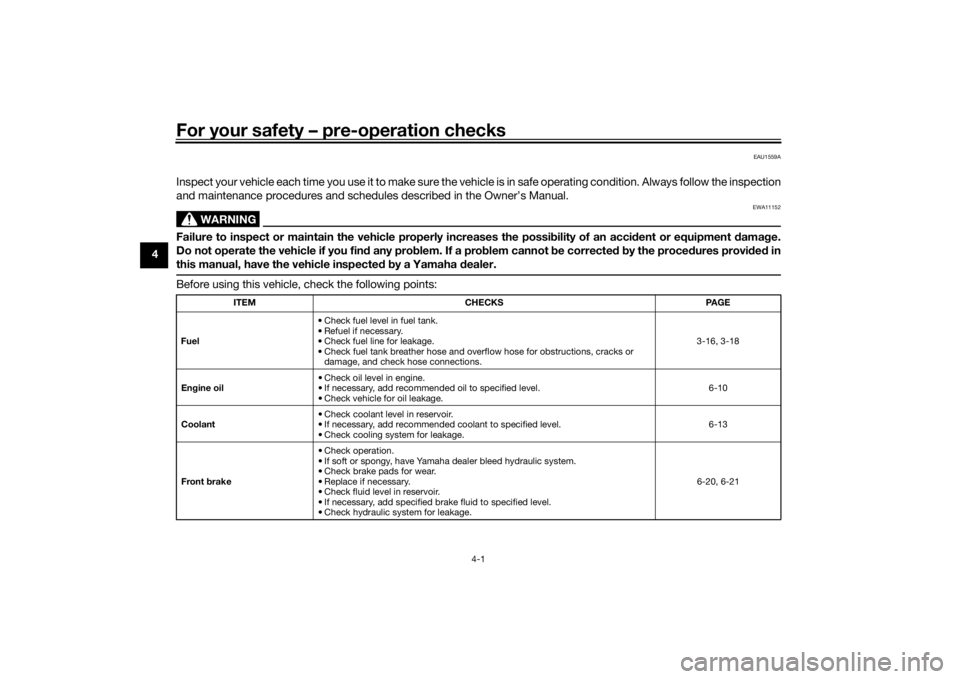
Inspect your vehicle each time you use it to make sure the vehicle is in safe operating condition. Always follow the inspection
and maintenance procedures and schedules described in the Owner’s Manual.
WARNING
EWA11152
Failure to inspect or maintain the vehicle properly increases the possibility of an acci dent or equipment damag e.
Do not operate the vehicle if you fin d any pro blem. If a pro blem cannot b e corrected b y the proce dures provi ded in
this manual, have the vehicle inspecte d b y a Yamaha dealer.Before using this vehicle, check the following points:
ITEM CHECKS PAGE
Fuel • Check fuel level in fuel tank.
• Refuel if necessary.
• Check fuel line for leakage.
• Check fuel tank breather hose and overflow hose for obstructions, cracks or
damage, and check hose connections. 3-16, 3-18
En gine oil • Check oil level in engine.
• If necessary, add recommended oil to specified level.
• Check vehicle for oil leakage. 6-10
Coolant • Check coolant level in reservoir.
• If necessary, add recommended coolant to specified level.
• Check cooling system for leakage. 6-13
Front brake • Check operation.
• If soft or spongy, have Yamaha dealer bleed hydraulic system.
• Check brake pads for wear.
• Replace if necessary.
• Check fluid level in reservoir.
• If necessary, add specified brake fluid to specified level.
• Check hydraulic system for leakage. 6-20, 6-21
UB4TE0E0.book Page 1 Monday, December 9, 2019 3:53 PM
Page 45 of 98
Operation and important ri din g points
5-1
5
EAU15952
Read the Owner’s Manual carefully to
become familiar with all controls. If
there is a control or function you do not
understand, ask your Yamaha dealer.
WARNING
EWA10272
Failure to familiarize yourself with
the controls can lead to loss of con-
trol, which coul d cause an acci dent
or injury.
EAU16842
En gine break-inThere is never a more important period
in the life of your engine than the period
between 0 and 1600 km (1000 mi). For
this reason, you should read the fol-
lowing material carefully.
Since the engine is brand new, do not
put an excessive load on it for the first
1600 km (1000 mi). The various parts in
the engine wear and polish themselves
to the correct operating clearances.
During this period, prolonged full-throt-
tle operation or any condition that
might result in engine overheating
must be avoided.
EAU17094
0–1000 km (0–600 mi)
Avoid prolonged operation above 5000
r/min. NOTICE: After 1000 km (600
mi) of operation, the en gine oil must
b e chan ged an d the oil filter car-
tri dge or element replace d.
[ECA10303]
1000–1600 km (600–1000 mi)
Avoid prolonged operation above 6000
r/min. 1600 km (1000 mi) an
d b eyon d
The vehicle can now be operated nor-
mally.
NOTICE
ECA10311
Keep the en gine spee d out of
the tachometer red zone.
If any en gine trou ble shoul d oc-
cur during the en gine break-in
perio d, imme diately have a
Yamaha dealer check the vehi-
cle.
UB4TE0E0.book Page 1 Monday, December 9, 2019 3:53 PM
Page 46 of 98
Operation and important rid ing points
5-2
5
EAU86620
Startin g the eng ineThe ignition circuit cut-off system will
enable starting when:
the transmission is in the neutral
position or
the transmission is in gear, the
sidestand is up, and the clutch le-
ver is pulled.
To start the engine1. Turn the main switch on and set the engine stop switch to the run
position.
2. Confirm the indicator and warning light(s) come on for a few sec-
onds, and the go off. (See page
3-3.)TIPDo not start the engine if the en-
gine trouble warning light remains
on.
The oil pressure warning light
should come on and stay on until
the engine is started.
The ABS warning light should
come on and stay on until the ve-
hicle reaches a speed of 10 km/h
(6 mi/h).
NOTICE
ECA24110
If a warnin g or in dicator li ght does
not work as d escribed a bove, have a
Yamaha dealer check the vehicle.3. Shift the transmission into the
neutral position.
4. Start the engine by pushing the start switch.
5. Release the start switch when the engine starts, or after 5 seconds.
Wait 10 seconds before pressing
the switch again to allow battery
voltage to restore.NOTICE
ECA11043
For maximum en gine life, never ac-
celerate har d when the en gine is
col d!
EAUM3632
TIPThis model is equipped with:
a lean angle sensor. This sensor
stops the engine in case of a vehi-
cle turnover. If this happens, the
engine trouble warning light will
come on, but this is not a malfunc-
tion. Turn the vehicle power off
and then back on again to cancel
the warning light. Failing to do so
will prevent the engine from start-
ing even though the engine will
crank when pushing the start
switch.
an engine auto-stop system. The
engine stops automatically if left
idling for 20 minutes. If the engine
stops, simply push the start
switch to restart the engine.
UB4TE0E0.book Page 2 Monday, December 9, 2019 3:53 PM