check oil YAMAHA MT09 TRACER 2017 User Guide
[x] Cancel search | Manufacturer: YAMAHA, Model Year: 2017, Model line: MT09 TRACER, Model: YAMAHA MT09 TRACER 2017Pages: 114, PDF Size: 5.27 MB
Page 74 of 114
Periodic maintenance and adjustment
6-13
1
2
3
4
56
7
8
9
10
11
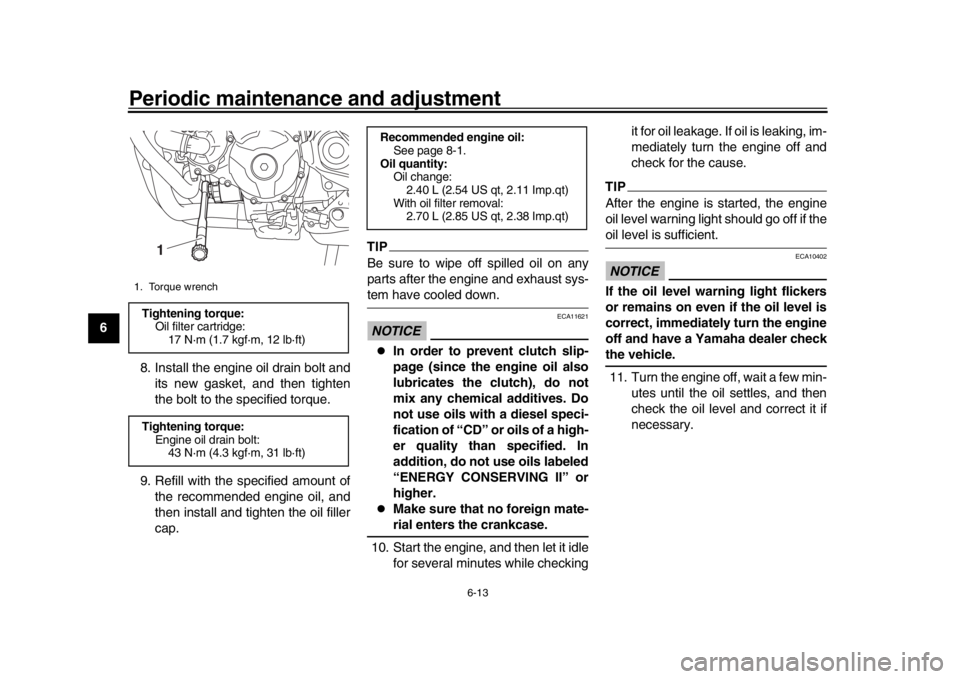
12 8. Install the engine oil drain bolt and
its new gasket, and then tighten
the bolt to the specified torque.
9. Refill with the specified amount of the recommended engine oil, and
then install and tighten the oil filler
cap.
TIPBe sure to wipe off spilled oil on any
parts after the engine and exhaust sys-tem have cooled down.NOTICE
ECA11621
In order to prevent clutch slip-
page (since the engine oil also
lubricates the clutch), do not
mix any chemical additives. Do
not use oils with a diesel speci-
fication of “CD” or oils of a high-
er quality than specified. In
addition, do not use oils labeled
“ENERGY CONSERVING II” or
higher.
Make sure that no foreign mate-rial enters the crankcase.
10. Start the engine, and then let it idle for several minutes while checking it for oil leakage. If oil is leaking, im-
mediately turn the engine off and
check for the cause.
TIPAfter the engine is started, the engine
oil level warning light should go off if theoil level is sufficient.NOTICE
ECA10402
If the oil level warning light flickers
or remains on even if the oil level is
correct, immediately turn the engine
off and have a Yamaha dealer checkthe vehicle.
11. Turn the engine off, wait a few min- utes until the oil settles, and then
check the oil level and correct it if
necessary.
1. Torque wrenchTightening torque:Oil filter cartridge:
17 N·m (1.7 kgf·m, 12 lb·ft)
Tightening torque: Engine oil drain bolt:43 N·m (4.3 kgf·m, 31 lb·ft)
1
Recommended engine oil:
See page 8-1.
Oil quantity: Oil change:
2.40 L (2.54 US qt, 2.11 Imp.qt)
With oil filter removal: 2.70 L (2.85 US qt, 2.38 Imp.qt)
2PP-9-E3.book 13 ページ 2016年9月13日 火曜日 午前9時7分
Page 85 of 114

Periodic maintenance and adjustment6-24
1
2
3
4
567
8
9
10
11
12
may deteriorate, causing leak-
age.
Refill with the same type of
brake fluid. Adding a brake fluid
other than DOT 4 may result in a
harmful chemical reaction.
Be careful that water or dust
does not enter the brake fluid
reservoir when refilling. Water
will significantly lower the boil-
ing point of the fluid and may re-
sult in vapor lock, and dirt may
clog the ABS hydraulic unitvalves.
NOTICE
ECA17641
Brake fluid may damage painted sur-
faces or plastic parts. Always cleanup spilled fluid immediately.
As the brake pads wear, it is normal for
the brake fluid level to gradually go
down. A low brake fluid level may indi-
cate worn brake pads and/or brake sys-
tem leakage; therefore, be sure to
check the brake pads for wear and the
brake system for leakage. If the brake
fluid level goes down suddenly, have a
Yamaha dealer check the cause before further riding.
EAU22733
Changing the brake fluidHave a Yamaha dealer change the
brake fluid at the intervals specified in
the periodic maintenance and lubrica-
tion chart. In addition, have the oil seals
of the master cylinders and calipers as
well as the brake hoses replaced at the
intervals listed below or whenever they
are damaged or leaking.
Oil seals: Replace every two
years.
Brake hoses: Replace every four
years.
2PP-9-E3.book 24 ページ 2016年9月13日 火曜日 午前9時7分
Page 91 of 114

Periodic maintenance and adjustment6-30
1
2
3
4
567
8
9
10
11
12
EAUM1653
Lubricating the swingarm
pivotsThe swingarm pivots must be lubricat-
ed by a Yamaha dealer at the intervals
specified in the periodic maintenance
and lubrication chart.
EAU23273
Checking the front forkThe condition and operation of the front
fork must be checked as follows at the
intervals specified in the periodic main-
tenance and lubrication chart.
To check the condition
Check the inner tubes for scratches,
damage and excessive oil leakage.
To check the operation 1. Place the vehicle on a level sur- face and hold it in an upright posi-
tion. WARNING! To avoid injury,
securely support the vehicle so
there is no danger of it falling
over.
[EWA10752]
2. While applying the front brake, push down hard on the handlebars
several times to check if the front
fork compresses and rebounds
smoothly.
NOTICE
ECA10591
If any damage is found or the front
fork does not operate smoothly,
have a Yamaha dealer check or re-pair it.
Recommended lubricant:Lithium-soap-based grease
2PP-9-E3.book 30 ページ 2016年9月13日 火曜日 午前9時7分
Page 105 of 114

Motorcycle care and storage
7-4
1
2
3
4
5
678
9
10
11
12
EAU26183
StorageShort-term
Always store your motorcycle in a cool,
dry place and, if necessary, protect it
against dust with a porous cover. Be
sure the engine and the exhaust sys-
tem are cool before covering the motor-
cycle.NOTICE
ECA10811
Storing the motorcycle in a
poorly ventilated room or cover-
ing it with a tarp, while it is still
wet, will allow water and humid-
ity to seep in and cause rust.
To prevent corrosion, avoid
damp cellars, stables (because
of the presence of ammonia)
and areas where strong chemi-cals are stored.
Long-term
Before storing your motorcycle for sev-
eral months: 1. Follow all the instructions in the “Care” section of this chapter. 2. Fill up the fuel tank and add fuel
stabilizer (if available) to prevent
the fuel tank from rusting and the
fuel from deteriorating.
3. Perform the following steps to pro- tect the cylinders, piston rings, etc.
from corrosion.
a. Remove the spark plug caps and spark plugs.
b. Pour a teaspoonful of engine oil into each spark plug bore.
c. Install the spark plug caps onto the spark plugs, and then place
the spark plugs on the cylinder
head so that the electrodes are
grounded. (This will limit spark-
ing during the next step.)
d. Turn the engine over several times with the starter. (This will
coat the cylinder walls with oil.)
WARNING! To prevent dam-
age or injury from sparking,
make sure to ground the
spark plug electrodes while
turning the engine
over.
[EWA10952]
e. Remove the spark plug capsfrom the spark plugs, and then
install the spark plugs and the spark plug caps.
4. Lubricate all control cables and the pivoting points of all levers and
pedals as well as of the sidestand/
centerstand.
5. Check and, if necessary, correct the tire air pressure, and then lift
the motorcycle so that both of its
wheels are off the ground. Alterna-
tively, turn the wheels a little every
month in order to prevent the tires
from becoming degraded in one
spot.
6. Cover the muffler outlet with a plastic bag to prevent moisture
from entering it.
7. Remove the battery and fully charge it. Store it in a cool, dry
place and charge it once a month.
Do not store the battery in an ex-
cessively cold or warm place [less
than 0 C (30 F) or more than 30
C (90 F)]. For more information
on storing the battery, see page
6-31.
TIPMake any necessary repairs beforestoring the motorcycle.
2PP-9-E3.book 4 ページ 2016年9月13日 火曜日 午前9時7分
Page 111 of 114

10-1
1
2
3
4
5
6
7
8
91011
12
Index
AABS ...................................................... 3-21
ABS warning light ................................... 3-4
Air filter element.................................... 6-17
Auxiliary DC connector ......................... 3-39
Auxiliary DC jack .................................. 3-39
Auxiliary lights....................................... 6-35BBattery .................................................. 6-31
Brake and clutch levers, checking and lubricating .................................... 6-28
Brake and shift pedals, checking and lubricating .................................... 6-28
Brake fluid, changing ............................ 6-24
Brake fluid level, checking .................... 6-23
Brake lever ........................................... 3-20
Brake lever free play, checking ............ 6-21
Brake light switches .............................. 6-22
Brake pedal .......................................... 3-21
Brake/tail light ....................................... 6-36CCables, checking and lubricating .......... 6-27
Canister ................................................ 6-11
Care ........................................................ 7-1
Catalytic converter ................................ 3-27
Centerstand and sidestand, checking and lubricating ..................... 6-29
Clutch lever........................................... 3-20
Clutch lever free play, adjusting ........... 6-21
Coolant ................................................. 6-14DData recording, vehicle ........................... 9-2
Diagnostic connecto r .............................. 9-2
Dimmer/Pass switch ............................. 3-18 D-mode (drive mode) ............................ 3-17
Drive chain, cleaning
and lubricating .... 6-26
Drive chain slack ................................... 6-25
EEngine break-in ....................................... 5-3
Engine idling speed, checking............... 6-17
Engine oil and oil filter cartridge ............ 6-11
Engine serial number ..............................9-1
Engine trouble warning light .................... 3-4FFront and rear brake pads, checking .... 6-22
Front fork, adjusting .............................. 3-33
Front fork, checking............................... 6-30
Fuel ....................................................... 3-25
Fuel consumption, tips for reducing ........5-3
Fuel tank cap......................................... 3-24
Fuel tank overflow hose ........................ 3-27
Fuses, replacing .................................... 6-33HHandlebar position, adjusting ................ 3-33
Handlebar switches ............................... 3-18
Hazard switch........................................ 3-19
Headlight beams, adjusting ................... 3-33
Headlights ............................................. 6-35
Helmet holder ........................................ 3-31
High beam indicator light .........................3-4
Horn switch ........................................... 3-19IIdentification numbers .............................9-1
Ignition circuit cut-off system ................. 3-37
Immobilizer system ................................. 3-1
Immobilizer system indicator light ........... 3-5
Indicator lights and warning lights ........... 3-4
LLicense plate light bul b, replacing......... 6-37
Luggage strap holders .......................... 3-36MMain switch/steering lock ........................ 3-2
Maintenance and lubrication, periodic .... 6-5
Maintenance, emission control system ... 6-3
Matte color, caution ................................ 7-1
Menu switch .......................................... 3-19
Model label ............................................. 9-2
Multi-function meter unit ......................... 3-6NNeutral indicator light .............................. 3-4OOil level warning light .............................. 3-4PPanel, removing and installing ................ 6-9
Parking.................................................... 5-4
Part locations .......................................... 2-1RRider seat height, adjusting .................. 3-29SSafety information ................................... 1-1
Seats..................................................... 3-28
Select switch ......................................... 3-19
Shifting .................................................... 5-2
Shift pedal ............................................. 3-20
Shock absorber assembly, adjusting .... 3-35
Sidestand .............................................. 3-37
Spark plugs, checking ........................... 6-10
Specifications.......................................... 8-1
Starting the engine.................................. 5-1
Steering, checking ................................ 6-31
Stop/Run/Start switch ........................... 3-19
2PP-9-E3.book 1 ページ 2016年9月13日 火曜日 午前9時7分