ECO mode YAMAHA MT09 TRACER 2017 Owners Manual
[x] Cancel search | Manufacturer: YAMAHA, Model Year: 2017, Model line: MT09 TRACER, Model: YAMAHA MT09 TRACER 2017Pages: 114, PDF Size: 5.27 MB
Page 2 of 114
EAU70071
Read this manual carefully before operating this vehicle. This manual should stay with this vehicle if it is sold.
Date of issue:
Signature of Responsible Person:April 28, 2016
Product: IMMOBILIZER
Model: 1RC-00
Supplied by
YAMAHA MOTOR ELECTRONICS
CO.,LTD.
1450-6 Mori, Mori-machi Shuchi-gun
Shizuoka 437-0292 Japan
EN 60950-1: 2006 + Amd.11:2009 + Amd.1:2010 +
Amd.12: 2011 + Amd.2:2013
EN 62479: 2010
Hiroshi Kamiiizaka
GENERAL MANAGER
QUALITY ASSURANCE DIV. 97/24/EC from 17.06.1997
EN 300 330-1 V1.8.1
EN 300 330-2 V1.6.1
Technical Construction File held by
YAMAHA MOTOR ELECTRONICS
CO.,LTD.
1450-6 Mori, Mori-machi Shuchi-gun
Shizuoka 437-0292 Japan
R&TTE Directive
(Article 3.1(a) Safety)
R&TTE Directive
(Article 3.1(b) EMC)
R&TTE Directive
(Article 3.2 Spectrum)
DECLARATION of CONFORMITY For
YAMAHA MOTOR ELECTRONICS CO., LTD.1450-6, Mori, Mori-machi, Shuchi-gun, Shizuoka-ken, 437-0292 Japan
Standard used for comply
Means of Conformity
We declare under our sole responsibility that the Product (s) is confor\
mity with the essential requirements and other relevant requirements of the
Radio and Telecommunication Terminal Equipment (R&TTE) Directive (1999/5/EC).
Page 21 of 114
Instrument and control functions
3-6
1
234
5
6
7
8
9
10
11
12
initially when the key is turned to “ON”,
if the indicator light remains on, or if the
indicator light flashes in a pattern (if a
problem is detected in the immobilizer
system, the immobili
zer system indica-
tor light will flash in a pattern), have a
Yamaha dealer check the vehicle.
TIPIf the immobilizer system indicator light
flashes in the pattern, slowly 5 times
then quickly 2 times, this could be
caused by transponder interference. Ifthis occurs, try the following.
1. Make sure there are no other im- mobilizer keys close to the main
switch. Other immobilizer system
keys may cause signal interfer-
ence and prevent the engine from
starting.
2. Use the code re-registering key to start the engine.
3. If the engine starts, turn it off, and try starting the engine with the
standard keys.
4. If one or both of the standard keys do not start the engine, take the
vehicle and all 3 keys to a Yamaha
dealer to have the standard keys re-registered.
EAU76322
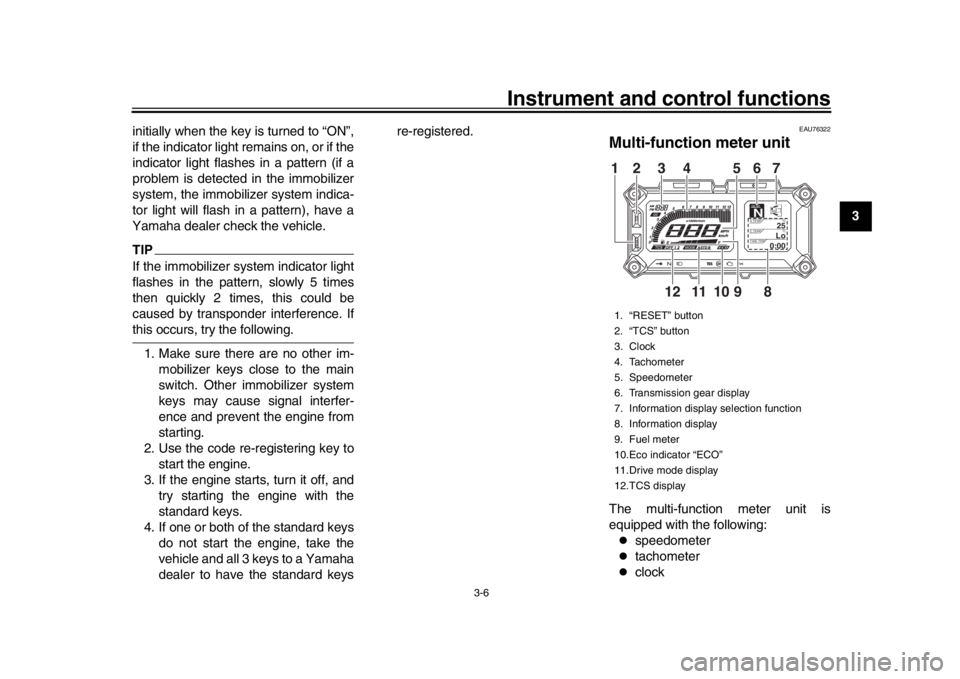
Multi-function meter unitThe multi-function meter unit is
equipped with the following:
speedometer
tachometer
clock
1. “RESET” button
2. “TCS” button
3. Clock
4. Tachometer
5. Speedometer
6. Transmission gear display
7. Information display selection function
8. Information display
9. Fuel meter
10.Eco indicator “ECO”
11.Drive mode display
12.TCS display
GEARN
25
A.TEMP
°C
Lo
C.TEMP°C
0:00
TIME TRIP
89
10
11
12
12 3 4 56
7
2PP-9-E3.book 6 ページ 2016年9月13日 火曜日 午前9時7分
Page 22 of 114
Instrument and control functions
3-7
1
23
4
5
6
7
8
9
10
11
12
fuel meter
eco indicator
transmission gear display
drive mode display
TCS display
information display
setting mode displayWARNING
EWA12423
Be sure to stop the vehicle before
making any setting changes to the
multi-function meter unit. Changing
settings while riding can distract the
operator and increase the risk of anaccident.TIP
The select switch “ / ” and the
menu switch “MENU” are located
on the left handlebar. These
switches allow you to control or
change the settings of the
multi-function meter unit.
QS requires an accessory part and
cannot be selected.
The key must be turned to “ON”
before you can use the handlebarswitches and buttons. Speedometer
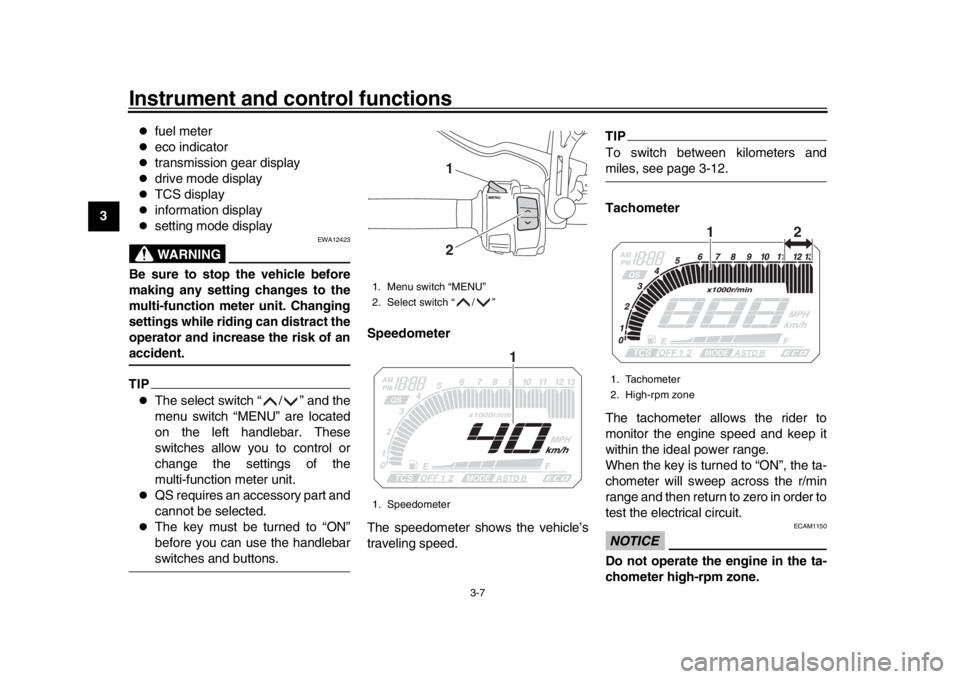
The speedometer shows the vehicle’s
traveling speed.
TIPTo switch between kilometers andmiles, see page 3-12.
Tachometer
The tachometer allows the rider to
monitor the engine speed and keep it
within the ideal power range.
When the key is turned to “ON”, the ta-
chometer will sweep across the r/min
range and then return to zero in order to
test the electrical circuit.NOTICE
ECAM1150
Do not operate the engine in the ta-
chometer high-rpm zone.
1. Menu switch “MENU”
2. Select switch “ / ”
1. Speedometer
12
1
1. Tachometer
2. High-rpm zone
12
2PP-9-E3.book 7 ページ 2016年9月13日 火曜日 午前9時7分
Page 25 of 114
Instrument and control functions
3-10
1
234
5
6
7
8
9
10
11
12
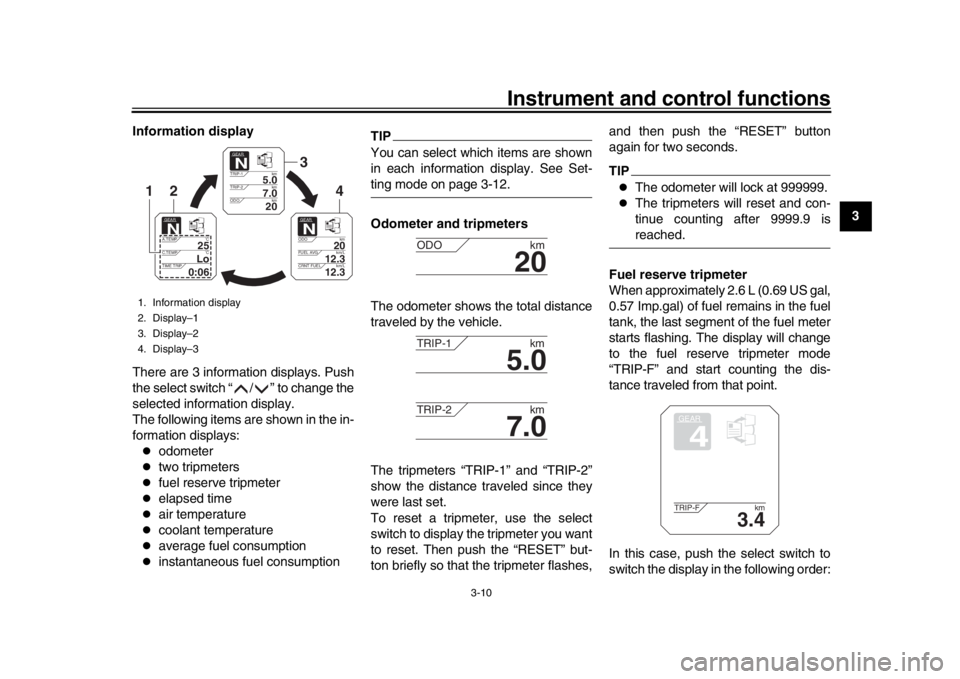
Information display
There are 3 information displays. Push
the select switch “ / ” to change the
selected information display.
The following items are shown in the in-
formation displays:
odometer
two tripmeters
fuel reserve tripmeter
elapsed time
air temperature
coolant temperature
average fuel consumption
instantaneous fuel consumption
TIPYou can select which items are shown
in each information display. See Set-ting mode on page 3-12.
Odometer and tripmeters
The odometer shows the total distance
traveled by the vehicle.
The tripmeters “TRIP-1” and “TRIP-2”
show the distance traveled since they
were last set.
To reset a tripmeter, use the select
switch to display the tripmeter you want
to reset. Then push the “RESET” but-
ton briefly so that the tripmeter flashes, and then push the “RESET” button
again for two seconds.
TIP
The odometer will lock at 999999.
The tripmeters will reset and con-
tinue counting after 9999.9 isreached.
Fuel reserve tripmeter
When approximately 2.6 L (0.69 US gal,
0.57 Imp.gal) of fuel remains in the fuel
tank, the last segment of the fuel meter
starts flashing. The display will change
to the fuel reserve tripmeter mode
“TRIP-F” and start counting the dis-
tance traveled from that point.
In this case, push the select switch to
switch the display in the following order:
1. Information display
2. Display–1
3. Display–2
4. Display–3
GEARN
5.0
TRIP-1 km
7.0
TRIP-2km
km
20
ODO
GEARN
20
ODO km
12.3
FUEL AVG km/L
km/L
12.3
CRNT FUEL
GEARN
25
A.TEMP ˚C
Lo
C.TEMP˚C
0:06
TIME TRIP
3
4
2
1
20
ODOkm
5.0
TRIP-1km
7.0
TRIP-2km
GEAR4
3.4
TRIP-Fkm
2PP-9-E3.book 10 ページ 2016年9月13日 火曜日 午前9時7分
Page 27 of 114
Instrument and control functions
3-12
1
234
5
6
7
8
9
10
11
12
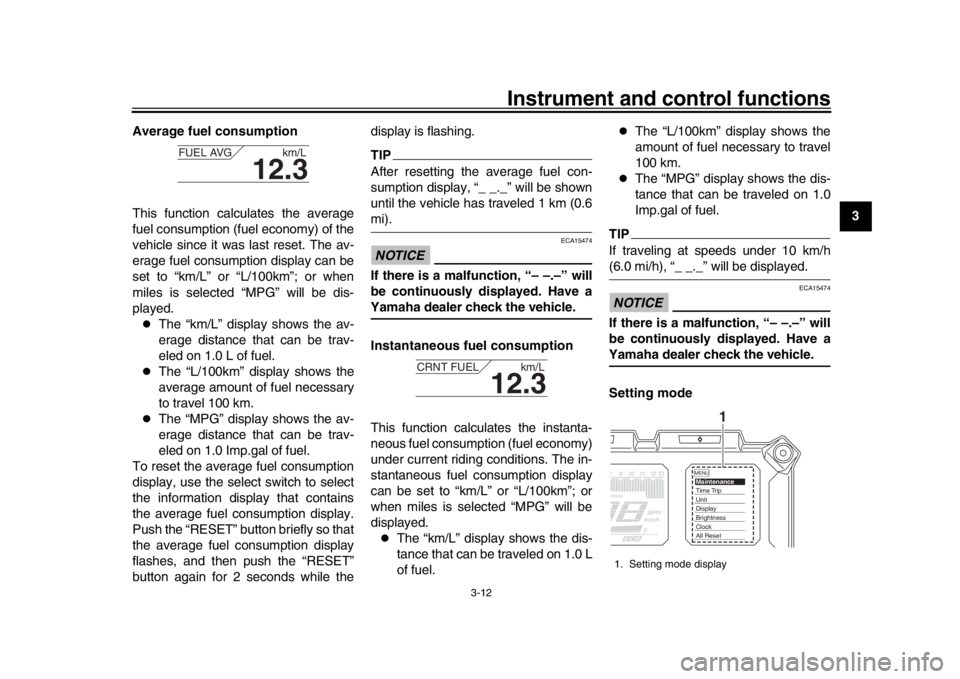
Average fuel consumption
This function calculates the average
fuel consumption (fuel economy) of the
vehicle since it was last reset. The av-
erage fuel consumption display can be
set to “km/L” or “L/100km”; or when
miles is selected “MPG” will be dis-
played.
The “km/L” display shows the av-
erage distance that can be trav-
eled on 1.0 L of fuel.
The “L/100km” display shows the
average amount of fuel necessary
to travel 100 km.
The “MPG” display shows the av-
erage distance that can be trav-
eled on 1.0 Imp.gal of fuel.
To reset the average fuel consumption
display, use the select switch to select
the information display that contains
the average fuel consumption display.
Push the “RESET” button briefly so that
the average fuel consumption display
flashes, and then push the “RESET”
button again for 2 seconds while the display is flashing.
TIPAfter resetting the average fuel con-
sumption display, “_ _._” will be shown
until the vehicle has traveled 1 km (0.6mi).NOTICE
ECA15474
If there is a malfunction, “– –.–” will
be continuously displayed. Have aYamaha dealer check the vehicle.
Instantaneous fuel consumption
This function calculates the instanta-
neous fuel consumption (fuel economy)
under current riding conditions. The in-
stantaneous fuel consumption display
can be set to “km/L” or “L/100km”; or
when miles is selected “MPG” will be
displayed.
The “km/L” display shows the dis-
tance that can be traveled on 1.0 L
of fuel.
The “L/100km” display shows the
amount of fuel necessary to travel
100 km.
The “MPG” display shows the dis-
tance that can be traveled on 1.0
Imp.gal of fuel.
TIPIf traveling at speeds under 10 km/h(6.0 mi/h), “_ _._” will be displayed.NOTICE
ECA15474
If there is a malfunction, “– –.–” will
be continuously displayed. Have aYamaha dealer check the vehicle.
Setting mode
12.3
FUEL AVG km/L
12.3
CRNT FUEL km/L
1. Setting mode display
MENUMaintenanceTime TripUnitDisplayBrightnessClockAll Reset
1
2PP-9-E3.book 12 ページ 2016年9月13日 火曜日 午前9時7分
Page 28 of 114
Instrument and control functions
3-13
1
23
4
5
6
7
8
9
10
11
12 This mode allows you to set, select, or
reset the items shown in the informa-
tion display.
TIP
The transmission must be in neu-
tral and the vehicle must be
stopped to change settings in this
mode.
Shifting the transmission into gear
or turning the key to “OFF” will exit
the setting mode and all changeswill be saved.
Push and hold the menu switch
“MENU” for 2 seconds to enter the set-
ting mode. To exit the setting mode and
return to the normal display, push and
hold the menu switch again for 2 sec-
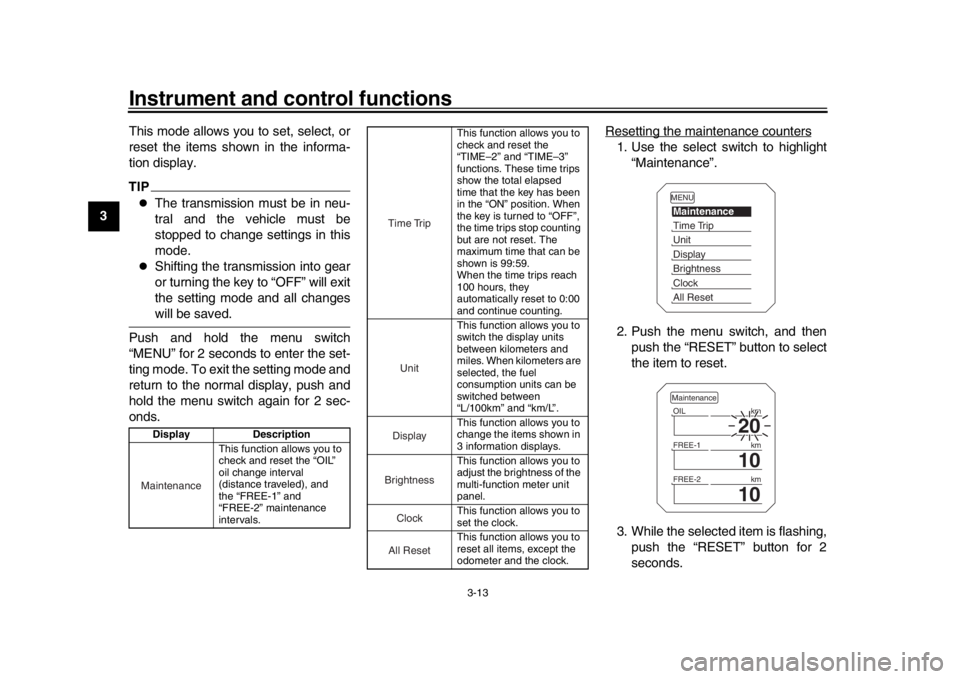
onds. Resetting the maintenance counters
1. Use the select switch to highlight
“Maintenance”.
2. Push the menu switch, and then push the “RESET” button to select
the item to reset.
3. While the selected item is flashing, push the “RESET” button for 2
seconds.
Display Description
This function allows you to
check and reset the “OIL”
oil change interval
(distance traveled), and
the “FREE-1” and
“FREE-2” maintenance
intervals.Maintenance
This function allows you to
check and reset the
“TIME–2” and “TIME–3”
functions. These time trips
show the total elapsed
time that the key has been
in the “ON” position. When
the key is turned to “OFF”,
the time trips stop counting
but are not reset. The
maximum time that can be
shown is 99:59.
When the time trips reach
100 hours, they
automatically reset to 0:00
and continue counting.
This function allows you to
switch the display units
between kilometers and
miles. When kilometers are
selected, the fuel
consumption units can be
switched between
“L/100km” and “km/L”.
This function allows you to
change the items shown in
3 information displays.
This function allows you to
adjust the brightness of the
multi-function meter unit
panel.
This function allows you to
set the clock.
This function allows you to
reset all items, except the
odometer and the clock.
Time TripUnitDisplayBrightnessCloc
k
All Reset
MENUMaintenanceTime TripUnitDisplayBrightnessClockAll Reset
20
OIL km
10
FREE-1 km
10
FREE-2kmMaintenance
2PP-9-E3.book 13 ページ 2016年9月13日 火曜日 午前9時7分
Page 29 of 114
Instrument and control functions
3-14
1
234
5
6
7
8
9
10
11
12
4. Push the menu switch to return to
the setting mode menu.
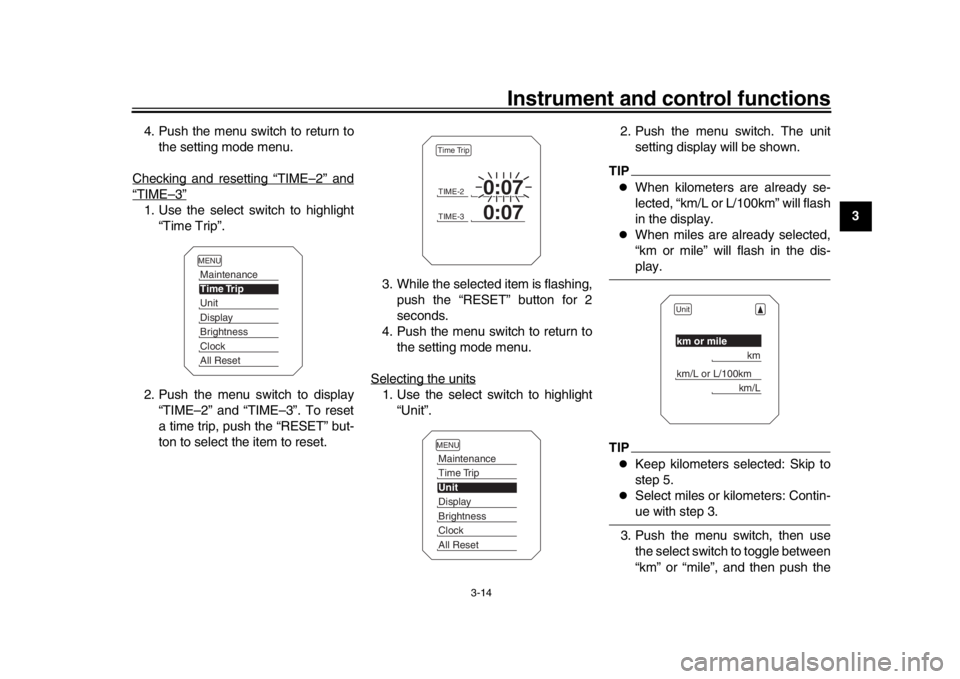
Checking and resetting “TIME
–2” and
“TIME
–3”
1. Use the select switch to highlight “Time Trip”.
2. Push the menu switch to display “TIME–2” and “TIME–3”. To reset
a time trip, push the “RESET” but-
ton to select the item to reset. 3. While the selected item is flashing,
push the “RESET” button for 2
seconds.
4. Push the menu switch to return to the setting mode menu.
Selecting the units
1. Use the select switch to highlight “Unit”. 2. Push the menu switch. The unit
setting display will be shown.
TIP
When kilometers are already se-
lected, “km/L or L/100km” will flash
in the display.
When miles are already selected,
“km or mile” will flash in the dis-play.
TIP
Keep kilometers selected: Skip to
step 5.
Select miles or kilometers: Contin-ue with step 3.
3. Push the menu switch, then use the select switch to toggle between
“km” or “mile”, and then push the
MENUMaintenanceTime TripUnitDisplayBrightnessClockAll Reset
TIME-2
0:07
TIME-3
0:07
Time TripMENUMaintenanceTime TripUnitDisplayBrightnessClockAll Reset
Unitkm or mile
km
km/L or L/100km
km/L
2PP-9-E3.book 14 ページ 2016年9月13日 火曜日 午前9時7分
Page 58 of 114
5-1
1
2
3
45
6
7
8
9
10
11
12
Operation and important riding points
EAU15952
Read the Owner’s Manual carefully to
become familiar with all controls. If
there is a control or function you do not
understand, ask your Yamaha dealer.
WARNING
EWA10272
Failure to familiarize yourself with
the controls can lead to loss of con-
trol, which could cause an accidentor injury.
EAUM3631
TIPThis model is equipped with:
a lean angle sensor to stop the en-
gine in case of a turnover. In this
case, the engine trouble warning
light will come on, but this is not a
malfunction. Turn the key to “OFF”
and then to “ON” to turn off the
warning light. Failing to do so will
prevent the engine from starting
even though the engine will crank
when pushing the start switch.
an engine auto-stop system. The
engine stops automatically if left
idling for 20 minutes. If the engine
stops, simply push the start switchto restart the engine.
EAU73430
Starting the engineIn order for the ignition circuit cut-off
system to enable starting, one of the
following conditions must be met:
The transmission is in the neutral
position.
The transmission is in gear with
the clutch lever pulled and the sid-
estand up.
See page 3-37 for more informa-
tion.
1. Turn the key to “ON” and make sure that the start/engine stop
switch is set to “ ”.
The following warning lights and
indicator light should come on for a
few seconds, then go off.
Oil level warning light
Coolant temperature warning
light
Engine trouble warning light
Immobilizer system indicator
light
NOTICE
ECA17671
If the above warning lights or indica-
tor light do not come on initially
when the key is turned to “ON”, or if
2PP-9-E3.book 1 ページ 2016年9月13日 火曜日 午前9時7分
Page 72 of 114
Periodic maintenance and adjustment
6-11
1
2
3
4
56
7
8
9
10
11
12
EAU36112
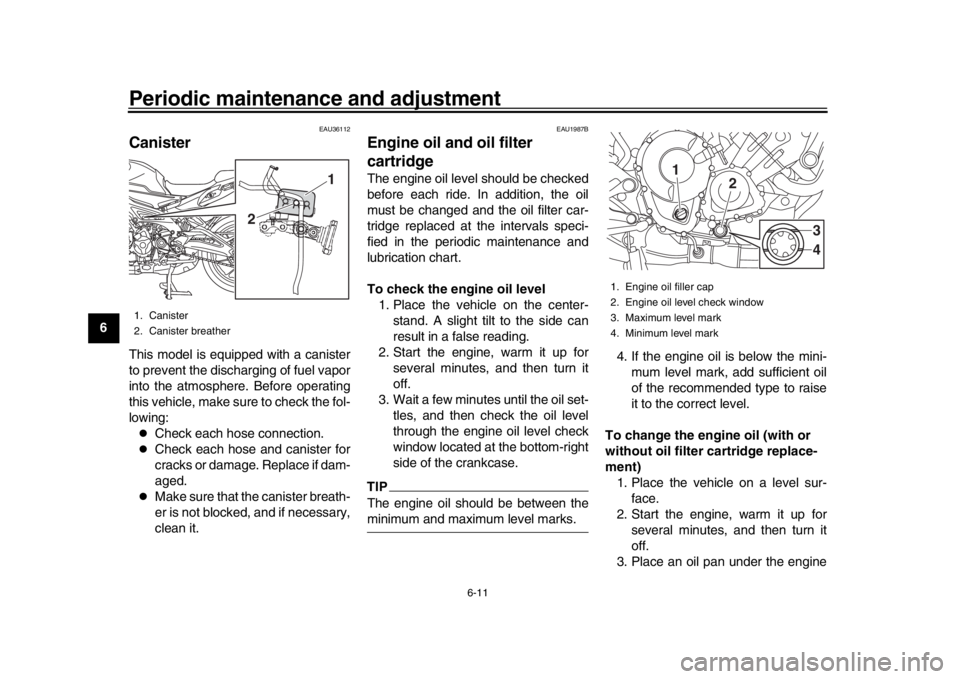
CanisterThis model is equipped with a canister
to prevent the discharging of fuel vapor
into the atmosphere. Before operating
this vehicle, make sure to check the fol-
lowing:
Check each hose connection.
Check each hose and canister for
cracks or damage. Replace if dam-
aged.
Make sure that the canister breath-
er is not blocked, and if necessary,
clean it.
EAU1987B
Engine oil and oil filter
cartridgeThe engine oil level should be checked
before each ride. In addition, the oil
must be changed and the oil filter car-
tridge replaced at the intervals speci-
fied in the periodic maintenance and
lubrication chart.
To check the engine oil level 1. Place the vehicle on the center- stand. A slight tilt to the side can
result in a false reading.
2. Start the engine, warm it up for several minutes, and then turn it
off.
3. Wait a few minutes until the oil set- tles, and then check the oil level
through the engine oil level check
window located at the bottom-right
side of the crankcase.TIPThe engine oil should be between theminimum and maximum level marks. 4. If the engine oil is below the mini-
mum level mark, add sufficient oil
of the recommended type to raise
it to the correct level.
To change the engine oil (with or
without oil filter cartridge replace-
ment) 1. Place the vehicle on a level sur- face.
2. Start the engine, warm it up for several minutes, and then turn it
off.
3. Place an oil pan under the engine
1. Canister
2. Canister breather
1
2
1. Engine oil filler cap
2. Engine oil level check window
3. Maximum level mark
4. Minimum level mark
1
2
34
2PP-9-E3.book 11 ページ 2016年9月13日 火曜日 午前9時7分
Page 106 of 114

8-1
1
2
3
4
5
6
78
9
10
11
12
Specifications
EAU69997
Dimensions:Overall length: 2160 mm (85.0 in)
Overall width: 950 mm (37.4 in)
Overall height: 1345/1375 mm (53.0/54.1 in)
Seat height:
845/860 mm (33.3/33.9 in)
Wheelbase: 1440 mm (56.7 in)
Ground clearance: 135 mm (5.31 in)
Minimum turning radius:
3.0 m (9.84 ft)Weight:Curb weight:210 kg (463 lb)Engine:Combustion cycle:4-stroke
Cooling system: Liquid cooled
Valve train:
DOHC
Cylinder arrangement: Inline
Number of cylinders: 3-cylinder
Displacement:
847 cm
3
Bore stroke:
78.0 59.1 mm (3.07 2.33 in) Compression ratio:
11.5 : 1
Starting system:
Electric starter
Lubrication system: Wet sump
Engine oil:Recommended brand:
YAMALUBE
SAE viscosity grades: 10W-40
Recommended engine oil grade: API service SG type or higher, JASO stan-
dard MA
Engine oil quantity: Oil change: 2.40 L (2.54 US qt, 2.11 Imp.qt)
With oil filter removal: 2.70 L (2.85 US qt, 2.38 Imp.qt)Coolant quantity:Coolant reservoir (up to the maximum level
mark):0.25 L (0.26 US qt, 0.22 Imp.qt)
Radiator (including all routes): 1.93 L (2.04 US qt, 1.70 Imp.qt)Air filter:Air filter element:
Oil-coated paper elementFuel:Recommended fuel:Premium unleaded gasoline (Gasohol
[E10] acceptable)
Fuel tank capacity: 18 L (4.8 US gal, 4.0 Imp.gal) Fuel reserve amount:
2.6 L (0.69 US gal, 0.57 Imp.gal)
Fuel injection:Throttle body:ID mark:
B901 00Spark plug(s):Manufacturer/model:NGK/CPR9EA9
Spark plug gap:
0.8–0.9 mm (0.031–0.035 in)Clutch:Clutch type:Wet, multiple-discDrivetrain:Primary reduction ratio:1.681 (79/47)
Final drive: Chain
Secondary reduction ratio:
2.813 (45/16)
Transmission type: Constant mesh 6-speed
Gear ratio: 1st: 2.667 (40/15)
2nd: 2.000 (38/19)
3rd:
1.619 (34/21)
4th: 1.381 (29/21)
5th: 1.190 (25/21)
2PP-9-E3.book 1 ページ 2016年9月13日 火曜日 午前9時7分