check engine YAMAHA MT09 TRACER 2017 Owners Manual
[x] Cancel search | Manufacturer: YAMAHA, Model Year: 2017, Model line: MT09 TRACER, Model: YAMAHA MT09 TRACER 2017Pages: 114, PDF Size: 5.27 MB
Page 6 of 114

Table of contentsSafety information........................... 1-1
Description ....................................... 2-1
Left view ......................................... 2-1
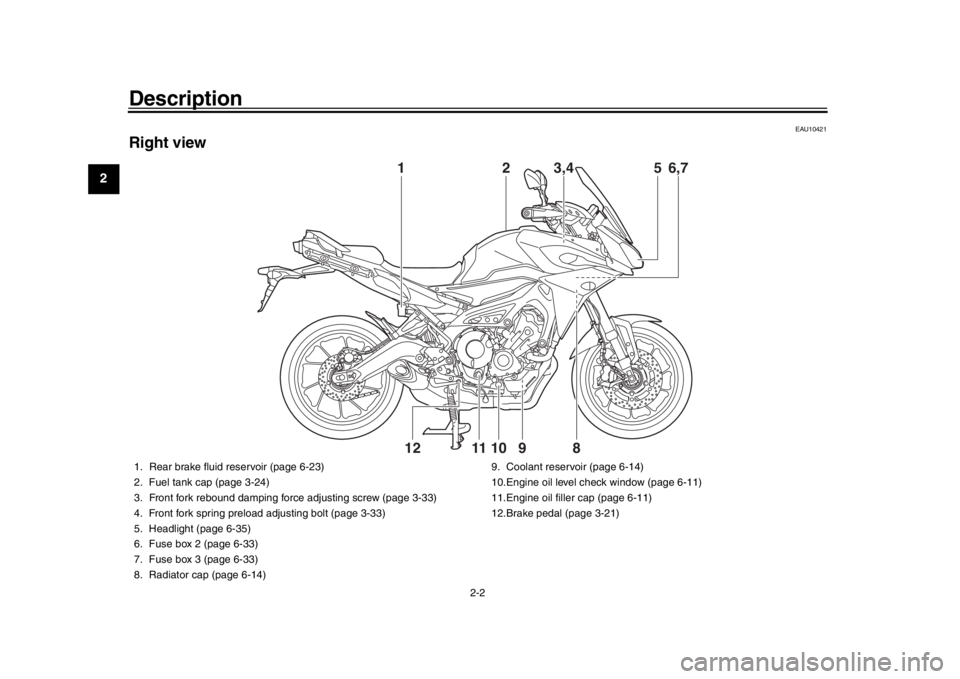
Right view ....................................... 2-2
Controls and instruments................ 2-3
Instrument and co ntrol functions... 3-1
Immobilizer system ..... .................... 3-1
Main switch/steering lock................ 3-2
Indicator lights and warning
lights ............................................ 3-4
Multi-function meter unit ................. 3-6
D-mode (drive mode).................... 3-17
Handlebar switches ...................... 3-18
Clutch lever................................... 3-20
Shift pedal..... ............................ .... 3-20
Brake lever ................................... 3-20
Brake pedal .................................. 3-21
ABS .............................................. 3-21
Traction control syst em ................ 3-22
Fuel tank cap ................................ 3-24
Fuel............................................... 3-25
Fuel tank overflow hose................ 3-27
Catalytic converter ........................ 3-27
Seats ............................................ 3-28
Adjusting the rider seat height ...... 3-29
Helmet holder ............................... 3-31
Storage compartment ................... 3-32
Windshield .................................... 3-32
Adjusting the headlight beams ..... 3-33 Handlebar position ...................... 3-33
Adjusting the front fork ................. 3-33
Adjusting the shock absorber
assembly................................... 3-35
Luggage strap holders . ................ 3-36
Sidestand ..................................... 3-37
Ignition circuit cut- off system ........ 3-37
Auxiliary DC jack .......................... 3-39
Auxiliary DC connector................. 3-39
For your safety – pre-operation
checks .............................................. 4-1
Operation and important riding
points ................................................ 5-1
Starting the engine ......................... 5-1
Shifting ........................................... 5-2
Tips for reducing fuel consumption ............................... 5-3
Engine break-in .............................. 5-3
Parking ........................................... 5-4
Periodic maintenance and
adjustment ....................................... 6-1
Owner’s tool kit............................... 6-2
Periodic maintenance chart for the emission control system ....... 6-3
General maintenance and
lubrication chart .......................... 6-5
Removing and installing the panel ........................................... 6-9 Checking the spark plugs ............ 6-10
Canister ....................................... 6-11
Engine oil and oil filt
er cartridge... 6-11
Coolant ........................................ 6-14
Air filter element ........................... 6-17
Checking the engine idling speed............ ............................ 6-17
Checking the throttle grip free
play ........................................... 6-17
Valve clearance ........................... 6-18
Tires ............................................. 6-18
Cast wheels ................................. 6-20
Adjusting the clutch lever free play ........................................... 6-21
Checking the brake lever free play ........................................... 6-21
Brake light switches ..................... 6-22
Checking the front and rear brake pads................................ 6-22
Checking the brake fluid level ...... 6-23
Changing the brake fluid .............. 6-24
Drive chain slack.......................... 6-25
Cleaning and lubricating the
drive chain ................................ 6-26
Checking and lubricating the
cables ....................................... 6-27
Checking and lubricating the throttle grip and cable ............... 6-27
Checking and lubricating the brake and shift pedals .............. 6-282PP-9-E3.book 1 ページ 2016年9月13日 火曜日 午前9時7分
Page 10 of 114

Safety information
1-3
1
2
3
4
5
6
7
8
9
10
11
12 MENT.
Do not run engine indoors. Even if
you try to ventilate engine exhaust
with fans or open windows and
doors, carbon monoxide can rap-
idly reach dangerous levels.
Do not run engine in poorly venti-
lated or partially enclosed areas
such as barns, garages, or car-
ports.
Do not run engine outdoors where
engine exhaust can be drawn into
a building through openings such
as windows and doors.
Loading
Adding accessories or cargo to your
motorcycle can adversely affect stabili-
ty and handling if the weight distribution
of the motorcycle is changed. To avoid
the possibility of an accident, use ex-
treme caution when adding cargo or
accessories to your motorcycle. Use
extra care when riding a motorcycle
that has added cargo or accessories.
Here, along with the information about
accessories below, are some general
guidelines to follow if loading cargo to
your motorcycle: The total weight of the operator, pas-
senger, accessories and cargo must
not exceed the maximum load limit.
Operation of an overloaded vehicle
could cause an accident.
When loading within this weight limit,
keep the following in mind:
Cargo and accessory weight
should be kept as low and close to
the motorcycle as possible. Se-
curely pack your heaviest items as
close to the center of the vehicle as
possible and make sure to distrib-
ute the weight as evenly as possi-
ble on both sides of the motorcycle
to minimize imbalance or instabili-
ty.
Shifting weights can create a sud-
den imbalance. Make sure that ac-
cessories and cargo are securely
attached to the motorcycle before
riding. Check accessory mounts
and cargo restraints frequently.
Properly adjust the suspension
for your load (suspension-ad- justable models only), and
check the condition and pres-
sure of your tires.
Never attach any large or heavy items to the handlebar, front
fork, or front fender. These
items, including such cargo as
sleeping bags, duffel bags, or
tents, can create unstable han-
dling or a slow steering re-
sponse.
This vehicle is not designed to
pull a trailer or to be attached to
a sidecar.
Genuine Yamaha Accessories
Choosing accessories for your vehicle
is an important decision. Genuine
Yamaha accessories, which are avail-
able only from a Yamaha dealer, have
been designed, tested, and approved
by Yamaha for use on your vehicle.
Many companies with no connection to
Yamaha manufacture parts and acces-
sories or offer other modifications for
Yamaha vehicles. Yamaha is not in a
position to test the products that these
aftermarket companies produce.
Therefore, Yamaha can neither en-
Maximum load: 180 kg (397 lb)
2PP-9-E3.book 3 ページ 2016年9月13日 火曜日 午前9時7分
Page 14 of 114
Description
2-2
12
3
4
5
6
7
8
9
10
11
12
EAU10421
Right view
1
5
6,7
2
8
9
10
11
12
3,4
1. Rear brake fluid reservoir (page 6-23)
2. Fuel tank cap (page 3-24)
3. Front fork rebound damping force adjusting screw (page 3-33)
4. Front fork spring preload adjusting bolt (page 3-33)
5. Headlight (page 6-35)
6. Fuse box 2 (page 6-33)
7. Fuse box 3 (page 6-33)
8. Radiator cap (page 6-14) 9. Coolant reservoir (page 6-14)
10.Engine oil level check window (page 6-11)
11.Engine oil fill
er cap (page 6-11)
12.Brake pedal (page 3-21)
2PP-9-E3.book 2 ページ 2016年9月13日 火曜日 午前9時7分
Page 19 of 114
Instrument and control functions
3-4
1
234
5
6
7
8
9
10
11
12
EAU4939B
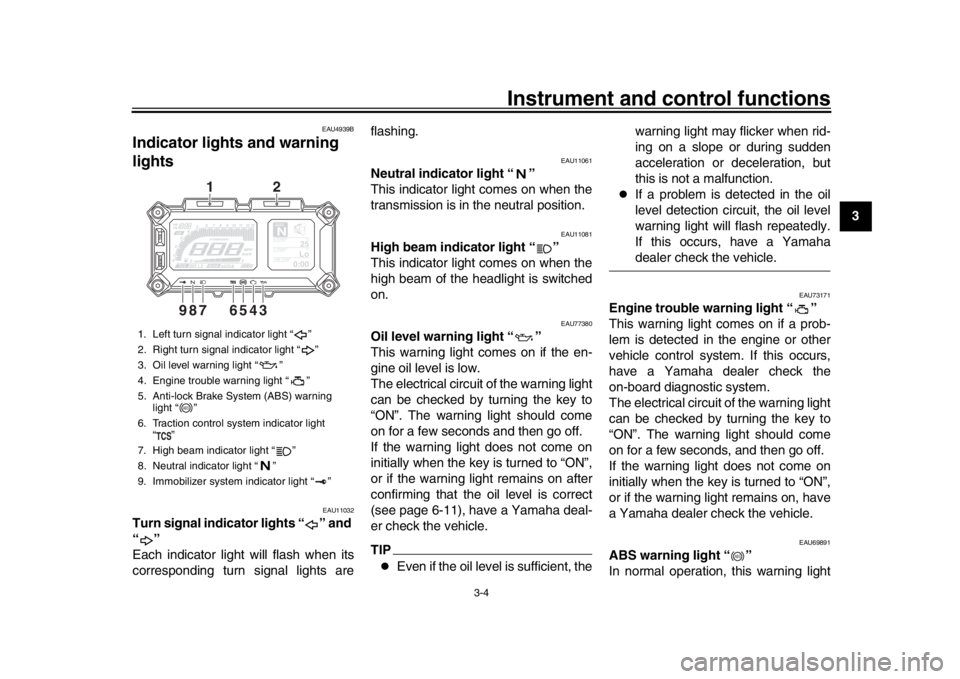
Indicator lights and warning
lights
EAU11032
Turn signal indicator lights “ ” and
“”
Each indicator light will flash when its
corresponding turn signal lights are flashing.
EAU11061
Neutral indicator light “ ”
This indicator light comes on when the
transmission is in the neutral position.
EAU11081
High beam indicator light “ ”
This indicator light comes on when the
high beam of the headlight is switched
on.
EAU77380
Oil level warning light “ ”
This warning light comes on if the en-
gine oil level is low.
The electrical circuit of the warning light
can be checked by turning the key to
“ON”. The warning light should come
on for a few seconds and then go off.
If the warning light does not come on
initially when the key is turned to “ON”,
or if the warning light remains on after
confirming that the oil level is correct
(see page 6-11), have a Yamaha deal-
er check the vehicle.TIP
Even if the oil level is sufficient, the
warning light may flicker when rid-
ing on a slope or during sudden
acceleration or deceleration, but
this is not a malfunction.
If a problem is detected in the oil
level detection circuit, the oil level
warning light will flash repeatedly.
If this occurs, have a Yamahadealer check the vehicle.
EAU73171
Engine trouble warning light “ ”
This warning light comes on if a prob-
lem is detected in the engine or other
vehicle control system. If this occurs,
have a Yamaha dealer check the
on-board diagnostic system.
The electrical circuit of the warning light
can be checked by turning the key to
“ON”. The warning light should come
on for a few seconds, and then go off.
If the warning light does not come on
initially when the key is turned to “ON”,
or if the warning light remains on, have
a Yamaha dealer check the vehicle.
EAU69891
ABS warning light “ ”
In normal operation, this warning light
1. Left turn signal indicator light “ ”
2. Right turn signal indicator light “ ”
3. Oil level warning light “ ”
4. Engine trouble warning light “ ”
5. Anti-lock Brake System (ABS) warning
light “ ”
6. Traction control system indicator light “”
7. High beam indicator light “ ”
8. Neutral indicator light “ ”
9. Immobilizer system indicator light “ ”
GEARN
25
A.TEMP °C
Lo
C.TEMP°C
0:00
TIME TRIP
3456
789
1
2
ABS
ABS
2PP-9-E3.book 4 ページ 2016年9月13日 火曜日 午前9時7分
Page 20 of 114
Instrument and control functions
3-5
1
23
4
5
6
7
8
9
10
11
12 comes on when the key is turned to
“ON”, and goes off after traveling at a
speed of 10 km/h (6 mi/h) or higher.
If the ABS warning light:
does not come on when the key is
turned to “ON”
comes on or flashes while riding
does not go off after traveling at a
speed of 10 km/h (6 mi/h) or higher
The ABS may not work correctly. If any
of the above occurs, have a Yamaha
dealer check the system as soon as
possible. (See page 3-21 for an expla-
nation of the ABS.)WARNING
EWA16041
If the ABS warning light does not go
off after traveling at a speed of 10
km/h (6 mi/h) or higher, or if the
warning light comes on or flashes
while riding, the brake system re-
verts to conventional braking. If ei-
ther of the above occurs, or if the
warning light does not come on at
all, use extra caution to avoid possi-
ble wheel lock during emergency
braking. Have a Yamaha dealer
check the brake system and electri-
cal circuits as soon as possible.
EAU73272
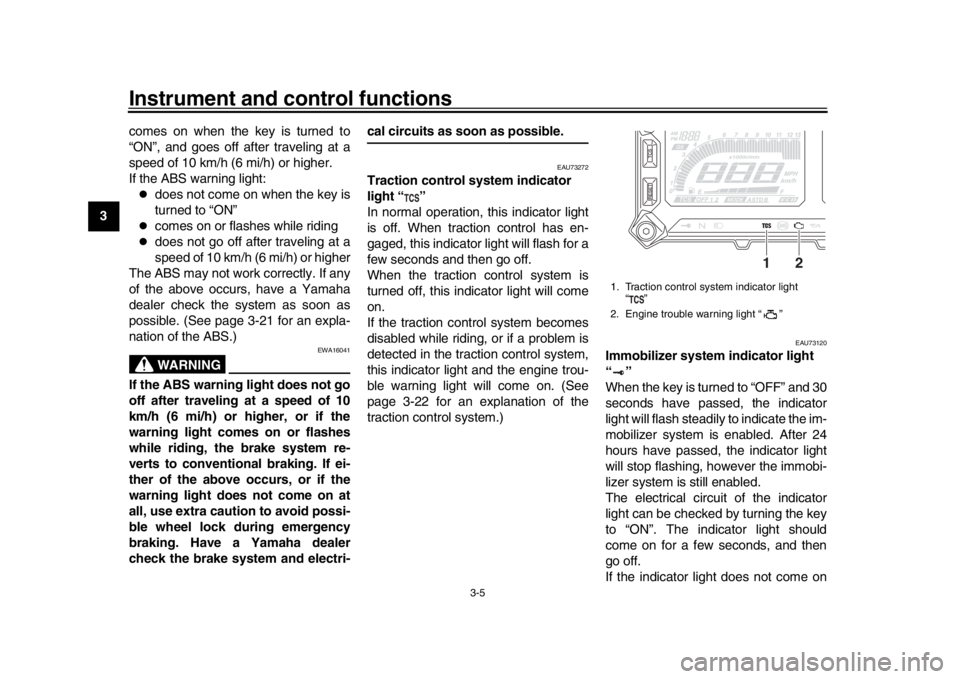
Traction control system indicator
light “ ”
In normal operation, this indicator light
is off. When traction control has en-
gaged, this indicator light will flash for a
few seconds and then go off.
When the traction control system is
turned off, this indicator light will come
on.
If the traction control system becomes
disabled while riding, or if a problem is
detected in the traction control system,
this indicator light and the engine trou-
ble warning light will come on. (See
page 3-22 for an explanation of the
traction control system.)
EAU73120
Immobilizer system indicator light
“”
When the key is turned to “OFF” and 30
seconds have passed, the indicator
light will flash steadily to indicate the im-
mobilizer system is enabled. After 24
hours have passed, the indicator light
will stop flashing, however the immobi-
lizer system is still enabled.
The electrical circui t of the indicator
light can be checked by turning the key
to “ON”. The indicator light should
come on for a few seconds, and then
go off.
If the indicator light does not come on1. Traction control system indicator light “”
2. Engine trouble warning light “ ”
1
2
2PP-9-E3.book 5 ページ 2016年9月13日 火曜日 午前9時7分
Page 21 of 114
Instrument and control functions
3-6
1
234
5
6
7
8
9
10
11
12
initially when the key is turned to “ON”,
if the indicator light remains on, or if the
indicator light flashes in a pattern (if a
problem is detected in the immobilizer
system, the immobili
zer system indica-
tor light will flash in a pattern), have a
Yamaha dealer check the vehicle.
TIPIf the immobilizer system indicator light
flashes in the pattern, slowly 5 times
then quickly 2 times, this could be
caused by transponder interference. Ifthis occurs, try the following.
1. Make sure there are no other im- mobilizer keys close to the main
switch. Other immobilizer system
keys may cause signal interfer-
ence and prevent the engine from
starting.
2. Use the code re-registering key to start the engine.
3. If the engine starts, turn it off, and try starting the engine with the
standard keys.
4. If one or both of the standard keys do not start the engine, take the
vehicle and all 3 keys to a Yamaha
dealer to have the standard keys re-registered.
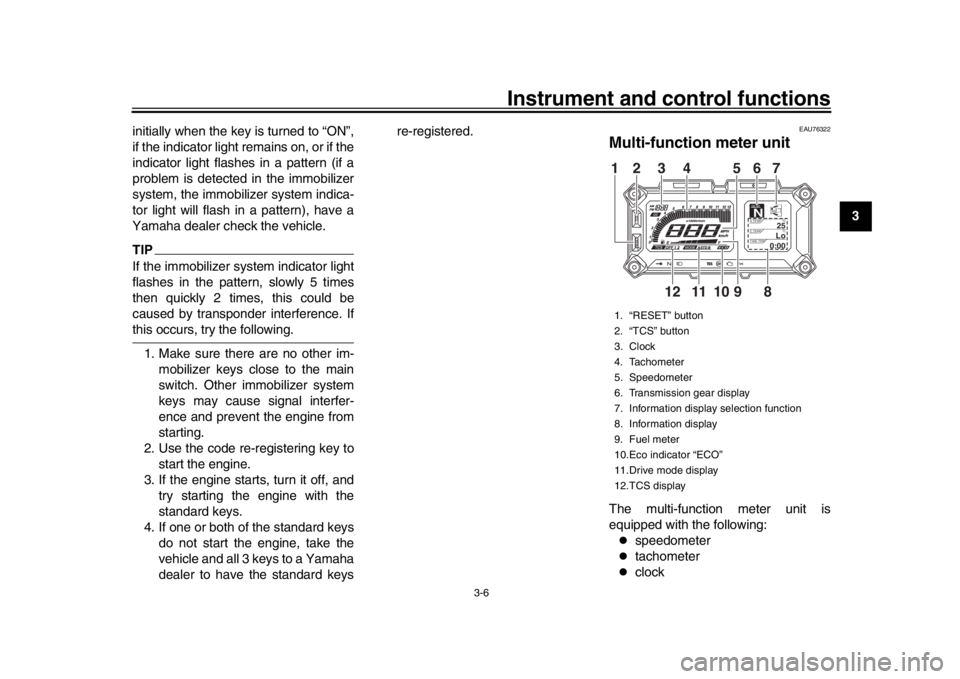
EAU76322
Multi-function meter unitThe multi-function meter unit is
equipped with the following:
speedometer
tachometer
clock
1. “RESET” button
2. “TCS” button
3. Clock
4. Tachometer
5. Speedometer
6. Transmission gear display
7. Information display selection function
8. Information display
9. Fuel meter
10.Eco indicator “ECO”
11.Drive mode display
12.TCS display
GEARN
25
A.TEMP
°C
Lo
C.TEMP°C
0:00
TIME TRIP
89
10
11
12
12 3 4 56
7
2PP-9-E3.book 6 ページ 2016年9月13日 火曜日 午前9時7分
Page 23 of 114
Instrument and control functions
3-8
1
234
5
6
7
8
9
10
11
12
High-rpm zone: 11250 r/min and
above
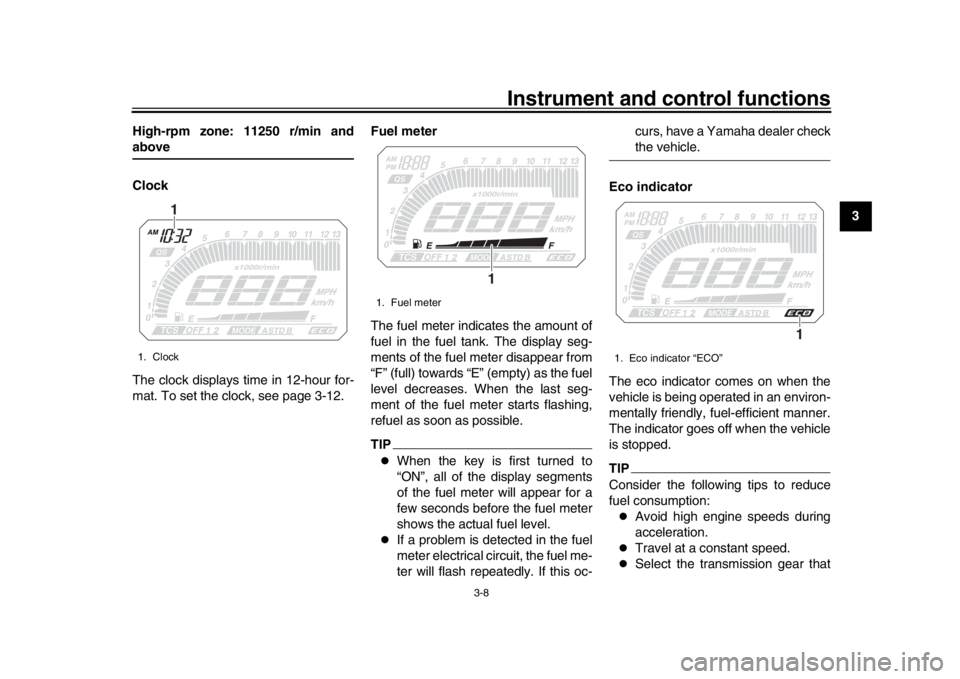
Clock
The clock displays time in 12-hour for-
mat. To set the clock, see page 3-12.
Fuel meter
The fuel meter indicates the amount of
fuel in the fuel tank. The display seg-
ments of the fuel meter disappear from
“F” (full) towards “E” (empty) as the fuel
level decreases. When the last seg-
ment of the fuel meter starts flashing,
refuel as soon as possible.
TIP
When the key is first turned to
“ON”, all of the display segments
of the fuel meter will appear for a
few seconds before the fuel meter
shows the actual fuel level.
If a problem is detected in the fuel
meter electrical circuit, the fuel me-
ter will flash repeatedly. If this oc-curs, have a Yamaha dealer check
the vehicle.
Eco indicator
The eco indicator comes on when the
vehicle is being operated in an environ-
mentally friendly, fuel-efficient manner.
The indicator goes off when the vehicle
is stopped.
TIPConsider the following tips to reduce
fuel consumption:
Avoid high engine speeds during
acceleration.
Travel at a constant speed.
Select the transmission gear that
1. Clock
1
1. Fuel meter
1
1. Eco indicator “ECO”
1
2PP-9-E3.book 8 ページ 2016年9月13日 火曜日 午前9時7分
Page 39 of 114
Instrument and control functions
3-24
1
234
5
6
7
8
9
10
11
12
either wheel is rotated with the key
turned to “ON” (such as when per-
forming maintenance).
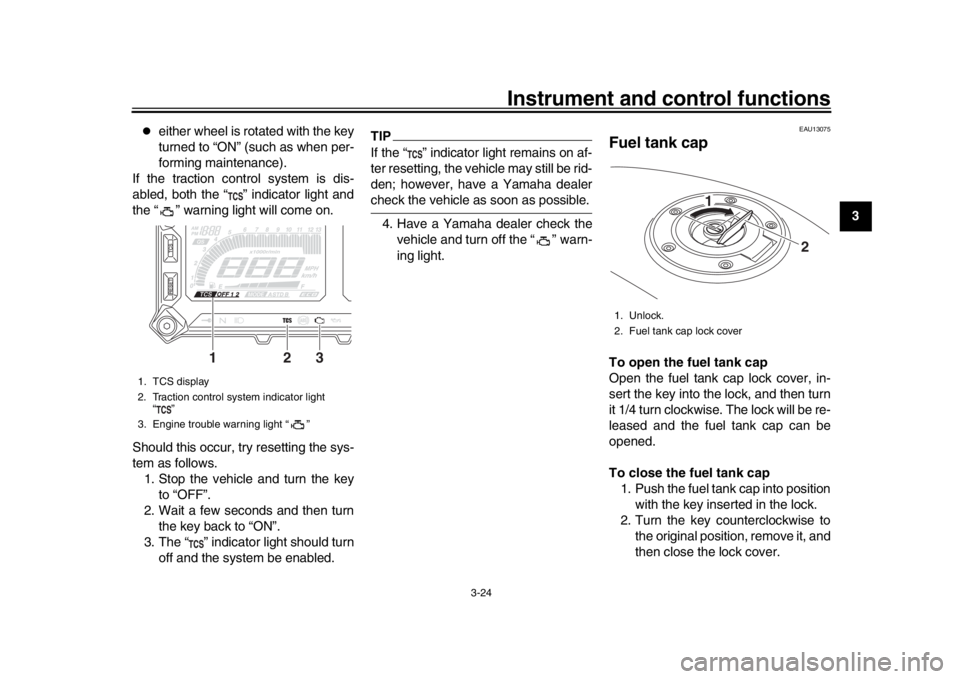
If the traction control system is dis-
abled, both the “ ” indicator light and
the “ ” warning light will come on.
Should this occur, try resetting the sys-
tem as follows. 1. Stop the vehicle and turn the key to “OFF”.
2. Wait a few seconds and then turn the key back to “ON”.
3. The “ ” indicator light should turn off and the system be enabled.
TIPIf the “ ” indicator light remains on af-
ter resetting, the vehicle may still be rid-
den; however, have a Yamaha dealercheck the vehicle as soon as possible.
4. Have a Yamaha dealer check the vehicle and turn off the “ ” warn-
ing light.
EAU13075
Fuel tank capTo open the fuel tank cap
Open the fuel tank cap lock cover, in-
sert the key into the lock, and then turn
it 1/4 turn clockwise. The lock will be re-
leased and the fuel tank cap can be
opened.
To close the fuel tank cap1. Push the fuel tank cap into position with the key inserted in the lock.
2. Turn the key counterclockwise to the original position, remove it, and
then close the lock cover.
1. TCS display
2. Traction control system indicator light “”
3. Engine trouble warning light “ ”
12
3
1. Unlock.
2. Fuel tank cap lock cover
2
1
2PP-9-E3.book 24 ページ 2016年9月13日 火曜日 午前9時7分
Page 41 of 114
Instrument and control functions
3-26
1
234
5
6
7
8
9
10
11
12
your eyes, see your doctor immedi-
ately. If gasoline spills on your skin,
wash with soap and water. If gaso-
line spills on your clothing, change
your clothes.
EAU75300
NOTICE
ECA11401
Use only unleaded gasoline. The use
of leaded gasoline will cause severe
damage to internal engine parts,
such as the valves and piston rings,as well as to the exhaust system.
TIP
This mark identifies the recom-
mended fuel for this vehicle as
specified by European regulation
(EN228).
Check that gasoli
ne nozzle has thesame identifier when fueling.
Your Yamaha engine has been de-
signed to use premium unleaded gaso-
line with a research octane number of
95 or higher. If knocking (or pinging) oc-
curs, use a gasoline of a different
brand. Use of unleaded fuel will extend
spark plug life and reduce maintenance
costs.
Gasohol
There are two types of gasohol: gaso- hol containing ethanol and that contain-
ing methanol. Gasohol containing
ethanol can be used if the ethanol con-
tent does not exceed 10% (E10). Gas-
ohol containing methanol is not
recommended by Yamaha because it
can cause damage to the fuel system
or vehicle performance problems.
Recommended fuel:
Premium unleaded gasoline (Gaso-
hol [E10] acceptable)
Fuel tank capacity: 18 L (4.8 US gal, 4.0 Imp.gal)
Fuel reserve amount:
2.6 L (0.69 US gal, 0.57 Imp.gal)
E10
2PP-9-E3.book 26 ページ 2016年9月13日 火曜日 午前9時7分
Page 42 of 114
Instrument and control functions
3-27
1
23
4
5
6
7
8
9
10
11
12
EAU74230
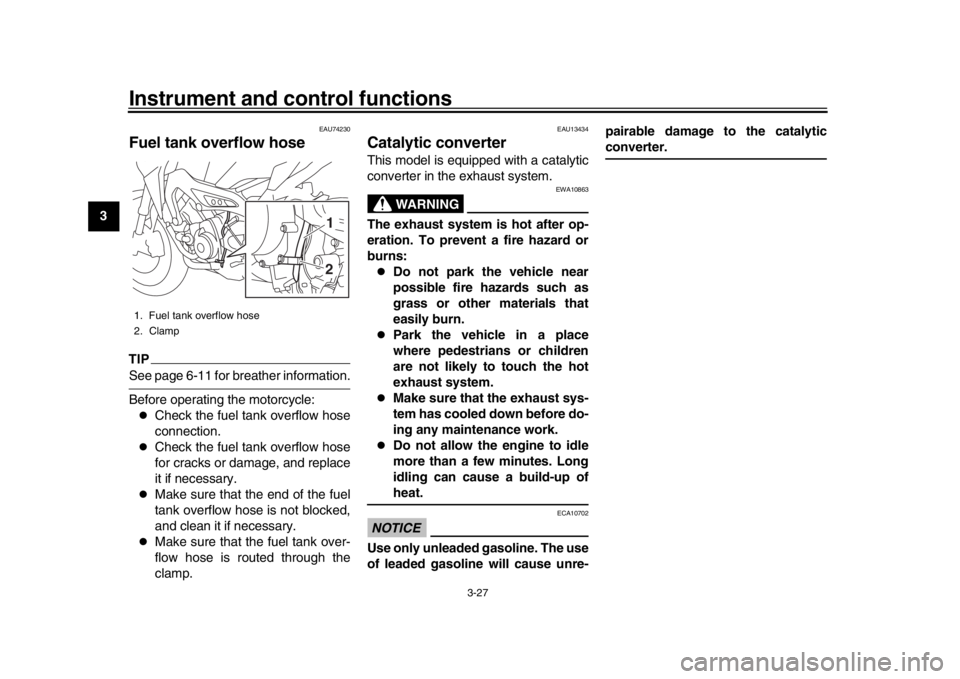
Fuel tank overflow hoseTIPSee page 6-11 for breather information.
Before operating the motorcycle:
Check the fuel tank overflow hose
connection.
Check the fuel tank overflow hose
for cracks or damage, and replace
it if necessary.
Make sure that the end of the fuel
tank overflow hose is not blocked,
and clean it if necessary.
Make sure that the fuel tank over-
flow hose is routed through the
clamp.
EAU13434
Catalytic converterThis model is equipped with a catalytic
converter in the exhaust system.
WARNING
EWA10863
The exhaust system is hot after op-
eration. To prevent a fire hazard or
burns:
Do not park the vehicle near
possible fire hazards such as
grass or other materials that
easily burn.
Park the vehicle in a place
where pedestrians or children
are not likely to touch the hot
exhaust system.
Make sure that the exhaust sys-
tem has cooled down before do-
ing any maintenance work.
Do not allow the engine to idle
more than a few minutes. Long
idling can cause a build-up ofheat.
NOTICE
ECA10702
Use only unleaded gasoline. The use
of leaded gasoline will cause unre- pairable damage to the catalytic
converter.
1. Fuel tank overflow hose
2. Clamp
21
2PP-9-E3.book 27 ページ 2016年9月13日 火曜日 午前9時7分