suspension YAMAHA NIKEN GT 2019 Owners Manual
[x] Cancel search | Manufacturer: YAMAHA, Model Year: 2019, Model line: NIKEN GT, Model: YAMAHA NIKEN GT 2019Pages: 108, PDF Size: 9.98 MB
Page 10 of 108

Safety information
1-3
1Avoid Carbon Monoxide Poisoning
All engine exhaust contains carbon
monoxide, a deadly gas. Breathing
carbon monoxide can cause head-
aches, dizziness, drowsiness, nausea,
confusion, and eventually death.
Carbon Monoxide is a colorless, odor-
less, tasteless gas which may be pres-
ent even if you do not see or smell any
engine exhaust. Deadly levels of car-
bon monoxide can collect rapidly and
you can quickly be overcome and un-
able to save yourself. Also, deadly lev-
els of carbon monoxide can linger for
hours or days in enclosed or poorly
ventilated areas. If you experience any
symptoms of carbon monoxide poi-
soning, leave the area immediately, get
fresh air, and SEEK MEDICAL TREAT-
MENT.
Do not run engine indoors. Even if
you try to ventilate engine exhaust
with fans or open windows and
doors, carbon monoxide can rap-
idly reach dangerous levels.
Do not run engine in poorly venti-
lated or partially enclosed areas
such as barns, garages, or car-
ports.
Do not run engine outdoors where
engine exhaust can be drawn into
a building through openings such
as windows and doors.
Loading
Adding accessories or cargo to your
motorcycle can adversely affect stabil-
ity and handling if the weight distribu-
tion of the motorcycle is changed. To
avoid the possibility of an accident, use
extreme caution when adding cargo or
accessories to your motorcycle. Use
extra care when riding a motorcycle
that has added cargo or accessories.
Here, along with the information about
accessories below, are some general
guidelines to follow if loading cargo to
your motorcycle:
The total weight of the operator, pas-
senger, accessories and cargo must
not exceed the maximum load limit.
Operation of an overloaded vehicle
could cause an accident. When loading within this weight limit,
keep the following in mind:
Cargo and accessory weight
should be kept as low and close to
the motorcycle as possible. Se-
curely pack your heaviest items as
close to the center of the vehicle
as possible and make sure to dis-
tribute the weight as evenly as
possible on both sides of the mo-
torcycle to minimize imbalance or
instability.
Shifting weights can create a sud-
den imbalance. Make sure that
accessories and cargo are se-
curely attached to the motorcycle
before riding. Check accessory
mounts and cargo restraints fre-
quently.
• Properly adjust the suspension for your load (suspension-ad-
justable models only), and
check the condition and pres-
sure of your tires.
• Never attach any large or heavy items to the handlebar, front
fork, or front fenders. These
items, including such cargo as
sleeping bags, duffel bags, or
Maximum load: 191 kg (421 lb)
UB5BE0E0.book Page 3 Tuesday, November 13, 2018 9:40 AM
Page 11 of 108

Safety information
1-4
1
tents, can create unstable han-
dling or a slow steering re-
sponse.
This vehicle is not desi gne d to
pull a trailer or to be attached to
a si decar.
Genuine Yamaha Accessories
Choosing accessories for your vehicle
is an important decision. Genuine
Yamaha accessories, which are avail- able only from a Yamaha dealer, have
been designed, tested, and approved
by Yamaha for use on your vehicle.
Many companies with no connection
to Yamaha manufacture parts and ac-
cessories or offer other modifications
for Yamaha vehicles. Yamaha is not in
a position to test the products that
these aftermarket companies produce.
Therefore, Yamaha can neither en-
dorse nor recommend the use of ac-
cessories not sold by Yamaha or
modifications not specifically recom-
mended by Yamaha, even if sold and
installed by a Yamaha dealer. Aftermarket Parts, Accessories, an
d
Mo difications
While you may find aftermarket prod-
ucts similar in design and quality to
genuine Yamaha accessories, recog-
nize that some aftermarket accesso-
ries or modifications are not suitable
because of potential safety hazards to
you or others. Installing aftermarket
products or having other modifications
performed to your vehicle that change
any of the vehicle’s design or operation
characteristics can put you and others
at greater risk of serious injury or
death. You are responsible for injuries
related to changes in the vehicle.
Keep the following guidelines in mind,
as well as those provided on page 1-3
when mounting accessories. Never install accessories or carry
cargo that would impair the per-
formance of your motorcycle.
Carefully inspect the accessory
before using it to make sure that it
does not in any way reduce
ground clearance or cornering
clearance, limit suspension travel, steering travel or control opera-
tion, or obscure lights or reflec-
tors.
• Accessories fitted to the han- dlebar or the front fork area can
create instability due to improp-
er weight distribution or aerody-
namic changes. If accessories
are added to the handlebar or
front fork area, they must be as
lightweight as possible and
should be kept to a minimum.
• Bulky or large accessories may seriously affect the stability of
the motorcycle due to aerody-
namic effects. Wind may at-
tempt to lift the motorcycle, or
the motorcycle may become
unstable in cross winds. These
accessories may also cause in-
stability when passing or being
passed by large vehicles.
• Certain accessories can dis- place the operator from his or
her normal riding position. This
improper position limits the
freedom of movement of the
UB5BE0E0.book Page 4 Friday, September 7, 2018 10:34 AM
Page 12 of 108

Safety information
1-5
1operator and may limit control
ability, therefore, such accesso-
ries are not recommended.
Use caution when adding electri-
cal accessories. If electrical ac-
cessories exceed the capacity of
the motorcycle’s electrical sys-
tem, an electric failure could re-
sult, which could cause a
dangerous loss of lights or engine
power.
Aftermarket Tires an d Rims
The tires and rims that came with your
motorcycle were designed to match
the performance capabilities and to
provide the best combination of han-
dling, braking, and comfort. Other
tires, rims, sizes, and combinations
may not be appropriate. See page 6-16
for tire specifications and for informa-
tion on servicing and replacing your
tires.
Transportin g the Motorcycle
Be sure to observe the following in-
structions before transporting the mo-
torcycle in another vehicle.
Remove all loose items from the
motorcycle.
Confirm there are no fuel or oil
leaks.
Shift the transmission into gear.
Secure with suitable straps that
are attached to solid parts of the
motorcycle, such as the frame or
upper front fork triple clamp. Do
not attach to turn signals, cowl-
ings and fairings, or any other
parts that can break. Choose the
location for the straps carefully so
the straps will not rub against
painted surfaces during transport.
The suspension should be partial-
ly compressed by the tie-down
straps so that the motorcycle will
not bounce excessively during
transport.
UB5BE0E0.book Page 5 Friday, September 7, 2018 10:34 AM
Page 46 of 108

Instrument and control functions
3-31
3
EAU39672
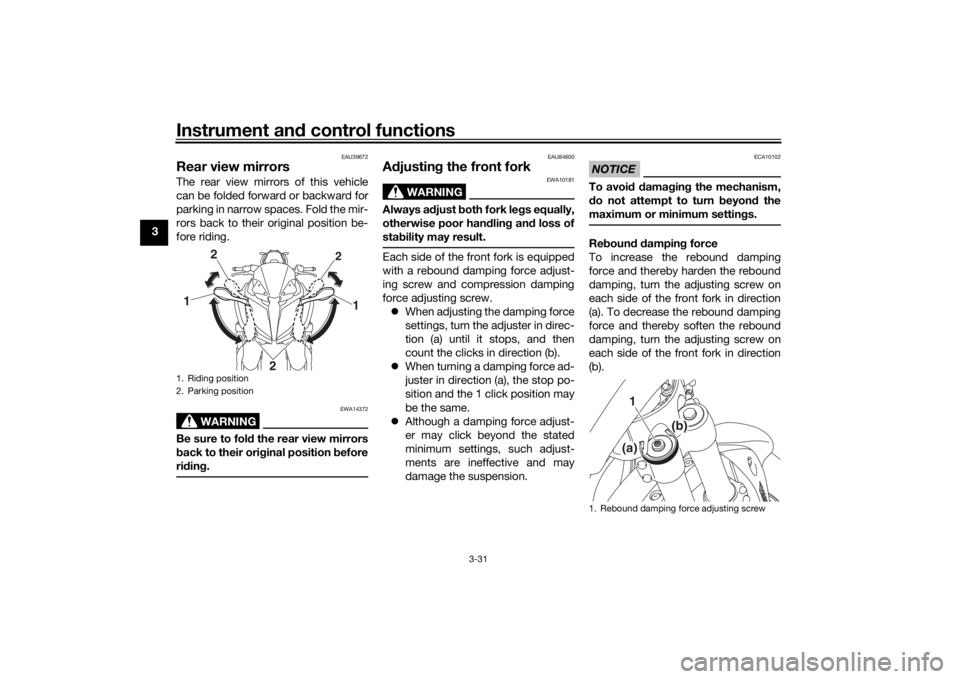
Rear view mirrorsThe rear view mirrors of this vehicle
can be folded forward or backward for
parking in narrow spaces. Fold the mir-
rors back to their original position be-
fore riding.
WARNING
EWA14372
Be sure to fol d the rear view mirrors
b ack to their ori ginal position before
ri din g.
EAU84600
A djustin g the front fork
WARNING
EWA10181
Always a djust both fork le gs equally,
otherwise poor han dlin g an d loss of
sta bility may result.Each side of the front fork is equipped
with a rebound damping force adjust-
ing screw and compression damping
force adjusting screw.
When adjusting the damping force
settings, turn the adjuster in direc-
tion (a) until it stops, and then
count the clicks in direction (b).
When turning a damping force ad-
juster in direction (a), the stop po-
sition and the 1 click position may
be the same.
Although a damping force adjust-
er may click beyond the stated
minimum settings, such adjust-
ments are ineffective and may
damage the suspension.
NOTICE
ECA10102
To avoi d d amag ing the mechanism,
d o not attempt to turn b eyond the
maximum or minimum settin gs.Re boun d d ampin g force
To increase the rebound damping
force and thereby harden the rebound
damping, turn the adjusting screw on
each side of the front fork in direction
(a). To decrease the rebound damping
force and thereby soften the rebound
damping, turn the adjusting screw on
each side of the front fork in direction
(b).
1. Riding position
2. Parking position
2
1
2
1
2
1. Rebound damping force adjusting screw
1(a)
(b)
UB5BE0E0.book Page 31 Friday, September 7, 2018 10:34 AM
Page 47 of 108

Instrument and control functions
3-32
3
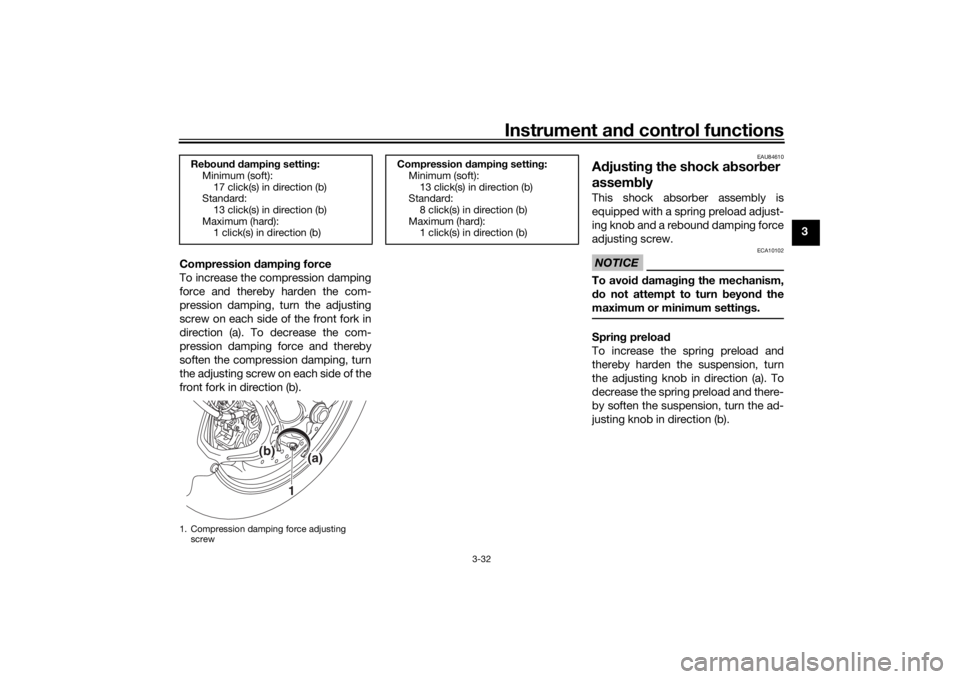
Compression dampin g force
To increase the compression damping
force and thereby harden the com-
pression damping, turn the adjusting
screw on each side of the front fork in
direction (a). To decrease the com-
pression damping force and thereby
soften the compression damping, turn
the adjusting screw on each side of the
front fork in direction (b).
EAU84610
A djustin g the shock a bsor ber
assem blyThis shock absorber assembly is
equipped with a spring preload adjust-
ing knob and a rebound damping force
adjusting screw.NOTICE
ECA10102
To avoi d d amag ing the mechanism,
d o not attempt to turn beyon d the
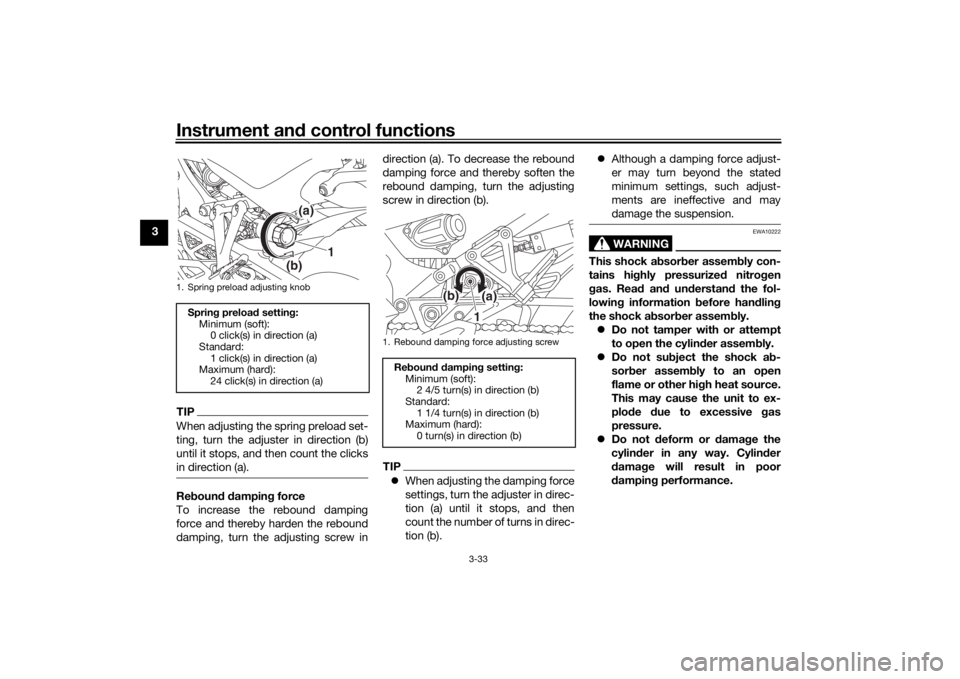
maximum or minimum settin gs.Sprin g preloa d
To increase the spring preload and
thereby harden the suspension, turn
the adjusting knob in direction (a). To
decrease the spring preload and there-
by soften the suspension, turn the ad-
justing knob in direction (b).
Re boun d d ampin g settin g:
Minimum (soft):
17 click(s) in direction (b)
Standard:
13 click(s) in direction (b)
Maximum (hard): 1 click(s) in direction (b)1. Compression damping force adjusting
screw
(b)
(a)
1
Compression dampin g setting :
Minimum (soft):
13 click(s) in direction (b)
Standard:
8 click(s) in direction (b)
Maximum (hard): 1 click(s) in direction (b)
UB5BE0E0.book Page 32 Friday, September 7, 2018 10:34 AM
Page 48 of 108

Instrument and control functions
3-33
3
TIPWhen adjusting the spring preload set-
ting, turn the adjuster in direction (b)
until it stops, and then count the clicks
in direction (a).Re boun d d ampin g force
To increase the rebound damping
force and thereby harden the rebound
damping, turn the adjusting screw in direction (a). To decrease the rebound
damping force and thereby soften the
rebound damping, turn the adjusting
screw in direction (b).
TIP
When adjusting the damping force
settings, turn the adjuster in direc-
tion (a) until it stops, and then
count the number of turns in direc-
tion (b).
Although a damping force adjust-
er may turn beyond the stated
minimum settings, such adjust-
ments are ineffective and may
damage the suspension.
WARNING
EWA10222
This shock a bsor ber assem bly con-
tains hi ghly pressurize d nitro gen
g as. Rea d an d und erstan d the fol-
lowin g information b efore handlin g
the shock a bsor ber assem bly.
Do not tamper with or attempt
to open the cylin der assem bly.
Do not su bject the shock a b-
sor ber assem bly to an open
flame or other hi gh heat source.
This may cause the unit to ex-
plo de due to excessive gas
pressure.
Do not deform or d amage the
cylin der in any way. Cylin der
d amag e will result in poor
d ampin g performance.
1. Spring preload adjusting knobSprin g preloa d setting :
Minimum (soft): 0 click(s) in direction (a)
Standard: 1 click(s) in direction (a)
Maximum (hard):
24 click(s) in direction (a)
(a)
(b)
1
1. Rebound damping force adjusting screwRe boun d d ampin g setting :
Minimum (soft): 2 4/5 turn(s) in direction (b)
Standard: 1 1/4 turn(s) in direction (b)
Maximum (hard):
0 turn(s) in direction (b)
(a)
(b)
1
UB5BE0E0.book Page 33 Friday, September 7, 2018 10:34 AM
Page 66 of 108

Periodic maintenance an d a djustment
6-7
6
21 *Front fork • Check operation and for oil leak-
age.
• Replace if necessary. √√√√
22 *Shock a
bsor ber as-
sem bly • Check operation and for oil leak-
age.
• Replace if necessary. √√√√
23 *Rear suspension re-
lay arm an
d con-
nectin g arm
pivotin g points • Check operation.
√√√√
24 En gine oil • Change (warm engine before
draining).
• Check oil level and vehicle for oil leakage. √√√√√√
25 En
gine oil filter car-
tri dge • Replace.
√√√
26 *Coolin g system • Check coolant level and vehicle
for coolant leakage. √√√√√
• Change. Every 3 years
27 *Front an
d rear
b rake switches • Check operation.
√√√√√√
28 *Movin
g parts an d
cab les • Lubricate.
√√√√√
29 *Throttle
grip hous-
in g an d cab le • Check operation and free play.
• Adjust the throttle cable free play
if necessary.
• Lubricate the throttle grip hous- ing, cable and grip warmer wire. √√√√√
NO. ITEM CHECK OR MAINTENANCE JOB
ODOMETER READING
A
NNUAL
CHECK
1000 km
(600 mi) 10000 km
(6000 mi) 20000 km
(12000 mi) 30000 km
(18000 mi) 40000 km
(24000 mi)
UB5BE0E0.book Page 7 Friday, September 7, 2018 10:34 AM
Page 101 of 108

Specifications
8-2
8
Manufacturer/model:BRIDGESTONE/A41R MLoading:Maximum load:
191 kg (421 lb)
(Total weight of rider, passenger, cargo
and accessories)Front brake:Type:Hydraulic disc brakeRear brake:Type:Hydraulic single disc brakeFront suspension:Type:Telescopic forkRear suspension:Type:
Swingarm (link suspension)Electrical system:System voltage:12 VBattery:Model:YTZ10S
Voltage, capacity: 12 V, 8.6 Ah (10 HR)Bulb wattage:Headlight:LED
Brake/tail light: LED
Front turn signal light:
LED Rear turn signal light:
LED
Auxiliary light: LED
License plate light:
LED
UB5BE0E0.book Page 2 Tuesday, November 13, 2018 9:40 AM