engine YAMAHA PW50 2015 Owner's Manual
[x] Cancel search | Manufacturer: YAMAHA, Model Year: 2015, Model line: PW50, Model: YAMAHA PW50 2015Pages: 76, PDF Size: 1.74 MB
Page 49 of 76
PERIODIC MAINTENANCE AND ADJUSTMENT
7-8
7
EAU40894
Transmission oilThe transmission oil must be checked
for oil leakage before each ride. If any
leakage is found, have a Yamaha deal-
er check and repair the motorcycle. In
addition, the transmission oil must be
changed at the intervals specified in
the periodic maintenance and lubrica-
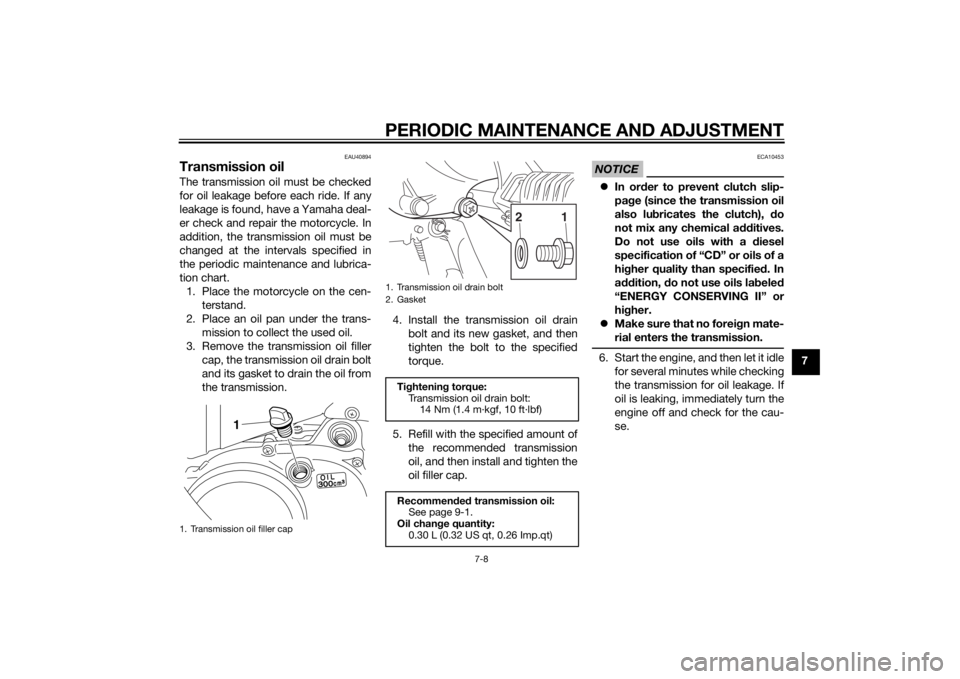
tion chart.1. Place the motorcycle on the cen- terstand.
2. Place an oil pan under the trans- mission to collect the used oil.
3. Remove the transmission oil filler cap, the transmission oil drain bolt
and its gasket to drain the oil from
the transmission. 4. Install the transmission oil drain
bolt and its new gasket, and then
tighten the bolt to the specified
torque.
5. Refill with the specified amount of the recommended transmission
oil, and then install and tighten the
oil filler cap.
NOTICE
ECA10453
In or der to prevent clutch slip-
pa ge (since the transmission oil
also lu bricates the clutch), do
not mix any chemical additives.
Do not use oils with a diesel
specification of “CD” or oils of a
hi gher quality than specifie d. In
a dd ition, do not use oils la bele d
“ENERGY CONSERVING II” or
hi gher.
Make sure that no forei gn mate-
rial enters the transmission.6. Start the engine, and then let it idle for several minutes while checking
the transmission for oil leakage. If
oil is leaking, immediately turn the
engine off and check for the cau-
se.
1. Transmission oil filler cap
1
1. Transmission oil drain bolt
2. Gasket
Tightenin g torque:
Transmission oil drain bolt: 14 Nm (1.4 m·kgf, 10 ft·lbf)
Recommen ded transmission oil:
See page 9-1.
Oil chan ge quantity:
0.30 L (0.32 US qt, 0.26 Imp.qt)
1
2
U2SA81E0.book Page 8 Monday, June 2, 2014 2:00 PM
Page 52 of 76
PERIODIC MAINTENANCE AND ADJUSTMENT
7-11
7
EAU39931
Adjustin g the car buretorThe carburetor is an important part of
the engine and requires very sophisti-
cated adjustment. Therefore, most
carburetor adjustments should be left
to a Yamaha dealer, who has the nec-
essary professional knowledge and ex-
perience. The adjustment described in
the following section, however, may be
serviced by the owner as part of rou-
tine maintenance.NOTICE
ECA10551
The car buretor has been set an d ex-
tensively teste d at the Yamaha fac-
tory. Chang ing these settin gs
without sufficient technical knowl-
e dge may result in poor perfor-
mance of or d amage to the en gine.
EAU21363
A djustin g the eng ine idlin g
spee dThe engine idling speed must be
checked and, if necessary, adjusted as
follows at the intervals specified in the
periodic maintenance and lubrication
chart.TIPA diagnostic tachometer is needed to
make this adjustment.1. Attach the tachometer to the
spark plug lead.
2. Start the engine and warm it up for several minutes at 1000–2000
r/min while occasionally revving it
to 4000–5000 r/min.TIPThe engine is warm when it quickly re-
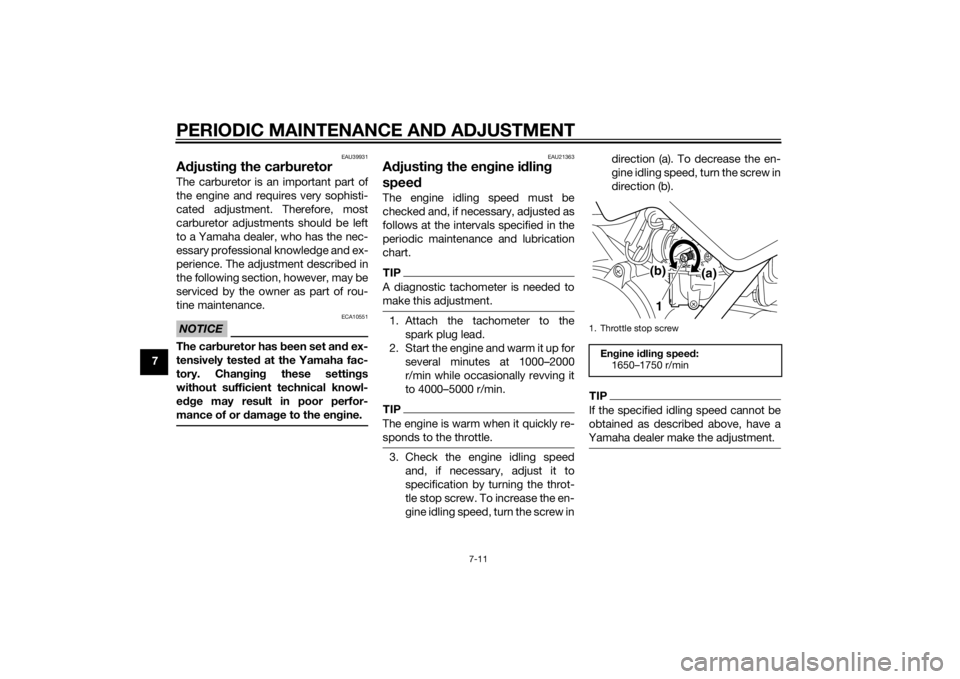
sponds to the throttle.3. Check the engine idling speedand, if necessary, adjust it to
specification by turning the throt-
tle stop screw. To increase the en-
gine idling speed, turn the screw in direction (a). To decrease the en-
gine idling speed, turn the screw in
direction (b).
TIPIf the specified idling speed cannot be
obtained as described above, have a
Yamaha dealer make the adjustment.1. Throttle stop screwEn gine i dlin g spee d:
1650–1750 r/min
1 (a)
(b)
U2SA81E0.book Page 11 Monday, June 2, 2014 2:00 PM
Page 57 of 76

PERIODIC MAINTENANCE AND ADJUSTMENT
7-16
7
EAU23098
Checking an d lu bricatin g the
ca blesThe operation of all control cables and
the condition of the cables should be
checked before each ride, and the ca-
bles and cable ends should be lubri-
cated if necessary. If a cable is
damaged or does not move smoothly,
have a Yamaha dealer check or re-
place it. WARNING! Dama ge to the
outer housin g of cab les may result
in internal rustin g an d cause inter-
ference with ca ble movement. Re-
place damag ed cab les as soon as
possi ble to prevent unsafe con di-
tions.
[EWA10712] EAU23115
Checkin
g an d lu bricatin g the
throttle grip an d ca bleThe operation of the throttle grip
should be checked before each ride. In
addition, the cable should be lubricat-
ed by a Yamaha dealer at the intervals
specified in the periodic maintenance
chart.
The throttle cable is equipped with a
rubber cover. Make sure that the cover
is securely installed. Even though the
cover is installed correctly, it does not
completely protect the cable from wa-
ter entry. Therefore, use care not to
pour water directly onto the cover or
cable when washing the vehicle. If the
cable or cover becomes dirty, wipe
clean with a moist cloth.
EAU23121
A djustin g the Autolu be pumpThe Autolube pump is a vital and so-
phisticated component of the engine,
which must be adjusted by a Yamaha
dealer at the intervals specified in the
periodic maintenance and lubrication
chart.
Recommen ded lu bricant:
Yamaha cable lubricant or other
suitable cable lubricant
U2SA81E0.book Page 16 Monday, June 2, 2014 2:00 PM
Page 65 of 76
PERIODIC MAINTENANCE AND ADJUSTMENT
7-24
7
EAU25975
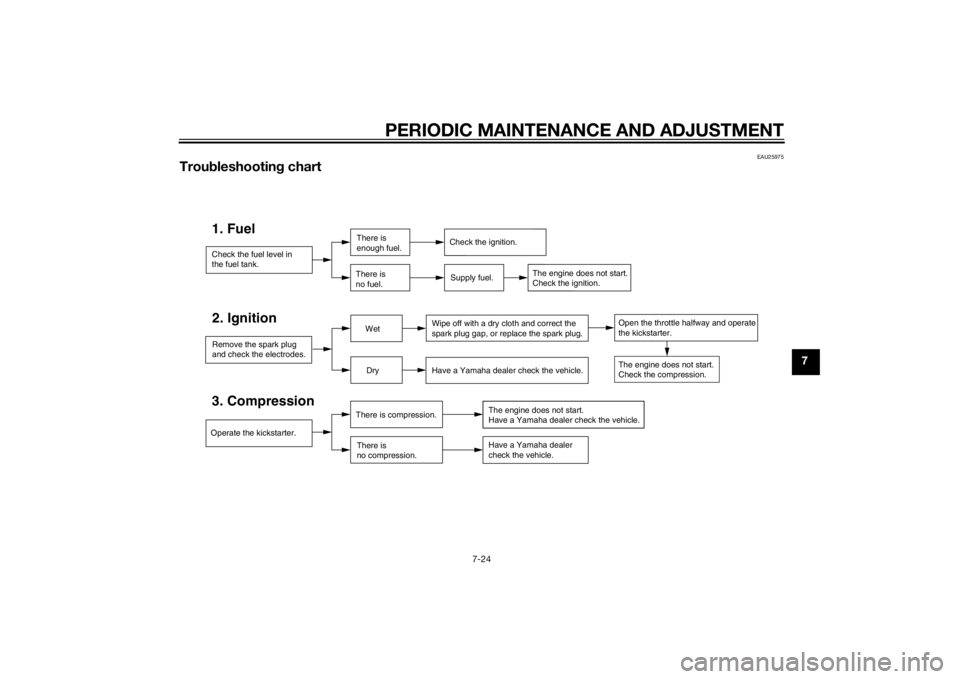
Troubleshootin g chart
Check the fuel level in
the fuel tank.1. Fuel
There is
enough fuel.
There is
no fuel.
Supply fuel.Check the ignition.
The engine does not start.
Check the ignition.
Operate the kickstarter.3. Compression
There is compression.There is
no compression. The engine does not start.
Have a Yamaha dealer check the vehicle.
Have a Yamaha dealer
check the vehicle.
Remove the spark plug
and check the electrodes.2. Ignition
Wet
Dry Wipe off with a dry cloth and correct the
spark plug gap, or replace the spark plug.
Have a Yamaha dealer check the vehicle.
The engine does not start.
Check the compression.
Open the throttle halfway and operate
the kickstarter.
U2SA81E0.book Page 24 Monday, June 2, 2014 2:00 PM
Page 66 of 76
MOTORCYCLE CARE AND STORAGE
8-1
8
EAU37834
Matte color cautionNOTICE
ECA15193
Some models are equipped with
matte colore d finishe d parts. Be
sure to consult a Yamaha d ealer for
a d vice on what prod ucts to use be-
fore cleanin g the vehicle. Usin g a
b rush, harsh chemical prod ucts or
cleanin g compoun ds when cleanin g
these parts will scratch or damag e
their surface. Wax also shoul d not
b e applied to any matte colore d fin-
ishe d parts.
EAU40636
CareWhile the open design of a motorcycle
reveals the attractiveness of the tech-
nology, it also makes it more vulnera-
ble. Rust and corrosion can develop
even if high-quality components are
used. A rusty exhaust pipe may go un-
noticed on a car, however, it detracts
from the overall appearance of a mo-
torcycle. Frequent and proper care
does not only comply with the terms of
the warranty, but it will also keep your
motorcycle looking good, extend its
life and optimize its performance.
Before cleanin g
1. Cover the muffler outlet with a plastic bag after the engine has
cooled down.
2. Make sure that all caps and cov- ers as well as all electrical cou-
plers and connectors, including
the spark plug cap, are tightly in-
stalled.
3. Remove extremely stubborn dirt, like oil burnt onto the crankcase,
with a degreasing agent and a
brush, but never apply such prod- ucts onto seals, gaskets and
wheel axles. Always rinse the dirt
and degreaser off with water.
Cleanin g
NOTICE
ECA17111
Avoi d usin g stron g aci dic wheel
cleaners, especially on spoke d
wheels. If such pro ducts are
use d on har d-to-remove dirt, do
not leave the cleaner on the af-
fected area any lon ger than in-
structe d. Also, thorou ghly rinse
the area off with water, imme di-
ately dry it, an d then apply a cor-
rosion protection spray.
Improper cleanin g can d amage
plastic parts (such as cowlin gs,
panels, etc.) an d the mufflers.
Use only a soft, clean cloth or
spon ge with water to clean
plastic. However, if the plastic
parts cannot be thorou ghly
cleaned with water, dilute d mil d
d eter gent with water may b e
use d. Be sure to rinse off any
U2SA81E0.book Page 1 Monday, June 2, 2014 2:00 PM
Page 67 of 76
MOTORCYCLE CARE AND STORAGE8-2
8
d
eter gent resi due usin g plenty
of water, as it is harmful to plas-
tic parts.
Do not use any harsh chemical
prod ucts on plastic parts. Be
sure to avoi d usin g cloths or
spon ges which have b een in
contact with stron g or a brasive
cleanin g prod ucts, solvent or
thinner, fuel ( gasoline), rust re-
movers or inhi bitors, brake flui d,
antifreeze or electrolyte.
Do not use hi gh-pressure wash-
ers or steam-jet cleaners since
they cause water seepag e and
d eterioration in the followin g ar-
eas: seals (of wheel an d swin g-
arm bearin gs, fork an d b rakes),
electric components (couplers,
connectors, an d switches),
b reather hoses an d vents.
After normal useRemove dirt with warm water, a mild
detergent, and a soft, clean sponge,
and then rinse thoroughly with clean
water. Use a toothbrush or bottlebrush
for hard-to-reach areas. Stubborn dirt and insects will come off more easily if
the area is covered with a wet cloth for
a few minutes before cleaning.
After riding in the rain or near the sea
Since sea salt is extremely corrosive,
carry out the following steps after each
ride in the rain or near the sea.
1. Clean the motorcycle with cold water and a mild detergent, after
the engine has cooled down.
NOTICE: Do not use warm wa-
ter since it increases the corro-
sive action of the salt.
[ECA10792]
2. Apply a corrosion protection spray on all metal, including chrome-
and nickel-plated, surfaces to pre-
vent corrosion.
After cleanin g
1. Dry the motorcycle with a chamois or an absorbing cloth.
2. Use a chrome polish to shine chrome, aluminum and stainless-
steel parts. 3. To prevent corrosion, it is recom-
mended to apply a corrosion pro-
tection spray on all metal,
including chrome- and nickel-plat-
ed, surfaces.
4. Use spray oil as a universal clean- er to remove any remaining dirt.
5. Touch up minor paint damage caused by stones, etc.
6. Wax all painted surfaces.
7. Let the motorcycle dry completely before storing or covering it.
WARNING
EWA14502
Contaminants on the brakes or tires
can cause loss of control. Make sure that there is no oil or
wax on the tires.
If necessary, wash the tires with
warm water an d a mil d d eter-
g ent. Before ri din g at hi gher
speed s, test the motorcycle’s
b rakin g performance an d cor-
nering b ehavior.
U2SA81E0.book Page 2 Monday, June 2, 2014 2:00 PM
Page 68 of 76
MOTORCYCLE CARE AND STORAGE
8-3
8
NOTICE
ECA10801
Apply spray oil an d wax spar-
in gly an d make sure to wipe off
any excess.
Never apply oil or wax to any
rubber an d plastic parts, but
treat them with a suitab le care
prod uct.
Avoi d usin g a brasive polishin g
compoun ds as they will wear
away the paint.TIPConsult a Yamaha dealer for advice on
what products to use.
EAU40646
Stora geShort-term
Always store your motorcycle in a cool,
dry place and, if necessary, protect it
against dust with a porous cover. Be
sure the engine and the exhaust sys-
tem are cool before covering the mo-
torcycle.NOTICE
ECA10811
Storin g the motorcycle in a
poorly ventilate d room or cover-
in g it with a tarp, while it is still
wet, will allow water an d humi d-
ity to seep in an d cause rust.
To prevent corrosion, avoi d
d amp cellars, sta bles (b ecause
of the presence of ammonia)
an d areas where stron g chemi-
cals are stored .Long-term
Before storing your motorcycle for sev-
eral months: 1. Follow all the instructions in the “Care” section of this chapter. 2. For motorcycles equipped with a
fuel cock that has an “S” (stop)
position: Turn the fuel cock lever
to “S”.
3. Drain the carburetor float chamber by loosening the drain bolt; this
will prevent fuel deposits from
building up. Pour the drained fuel
into the fuel tank.
4. Fill up the fuel tank and add fuel stabilizer (if available) to prevent
the fuel tank from rusting and the
fuel from deteriorating.
5. Perform the following steps to protect the cylinder, piston rings,
etc. from corrosion.a. Remove the spark plug cap and spark plug.
b. Pour a teaspoonful of engine oil into the spark plug bore.
c. Install the spark plug cap onto the spark plug, and then place
the spark plug on the cylinder
head so that the electrodes are
grounded. (This will limit spark-
ing during the next step.)
d. Turn the engine over several times with the starter. (This will
coat the cylinder wall with oil.)
U2SA81E0.book Page 3 Monday, June 2, 2014 2:00 PM
Page 70 of 76

SPECIFICATIONS
9-1
9
Dimensions:Overall length:1245 mm (49.0 in)
Overall width:
575 mm (22.6 in)
Overall height: 715 mm (28.1 in)
Seat height: 485 mm (19.1 in)
Wheelbase:
855 mm (33.7 in)
Ground clearance: 105 mm (4.13 in)
Minimum turning radius: 1300 mm (51.2 in)Wei ght:Curb weight:
39 kg (86 lb)
Technical permissible mass (Maximum load +
Curb weight): 64 kg (141 lb)Noise an d vi bration level:Noise level (77/311/EEC):
PW50 75.1 dB(A)@2750 r/min
(AUT)(BEL)(CHE)(CYP)(CZE)(DEU)(DNK)(E
SP)(FIN)(FRA)(GBR)(GRC)(IRL)(ITA)(NLD)(N
OR)(POL)(PRT)(SVK)(SVN)(SWE)(TUR)
Vibration on seat (EN1032, ISO5008): PW50 Will not exceed 0.5 m/s²
(AUT)(BEL)(CHE)(CYP)(CZE)(DEU)(DNK)(E
SP)(FIN)(FRA)(GBR)(GRC)(IRL)(ITA)(NLD)(N
OR)(POL)(PRT)(SVK)(SVN)(SWE)(TUR) Vibration on handlebar (EN1032, ISO5008):
PW50 Will not exceed 2.5 m/s²
(AUT)(BEL)(CHE)(CYP)(CZE)(DEU)(DNK)(E
SP)(FIN)(FRA)(GBR)(GRC)(IRL)(ITA)(NLD)(N
OR)(POL)(PRT)(SVK)(SVN)(SWE)(TUR)
Engine:Engine type:
Air cooled 2-stroke
Cylinder arrangement: Single cylinder
Displacement: 49 cm³
Bore × stroke:
40.0 × 39.2 mm (1.57 × 1.54 in)
Compression ratio: 6.0 : 1
Starting system: Kickstarter
Lubrication system:
Separate lubrication (Yamaha autolube)Engine oil:Type:
YAMALUBE 2S or 2-stroke engine oil
(JASO FC grade) or (ISO EG-C or EG-D
grade)
Engine oil quantity: Engine oil tank capacity:
0.30 L (0.32 US qt, 0.26 Imp.qt)Transmission oil:Type:YAMALUBE 4 (10W-40) or SAE 10W-40
Oil change quantity:
0.30 L (0.32 US qt, 0.26 Imp.qt)
Air filter:Air filter element:Wet elementFuel:Recommended fuel:Regular unleaded gasoline only
Fuel tank capacity: 2.0 L (0.53 US gal, 0.44 Imp.gal)Car buretor:Type × quantity:
VM12SC x 1Spark plu g(s):Manufacturer/model:
PW50 NGK/BP4HS (ZAF)
PW50 NGK/BPR4HS
(AUT)(BEL)(CHE)(CYP)(CZE)(DEU)(DNK)(E
SP)(FIN)(FRA)(GBR)(GRC)(IRL)(ITA)(NLD)(N
OR)(POL)(PRT)(SVK)(SVN)(SWE)(TUR)
PW50F NGK/BPR4HS
PW50F1 NGK/BPR4HS
Manufacturer/model: PW50 DENSO/W14FP-L (ZAF)
Spark plug gap: 0.6–0.7 mm (0.024–0.028 in)Clutch:Clutch type:Wet, centrifugal automaticTransmission:Primary reduction ratio:
1.909 (63/33)
Final drive: Shaft
Secondary reduction ratio: 6.218 (19/15 x 54/11)
U2SA81E0.book Page 1 Monday, June 2, 2014 2:00 PM
Page 73 of 76
CONSUMER INFORMATION
10-1
10
EAU53562
Id entification num bersRecord the vehicle identification num-
ber, engine serial number, and the
model label information in the spaces
provided below. These identification
numbers are needed when registering
the vehicle with the authorities in your
area and when ordering spare parts
from a Yamaha dealer.
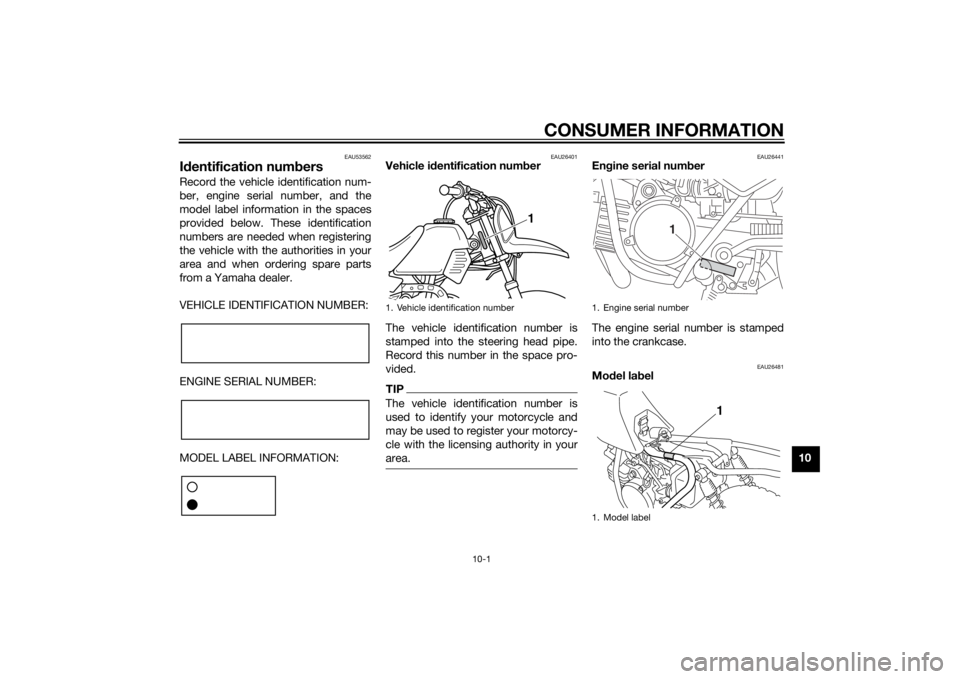
VEHICLE IDENTIFICATION NUMBER:
ENGINE SERIAL NUMBER:
MODEL LABEL INFORMATION:
EAU26401
Vehicle i dentification num ber
The vehicle identification number is
stamped into the steering head pipe.
Record this number in the space pro-
vided.TIPThe vehicle identification number is
used to identify your motorcycle and
may be used to register your motorcy-
cle with the licensing authority in your
area.
EAU26441
En gine serial num ber
The engine serial number is stamped
into the crankcase.
EAU26481
Mo del la bel
1. Vehicle identification number
1
1. Engine serial number
1. Model label
1
1
U2SA81E0.book Page 1 Monday, June 2, 2014 2:00 PM
Page 75 of 76

11-1
11
INDEX
AAcceleration and deceleration ................ 6-2
Air filter element, cleaning ...................... 7-9
Autolube pump, adjusting .................... 7-16BBrake lever, front .................................... 4-2
Brake lever, rear ..................................... 4-3
Brake levers, lubricating ....................... 7-17
Brake shoes, checking ......................... 7-15
Braking ................................................... 6-2CCable lock (for Europe) ........................... 4-8
Cables, checking and lubricating ......... 7-16
Carburetor, adjusting............................ 7-11
Care ........................................................ 8-1
Centerstand, checking and lubricating........................................... 7-17EEngine break-in ...................................... 6-3
Engine idling speed .............................. 7-11
Engine oil ................................................ 4-6
Engine serial number ............................ 10-1
Engine, starting a warm.......................... 6-1
Engine stop switch ................................. 4-1FFront and rear brake lever free play, adjusting ............................................. 7-14
Front fork, checking ............................. 7-17
Fuel ......................................................... 4-3
Fuel cock ................................................ 4-6
Fuel tank breather hose.......................... 4-5
Fuel tank cap .......................................... 4-3HHandlebar switch.................................... 4-1
IIdentification numbers ......................... 10-1KKickstarter .............................................. 4-7LLabels, location ...................................... 1-1MMaintenance and lubrication, periodic... 7-4
Maintenance, emission control system ................................................. 7-3
Matte color, caution ............................... 8-1
Middle and final gear cases ................... 7-9
Model label........................................... 10-1PParking ................................................... 6-4
Part locations ......................................... 3-1
Power reduction plate, removing ........... 7-7SSafety information .................................. 2-1
Seat ........................................................ 4-7
Spark arrester, cleaning ....................... 7-10
Spark plug, checking ............................. 7-6
Specifications......................................... 9-1
Speed limiter and power reduction plate ..................................................... 4-1
Starter (choke) lever ............................... 4-7
Starting and warming up a cold engine .................................................. 6-1
Starting off ............................................. 6-2
Steering, checking ............................... 7-18
Storage................................................... 8-3TThrottle grip and cable, checking and lubricating .......................................... 7-16 Throttle grip free play, checking ........... 7-12
Tires ...................................................... 7-12
Tool kit .................................................... 7-2
Transmission oil ...................................... 7-8
Troubleshooting .................................... 7-23
Troubleshooting chart........................... 7-24
VVehicle Emission Control Information
label (For Canada) .............................. 10-2
Vehicle identification number ............... 10-1WWheel bearings, checking .................... 7-18
Wheel (front).......................................... 7-19
Wheel (rear)........................................... 7-20
Wheels .................................................. 7-14
U2SA81E0.book Page 1 Monday, June 2, 2014 2:00 PM