light YAMAHA PW50 2018 Owners Manual
[x] Cancel search | Manufacturer: YAMAHA, Model Year: 2018, Model line: PW50, Model: YAMAHA PW50 2018Pages: 80, PDF Size: 1.9 MB
Page 21 of 80
Safety information
2-4
2
Aftermarket Parts, Accessories, an
d
Mo difications
While you may find aftermarket prod-
ucts similar in design and quality to
genuine Yamaha accessories, recog-
nize that some aftermarket accesso-
ries or modifications are not suitable
because of potential safety hazards to
you or others. Installing aftermarket
products or having other modifications
performed to your vehicle that change
any of the vehicle’s design or operation
characteristics can put you and others
at greater risk of serious injury or
death. You are responsible for injuries
related to changes in the vehicle.
Keep the following guidelines in mind,
as well as those provided under “Load-
ing” when mounting accessories. Never install accessories that
would impair the performance of
your motorcycle. Carefully inspect
the accessory before using it to
make sure that it does not in any
way reduce ground clearance or
cornering clearance, limit suspen-
sion travel, steering travel or con-
trol operation.
• Accessories fitted to the han- dlebar or the front fork area can
create instability due to improp-
er weight distribution. If acces-
sories are added to the
handlebar or front fork area,
they must be as lightweight as
possible and should be kept to
a minimum.
• Bulky or large accessories may seriously affect the stability of
the motorcycle. Wind may at- tempt to lift the motorcycle, or
the motorcycle may become
unstable in cross winds.
• Certain accessories can dis- place the operator from his or
her normal riding position. This
improper position limits the
freedom of movement of the
operator and may limit control
ability, therefore, such accesso-
ries are not recommended.
Use caution when adding electri-
cal accessories. If electrical ac-
cessories exceed the capacity of
the motorcycle’s electrical sys-
tem, an electric failure could re-
sult, which could cause a
dangerous loss of lights or engine
power.
Aftermarket Tires an d Rims
The tires and rims that came with your
motorcycle were designed to match
the performance capabilities and to
provide the best combination of han-
dling, braking, and comfort. Other
tires, rims, sizes, and combinations
may not be appropriate. Refer to page
7-14 for tire specifications and more in-
formation on replacing your tires.
Transportin g the Motorcycle
Be sure to observe following instruc-
tions before transporting the motorcy-
cle in another vehicle. Remove all loose items from the
motorcycle.
Check that the fuel cock is in the
“S” (stop) position and that there
are no fuel leaks.
U2SA84E0.book Page 4 Wednesday, May 10, 2017 9:37 AM
Page 29 of 80
Instrument and control functions
4-4
4
EAU13213
Fuel
Make sure there is sufficient gasoline in
the tank.
WARNING
EWA10882
Gasoline an d gasoline vapors are
extremely flamma ble. To avoi d fires
an d explosions an d to re duce the
risk of injury when refuelin g, follow
these instructions.
1. Before refueling, turn off the en- gine and be sure that no one is sit-
ting on the vehicle. Never refuel
while smoking, or while in the vi-
cinity of sparks, open flames, or
other sources of ignition such as
the pilot lights of water heaters
and clothes dryers.
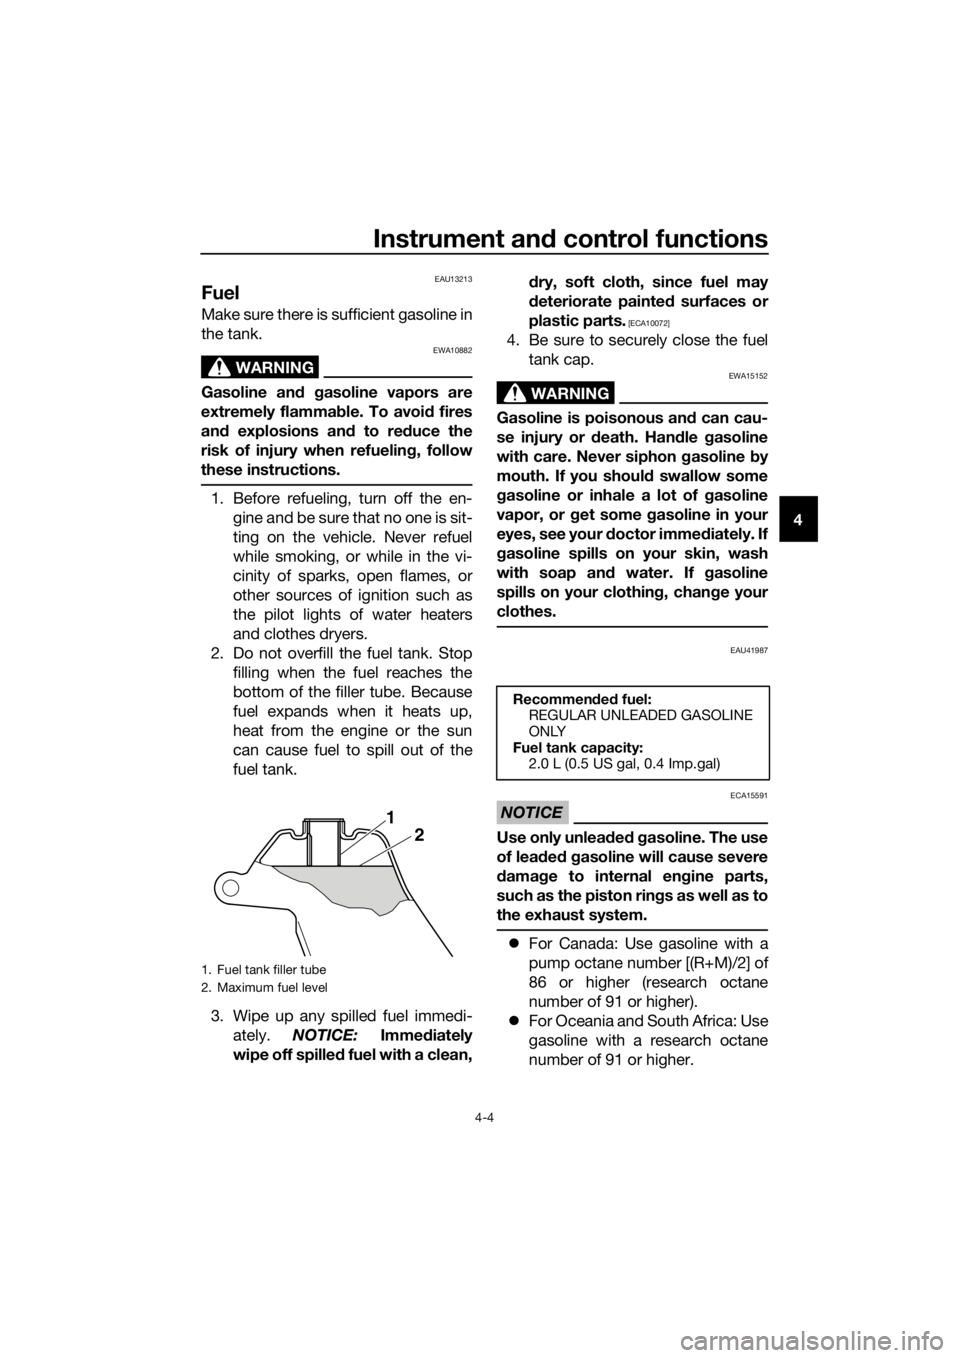
2. Do not overfill the fuel tank. Stop filling when the fuel reaches the
bottom of the filler tube. Because
fuel expands when it heats up,
heat from the engine or the sun
can cause fuel to spill out of the
fuel tank.
3. Wipe up any spilled fuel immedi- ately. NOTICE: Immediately
wipe off spille d fuel with a clean, d
ry, soft cloth, since fuel may
d eteriorate painte d surfaces or
plastic parts.
[ECA10072]
4. Be sure to securely close the fuel tank cap.
WARNING
EWA15152
Gasoline is poisonous an d can cau-
se injury or death. Han dle gasoline
with care. Never siphon gasoline by
mouth. If you shoul d swallow some
g asoline or inhale a lot of gasoline
vapor, or get some g asoline in your
eyes, see your doctor imme diately. If
g asoline spills on your skin, wash
with soap an d water. If gasoline
spills on your clothin g, chan ge your
clothes.
EAU41987
NOTICE
ECA15591
Use only unlea ded g asoline. The use
of lead ed g asoline will cause severe
d amag e to internal en gine parts,
such as the piston rin gs as well as to
the exhaust system.
For Canada: Use gasoline with a
pump octane number [(R+M)/2] of
86 or higher (research octane
number of 91 or higher).
For Oceania and South Africa: Use
gasoline with a research octane
number of 91 or higher.
1. Fuel tank filler tube
2. Maximum fuel level
2
1
Recommen
ded fuel:
REGULAR UNLEADED GASOLINE
ONLY
Fuel tank capacity: 2.0 L (0.5 US gal, 0.4 Imp.gal)
U2SA84E0.book Page 4 Wednesday, May 10, 2017 9:37 AM
Page 32 of 80
Instrument and control functions
4-7
4
EAU13591
Starter (choke) lever “ ”
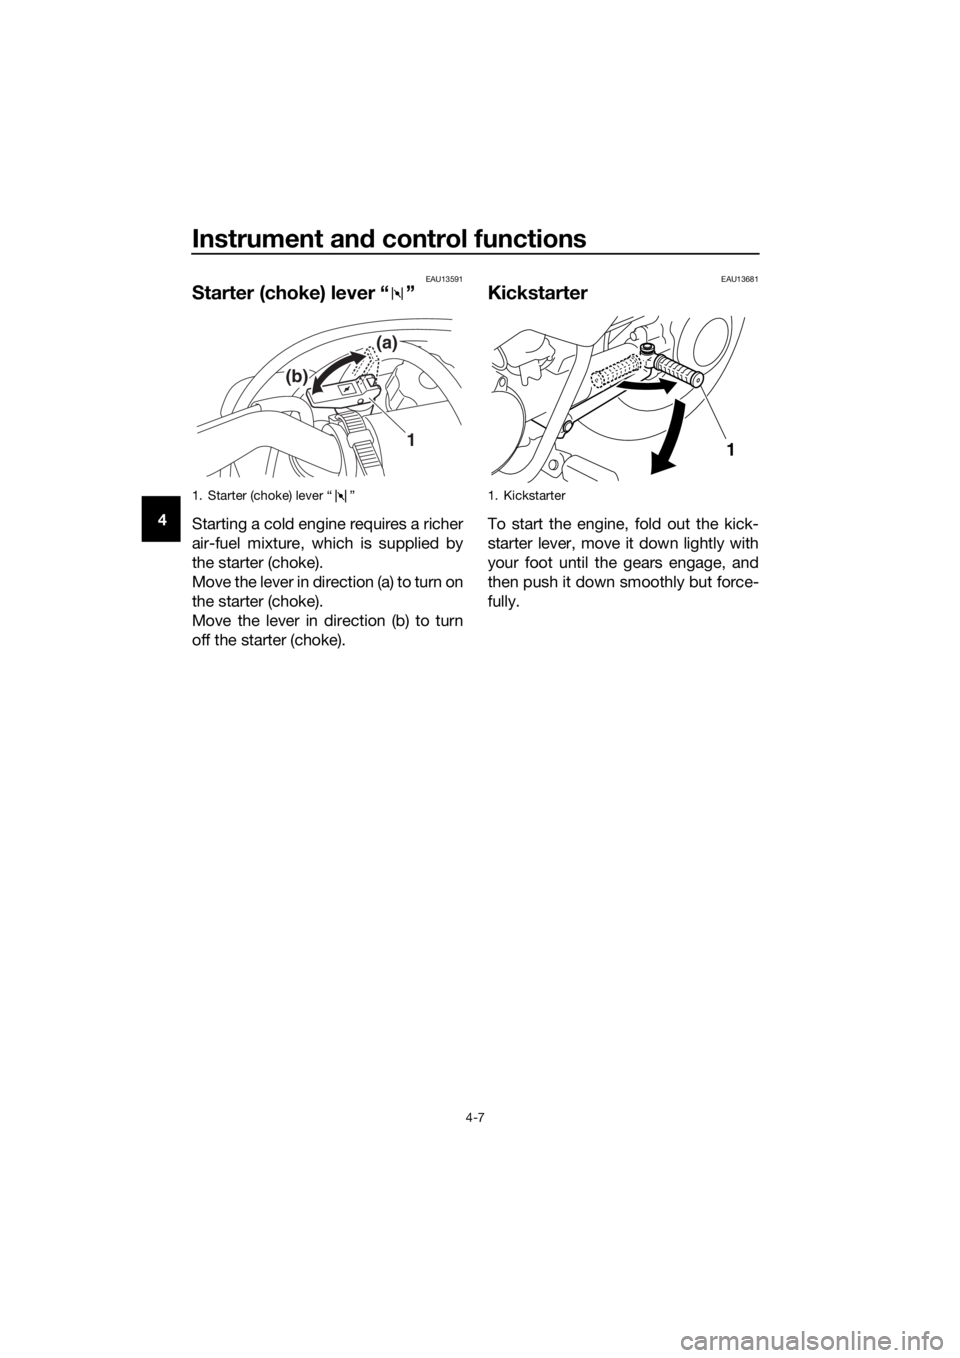
Starting a cold engine requires a richer
air-fuel mixture, which is supplied by
the starter (choke).
Move the lever in direction (a) to turn on
the starter (choke).
Move the lever in direction (b) to turn
off the starter (choke).
EAU13681
Kickstarter
To start the engine, fold out the kick-
starter lever, move it down lightly with
your foot until the gears engage, and
then push it down smoothly but force-
fully.
1. Starter (choke) lever “ ”
1
(a)
(b)
1. Kickstarter
1
U2SA84E0.book Page 7 Wednesday, May 10, 2017 9:37 AM
Page 38 of 80
Operation and important rid ing points
6-2
6
EAU16661
Startin g a warm en gine
Follow the same procedure as for
starting a cold engine with the excep-
tion that the starter (choke) is not re-
quired when the engine is warm.
Instead, start the engine with the throt-
tle slightly open.
TIP
If the engine does not start after sever-
al kicks, try again with the throttle 1/4
to 1/2 open.
EAU41004
Startin g off
1. While applying the rear brake le-
ver, push the motorcycle off the
centerstand.
2. Completely close the throttle.
3. Set the engine stop switch to “RUN”.
4. Check for oncoming off-road vehi- cles, release the rear brake lever,
and then slowly turn the throttle
grip in order to take off.
U2SA84E0.book Page 2 Wednesday, May 10, 2017 9:37 AM
Page 45 of 80
Periodic maintenance an d a djustment
7-5
7TIP
The air filter needs more frequent service if you are riding in unusually wet or dusty
areas.
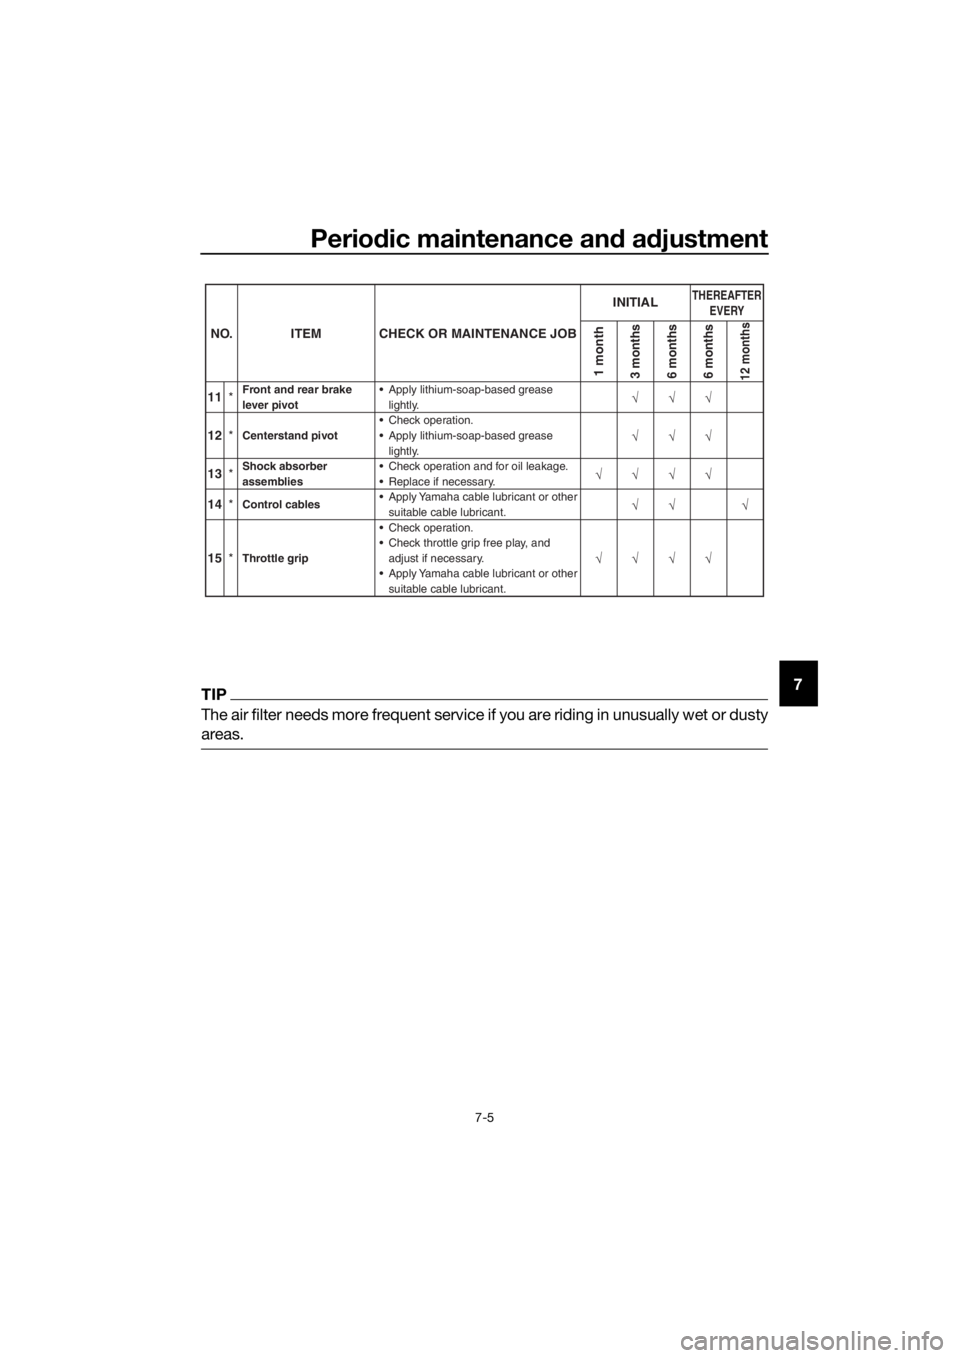
11 *Front and rear brake
lever pivot Apply lithium-soap-based grease
lightly.
12 *Centerstand pivot Check operation.
13
*Shock absorber
assemblies Check operation and for oil leakage.
14
*Control cables Apply Yamaha cab
le lubricant or other
suitab le cable lubricant.
15*Throttle grip Check operation.
Check throttle grip free play, and
adjust if necessary.
Apply Yamaha cab le lubricant or other
suitab le cable lubricant.
Replace if necessary. Apply lithium-soap-based grease
lightly.
NO. ITEM CHECK OR MAINTENANCE JOB
1 month3 months
6 months
6 months12 months
√√√ √
√√√ √√√
√
√√
√
√
√√
THEREAFTER
EVERYINITIAL
U2SA84E0.book Page 5 Wednesday, May 10, 2017 9:37 AM
Page 46 of 80
Periodic maintenance an d a djustment
7-6
7
EAU19607
Checkin g the spark plu g
The spark plug is an important engine
component, which is easy to check.
Since heat and deposits will cause any
spark plug to slowly erode, the spark
plug should be removed and checked
in accordance with the periodic main-
tenance and lubrication chart. In addi-
tion, the condition of the spark plug
can reveal the condition of the engine.
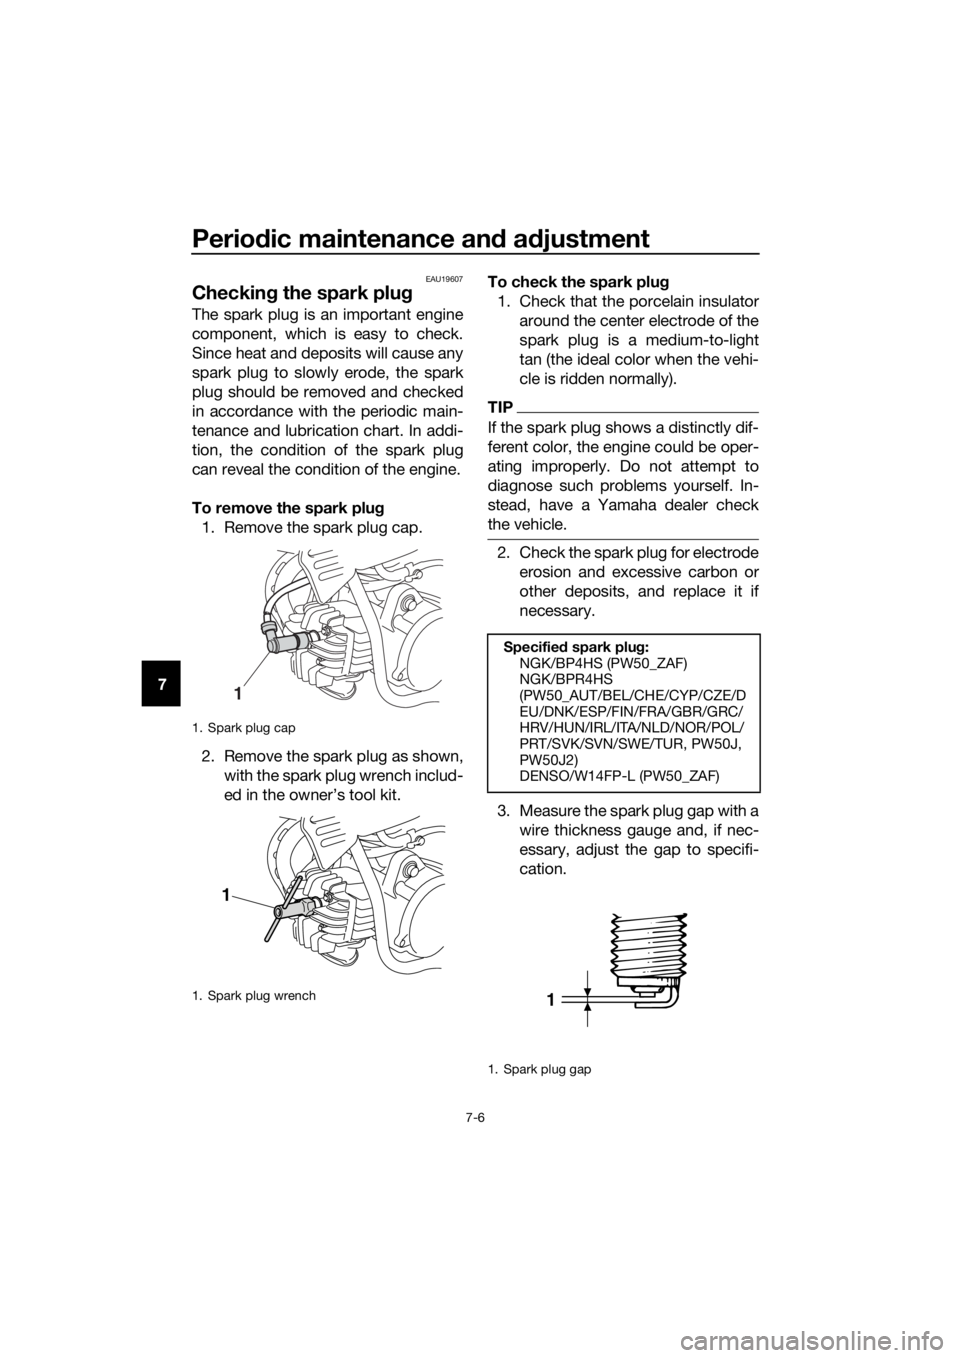
To remove the spark plu g
1. Remove the spark plug cap.
2. Remove the spark plug as shown, with the spark plug wrench includ-
ed in the owner’s tool kit. To check the spark plu
g
1. Check that the porcelain insulator around the center electrode of the
spark plug is a medium-to-light
tan (the ideal color when the vehi-
cle is ridden normally).
TIP
If the spark plug shows a distinctly dif-
ferent color, the engine could be oper-
ating improperly. Do not attempt to
diagnose such problems yourself. In-
stead, have a Yamaha dealer check
the vehicle.
2. Check the spark plug for electrodeerosion and excessive carbon or
other deposits, and replace it if
necessary.
3. Measure the spark plug gap with a wire thickness gauge and, if nec-
essary, adjust the gap to specifi-
cation.
1. Spark plug cap
1. Spark plug wrench
1
1
Specified spark plu g:
NGK/BP4HS (PW50_ZAF)
NGK/BPR4HS
(PW50_AUT/BEL/CHE/CYP/CZE/D
EU/DNK/ESP/FIN/FRA/GBR/GRC/
HRV/HUN/IRL/ITA/NLD/NOR/POL/
PRT/SVK/SVN/SWE/TUR, PW50J,
PW50J2)
DENSO/W14FP-L (PW50_ZAF)
1. Spark plug gap
1
U2SA84E0.book Page 6 Wednesday, May 10, 2017 9:37 AM
Page 51 of 80
Periodic maintenance an d a djustment
7-11
7
4. Apply oil of the recommended
type to the entire surface of the
sponge material, and then
squeeze the excess oil out.
TIP
The sponge material should be wet but
not dripping.
5. Insert the sponge material into theair filter case. NOTICE: Make
sure that the spon ge material is
properly seated in the air filter
case. The en gine shoul d never
b e operated without the spon ge
material installe d, otherwise the
piston(s) an d/or cylin der(s) may
b ecome excessively worn.
[ECA15622]
6. Install the air filter case cover by
installing the screw.
7. Install the seat.
EAU41222
Cleanin g the spark arrester
The spark arrester should be cleaned
at the intervals specified in the periodic
maintenance and lubrication chart.
WARNING
EWA10981
Always let the exhaust system
cool prior to touching exhaust
components.
Do not start the en gine when
cleanin g the exhaust system.
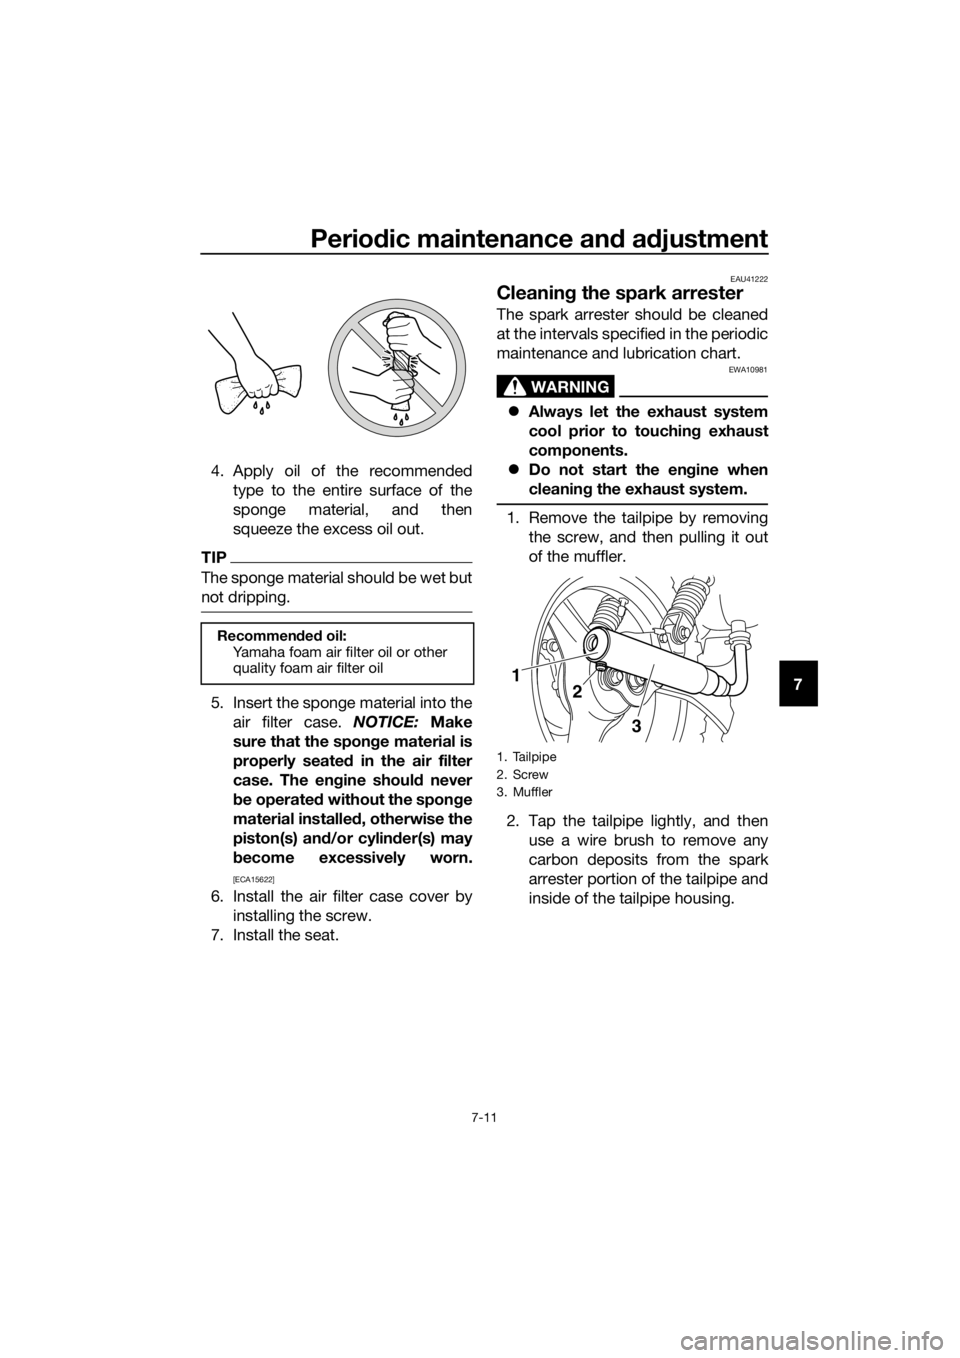
1. Remove the tailpipe by removing
the screw, and then pulling it out
of the muffler.
2. Tap the tailpipe lightly, and then use a wire brush to remove any
carbon deposits from the spark
arrester portion of the tailpipe and
inside of the tailpipe housing.
Recommen ded oil:
Yamaha foam air filter oil or other
quality foam air filter oil
1. Tailpipe
2. Screw
3. Muffler
1
2
3
U2SA84E0.book Page 11 Wednesday, May 10, 2017 9:37 AM
Page 65 of 80
Periodic maintenance an d a djustment
7-25
7
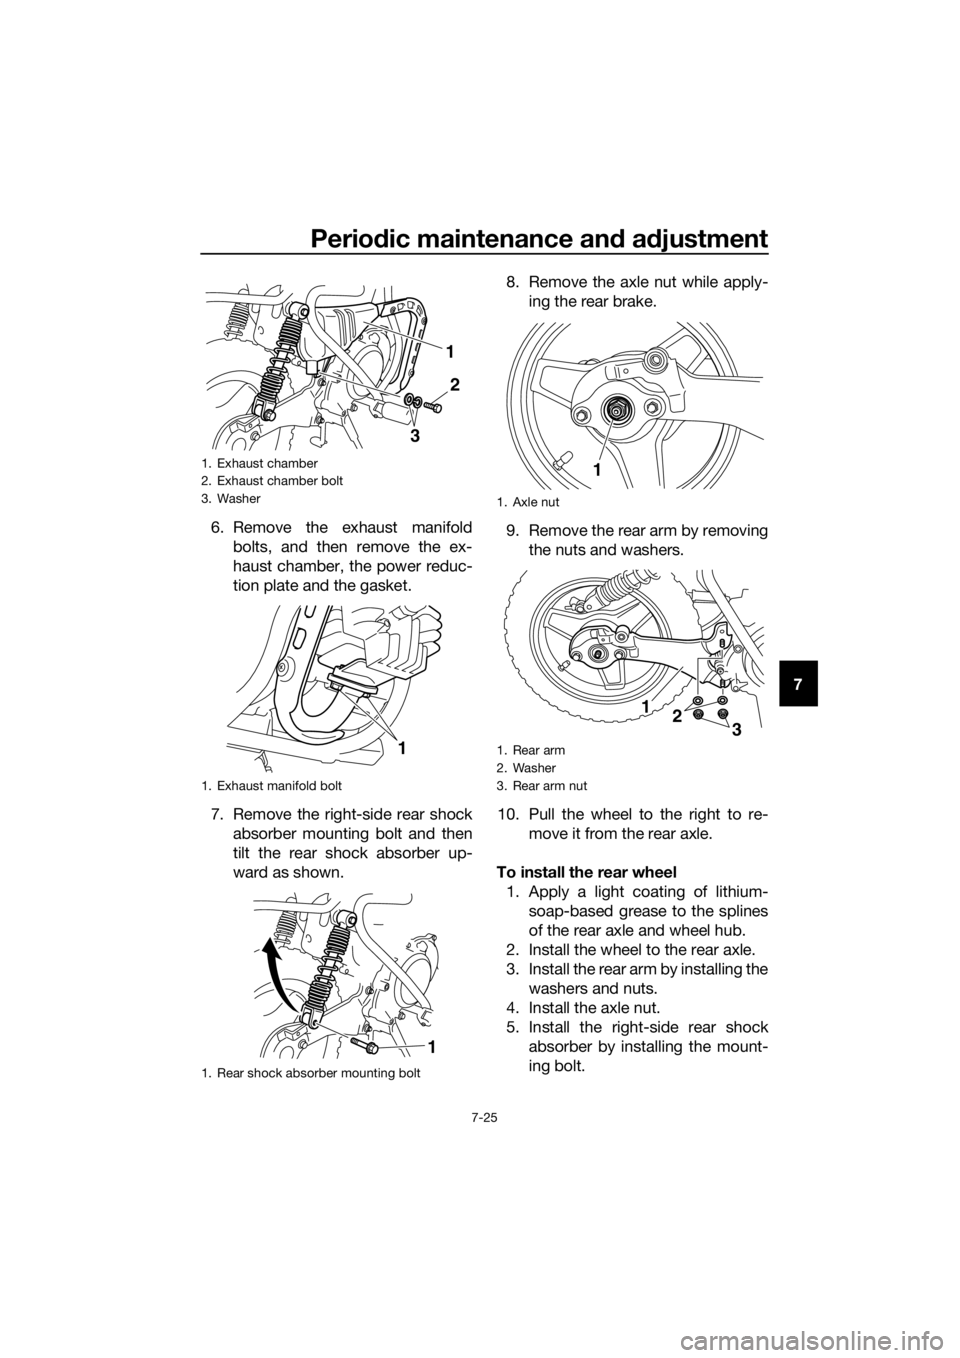
6. Remove the exhaust manifold
bolts, and then remove the ex-
haust chamber, the power reduc-
tion plate and the gasket.
7. Remove the right-side rear shock absorber mounting bolt and then
tilt the rear shock absorber up-
ward as shown. 8. Remove the axle nut while apply-
ing the rear brake.
9. Remove the rear arm by removing the nuts and washers.
10. Pull the wheel to the right to re- move it from the rear axle.
To install the rear wheel 1. Apply a light coating of lithium- soap-based grease to the splines
of the rear axle and wheel hub.
2. Install the wheel to the rear axle.
3. Install the rear arm by installing the washers and nuts.
4. Install the axle nut.
5. Install the right-side rear shock absorber by installing the mount-
ing bolt.
1. Exhaust chamber
2. Exhaust chamber bolt
3. Washer
1. Exhaust manifold bolt
1. Rear shock absorber mounting bolt
2
1
3
1
1
1. Axle nut
1. Rear arm
2. Washer
3. Rear arm nut
1
1
2
3
U2SA84E0.book Page 25 Wednesday, May 10, 2017 9:37 AM