maintenance YAMAHA PW80 2008 Owner's Guide
[x] Cancel search | Manufacturer: YAMAHA, Model Year: 2008, Model line: PW80, Model: YAMAHA PW80 2008Pages: 72, PDF Size: 1.38 MB
Page 61 of 72

PERIODIC MAINTENANCE AND MINOR REPAIR
6-27
2
3
4
5
67
8
9
EAU41570
To install the rear wheel
1. Install the drive chain onto the rear
sprocket.
2. Install the wheel by inserting the
chain pullers, spacer and then in-
sert the wheel axle from the
right-hand side.
3. Install the brake rod onto the brake
camshaft lever, and then install the
brake pedal free play adjusting nut
onto the brake rod.
4. Connect the brake torque rod onto
the brake shoe plate by installing
the bolt and nut, and then tighten
the nut to the specified torque.
5. Insert a new cotter pin into the
brake torque rod bolt.
WARNING
EWA10830
Always use a new cotter pin.
6. Install the washer and axle nut,
and then lower the rear wheel so
that it is on the ground.7. Adjust the drive chain slack. (See
page 6-16.)
8. Tighten the axle nut to the speci-
fied torque.
9. Adjust the brake pedal free play.
(See page 6-15.)
EAU25850
Troubleshooting
Although Yamaha motorcycles receive
a thorough inspection before shipment
from the factory, trouble may occur dur-
ing operation. Any problem in the fuel,
compression, or ignition systems, for
example, can cause poor starting and
loss of power.
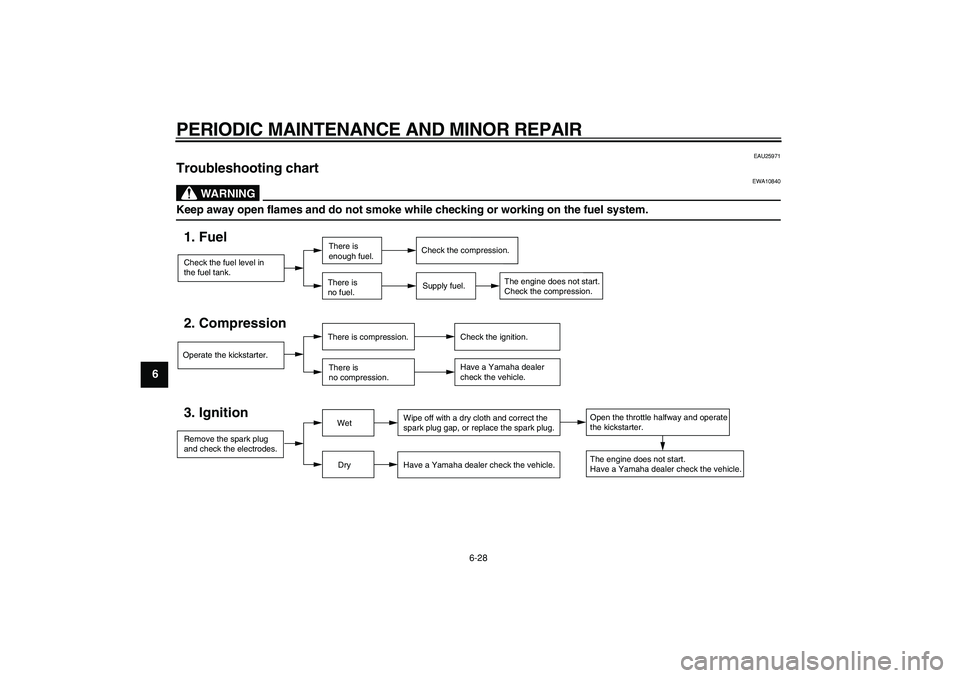
The following troubleshooting chart
represents a quick and easy procedure
for checking these vital systems your-
self. However, should your motorcycle
require any repair, take it to a Yamaha
dealer, whose skilled technicians have
the necessary tools, experience, and
know-how to service the motorcycle
properly.
Use only genuine Yamaha replace-
ment parts. Imitation parts may look like
Yamaha parts, but they are often inferi-
or, have a shorter service life and can
lead to expensive repair bills.
Tightening torque:
Brake torque rod nut:
15.5 Nm (1.6 m·kgf, 11.2 ft·lbf)
Tightening torque:
Axle nut:
60 Nm (6.0 m·kgf, 43.4 ft·lbf)
Page 62 of 72

PERIODIC MAINTENANCE AND MINOR REPAIR
6-28
1
2
3
4
5
6
7
8
9
EAU25971
Troubleshooting chart
WARNING
EWA10840
Keep away open flames and do not smoke while checking or working on the fuel system.
Check the fuel level in
the fuel tank.1. Fuel
There is
enough fuel.
There is
no fuel.
Supply fuel.
Operate the kickstarter.2. Compression
There is compression.
There is
no compression.Check the ignition.
Have a Yamaha dealer
check the vehicle.
Remove the spark plug
and check the electrodes.3. Ignition
Wet
DryWipe off with a dry cloth and correct the
spark plug gap, or replace the spark plug.
Have a Yamaha dealer check the vehicle.The engine does not start.
Have a Yamaha dealer check the vehicle.
Open the throttle halfway and operate
the kickstarter.
Check the compression.
The engine does not start.
Check the compression.
Page 70 of 72

INDEX
A
Accessories and replacement parts ........ 6-14
Air filter element, cleaning......................... 6-8
Autolube pump, adjusting ....................... 6-19
B
Brake and shift pedals, checking and
lubricating ............................................. 6-20
Brake lever ................................................ 3-2
Brake lever, checking and lubricating ..... 6-20
Brake lever free play, adjusting............... 6-14
Brake pedal ............................................... 3-2
Brake pedal free play, adjusting.............. 6-15
Brake shoes, checking ............................ 6-16
C
Cables, checking and lubricating ............ 6-19
Carburetor, adjusting .............................. 6-10
Care .......................................................... 7-1
D
Drive chain, cleaning and lubricating ...... 6-18
Drive chain slack ..................................... 6-16
E
Engine break-in ......................................... 5-3
Engine idling speed................................. 6-11
Engine oil .................................................. 3-4
Engine, starting a warm ............................ 5-2
Engine stop switch .................................... 3-1
F
Front fork, checking ................................ 6-21
Fuel ........................................................... 3-3
Fuel cock................................................... 3-5
Fuel tank breather hose ............................ 3-4
Fuel tank cap ............................................ 3-2
H
Handlebar switch ...................................... 3-1
I
Identification numbers................................9-1
K
Kickstarter ..................................................3-6
L
Labels, location of ......................................1-4
M
Matte color, caution ...................................7-1
Model label ................................................9-1
P
Parking.......................................................5-4
Part locations .............................................2-1
Periodic maintenance and lubrication
chart ........................................................6-2
Power reduction plate ................................3-1
Power reduction plate, removing ...............6-6
Pre-operation check list .............................4-2
S
Safety information ......................................1-1
Seat ...........................................................3-6
Shifting .......................................................5-2
Shift pedal ..................................................3-1
Shock absorber..........................................3-7
Sidestand, checking and lubricating ........6-21
Spark arrester, cleaning.............................6-9
Spark plug, checking .................................6-5
Specifications.............................................8-1
Starter (choke) lever ..................................3-6
Starting and warming up a cold engine .....5-1
Steering, checking ...................................6-22
Storage ......................................................7-3
Supporting the motorcycle .......................6-23
T
Throttle cable free play, adjusting ............6-11Throttle grip and cable, checking and
lubricating .............................................. 6-19
Tires ........................................................ 6-12
Tool kit ....................................................... 6-1
Transmission oil ........................................ 6-7
Troubleshooting....................................... 6-27
Troubleshooting chart.............................. 6-28
V
Vehicle identification number .................... 9-1
W
Wheel bearings, checking ....................... 6-22
Wheel (front)............................................ 6-23
Wheel (rear) ............................................ 6-26
Wheels .................................................... 6-13