Choke YAMAHA RHINO 660 2006 Owners Manual
[x] Cancel search | Manufacturer: YAMAHA, Model Year: 2006, Model line: RHINO 660, Model: YAMAHA RHINO 660 2006Pages: 410, PDF Size: 11.49 MB
Page 14 of 410
EVU00050
1-CONTENTS
LOCATION OF THE WARNING AND
SPECIFICATION LABELS ....................... 1-1
SAFETY INFORMATION ......................... 2-1
DESCRIPTION AND VEHICLE
IDENTIFICATION .................................... 3-1
Identification number records ............... 3-7
Key identification number ..................... 3-9
Vehicle identification number ............. 3-11
Model label ......................................... 3-13
CONTROL FUNCTIONS ......................... 4-1
Main switch........................................... 4-1
Indicator and warning lights.................. 4-5
Multi-function meter unit ..................... 4-13
Switches ............................................. 4-19
Accelerator pedal ............................... 4-33
Brake pedal ........................................ 4-35
Parking brake lever ............................ 4-37
Drive select lever ................................ 4-39
Fuel tank cap ...................................... 4-39
Fuel level check window..................... 4-41
Starter (choke) ................................... 4-41
1234
Seats .................................................. 4-43
Seat belts ........................................... 4-45
Glove compartment............................ 4-49
Cargo bed .......................................... 4-51
Front and rear shock absorber
adjustment ....................................... 4-57
Trailer hitch bracket ........................... 4-61
Auxiliary DC jack ................................ 4-63
PRE-OPERATION CHECKS ................... 5-1
Front and rear brakes .......................... 5-7
Fuel .................................................... 5-11
Engine oil ........................................... 5-15
Coolant............................................... 5-17
Final gear oil ...................................... 5-21
Differential gear oil ............................. 5-21
Accelerator pedal ............................... 5-23
Seat belts ........................................... 5-23
Steering.............................................. 5-25
Fittings and fasteners......................... 5-25
Lights ................................................. 5-25
Switches............................................. 5-27
Tires ................................................... 5-29
How to measure tire pressure ............ 5-33
5
EE.book Page 1 Monday, July 11, 2005 2:32 PM
Page 49 of 410
3-2
3
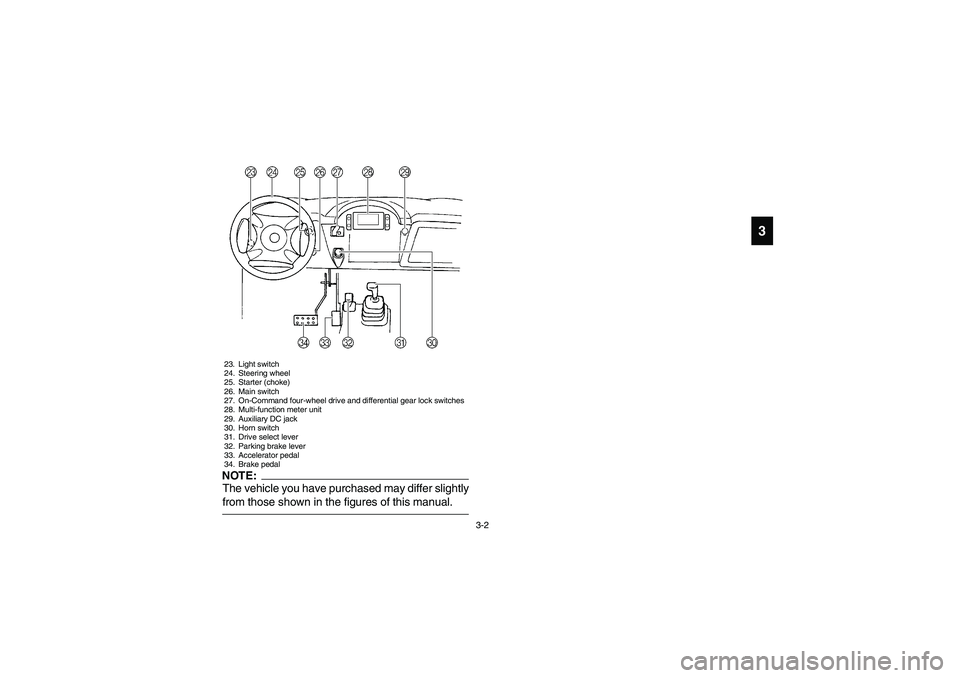
23. Light switch
24. Steering wheel
25. Starter (choke)
26. Main switch
27. On-Command four-wheel drive and differential gear lock switches
28. Multi-function meter unit
29. Auxiliary DC jack
30. Horn switch
31. Drive select lever
32. Parking brake lever
33. Accelerator pedal
34. Brake pedalNOTE:_ The vehicle you have purchased may differ slightly
from those shown in the figures of this manual. _ EE.book Page 2 Monday, July 11, 2005 2:32 PM
Page 102 of 410
4-41 1. Fuel level check window
1. Hublot de contrôle du niveau de carburant
1. Mirilla de control del nivel de gasolina
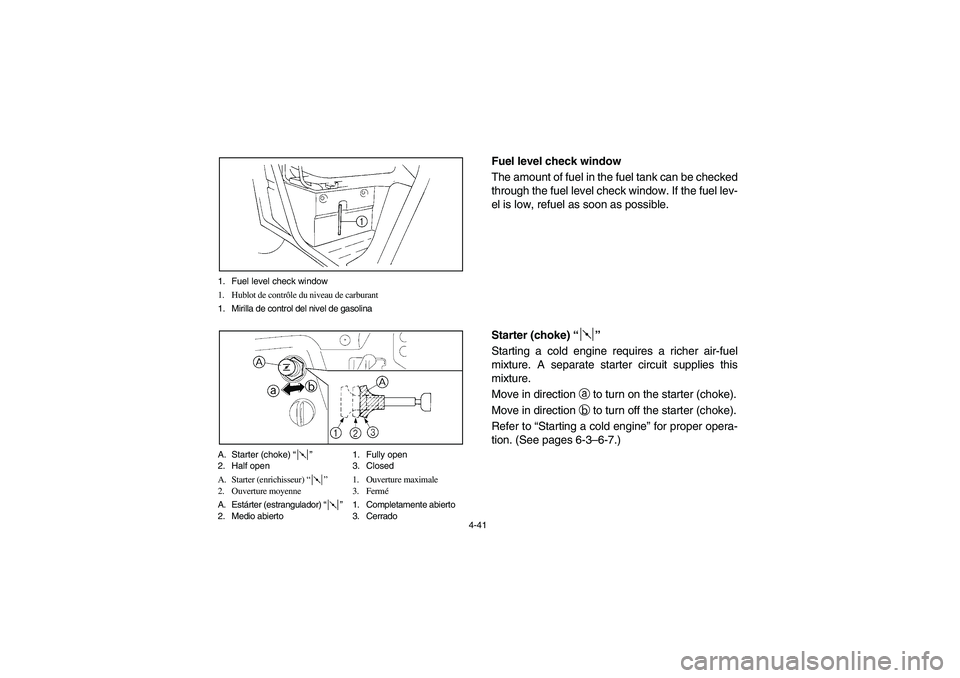
A. Starter (choke) “”1. Fully open
2. Half open 3. Closed
A. Starter (enrichisseur) “”1. Ouverture maximale
2. Ouverture moyenne 3. Fermé
A. Estárter (estrangulador) “”1. Completamente abierto
2. Medio abierto 3. Cerrado
EVU00310
Fuel level check window
The amount of fuel in the fuel tank can be checked
through the fuel level check window. If the fuel lev-
el is low, refuel as soon as possible.
EVU00320
Starter (choke) “”
Starting a cold engine requires a richer air-fuel
mixture. A separate starter circuit supplies this
mixture.
Move in direction
a to turn on the starter (choke).
Move in direction
b to turn off the starter (choke).
Refer to “Starting a cold engine” for proper opera-
tion. (See pages 6-3–6-7.)
EE.book Page 41 Monday, July 11, 2005 2:32 PM
Page 168 of 410
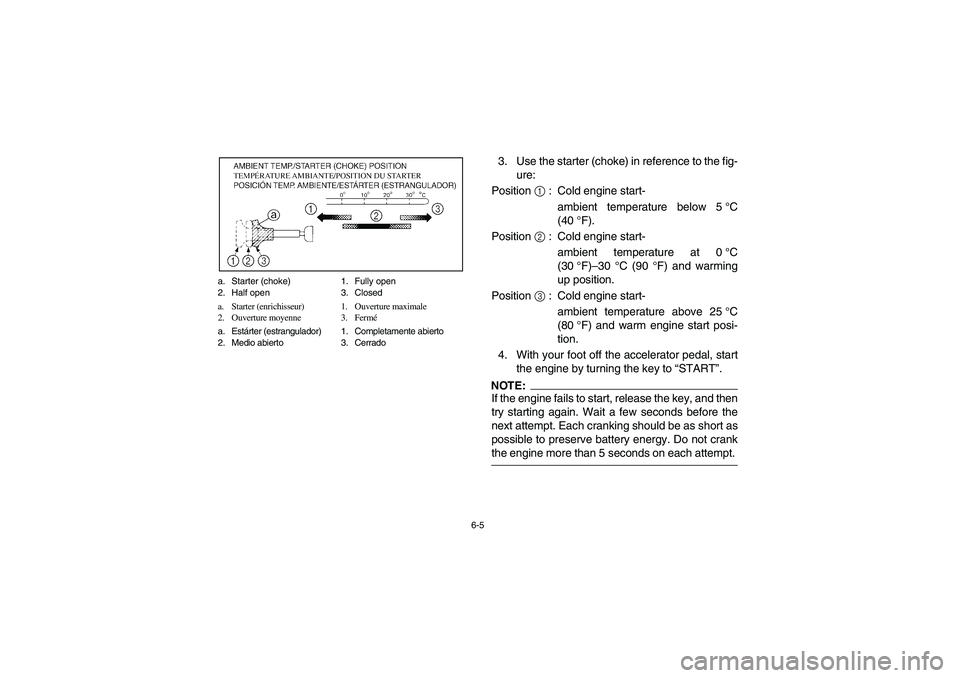
6-5 a. Starter (choke) 1. Fully open
2. Half open 3. Closed
a. Starter (enrichisseur) 1. Ouverture maximale
2. Ouverture moyenne 3. Fermé
a. Estárter (estrangulador) 1. Completamente abierto
2. Medio abierto 3. Cerrado
3. Use the starter (choke) in reference to the fig-
ure:
Position
1 : Cold engine start-
ambient temperature below 5°C
(40°F).
Position
2 : Cold engine start-
ambient temperature at 0°C
(30°F)–30 °C (90 °F) and warming
up position.
Position
3 : Cold engine start-
ambient temperature above 25°C
(80°F) and warm engine start posi-
tion.
4. With your foot off the accelerator pedal, start
the engine by turning the key to “START”.NOTE:_ If the engine fails to start, release the key, and then
try starting again. Wait a few seconds before the
next attempt. Each cranking should be as short as
possible to preserve battery energy. Do not crank
the engine more than 5 seconds on each attempt. _
EE.book Page 5 Monday, July 11, 2005 2:32 PM
Page 170 of 410
6-7
5. If the engine is started with the starter (choke)
in position
1, the starter (choke) should be
returned to position
2 to warm up the en-
gine. If the engine is started with the starter
(choke) in position
2, keep the starter
(choke) in this position to warm up the en-
gine.
6. Continue warming up the engine until it idles
smoothly and return the starter (choke) to po-
sition
3 before riding.CAUTION:_ See the “Engine break-in” section prior to op-
erating the engine for the first time. _
EE.book Page 7 Monday, July 11, 2005 2:32 PM
Page 172 of 410
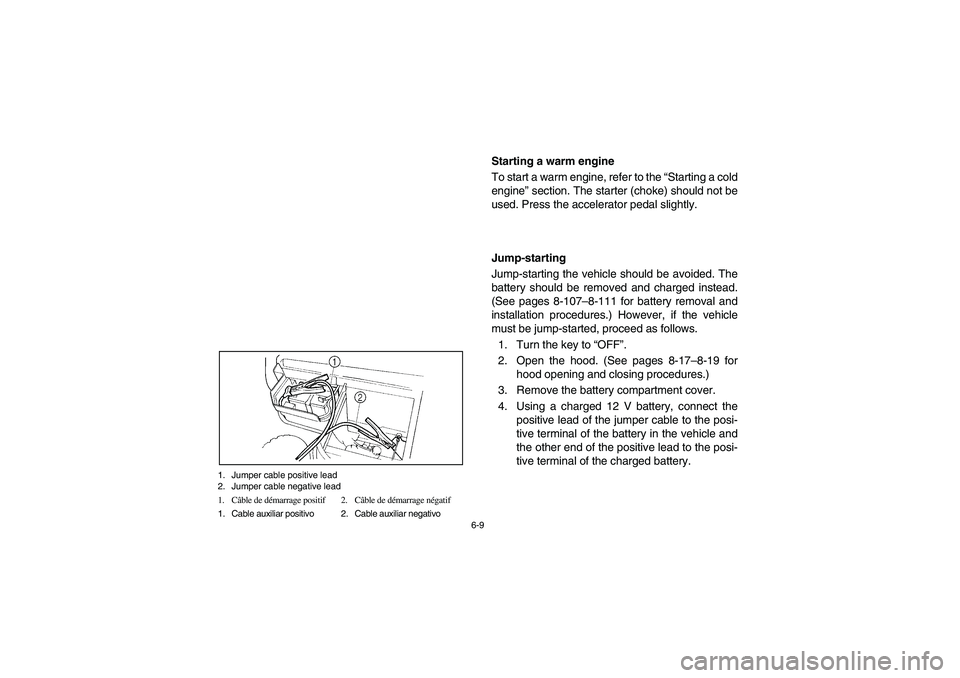
6-9 1. Jumper cable positive lead
2. Jumper cable negative lead
1. Câble de démarrage positif 2. Câble de démarrage négatif
1. Cable auxiliar positivo 2. Cable auxiliar negativo
EVU00550
Starting a warm engine
To start a warm engine, refer to the “Starting a cold
engine” section. The starter (choke) should not be
used. Press the accelerator pedal slightly.
EVU00560
Jump-starting
Jump-starting the vehicle should be avoided. The
battery should be removed and charged instead.
(See pages 8-107–8-111 for battery removal and
installation procedures.) However, if the vehicle
must be jump-started, proceed as follows.
1. Turn the key to “OFF”.
2. Open the hood. (See pages 8-17–8-19 for
hood opening and closing procedures.)
3. Remove the battery compartment cover.
4. Using a charged 12 V battery, connect the
positive lead of the jumper cable to the posi-
tive terminal of the battery in the vehicle and
the other end of the positive lead to the posi-
tive terminal of the charged battery.
EE.book Page 9 Monday, July 11, 2005 2:32 PM
Page 176 of 410
6-13
7. After the engine starts, disconnect the nega-
tive lead of the jumper cable from the vehicle
and charged battery, and then disconnect the
positive lead of the jumper cable from the
charged battery and the battery in the vehi-
cle.
8. Install the battery compartment cover.
9. Close the hood.
EVU00570
Warming up
To get maximum engine life, always warm up the
engine before starting off. Never accelerate hard
with a cold engine! To see whether or not the en-
gine is warm, check if it responds to the throttle
normally with the starter (choke) turned off.
EE.book Page 13 Monday, July 11, 2005 2:32 PM
Page 212 of 410
7-11
Perform the Pre-Operation Checks on pages 5-1–
5-35. Set the parking brake, shift to neutral, and
follow the instructions on page 6-3 to start the en-
gine. Once it has warmed up and you have turned
the choke off, you are ready to begin driving your
vehicle. With the engine idling, shift the drive se-
lect lever into low or high. Then release the parking
brake. Press the accelerator pedal slowly and
smoothly. The centrifugal clutch will engage and
you will start to accelerate. Avoid higher speeds
until you are thoroughly familiar with the operation
of your vehicle.
When slowing down or stopping, take your foot off
the accelerator pedal and smoothly press the
brake pedal. Improper use of the brakes can
cause the tires to lose traction, reducing control
and increasing the possibility of an accident.
EE.book Page 11 Monday, July 11, 2005 2:32 PM