YAMAHA SLIDER 50 2003 Service Manual
Manufacturer: YAMAHA, Model Year: 2003, Model line: SLIDER 50, Model: YAMAHA SLIDER 50 2003Pages: 80, PDF Size: 2.76 MB
Page 41 of 80

PERIODIC MAINTENANCE AND MINOR REPAIR
6
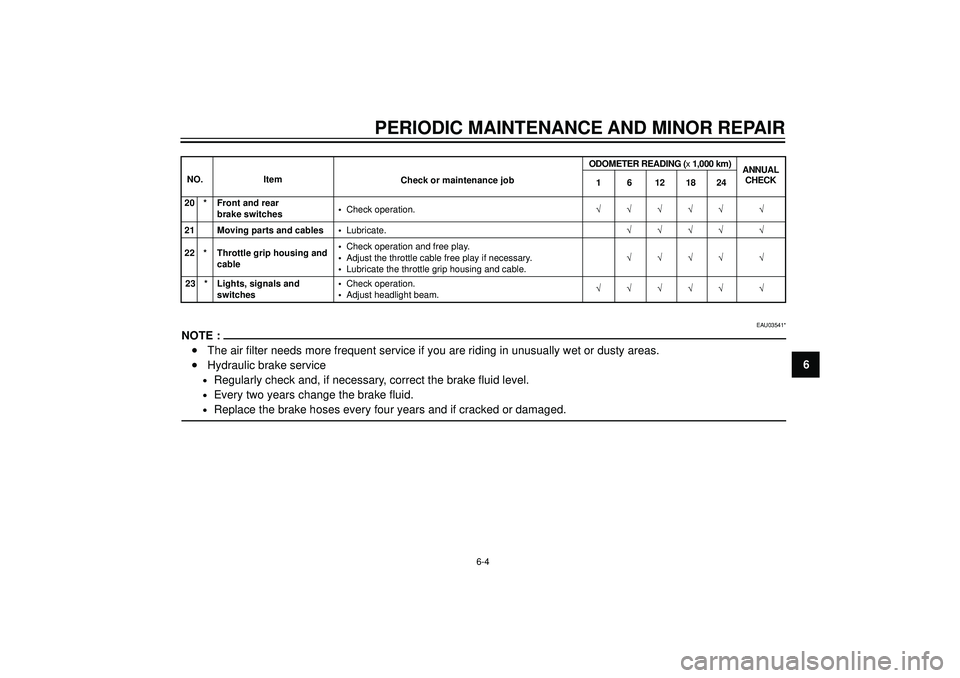
6-4 20 * Front and rear
•Check operation.√√√√√ √
brake switches
21 Moving parts and cables •Lubricate.√√√√ √
22 * Throttle grip housing and•Check operation and free play.
cable•Adjust the throttle cable free play if necessary.√√√√ √
•Lubricate the throttle grip housing and cable.
23 * Lights, signals and •Check operation.
‚àö‚àö‚àö‚àö‚àö ‚àö
switches •Adjust headlight beam.
NO. Item
Check or maintenance job
ODOMETER READING (x 1,000 km)
1ANNUAL
CHECK6121824
EAU03541*
NOTE :
•The air filter needs more frequent service if you are riding in unusually wet or dusty areas.
•Hydraulic brake service
•Regularly check and, if necessary, correct the brake fluid level.
•Every two years change the brake fluid.
•Replace the brake hoses every four years and if cracked or damaged.
Page 42 of 80

PERIODIC MAINTENANCE AND MINOR REPAIR
6
EAU01651
Checking the spark plug
The spark plug is an important engine
component, which should be checked
periodically, preferably by a Yamaha
dealer. Since heat and deposits will
cause any spark plug to slowly erode,
it should be removed and checked in
accordance with the periodic mainte-
nance and lubrication chart. In addition,
the condition of the spark plug can
reveal the condition of the engine.The porcelain insulator around the
center electrode of the spark plug
should be a medium-to-light tan (the
ideal color when the scooter is ridden
normally). If the spark plug shows a
distinctly different color, the engine
could be defective. Do not attempt to
diagnose such problems yourself.
Instead, have a Yamaha dealer check
the scooter.
If the spark plug shows signs of
electrode erosion and excessive
carbon or other deposits, it should be
replaced.
Specified spark plug:
BR8HS (NGK)
or BR9HS (NGK)
Before installing a spark plug, the spark
plug gap should be measured with a
wire thickness gauge and, if necessary,
adjusted to specification.
Spark plug gap:
0.5 - 0.7 mmClean the surface of the spark plug
gasket and its mating surface, and then
wipe off any grime from the spark plug
threads.
Tightening torque:
Spark plug:
20 Nm (2.0 m
•kg)
NOTE :
If a torque wrench is not available when
installing a spark plug, a good estimate
of the correct torque is 1/4 - 1/2 turn
past finger tight. However, the spark
plug should be tightened to the
specified torque as soon as possible.
a
ZAUM0037
a. Spark plug gap
6-5
Page 43 of 80

PERIODIC MAINTENANCE AND MINOR REPAIR
6
12
ZAUM0153
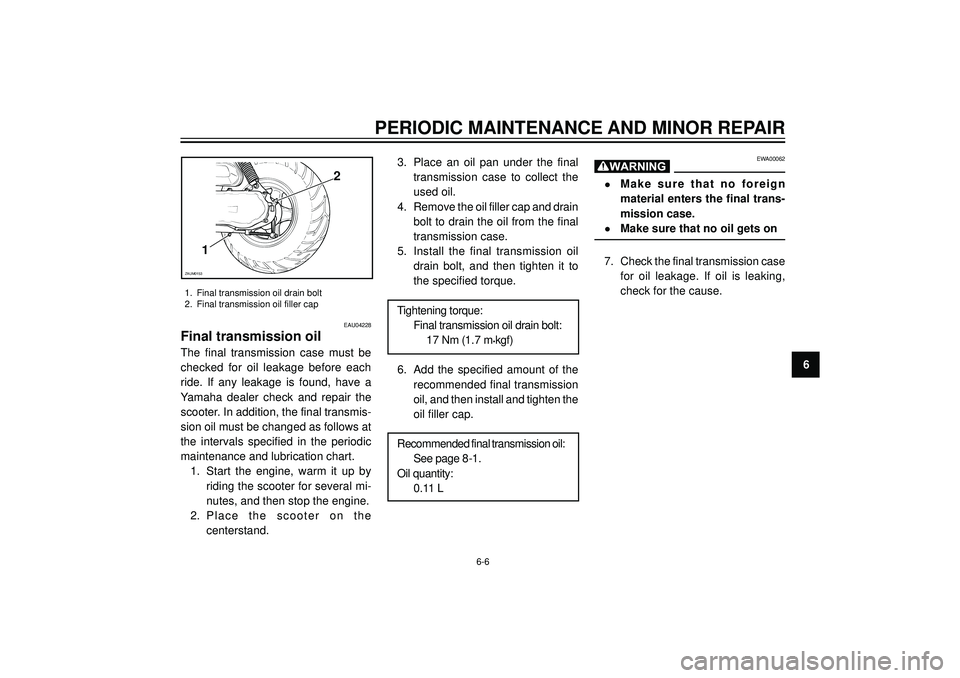
1. Final transmission oil drain bolt
2. Final transmission oil filler cap
EAU04228
Final transmission oil
The final transmission case must be
checked for oil leakage before each
ride. If any leakage is found, have a
Yamaha dealer check and repair the
scooter. In addition, the final transmis-
sion oil must be changed as follows at
the intervals specified in the periodic
maintenance and lubrication chart.
1. Start the engine, warm it up by
riding the scooter for several mi-
nutes, and then stop the engine.
2. Place the scooter on the
centerstand.3. Place an oil pan under the final
transmission case to collect the
used oil.
4. Remove the oil filler cap and drain
bolt to drain the oil from the final
transmission case.
5. Install the final transmission oil
drain bolt, and then tighten it to
the specified torque.
Tightening torque:
Final transmission oil drain bolt:
17 Nm (1.7 m
•kgf)
6. Add the specified amount of the
recommended final transmission
oil, and then install and tighten the
oil filler cap.
Recommended final transmission oil:
See page 8-1.
Oil quantity:
0.11 L
EWA00062
•Make sure that no foreign
material enters the final trans-
mission case.
•Make sure that no oil gets on
7. Check the final transmission case
for oil leakage. If oil is leaking,
check for the cause.
6-6
Page 44 of 80

PERIODIC MAINTENANCE AND MINOR REPAIR
6
1
ZAUM0170
1
ZAUM0318
1
4 32
ZAUM0156
1. Air filter case cover1. Air filter element
EAUM0071
Cleaning the air filter element
The air filter element should be cleaned
at the intervals specified in the periodic
maintenance and lubrication chart.
Clean the air filter element more
frequently if you are riding in unusually
wet or dusty areas.
1. Remove the air filter case cover
by removing the screws.2. Pull the air filter element out, clean
it with solvent, and then squeeze
the remaining solvent out.
EW000075
Use only a dedicated parts cleaning
solvent. To avoid the risk of fire or
explosion, do not use gasoline or
solvents with a low flash point.
EC000089
To avoid damaging the foam material,
handle it gently and carefully, and do
not twist or wring it.3. Apply oil of the recommended
type to the entire surface of the
element, and then squeeze the
excess oil out.
NOTE :
The air filter element should be wet but
not dripping.
Recommended oil:
Engine oil
6-7
Page 45 of 80

PERIODIC MAINTENANCE AND MINOR REPAIR
6
EAU00631
Adjusting the carburetor
The carburetor is an important part of
the engine and requires very
sophisticated adjustment. Therefore, all
carburetor adjustments should be left
to a Yamaha dealer, who has the
necessary professional knowledge and
experience.
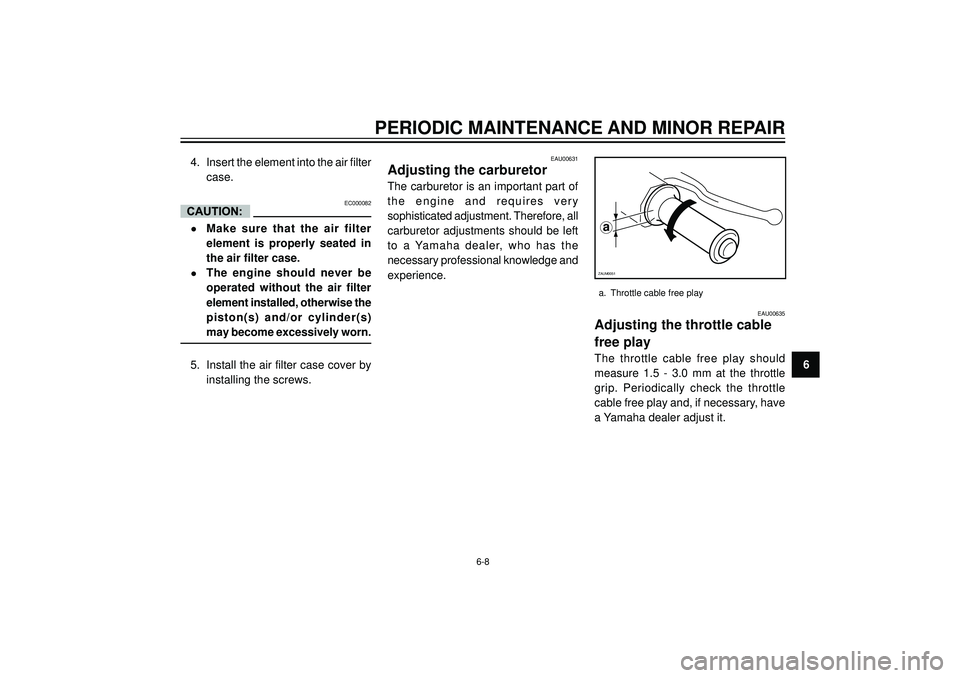
a
ZAUM0051
a. Throttle cable free play
EAU00635
Adjusting the throttle cable
free play
The throttle cable free play should
measure 1.5 - 3.0 mm at the throttle
grip. Periodically check the throttle
cable free play and, if necessary, have
a Yamaha dealer adjust it. 4. Insert the element into the air filter
case.
EC000082
•Make sure that the air filter
element is properly seated in
the air filter case.
•The engine should never be
operated without the air filter
element installed, otherwise the
piston(s) and/or cylinder(s)
may become excessively worn.
5. Install the air filter case cover by
installing the screws.
6-8
Page 46 of 80

PERIODIC MAINTENANCE AND MINOR REPAIR
6
EAU04551*
Tires
To maximize the performance,
durability, and safe operation of your
scooter, note the following points
regarding the specified tires.
Tire air pressure
The tire air pressure should be checked
and, if necessary, adjusted before each
ride.
ZAUM0053
EW000082
•The tire air pressure must be
checked and adjusted on cold
tires (i.e., when the temperature
of the tires equals the ambient
temperature).
•The tire air pressure must be
adjusted in accordance with the
riding speed and with the total
weight of rider, passenger,
cargo, and accessories
approved for this model.
EW000077
Because loading has an enormous
impact on the handling, braking, per-
formance and safety characteristics of
your scooter, you should keep the
following precautions in mind.
•NEVER OVERLOAD THE SCOO-
TER! Operation of an overloaded
scooter may result in tire damage,
loss of control, or severe injury.
Make sure that the total weight of
rider, cargo, and accessories
does not exceed the specified
maximum load for the vehicle.
•Do not carry along loosely packed
items, which can shift during a
ride.
•Securely pack the heaviest items
close to the center of the scooter
and distribute the weight evenly
on both sides.
•Adjust the suspension and tire air
pressure with regard to the load.
Check the tire condition and air
pressure before each ride.
Tire air pressure
(measured on cold tires)
Load* Front Rear
Up to 90 kg150 kPa
1.5 kgf/cm
2
1.5 bar150 kPa
1.5 kgf/cm
2
1.5 bar
90 kg load-maximum
150 kPa
1.5 kgf/cm2
1.5 bar170 kPa
1.7 kgf/cm
2
1.7 bar
Maximum load* 184 kg
* Total weight of rider, passenger, cargo and
accessories
6-9
Page 47 of 80

PERIODIC MAINTENANCE AND MINOR REPAIR
6 Tire inspection
The tires must be checked before each
ride. If the center tread depth reaches
the specified limit, if the tire has a nail
or glass fragments in it, or if the sidewall
is cracked, have a Yamaha dealer re-
place the tire immediately.
EW000079
•Have a Yamaha dealer replace
excessively worn tires. Besides
being illegal, operating the
scooter with excessively worn
tires decreases riding stability
and can lead to loss of control.
•The replacement of all wheel
and brake related parts,
including the tires, should be
left to a Yamaha dealer, who has
the necessary professional
knowledge and experience.
Minimum tire tread depth
(front and rear)1.6 mm
NOTE :
The tire tread depth limits may differ
from country to country. Always comply
with the local regulations.
1
2
ZAUM0054
1. Tread depth
2. Side wall
Tire information
This scooter is equipped with tubeless
tires.
6-10
MICHELIN O 120/80-12 55LO BOPPER
Front
Manufacturer Size Type
Rear
CHENG SHIN O120/80-12 55JO MAXXIS
MICHELIN O 130/90-10 61LO BOPPER
CHENG SHIN O130/90-10 61JO MAXXIS
Manufacturer Size Type
Page 48 of 80

PERIODIC MAINTENANCE AND MINOR REPAIR
6
EAU03773
Cast wheels
To maximize the performance,
durability, and safe operation of your
scooter, note the following points
regarding the specified wheels.
•The wheel rims should be
checked for cracks, bends or
warpage before each ride. If any
damage is found, have a Yamaha
dealer replace the wheel. Do not
attempt even the smallest repair
to the wheel. A deformed or
cracked wheel must be replaced.
•The wheel should be balanced
whenever either the tire or wheel
has been changed or replaced. An
unbalanced wheel can result in
poor performance, adverse
handling characteristics, and a
shortened tire life.
•Ride at moderate speeds after
changing a tire since the tire sur-
face must first be "broken in" for it
to develop its optimal
characteristics.
EAU00697*
Adjusting the front brake
lever free play
The brake lever free play should
measure 10 - 20 mm as shown.
Periodically check the brake lever free
play and, if necessary, have a Yamaha
dealer adjust it.
EW000100
An incorrect brake lever free play
indicates a hazardous condition in
the brake system. Do not operate the
scooter until the brake system has
been checked or repaired by a
Yamaha dealer.
a
ZAUM0107
a
ZAUM0108
a. Front brake lever free playa. Rear brake lever free play
EAU04469
Adjusting the rear brake
lever free play
The brake lever free play should
measure 10 - 20 mm as shown.
Periodically check the brake lever free
play and, if necessary, adjust it as
follows.
6-11
Page 49 of 80

PERIODIC MAINTENANCE AND MINOR REPAIR
6
a
b
ZAUM0320
To increase the brake lever free play,
turn the adjusting nut at the brake shoe
plate in direction a . To decrease the
brake lever free play, turn the adjusting
nut in direction b .
EW000101
If proper adjustment cannot be
obtained as described, have a
Yamaha dealer make this
adjustment.
EAU00720
Checking the front brake
pads and rear brake shoes
The front brake pads and the rear brake
shoes must be checked for wear at the
intervals specified in the periodic main-
tenance and lubrication chart.
EAU01436
Front brake pads
Check each front brake pad for damage
and measure the lining thickness. If a
brake pad is damaged or if the lining
thickness is less than 3.1 mm, have a
Yamaha dealer replace, the brake pads
as a set.
a
ZAUM0243
a. Wear limit
6-12
Page 50 of 80

PERIODIC MAINTENANCE AND MINOR REPAIR
6
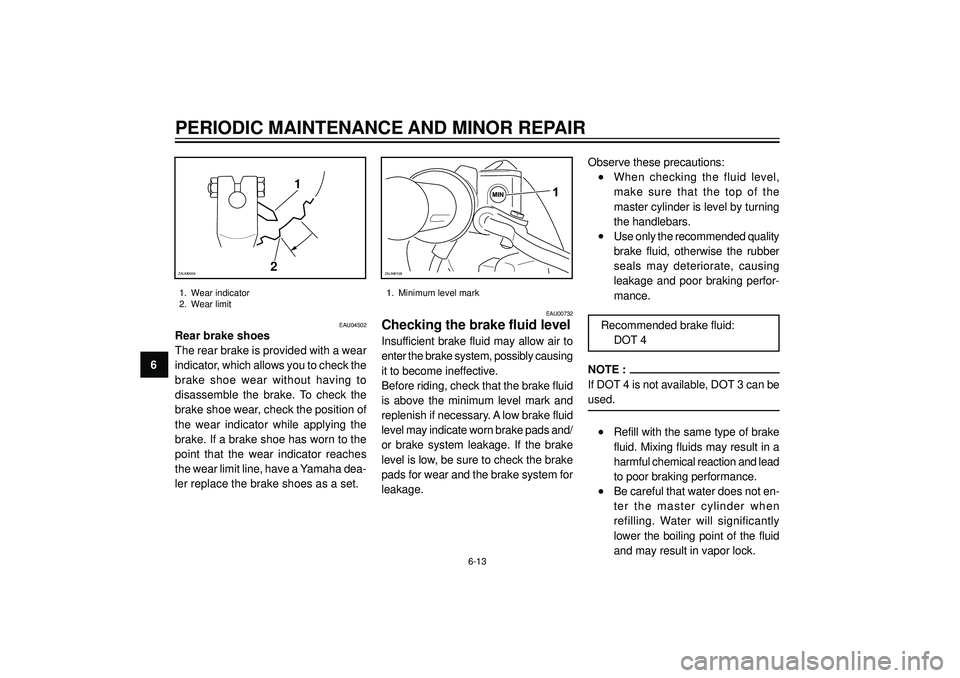
EAU04502
Rear brake shoes
The rear brake is provided with a wear
indicator, which allows you to check the
brake shoe wear without having to
disassemble the brake. To check the
brake shoe wear, check the position of
the wear indicator while applying the
brake. If a brake shoe has worn to the
point that the wear indicator reaches
the wear limit line, have a Yamaha dea-
ler replace the brake shoes as a set.
1
2
ZAUM0059
1. Wear indicator
2. Wear limit
1
ZAUM0158
1. Minimum level mark
6-13
EAU00732
Checking the brake fluid level
Insufficient brake fluid may allow air to
enter the brake system, possibly causing
it to become ineffective.
Before riding, check that the brake fluid
is above the minimum level mark and
replenish if necessary. A low brake fluid
level may indicate worn brake pads and/
or brake system leakage. If the brake
level is low, be sure to check the brake
pads for wear and the brake system for
leakage.Observe these precautions:
•When checking the fluid level,
make sure that the top of the
master cylinder is level by turning
the handlebars.
•Use only the recommended quality
brake fluid, otherwise the rubber
seals may deteriorate, causing
leakage and poor braking perfor-
mance.
Recommended brake fluid:
DOT 4
NOTE :
If DOT 4 is not available, DOT 3 can be
used.
•Refill with the same type of brake
fluid. Mixing fluids may result in a
harmful chemical reaction and lead
to poor braking performance.
•Be careful that water does not en-
ter the master cylinder when
refilling. Water will significantly
lower the boiling point of the fluid
and may result in vapor lock.