check engine YAMAHA SLIDER 50 2004 Owners Manual
[x] Cancel search | Manufacturer: YAMAHA, Model Year: 2004, Model line: SLIDER 50, Model: YAMAHA SLIDER 50 2004Pages: 80, PDF Size: 2.76 MB
Page 19 of 80
INSTRUMENT AND CONTROL FUNCTIONS
31
23
ZAUM0181
EAU03034
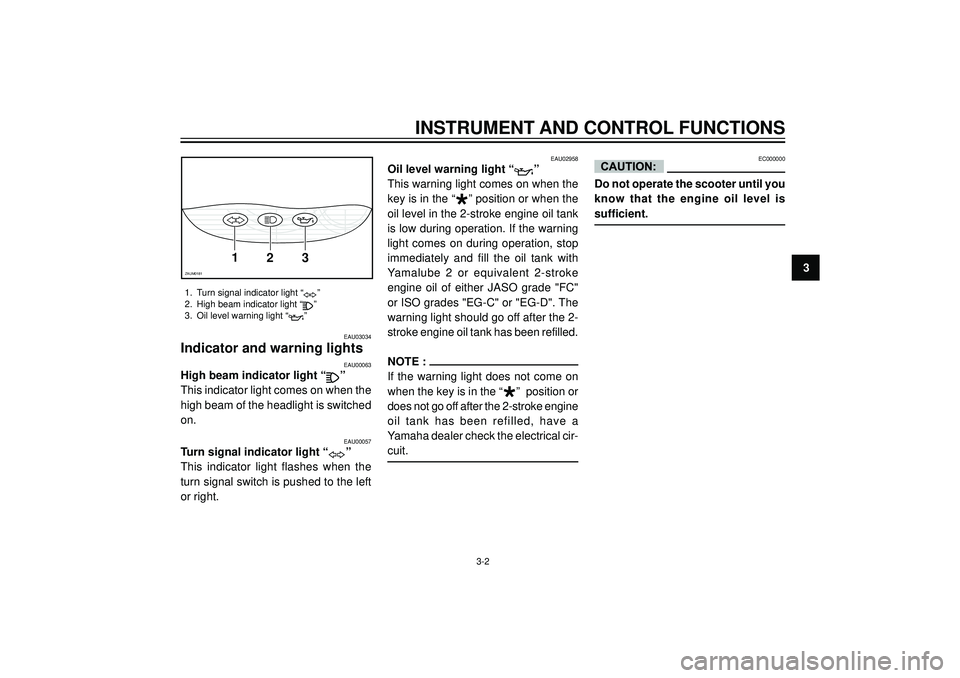
Indicator and warning lights
EAU00057
Turn signal indicator light “”
This indicator light flashes when the
turn signal switch is pushed to the left
or right.
1. Turn signal indicator light “”
2. High beam indicator light “
”
3. Oil level warning light “”
EAU00063
High beam indicator light “”
This indicator light comes on when the
high beam of the headlight is switched
on.
EAU02958
Oil level warning light “”
This warning light comes on when the
key is in the “
*
” position or when the
oil level in the 2-stroke engine oil tank
is low during operation. If the warning
light comes on during operation, stop
immediately and fill the oil tank with
Yamalube 2 or equivalent 2-stroke
engine oil of either JASO grade "FC"
or ISO grades "EG-C" or "EG-D". The
warning light should go off after the 2-
stroke engine oil tank has been refilled.
NOTE :
If the warning light does not come on
when the key is in the “
*
” position or
does not go off after the 2-stroke engine
oil tank has been refilled, have a
Yamaha dealer check the electrical cir-
cuit.
3-2
EC000000
Do not operate the scooter until you
know that the engine oil level is
sufficient.
Page 28 of 80
PRE-OPERATION CHECKS
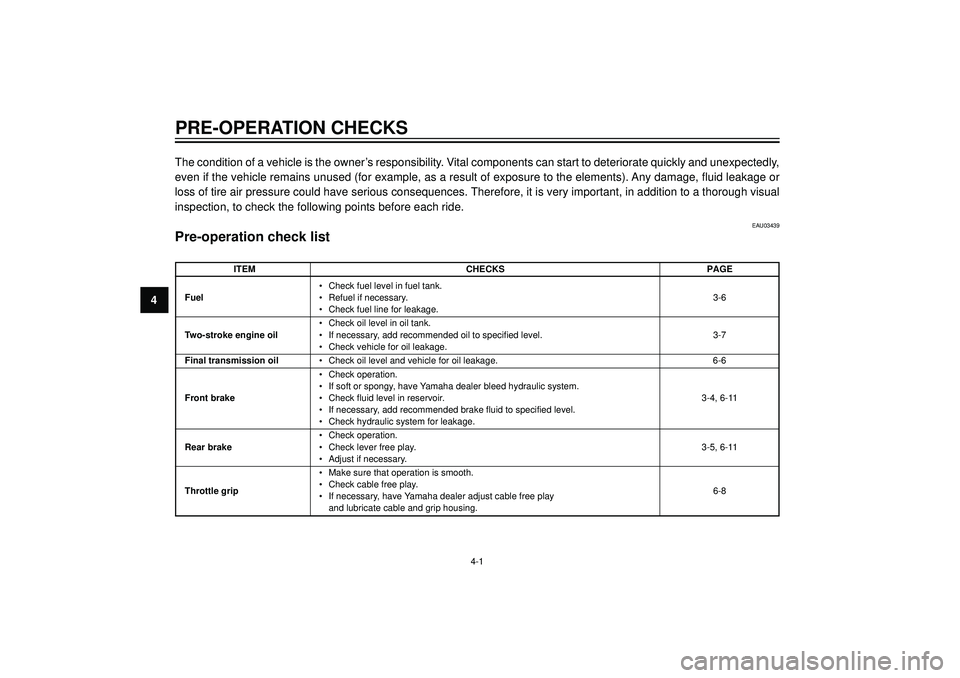
4The condition of a vehicle is the owner’s responsibility. Vital components can start to deteriorate quickly and unexpectedly,
even if the vehicle remains unused (for example, as a result of exposure to the elements). Any damage, fluid leakage or
loss of tire air pressure could have serious consequences. Therefore, it is very important, in addition to a thorough visual
inspection, to check the following points before each ride.
ITEM CHECKS PAGE
• Check fuel level in fuel tank.
Fuel• Refuel if necessary.3-6
• Check fuel line for leakage.
• Check oil level in oil tank.
Two-stroke engine oil• If necessary, add recommended oil to specified level. 3-7
• Check vehicle for oil leakage.
Final transmission oil• Check oil level and vehicle for oil leakage. 6-6
• Check operation.
• If soft or spongy, have Yamaha dealer bleed hydraulic system.
Front brake• Check fluid level in reservoir. 3-4, 6-11
• If necessary, add recommended brake fluid to specified level.
• Check hydraulic system for leakage.
• Check operation.
Rear brake• Check lever free play. 3-5, 6-11
• Adjust if necessary.
• Make sure that operation is smooth.
Throttle grip• Check cable free play.
6-8
• If necessary, have Yamaha dealer adjust cable free play
and lubricate cable and grip housing.
EAU03439
Pre-operation check list
4-1
Page 32 of 80
OPERATION AND IMPORTANT RIDING POINTS
5
EAU01118
EW000129
•Become thoroughly familiar
with all operating controls and
their functions before riding.
Consult a Yamaha dealer
regarding any control or
function that you do not
thoroughly understand.
•Never start the engine or
operate it in a closed area for
any length of time. Exhaust fu-
mes are poisonous, and
inhaling them can cause loss of
consciousness and death
within a short time. Always
make sure that there is
adequate ventilation.
•For safety, always start the
engine with the centerstand
down.
P
U
S
H
ZAUM0332ZAUM0367
EAU00415*
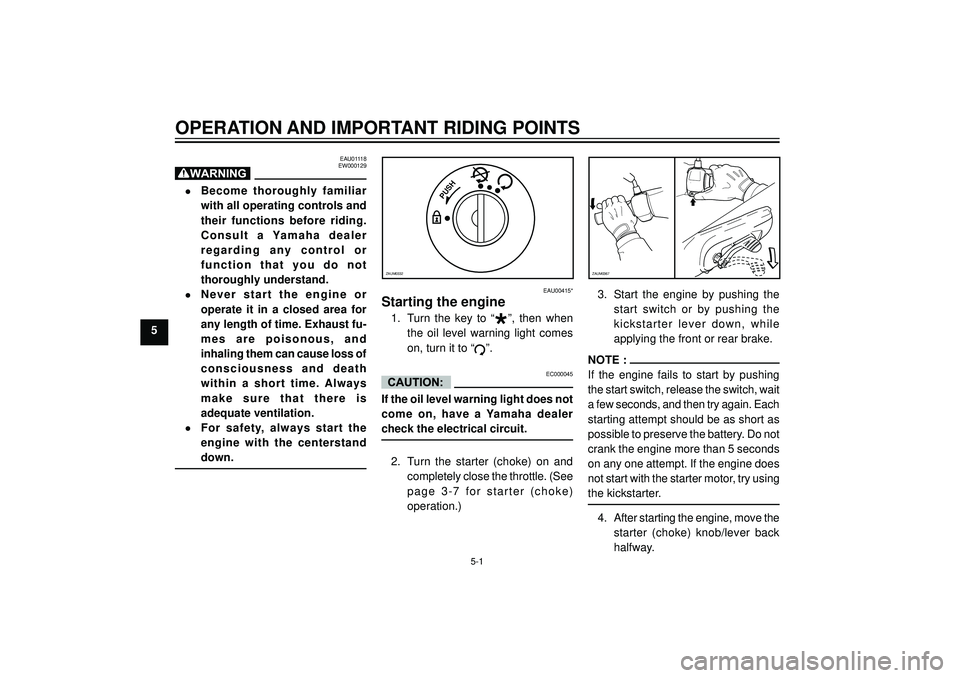
Starting the engine
1. Turn the key to “
*
”, then when
the oil level warning light comes
on, turn it to “
”.
EC000045
If the oil level warning light does not
come on, have a Yamaha dealer
check the electrical circuit.
2. Turn the starter (choke) on and
completely close the throttle. (See
page 3-7 for starter (choke)
operation.)3. Start the engine by pushing the
start switch or by pushing the
kickstarter lever down, while
applying the front or rear brake.
NOTE :
If the engine fails to start by pushing
the start switch, release the switch, wait
a few seconds, and then try again. Each
starting attempt should be as short as
possible to preserve the battery. Do not
crank the engine more than 5 seconds
on any one attempt. If the engine does
not start with the starter motor, try using
the kickstarter.
4. After starting the engine, move the
starter (choke) knob/lever back
halfway.
5-1
Page 33 of 80

OPERATION AND IMPORTANT RIDING POINTS
5
ZAUM0150
EAU00433
Starting off
NOTE :
Before starting off, allow the engine to
warm up.
1. While pulling the rear brake lever
with your left hand and holding the
grab bar with your right hand,
push the scooter off the
centerstand.
2. Sit astride the seat, and then
adjust the rear view mirrors.
3. Switch the turn signal on.
4. Check for oncoming traffic, and
then slowly turn the throttle grip
(on the right) in order to take off.
5. Switch the turn signal off.
EAU01258
Starting a warm engine
Follow the same procedure as for
starting a cold engine with the excep-
tion that the starter (choke) is not
required when the engine is warm.
ECA00045
For maximum engine life, never
accelerate hard when the engine is
cold!
5. When the engine is warm, turn the
starter (choke) off.
NOTE :
The engine is warm when it responds
normally to the throttle with the starter
(choke) turned off.
5-2
EC000046
See page 5-4 for engine break-in ins-
tructions prior to operating the
vehicle for the first time.
Page 35 of 80
OPERATION AND IMPORTANT RIDING POINTS
5
EAU03093
Tips for reducing fuel
consumption
Fuel consumption depends largely on
your riding style. Consider the following
tips to reduce fuel consumption:
•Thoroughly warm up the engine.
•Avoid high engine speeds during
acceleration.
•Avoid high engine speeds with no
load on the engine.
•Turn the engine off instead of
letting it idle for an extended
length of time (e.g., in traffic jams,
at traffic lights or at railroad
crossings).
EAU00436
Engine break-in
There is never a more important period
in the life of your engine than the period
between 0 and 1,000 km. For this
reason, you should read the following
material carefully.
Since the engine is brand new, do not
put an excessive load on it for the first
1,000 km. The various parts in the
engine wear and polish themselves to
the correct operating clearances.
During this period, prolonged full-
throttle operation or any condition that
might result in engine overheating must
be avoided.
EAUT0003*
0 - 150 km
Avoid operation above 1/3 throttle. Stop
the engine and let it cool for 5 to 10
minutes after every hour of operation.
Vary the speed of the scooter from time
to time. Do not operate it at one set
throttle position.150 - 500 km
Avoid prolonged operation above 1/2
throttle.
500 - 1,000 km
Avoid cruising speeds in excess of 3/4
throttle.
ECAT0001*
After 1,000 km of operation, be sure
to replace the final transmission oil.
1,000 km and beyond
Avoid prolonged full throttle operation.
Vary speeds occasionally.
EC000049
If any engine trouble should occur
during the engine break-in period,
immediately have a Yamaha dealer
check the vehicle.
5-4
Page 40 of 80
PERIODIC MAINTENANCE AND MINOR REPAIR
6
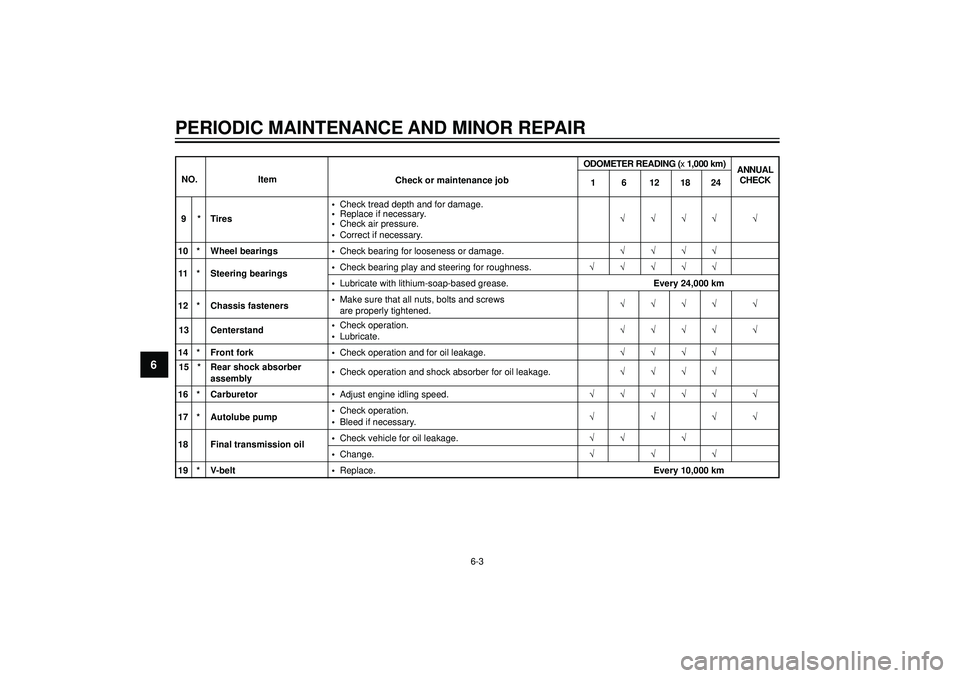
6-3 •Check tread depth and for damage.
9 * Tires•Replace if necessary.
•Check air pressure.√√√√ √
•Correct if necessary.
10 * Wheel bearings •Check bearing for looseness or damage.√√√√
11 * Steering bearings•Check bearing play and steering for roughness.√√√√√•Lubricate with lithium-soap-based grease.Every 24,000 km
12 * Chassis fasteners•Make sure that all nuts, bolts and screws
√√√√ √
are properly tightened.
13 Centerstand•Check operation.
√√√√ √
•Lubricate.
14 * Front fork •Check operation and for oil leakage.√√√√
15 * Rear shock absorber
•Check operation and shock absorber for oil leakage.√√√√
assembly
16 * Carburetor• Adjust engine idling speed.√√√√√ √
17 * Autolube pump•Check operation.
√√√√
•Bleed if necessary.
18 Final transmission oil•Check vehicle for oil leakage.√√ √•Change.√√√
19 * V-belt •Replace.Every 10,000 km
NO. Item
Check or maintenance job
ODOMETER READING (x 1,000 km)
1ANNUAL
CHECK6121824
Page 42 of 80

PERIODIC MAINTENANCE AND MINOR REPAIR
6
EAU01651
Checking the spark plug
The spark plug is an important engine
component, which should be checked
periodically, preferably by a Yamaha
dealer. Since heat and deposits will
cause any spark plug to slowly erode,
it should be removed and checked in
accordance with the periodic mainte-
nance and lubrication chart. In addition,
the condition of the spark plug can
reveal the condition of the engine.The porcelain insulator around the
center electrode of the spark plug
should be a medium-to-light tan (the
ideal color when the scooter is ridden
normally). If the spark plug shows a
distinctly different color, the engine
could be defective. Do not attempt to
diagnose such problems yourself.
Instead, have a Yamaha dealer check
the scooter.
If the spark plug shows signs of
electrode erosion and excessive
carbon or other deposits, it should be
replaced.
Specified spark plug:
BR8HS (NGK)
or BR9HS (NGK)
Before installing a spark plug, the spark
plug gap should be measured with a
wire thickness gauge and, if necessary,
adjusted to specification.
Spark plug gap:
0.5 - 0.7 mmClean the surface of the spark plug
gasket and its mating surface, and then
wipe off any grime from the spark plug
threads.
Tightening torque:
Spark plug:
20 Nm (2.0 m
•kg)
NOTE :
If a torque wrench is not available when
installing a spark plug, a good estimate
of the correct torque is 1/4 - 1/2 turn
past finger tight. However, the spark
plug should be tightened to the
specified torque as soon as possible.
a
ZAUM0037
a. Spark plug gap
6-5
Page 43 of 80
PERIODIC MAINTENANCE AND MINOR REPAIR
6
12
ZAUM0153
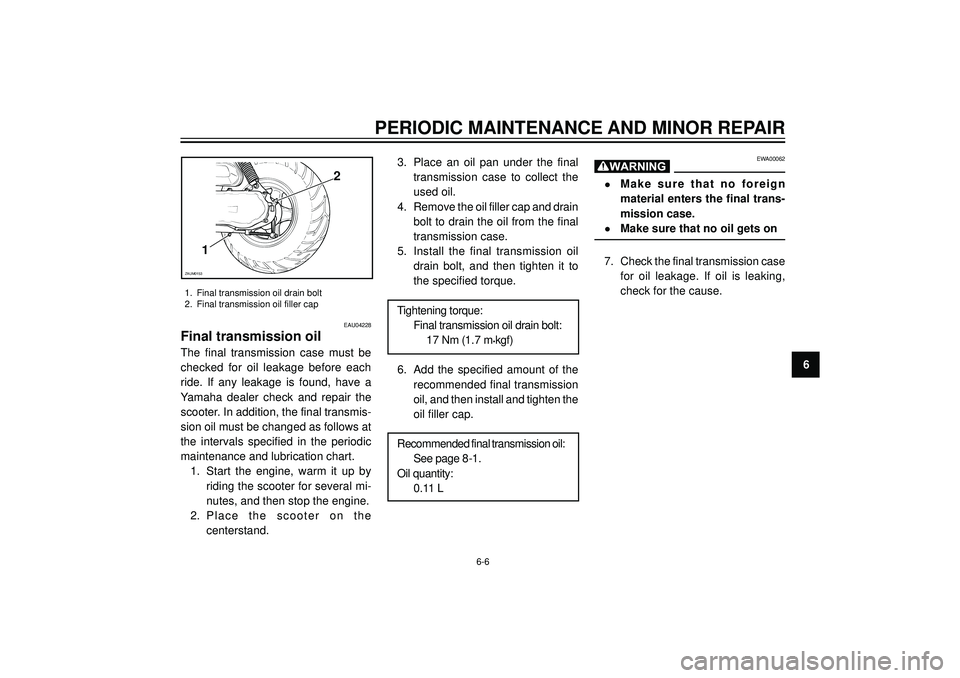
1. Final transmission oil drain bolt
2. Final transmission oil filler cap
EAU04228
Final transmission oil
The final transmission case must be
checked for oil leakage before each
ride. If any leakage is found, have a
Yamaha dealer check and repair the
scooter. In addition, the final transmis-
sion oil must be changed as follows at
the intervals specified in the periodic
maintenance and lubrication chart.
1. Start the engine, warm it up by
riding the scooter for several mi-
nutes, and then stop the engine.
2. Place the scooter on the
centerstand.3. Place an oil pan under the final
transmission case to collect the
used oil.
4. Remove the oil filler cap and drain
bolt to drain the oil from the final
transmission case.
5. Install the final transmission oil
drain bolt, and then tighten it to
the specified torque.
Tightening torque:
Final transmission oil drain bolt:
17 Nm (1.7 m
•kgf)
6. Add the specified amount of the
recommended final transmission
oil, and then install and tighten the
oil filler cap.
Recommended final transmission oil:
See page 8-1.
Oil quantity:
0.11 L
EWA00062
•Make sure that no foreign
material enters the final trans-
mission case.
•Make sure that no oil gets on
7. Check the final transmission case
for oil leakage. If oil is leaking,
check for the cause.
6-6
Page 45 of 80
PERIODIC MAINTENANCE AND MINOR REPAIR
6
EAU00631
Adjusting the carburetor
The carburetor is an important part of
the engine and requires very
sophisticated adjustment. Therefore, all
carburetor adjustments should be left
to a Yamaha dealer, who has the
necessary professional knowledge and
experience.
a
ZAUM0051
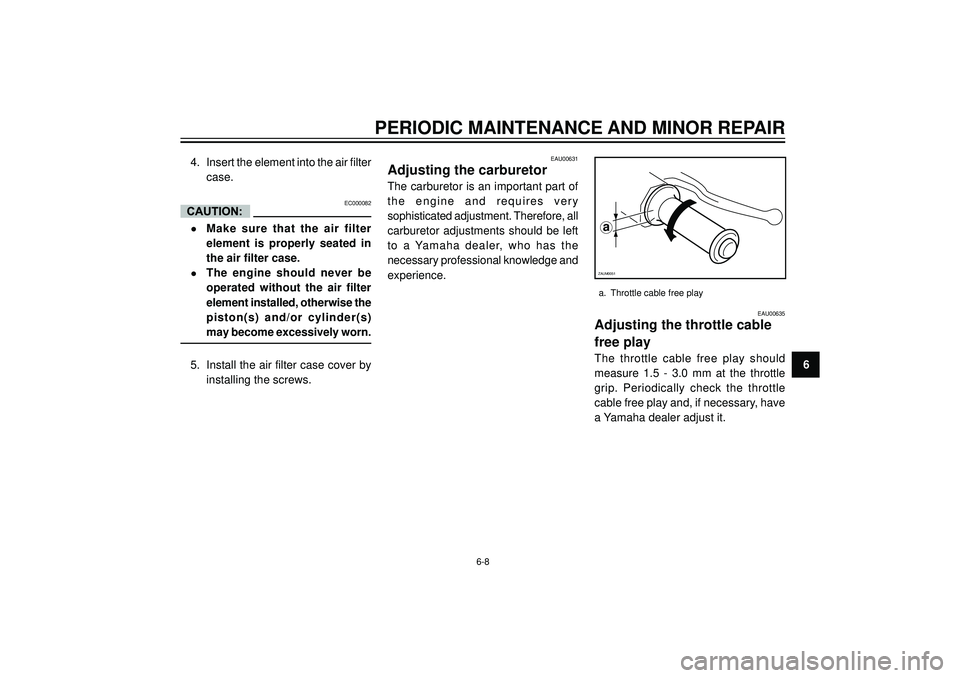
a. Throttle cable free play
EAU00635
Adjusting the throttle cable
free play
The throttle cable free play should
measure 1.5 - 3.0 mm at the throttle
grip. Periodically check the throttle
cable free play and, if necessary, have
a Yamaha dealer adjust it. 4. Insert the element into the air filter
case.
EC000082
•Make sure that the air filter
element is properly seated in
the air filter case.
•The engine should never be
operated without the air filter
element installed, otherwise the
piston(s) and/or cylinder(s)
may become excessively worn.
5. Install the air filter case cover by
installing the screws.
6-8
Page 51 of 80
PERIODIC MAINTENANCE AND MINOR REPAIR
6
EAUM0008
Changing the brake fluid
Have a Yamaha dealer change the
brake fluid at the intervals specified in
the periodic maintenance and
lubrication chart. In addition, have the
brake hose replaced every four years
or whenever it is damaged or leaking.
EAU02962
Checking and lubricating the
cables
The operation of all control cables and
the condition of the cables should be
checked before each ride, and the
cables and cable ends should be
lubricated if necessary. If a cable is
damaged or does not move smoothly,
have a Yamaha dealer check or replace
it.
Recommended lubricant:
Engine oil
EW000112
Damage to the outer sheath may
interfere with proper cable operation
and will cause the inner cable to
rust. Replace a damaged cable as
soon as possible to prevent unsafe
conditions.
6-14
•Brake fluid may deteriorate painted
surfaces or plastic parts. Always
clean up spilled fluid immediately.
•As the brake pads wear, it is nor-
mal for the brake fluid level to
gradually go down. However, if the
brake fluid level goes down
suddenly, have a Yamaha dealer
check the cause.