stop start YAMAHA SUPERJET 2001 Owners Manual
[x] Cancel search | Manufacturer: YAMAHA, Model Year: 2001, Model line: SUPERJET, Model: YAMAHA SUPERJET 2001Pages: 107, PDF Size: 6.2 MB
Page 19 of 107

1-12
E
●Attach the engine shut-off cord (lanyard)
to wrist and keep it free from the handle-
bars so that the engine stops if the opera-
tor falls off. After riding, remove the
engine shut-off cord from the watercraft to
avoid accidental starting or unauthorized
use by children or others.
●Scan carefully for swimmers, and stay
away from swimming areas. Swimmers
are hard to see and you could acciden-
tally hit someone in the water.
●Avoid being hit by another boat! You
should always take the responsibility to
watch for traffic; other boaters may not be
watching for you. If they do not see you,
or you maneuver more quickly than other
boaters expect, you risk a collision.
●Maintain a safe distance from other boats
or watercraft, and also watch for boats’ ski
ropes or fishing lines. Obey the “Safe
boating rules” and be sure to check
behind you before making a turn. (See
Safe boating rules on page 1-14.)
EJU00313
Hazard information
●When transporting or storing your water-
craft, always place the fuel cock knob in
the “OFF” position, otherwise gasoline
may overflow from the carburetor.
●Never start the engine or let it run for any
length of time in an enclosed area.
Exhaust fumes contain carbon monoxide,
a colorless, odorless gas that may cause
loss of consciousness and death within a
short time. Always operate the watercraft
in an open area.
E_GM6-1.fm Page 12 Tuesday, July 11, 2000 10:49 AM
Page 23 of 107
E
2
EJU00326
FEATURES AND
FUNCTIONS
Location of main components............... 2-1
Operation of controls and other
functions ................................................... 2-3
Hood ........................................................ 2-3
Fuel tank filler cap ................................... 2-4
Fuel cock knob........................................ 2-4
Engine stop switch .................................. 2-5
Engine shut-off switch............................. 2-5
Choke knob ............................................. 2-6
Throttle lever ........................................... 2-6
Start switch.............................................. 2-6
Cooling water pilot outlet ........................ 2-7
Steering system ...................................... 2-7
Steering pole ........................................... 2-8
Engine overheat warning system ........... 2-9
Storage pouch....................................... 2-10
E_GM6-2TOC.fm Page 1 Tuesday, July 11, 2000 10:50 AM
Page 25 of 107
2-2
E
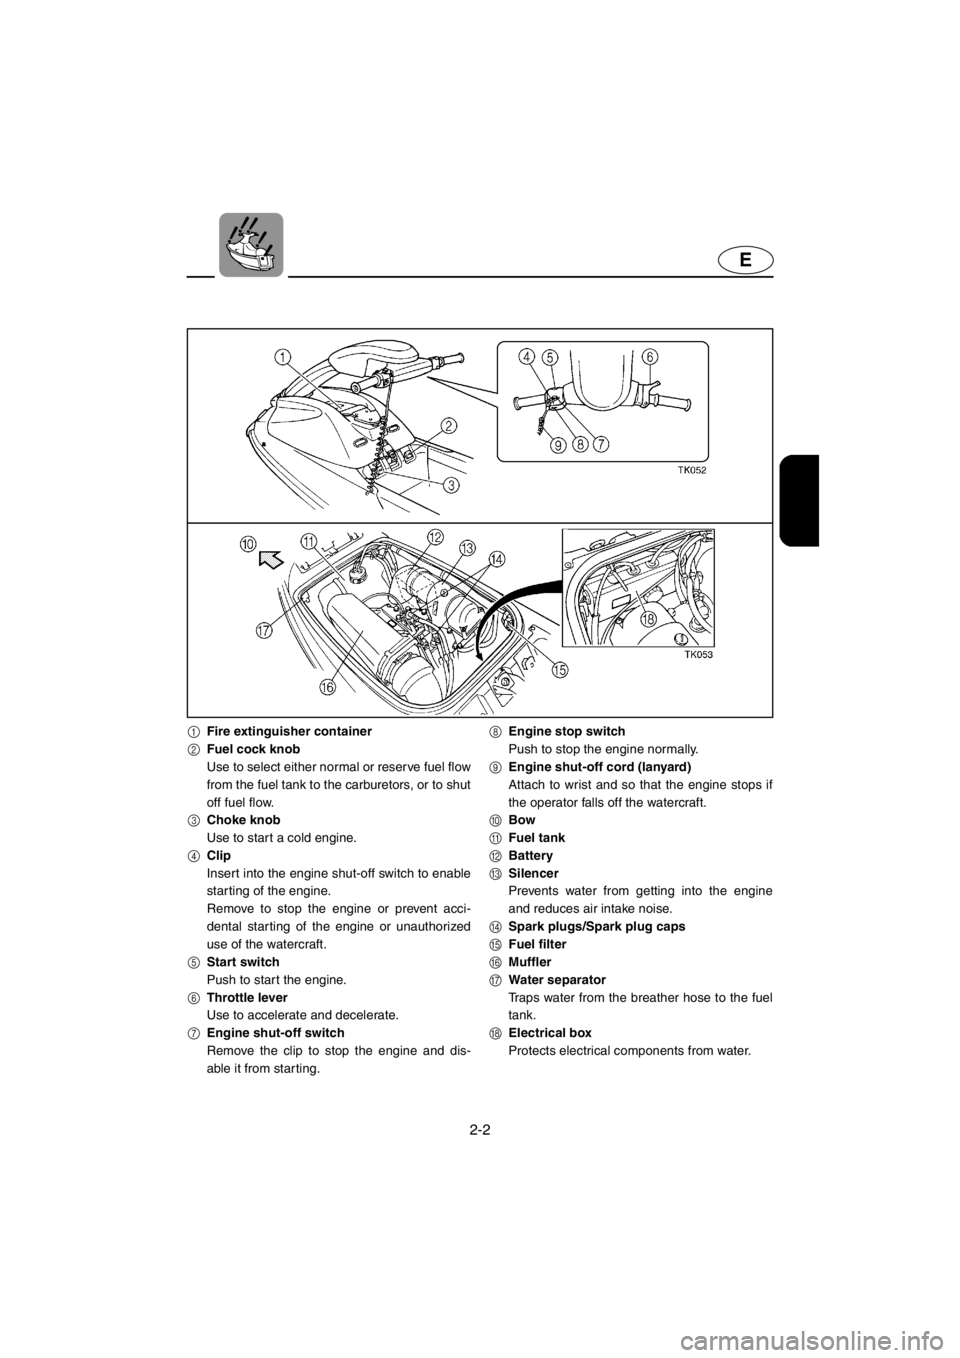
1Fire extinguisher container
2Fuel cock knob
Use to select either normal or reserve fuel flow
from the fuel tank to the carburetors, or to shut
off fuel flow.
3Choke knob
Use to start a cold engine.
4Clip
Insert into the engine shut-off switch to enable
starting of the engine.
Remove to stop the engine or prevent acci-
dental star ting of the engine or unauthorized
use of the watercraft.
5Start switch
Push to start the engine.
6Throttle lever
Use to accelerate and decelerate.
7Engine shut-off switch
Remove the clip to stop the engine and dis-
able it from starting.8Engine stop switch
Push to stop the engine normally.
9Engine shut-off cord (lanyard)
Attach to wrist and so that the engine stops if
the operator falls off the watercraft.
0Bow
AFuel tank
BBattery
CSilencer
Prevents water from getting into the engine
and reduces air intake noise.
DSpark plugs/Spark plug caps
EFuel filter
FMuffler
GWater separator
Traps water from the breather hose to the fuel
tank.
HElectrical box
Protects electrical components from water.
E_GM6-2.fm Page 2 Tuesday, July 11, 2000 10:51 AM
Page 28 of 107
2-5
E
EJU00705
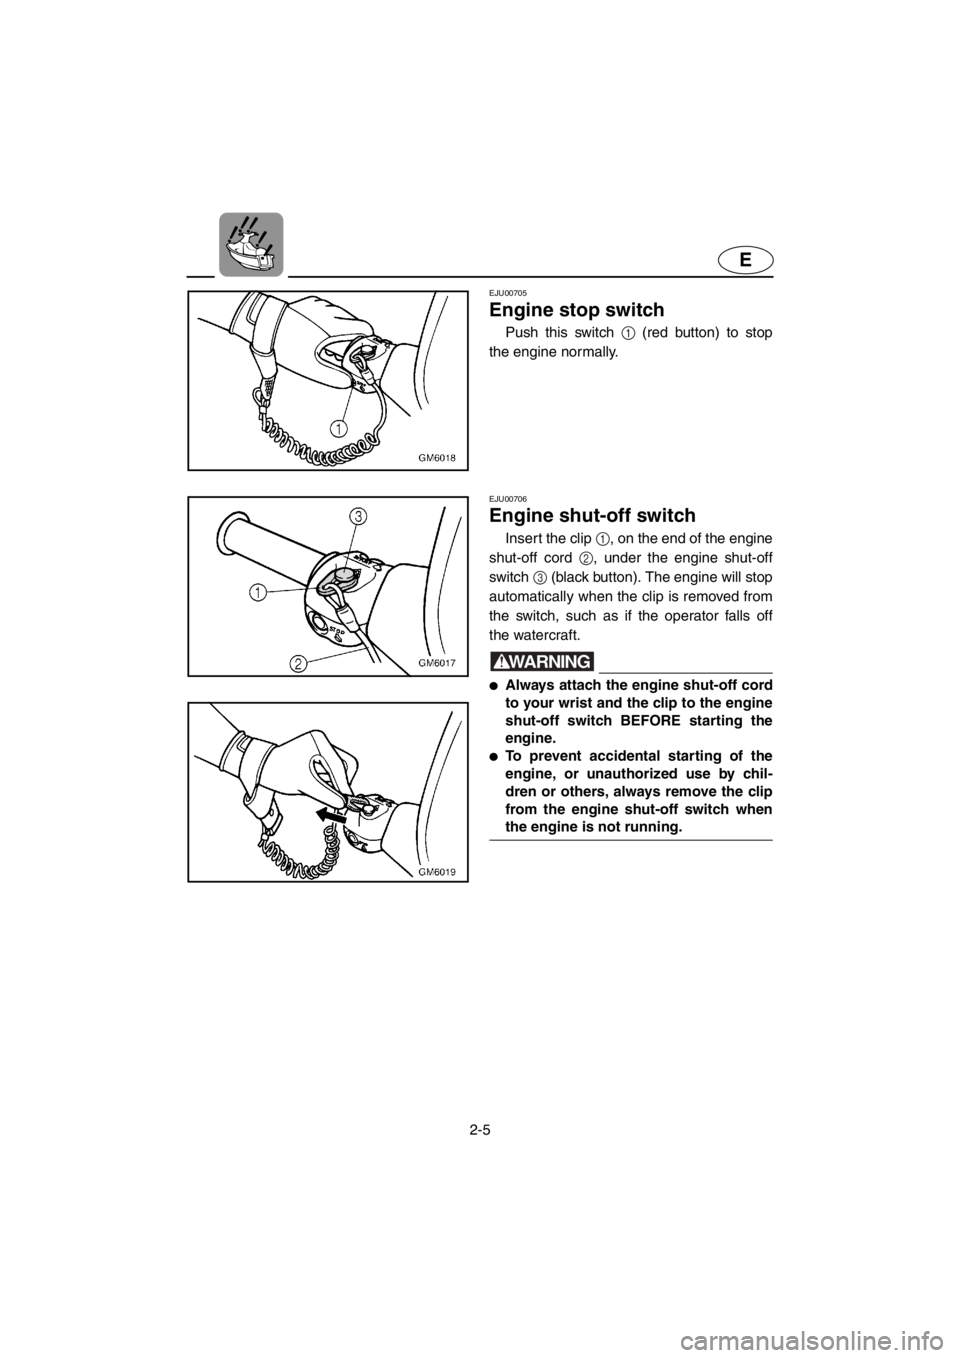
Engine stop switch
Push this switch 1 (red button) to stop
the engine normally.
EJU00706
Engine shut-off switch
Insert the clip 1, on the end of the engine
shut-off cord 2, under the engine shut-off
switch 3 (black button). The engine will stop
automatically when the clip is removed from
the switch, such as if the operator falls off
the watercraft.
WARNING@●Always attach the engine shut-off cord
to your wrist and the clip to the engine
shut-off switch BEFORE starting the
engine.
●To prevent accidental starting of the
engine, or unauthorized use by chil-
dren or others, always remove the clip
from the engine shut-off switch when
the engine is not running.
@
E_GM6-2.fm Page 5 Tuesday, July 11, 2000 10:51 AM
Page 30 of 107
2-7
E
EJU00923
Cooling water pilot outlet
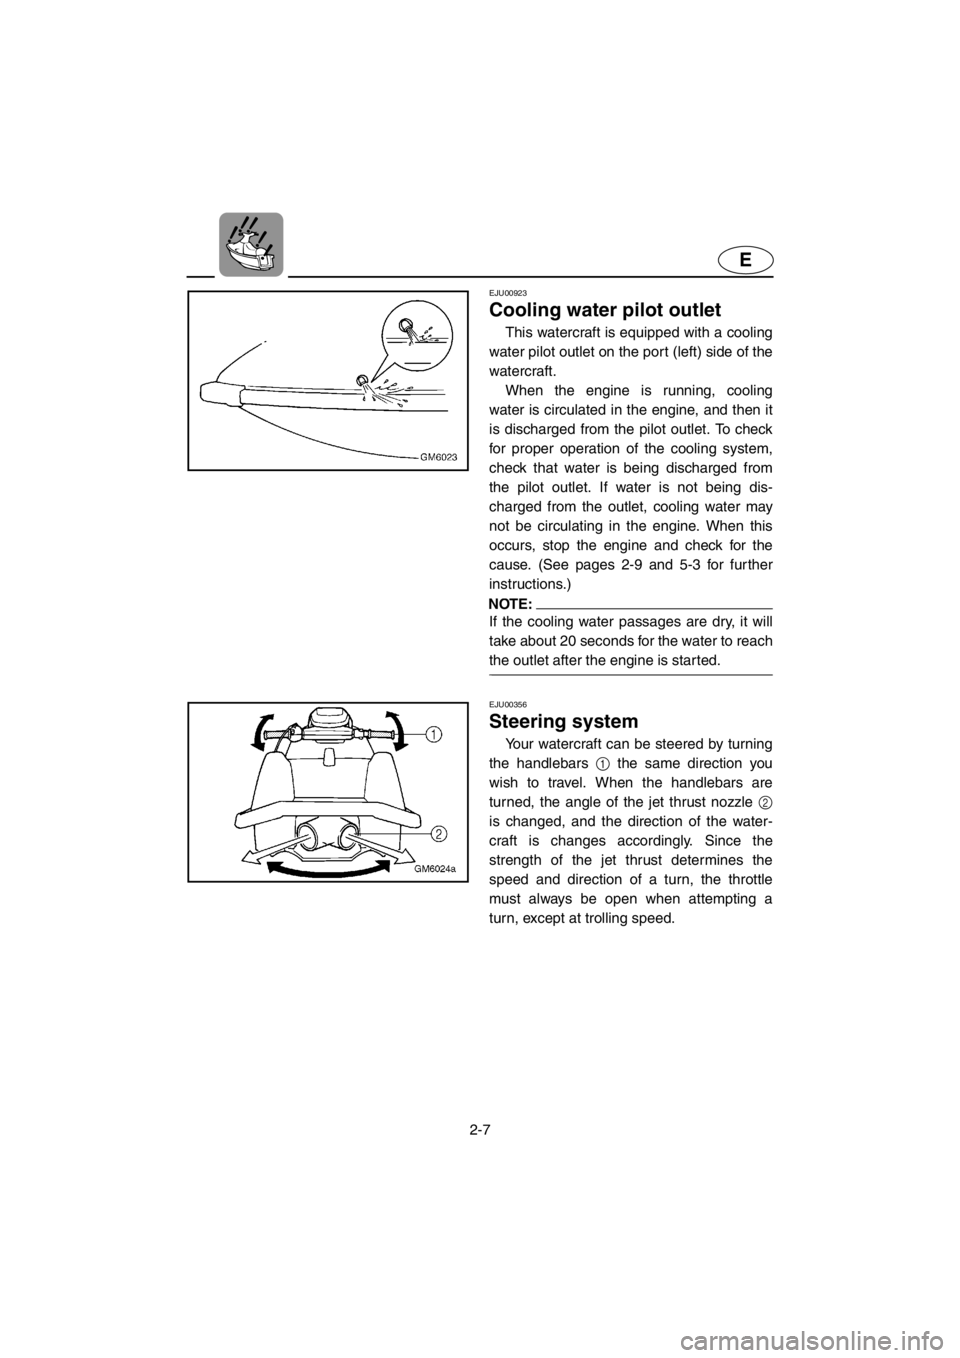
This watercraft is equipped with a cooling
water pilot outlet on the port (left) side of the
watercraft.
When the engine is running, cooling
water is circulated in the engine, and then it
is discharged from the pilot outlet. To check
for proper operation of the cooling system,
check that water is being discharged from
the pilot outlet. If water is not being dis-
charged from the outlet, cooling water may
not be circulating in the engine. When this
occurs, stop the engine and check for the
cause. (See pages 2-9 and 5-3 for further
instructions.)
NOTE:@If the cooling water passages are dry, it will
take about 20 seconds for the water to reach
the outlet after the engine is started.
@
EJU00356
Steering system
Your watercraft can be steered by turning
the handlebars 1 the same direction you
wish to travel. When the handlebars are
turned, the angle of the jet thrust nozzle 2
is changed, and the direction of the water-
craft is changes accordingly. Since the
strength of the jet thrust determines the
speed and direction of a turn, the throttle
must always be open when attempting a
turn, except at trolling speed.
E_GM6-2.fm Page 7 Tuesday, July 11, 2000 10:51 AM
Page 35 of 107

E
3
EJU00410
OPERATION
Fuel and oil................................................ 3-1
Gasoline .................................................. 3-1
2-stroke engine oil................................... 3-2
Mixing fuel and oil .................................. 3-3
Filling the fuel tank .................................. 3-4
Pre-operation checks............................... 3-5
Pre-operation check list .......................... 3-5
Pre-operation check points..................... 3-6
Operation................................................. 3-13
Engine break-in ..................................... 3-13
Starting the engine................................ 3-15
Stopping the engine.............................. 3-18
Leaving the watercraft .......................... 3-18
Operating your watercraft..................... 3-19
Getting to know your watercraft............ 3-19
Learning to operate your watercraft ..... 3-19
Starting the watercraft........................... 3-21
Operating positions ............................... 3-25
Capsized watercraft .............................. 3-26
Turning the watercraft........................... 3-27
Stopping the watercraft......................... 3-29
Beaching the watercraft ........................ 3-30
Rough water operation ......................... 3-30
Post-operation checks.......................... 3-31
Transporting........................................... 3-33
E_GM6-3TOC.fm Page 1 Tuesday, July 11, 2000 10:51 AM
Page 40 of 107

3-5
E
EJU00422
Pre-operation checks
Pre-operation check list
Before operating this watercraft, perform the checks in the following check list. See the
accompanying text in this chapter for details on how to perform the checks.
WARNING@If any item in the pre-operation check list is not working properly, have it inspected
and repaired before operating the watercraft, otherwise an accident could occur.
@
NOTE:@Pre-operation checks should be made thoroughly each time the watercraft is used. This pro-
cedure can be completed in a short time. It is worth the time spent to assure safety and reli-
ability.
@
ITEM ROUTINE PAGE
Engine compar tment Remove hood, ventilate fuel vapors and check
electrical connections3-6
Bilge Check for water and fuel residue and remove if
necessary3-7
Throttle Check that throttle lever springs back 3-10
Steering system Check for proper steering system operation 3-10
Fuel Check fuel level and add if necessary
Check hoses and tank for leakage3-6
Water separator Check for water and drain if necessary 3-7
Battery Check electrolyte level and battery condition 3-8
Hood Check that hood latches are secured 2-3
Hull/Deck Check hull for cracks or other damage —
Jet unit Check for debris and remove if necessary 3-11
Fire extinguisher Check condition and replace if necessary 3-9
Engine shut-off cord Check condition and replace if frayed or broken 3-11
Switches Check start switch, engine stop switch and
engine shut-off switch for proper operation when
watercraft is in the water 3-12
Cooling water pilot outlet Check that water is discharged while engine is
running and watercraft is in the water3-12
E_GM6-3.fm Page 5 Tuesday, July 11, 2000 10:52 AM
Page 41 of 107
3-6
E
EJU00424
Pre-operation check points
Engine compartment
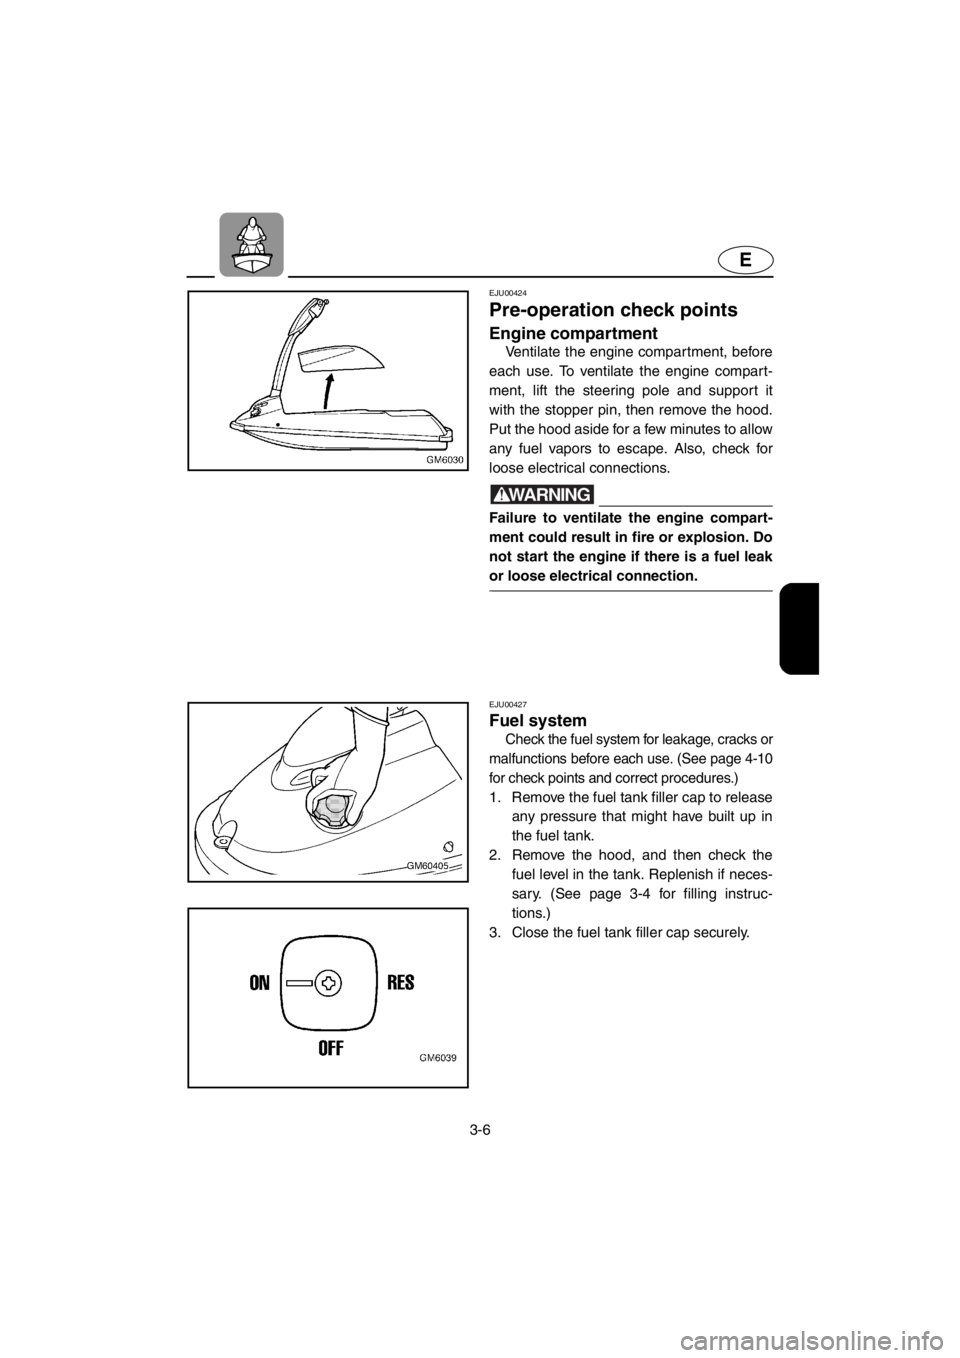
Ventilate the engine compartment, before
each use. To ventilate the engine compart-
ment, lift the steering pole and support it
with the stopper pin, then remove the hood.
Put the hood aside for a few minutes to allow
any fuel vapors to escape. Also, check for
loose electrical connections.
WARNING@Failure to ventilate the engine compart-
ment could result in fire or explosion. Do
not start the engine if there is a fuel leak
or loose electrical connection.
@
EJU00427
Fuel system
Check the fuel system for leakage, cracks or
malfunctions before each use. (See page 4-10
for check points and correct procedures.)
1. Remove the fuel tank filler cap to release
any pressure that might have built up in
the fuel tank.
2. Remove the hood, and then check the
fuel level in the tank. Replenish if neces-
sary. (See page 3-4 for filling instruc-
tions.)
3. Close the fuel tank filler cap securely.
E_GM6-3.fm Page 6 Tuesday, July 11, 2000 10:52 AM
Page 47 of 107
3-12
E
EJU00915
Switches
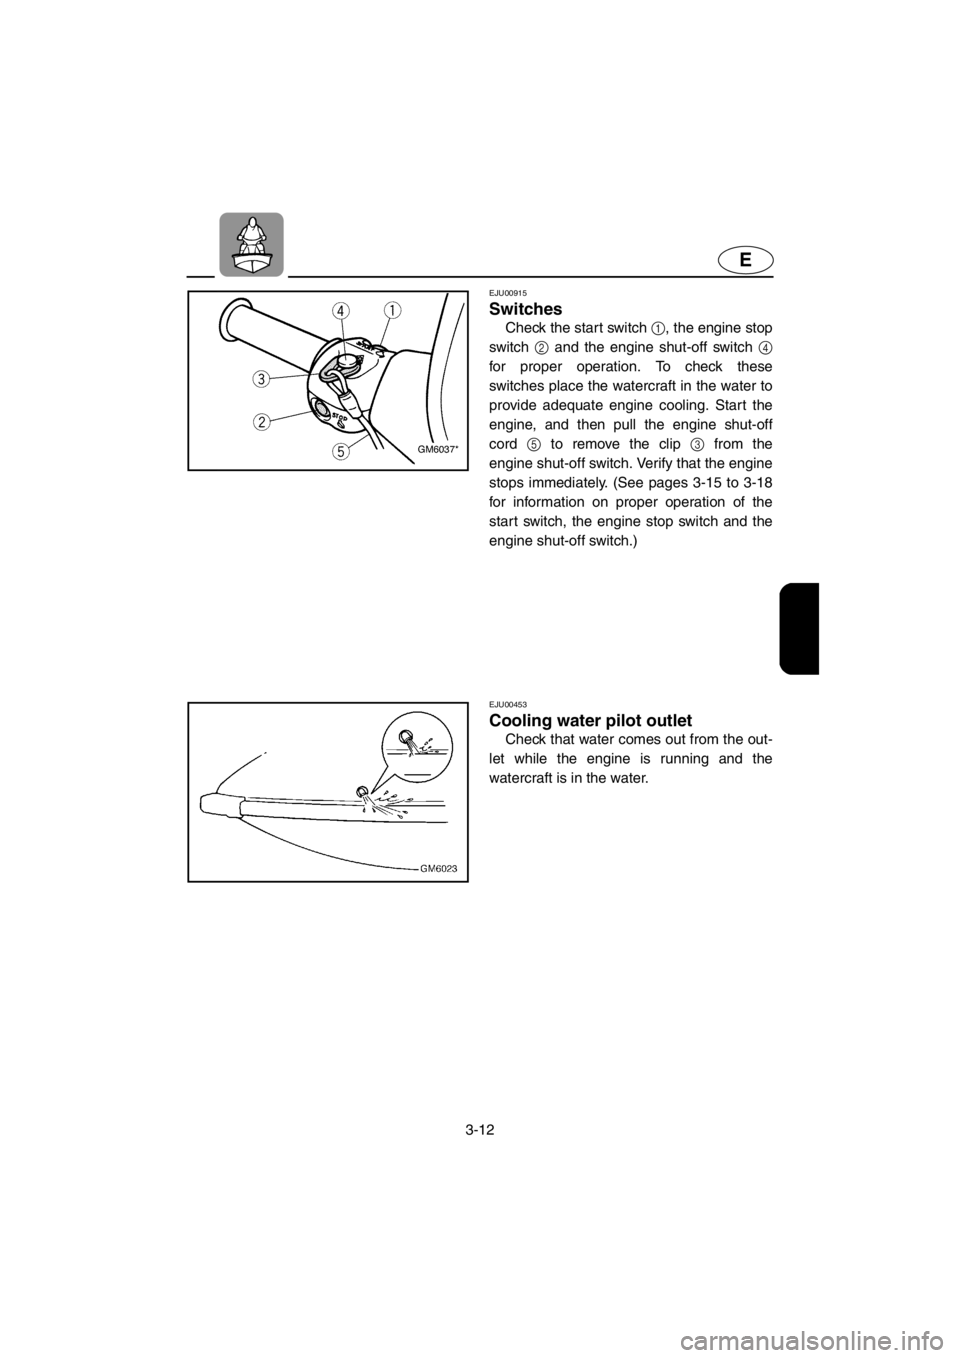
Check the start switch 1, the engine stop
switch 2 and the engine shut-off switch 4
for proper operation. To check these
switches place the watercraft in the water to
provide adequate engine cooling. Start the
engine, and then pull the engine shut-off
cord5 to remove the clip 3 from the
engine shut-off switch. Verify that the engine
stops immediately. (See pages 3-15 to 3-18
for information on proper operation of the
start switch, the engine stop switch and the
engine shut-off switch.)
EJU00453
Cooling water pilot outlet
Check that water comes out from the out-
let while the engine is running and the
watercraft is in the water.
E_GM6-3.fm Page 12 Tuesday, July 11, 2000 10:52 AM
Page 51 of 107
3-16
E
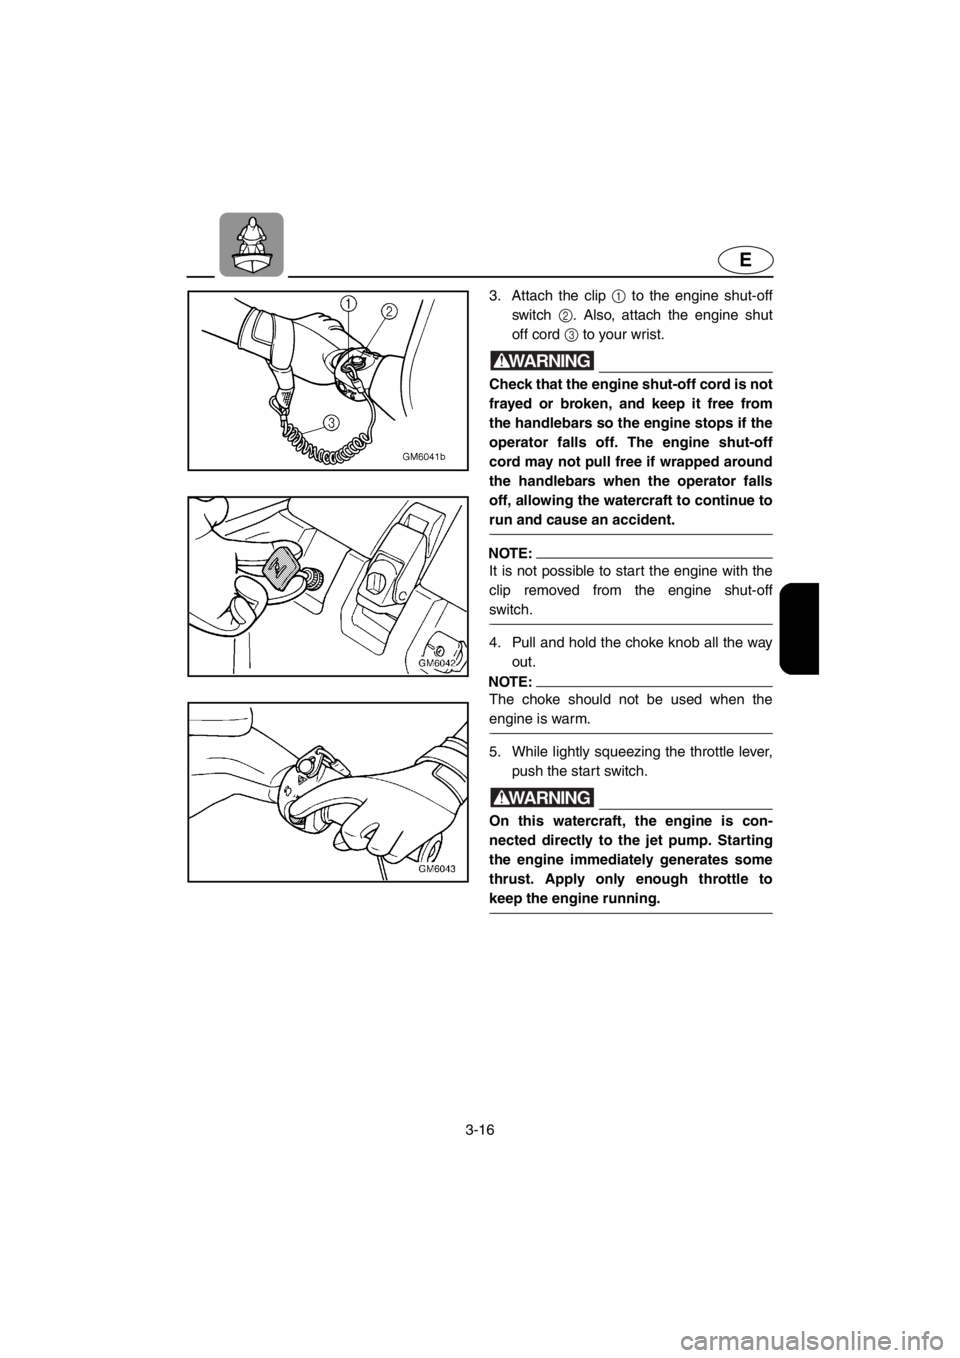
3. Attach the clip 1 to the engine shut-off
switch 2. Also, attach the engine shut
off cord 3 to your wrist.
WARNING@Check that the engine shut-off cord is not
frayed or broken, and keep it free from
the handlebars so the engine stops if the
operator falls off. The engine shut-off
cord may not pull free if wrapped around
the handlebars when the operator falls
off, allowing the watercraft to continue to
run and cause an accident.
@
NOTE:@It is not possible to start the engine with the
clip removed from the engine shut-off
switch.
@
4. Pull and hold the choke knob all the way
out.
NOTE:@The choke should not be used when the
engine is warm.
@
5. While lightly squeezing the throttle lever,
push the start switch.
WARNING@On this watercraft, the engine is con-
nected directly to the jet pump. Starting
the engine immediately generates some
thrust. Apply only enough throttle to
keep the engine running.
@
E_GM6-3.fm Page 16 Tuesday, July 11, 2000 10:52 AM