ECU YAMAHA SUPERJET 2021 Owners Manual
[x] Cancel search | Manufacturer: YAMAHA, Model Year: 2021, Model line: SUPERJET, Model: YAMAHA SUPERJET 2021Pages: 84, PDF Size: 3.76 MB
Page 29 of 84
Control function operation
22
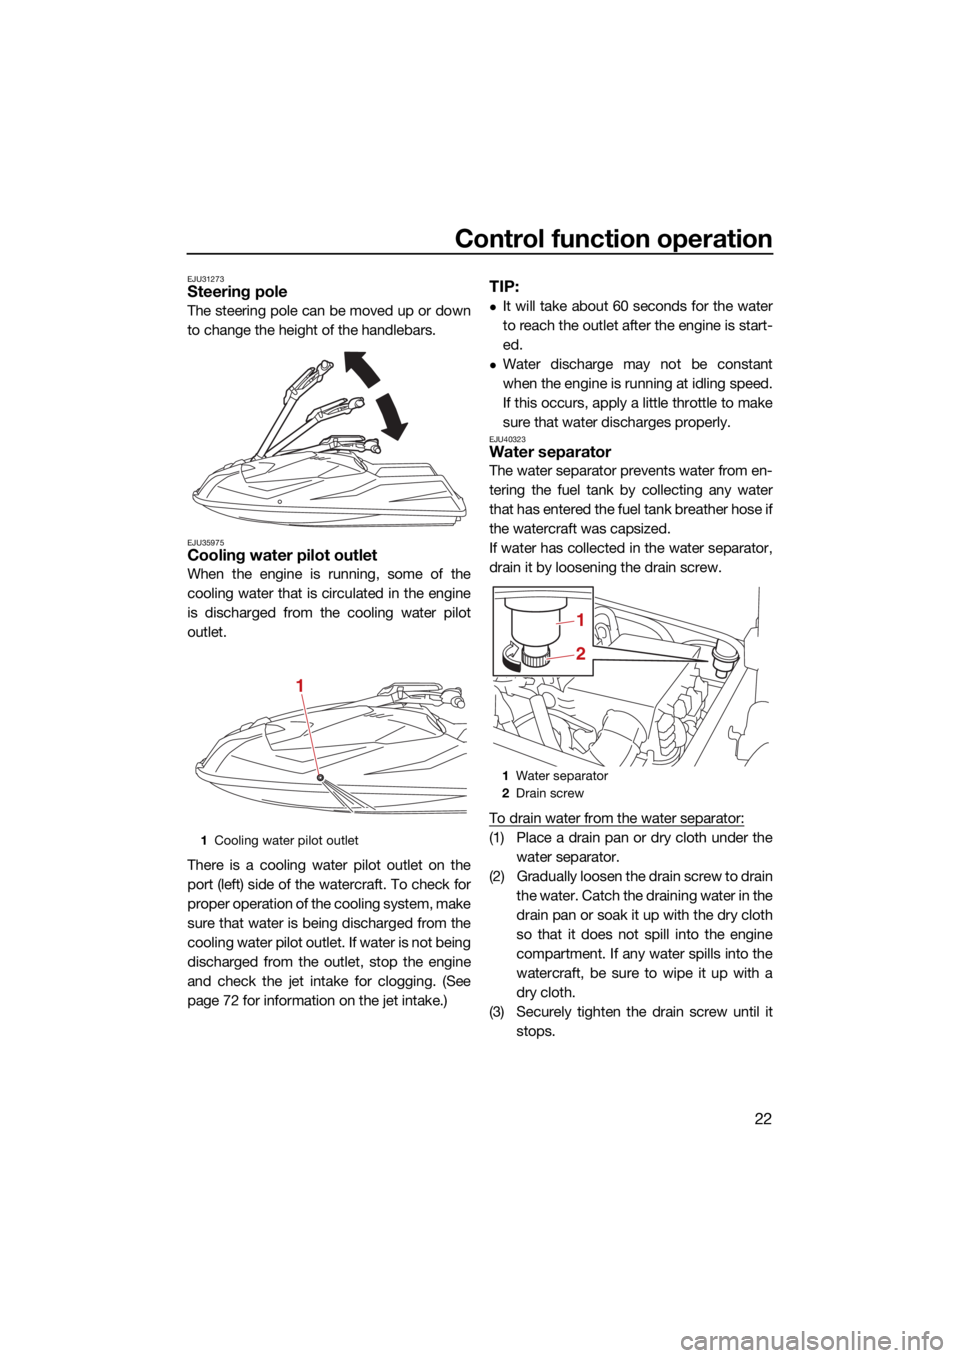
EJU31273Steering pole
The steering pole can be moved up or down
to change the height of the handlebars.
EJU35975Cooling water pilot outlet
When the engine is running, some of the
cooling water that is circulated in the engine
is discharged from the cooling water pilot
outlet.
There is a cooling water pilot outlet on the
port (left) side of the watercraft. To check for
proper operation of the cooling system, make
sure that water is being discharged from the
cooling water pilot outlet. If water is not being
discharged from the outlet, stop the engine
and check the jet intake for clogging. (See
page 72 for information on the jet intake.)
TIP:
It will take about 60 seconds for the water
to reach the outlet after the engine is start-
ed.
Water discharge may not be constant
when the engine is running at idling speed.
If this occurs, apply a little throttle to make
sure that water discharges properly.
EJU40323Water separator
The water separator prevents water from en-
tering the fuel tank by collecting any water
that has entered the fuel tank breather hose if
the watercraft was capsized.
If water has collected in the water separator,
drain it by loosening the drain screw.
To drain water from the water separator:
(1) Place a drain pan or dry cloth under thewater separator.
(2) Gradually loosen the drain screw to drain the water. Catch the draining water in the
drain pan or soak it up with the dry cloth
so that it does not spill into the engine
compartment. If any water spills into the
watercraft, be sure to wipe it up with a
dry cloth.
(3) Securely tighten the drain screw until it stops.1Cooling water pilot outlet
1
1Water separator
2 Drain screw
2
1
UF4R71E0.book Page 22 Monday, May 10, 2021 1:14 PM
Page 34 of 84
Equipment operation
27
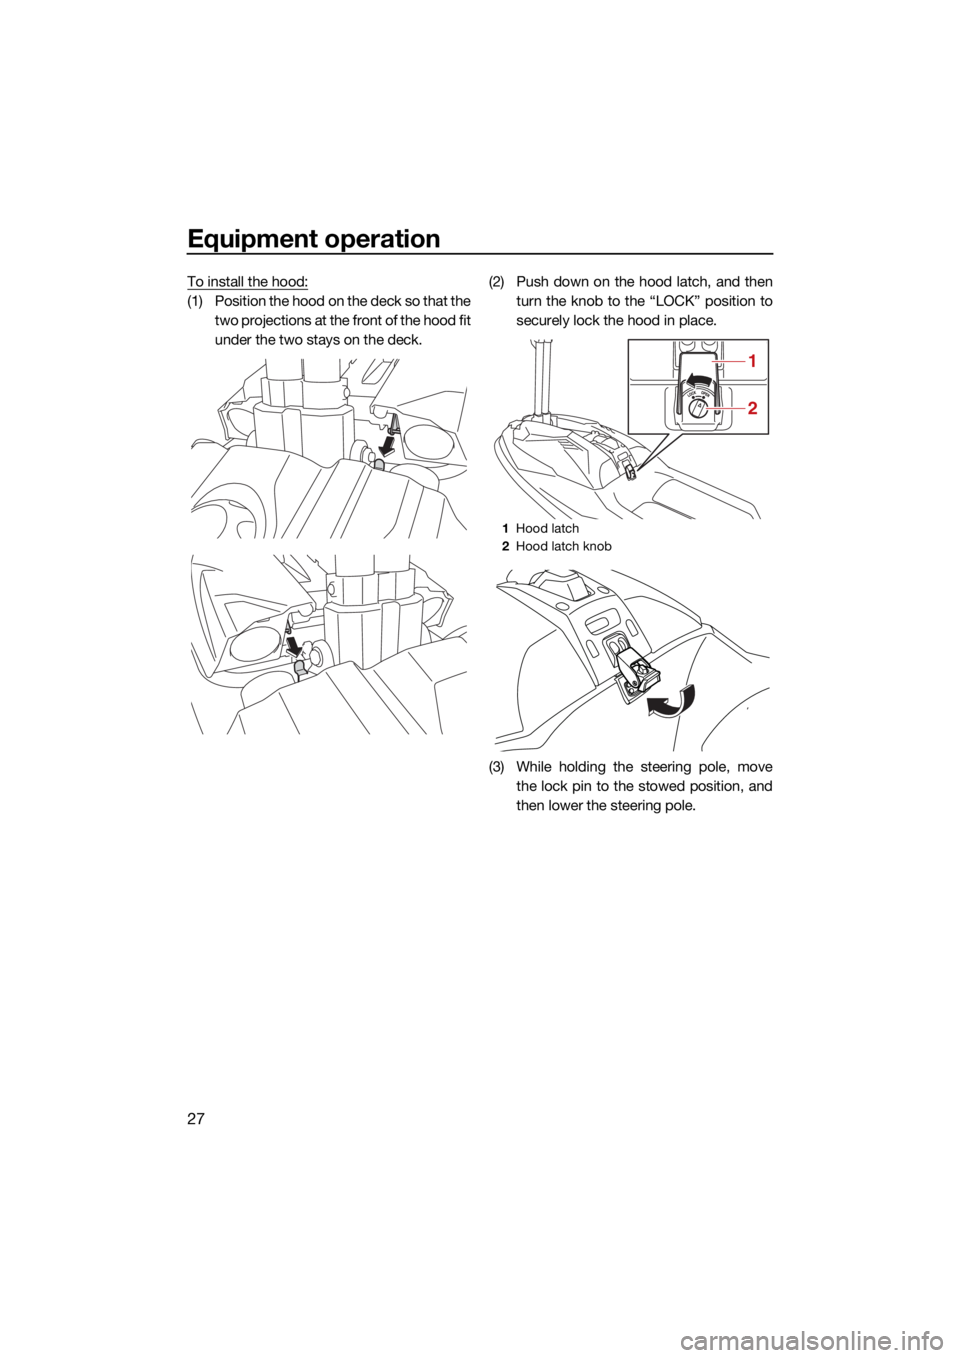
To install the hood:
(1) Position the hood on the deck so that thetwo projections at the front of the hood fit
under the two stays on the deck. (2) Push down on the hood latch, and then
turn the knob to the “LOCK” position to
securely lock the hood in place.
(3) While holding the steering pole, move the lock pin to the stowed position, and
then lower the steering pole.
1Hood latch
2 Hood latch knob
1
2
UF4R71E0.book Page 27 Monday, May 10, 2021 1:14 PM
Page 36 of 84
Equipment operation
29
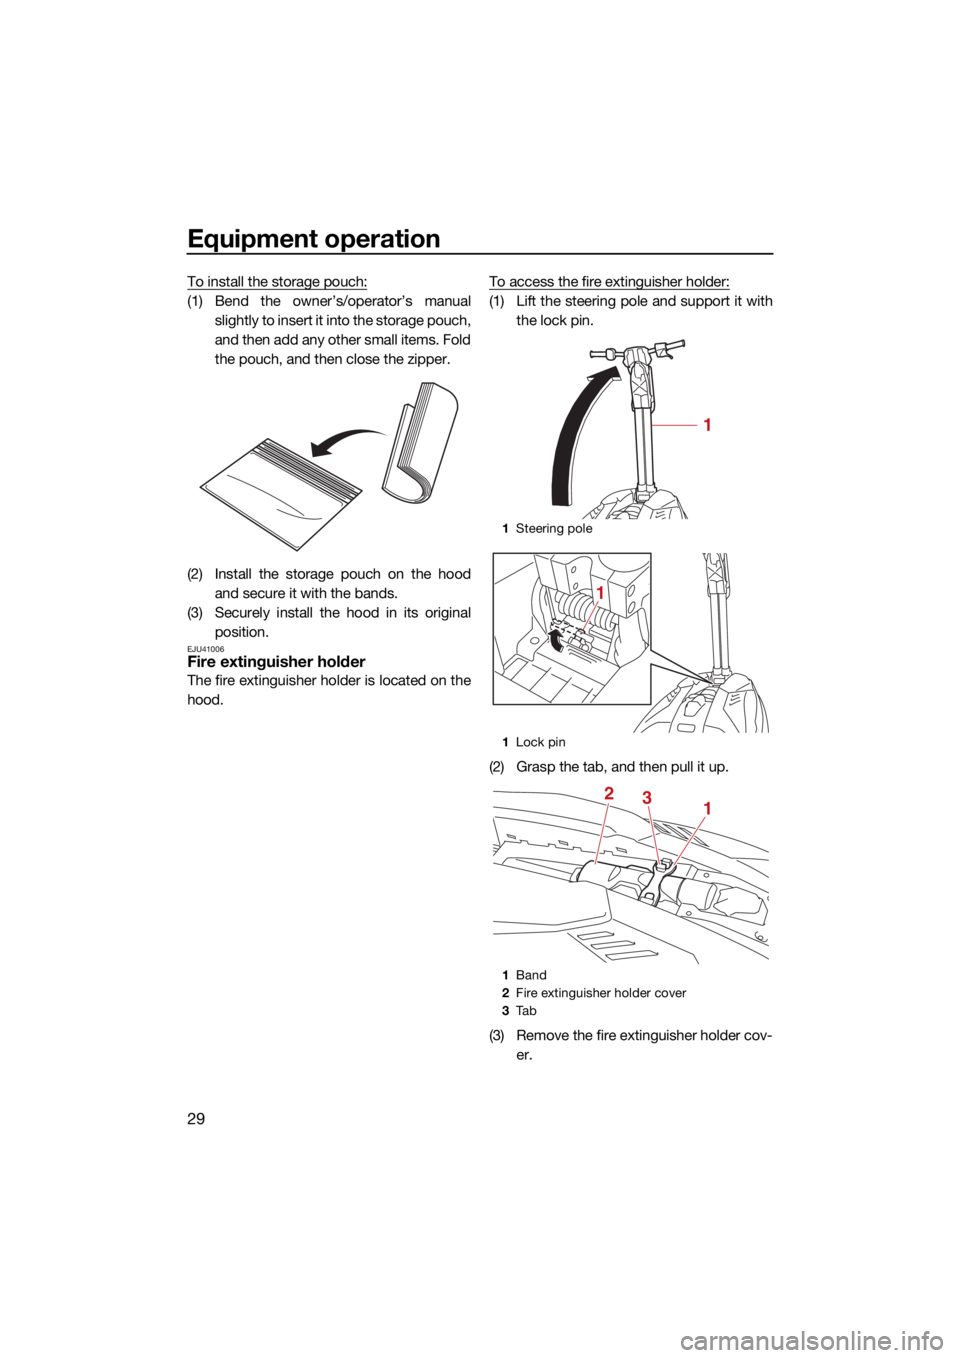
To install the storage pouch:
(1) Bend the owner’s/operator’s manualslightly to insert it into the storage pouch,
and then add any other small items. Fold
the pouch, and then close the zipper.
(2) Install the storage pouch on the hood and secure it with the bands.
(3) Securely install the hood in its original position.
EJU41006Fire extinguisher holder
The fire extinguisher holder is located on the
hood. To access the fire extinguisher holder:
(1) Lift the steering pole and support it with
the lock pin.
(2) Grasp the tab, and then pull it up.
(3) Remove the fire extinguisher holder cov- er.
1Steering pole
1 Lock pin
1 Band
2 Fire extinguisher holder cover
3 Ta b
1
1
132
UF4R71E0.book Page 29 Monday, May 10, 2021 1:14 PM
Page 37 of 84
Equipment operation
30
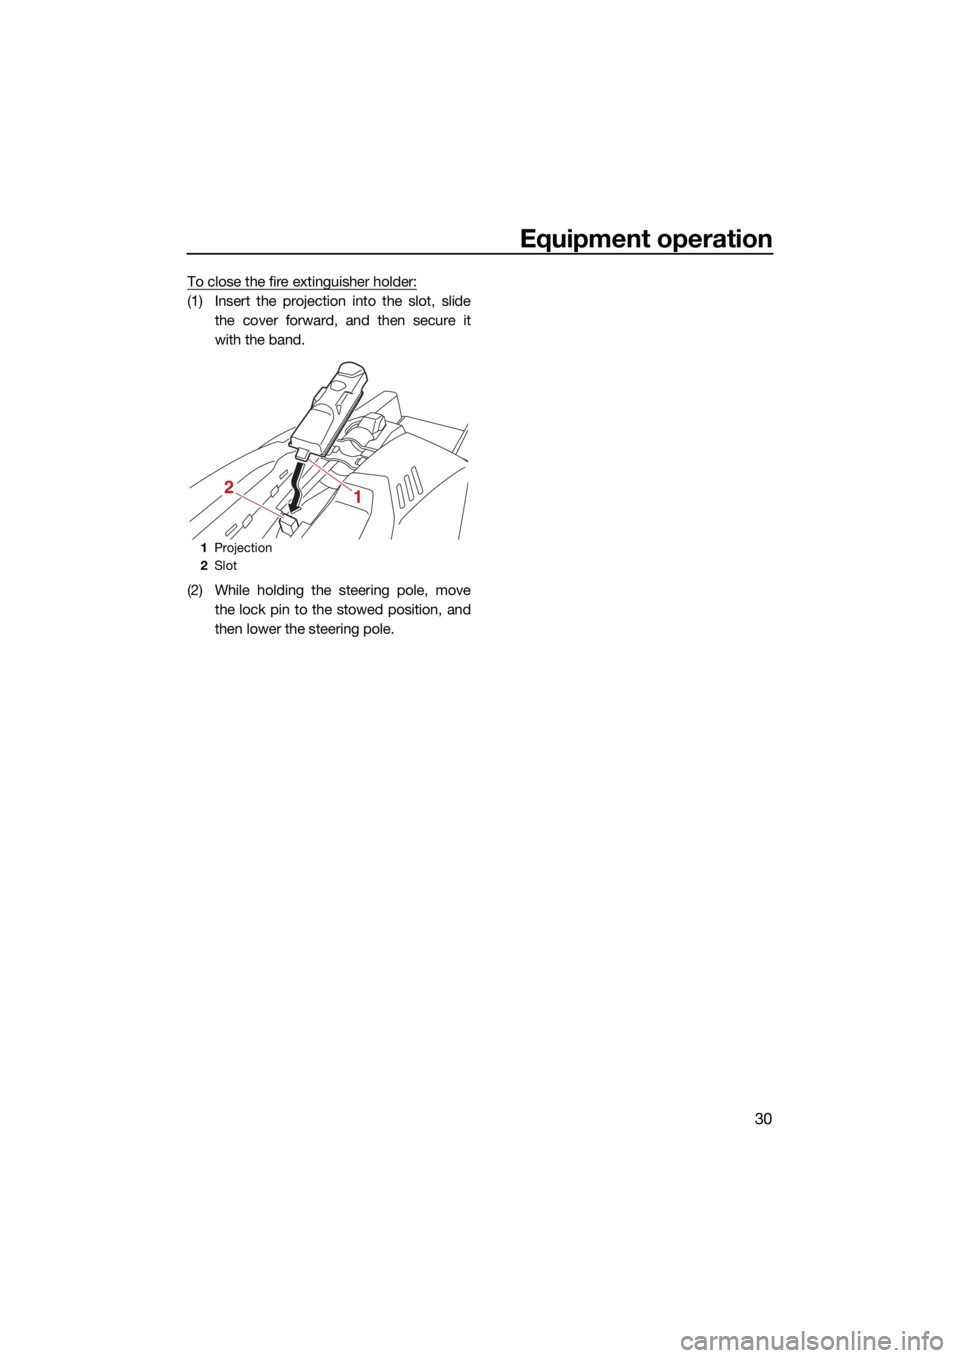
To close the fire extinguisher holder:
(1) Insert the projection into the slot, slidethe cover forward, and then secure it
with the band.
(2) While holding the steering pole, move the lock pin to the stowed position, and
then lower the steering pole.
1Projection
2 Slot
12
UF4R71E0.book Page 30 Monday, May 10, 2021 1:14 PM
Page 39 of 84
Operation and handling requirements
32
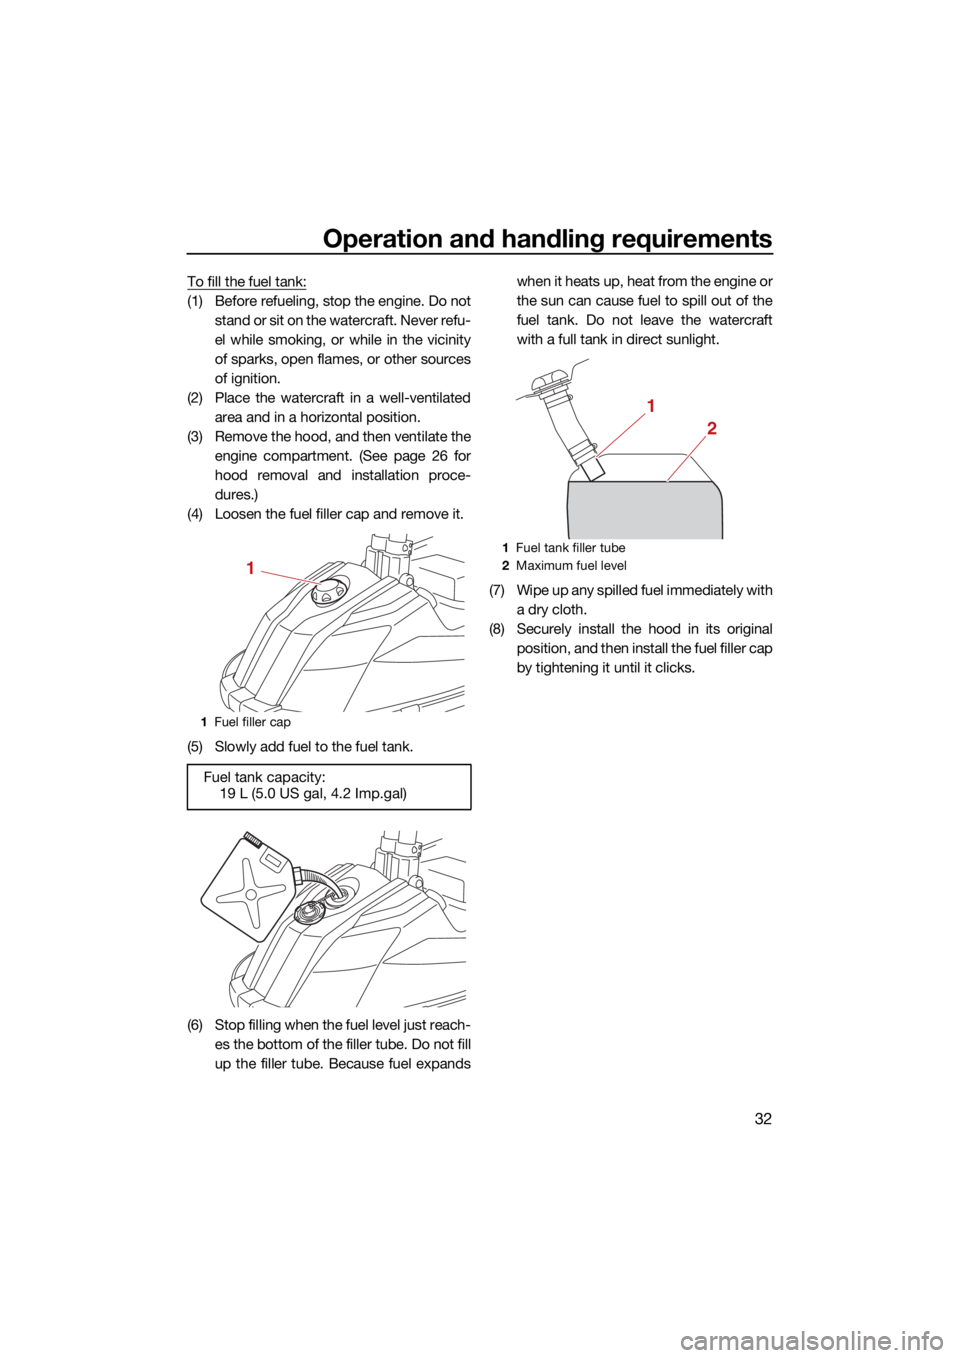
To fill the fuel tank:
(1) Before refueling, stop the engine. Do notstand or sit on the watercraft. Never refu-
el while smoking, or while in the vicinity
of sparks, open flames, or other sources
of ignition.
(2) Place the watercraft in a well-ventilated area and in a horizontal position.
(3) Remove the hood, and then ventilate the engine compartment. (See page 26 for
hood removal and installation proce-
dures.)
(4) Loosen the fuel filler cap and remove it.
(5) Slowly add fuel to the fuel tank.
(6) Stop filling when the fuel level just reach- es the bottom of the filler tube. Do not fill
up the filler tube. Because fuel expands when it heats up, heat from the engine or
the sun can cause fuel to spill out of the
fuel tank. Do not leave the watercraft
with a full tank in direct sunlight.
(7) Wipe up any spilled fuel immediately with a dry cloth.
(8) Securely install the hood in its original position, and then install the fuel filler cap
by tightening it until it clicks.
1Fuel filler cap
Fuel tank capacity:
19 L (5.0 US gal, 4.2 Imp.gal)
1
1Fuel tank filler tube
2 Maximum fuel level
2
1
UF4R71E0.book Page 32 Monday, May 10, 2021 1:14 PM
Page 41 of 84
Operation and handling requirements
34
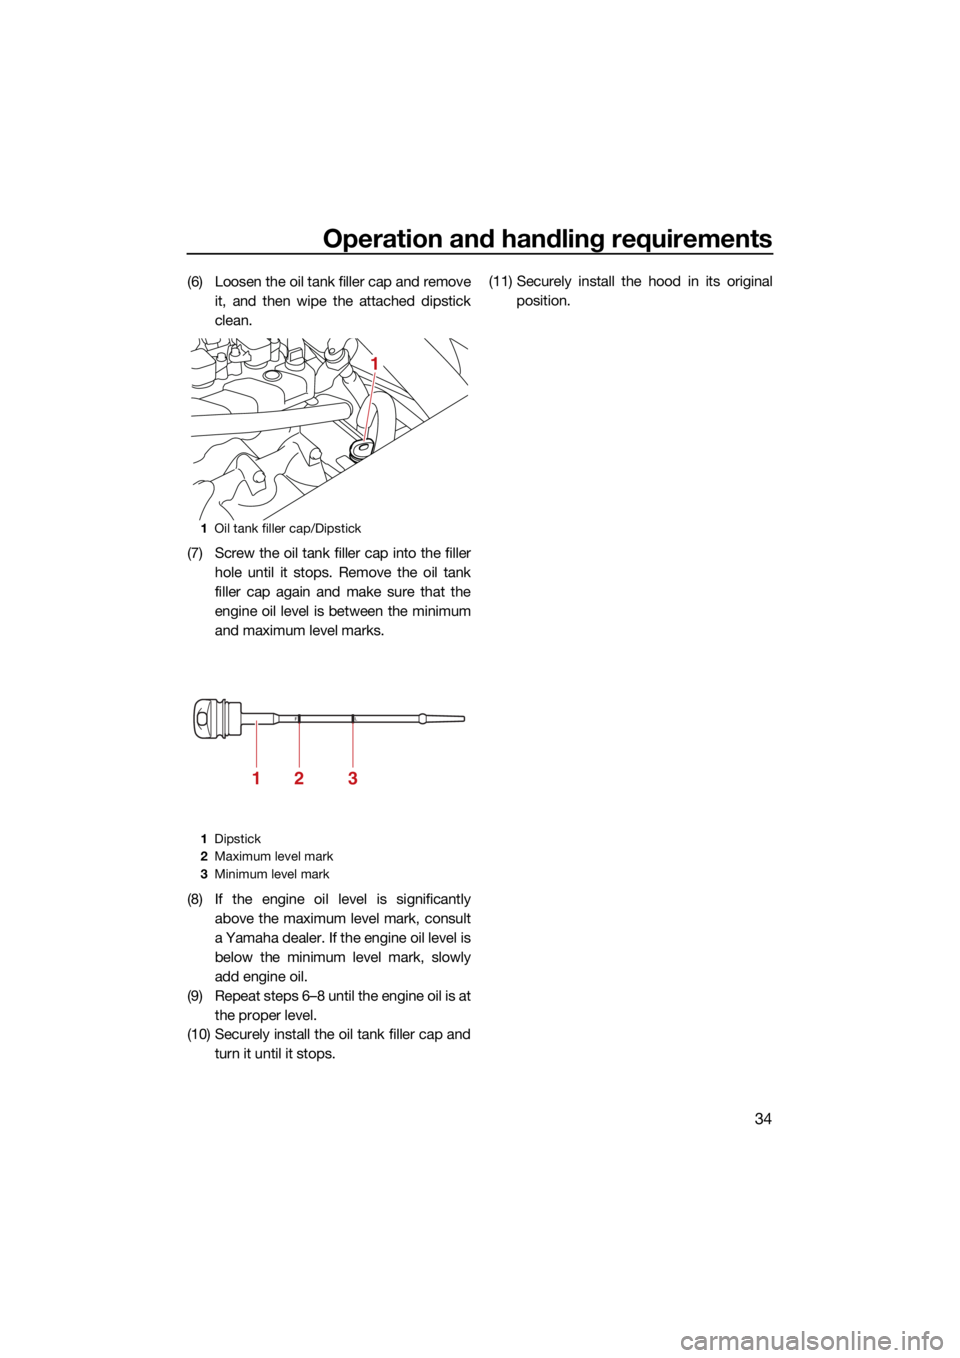
(6) Loosen the oil tank filler cap and removeit, and then wipe the attached dipstick
clean.
(7) Screw the oil tank filler cap into the filler hole until it stops. Remove the oil tank
filler cap again and make sure that the
engine oil level is between the minimum
and maximum level marks.
(8) If the engine oil level is significantly above the maximum level mark, consult
a Yamaha dealer. If the engine oil level is
below the minimum level mark, slowly
add engine oil.
(9) Repeat steps 6–8 until the engine oil is at the proper level.
(10) Securely install the oil tank filler cap and turn it until it stops. (11) Securely install the hood in its original
position.
1Oil tank filler cap/Dipstick
1 Dipstick
2 Maximum level mark
3 Minimum level mark
1
213
UF4R71E0.book Page 34 Monday, May 10, 2021 1:14 PM
Page 42 of 84
Operation and handling requirements
35
EJU40022
Draining the bilge waterECJ01302
Do not run the engine at full throttle when
bilge water remains in the engine com-
partment. The bilge water can splash into
the engine, which can result in severe
damage.
EJU44262Draining the bilge water on land
To drain the bilge water on land:
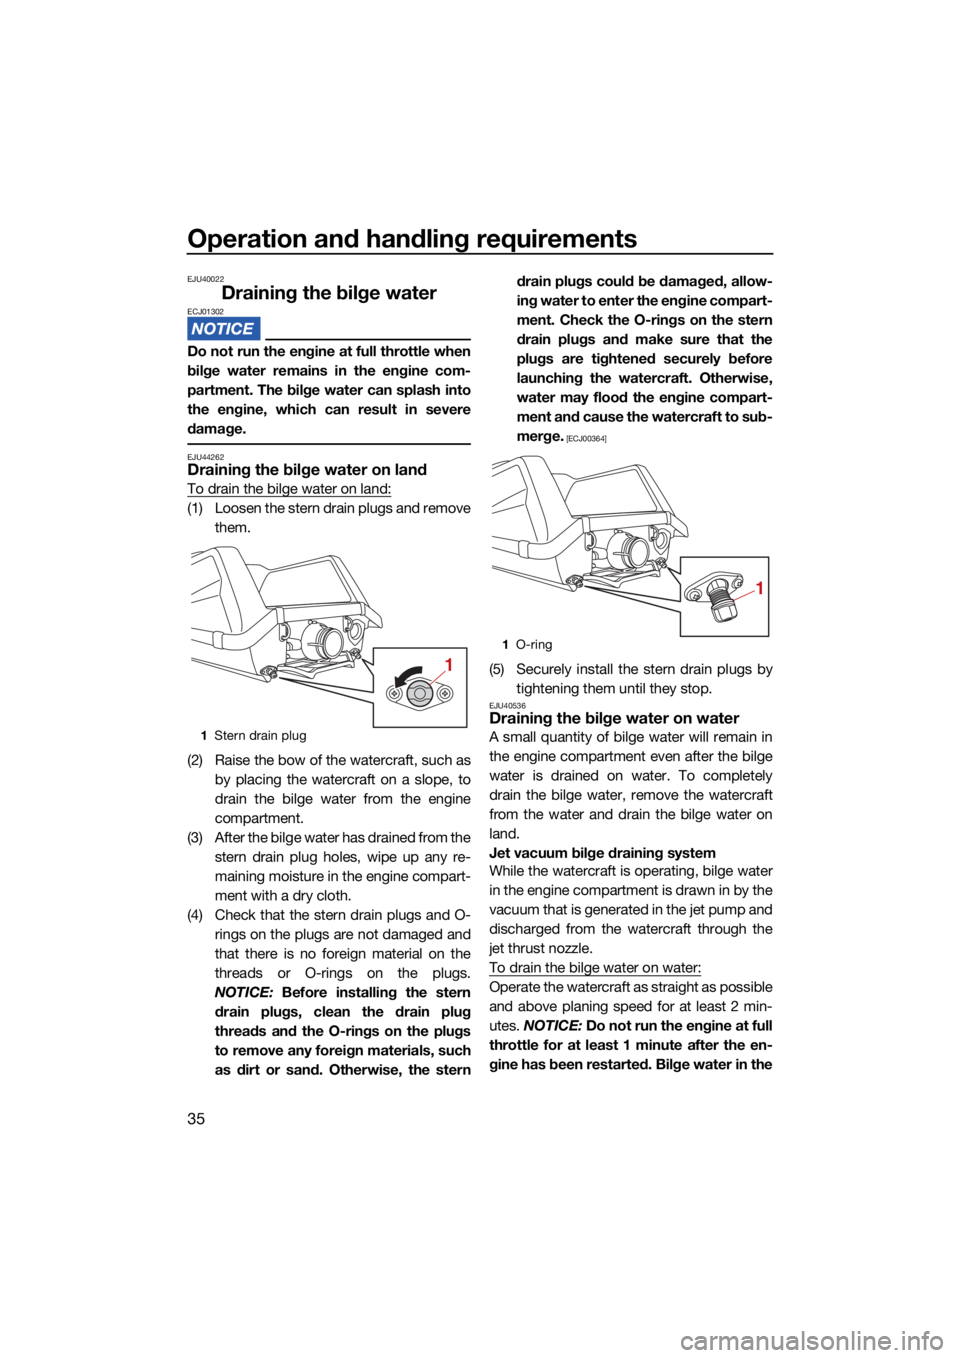
(1) Loosen the stern drain plugs and removethem.
(2) Raise the bow of the watercraft, such as by placing the watercraft on a slope, to
drain the bilge water from the engine
compartment.
(3) After the bilge water has drained from the stern drain plug holes, wipe up any re-
maining moisture in the engine compart-
ment with a dry cloth.
(4) Check that the stern drain plugs and O- rings on the plugs are not damaged and
that there is no foreign material on the
threads or O-rings on the plugs.
NOTICE: Before installing the stern
drain plugs, clean the drain plug
threads and the O-rings on the plugs
to remove any foreign materials, such
as dirt or sand. Otherwise, the stern drain plugs could be damaged, allow-
ing water to enter the engine compart-
ment. Check the O-rings on the stern
drain plugs and make sure that the
plugs are tightened securely before
launching the watercraft. Otherwise,
water may flood the engine compart-
ment and cause the watercraft to sub-
merge.
[ECJ00364]
(5) Securely install the stern drain plugs by
tightening them until they stop.
EJU40536Draining the bilge water on water
A small quantity of bilge water will remain in
the engine compartment even after the bilge
water is drained on water. To completely
drain the bilge water, remove the watercraft
from the water and drain the bilge water on
land.
Jet vacuum bilge draining system
While the watercraft is operating, bilge water
in the engine compartment is drawn in by the
vacuum that is generated in the jet pump and
discharged from the watercraft through the
jet thrust nozzle.
To drain the bilge water on water:
Operate the watercraft as straight as possible
and above planing speed for at least 2 min-
utes. NOTICE: Do not run the engine at full
throttle for at least 1 minute after the en-
gine has been restarted. Bilge water in the
1 Stern drain plug
1
1O-ring
1
UF4R71E0.book Page 35 Monday, May 10, 2021 1:14 PM
Page 43 of 84
![YAMAHA SUPERJET 2021 Owners Manual Operation and handling requirements
36
engine compartment can splash into the
engine, which can result in severe dam-
age.
[ECJ00554]EJU45602
Transporting on a trailer
When transporting the watercraf YAMAHA SUPERJET 2021 Owners Manual Operation and handling requirements
36
engine compartment can splash into the
engine, which can result in severe dam-
age.
[ECJ00554]EJU45602
Transporting on a trailer
When transporting the watercraf](/img/51/51248/w960_51248-42.png)
Operation and handling requirements
36
engine compartment can splash into the
engine, which can result in severe dam-
age.
[ECJ00554]EJU45602
Transporting on a trailer
When transporting the watercraft on a trailer,
secure the tie downs to the trailer through the
bow eye and stern eyes. Use a rubber shock
cord to secure the steering pole to the water-
craft.
NOTICE: Do not attach ropes or tie
downs to any part of the watercraft other
than the bow eye and stern eyes to secure
the watercraft to the trailer. Otherwise, the
watercraft may be damaged. Wrap the
ropes or tie downs with towels or rags
where they touch the body of the water-
craft to avoid scratches or damage. Do
not secure the steering pole with ropes or
tie downs and do not secure it to the trail-
er. Also, do not transport the watercraft
UF4R71E0.book Page 36 Monday, May 10, 2021 1:14 PM
Page 46 of 84
Pre-operation checks
39
EJU31984
EWJ00413
Failure to inspect or maintain the watercraft properly increases the possibility of an ac-
cident or damage to the watercraft. Do not operate the watercraft if you find any prob-
lem. If a problem cannot be corrected by the procedures provided in this manual, have
the watercraft inspected by a Yamaha dealer.
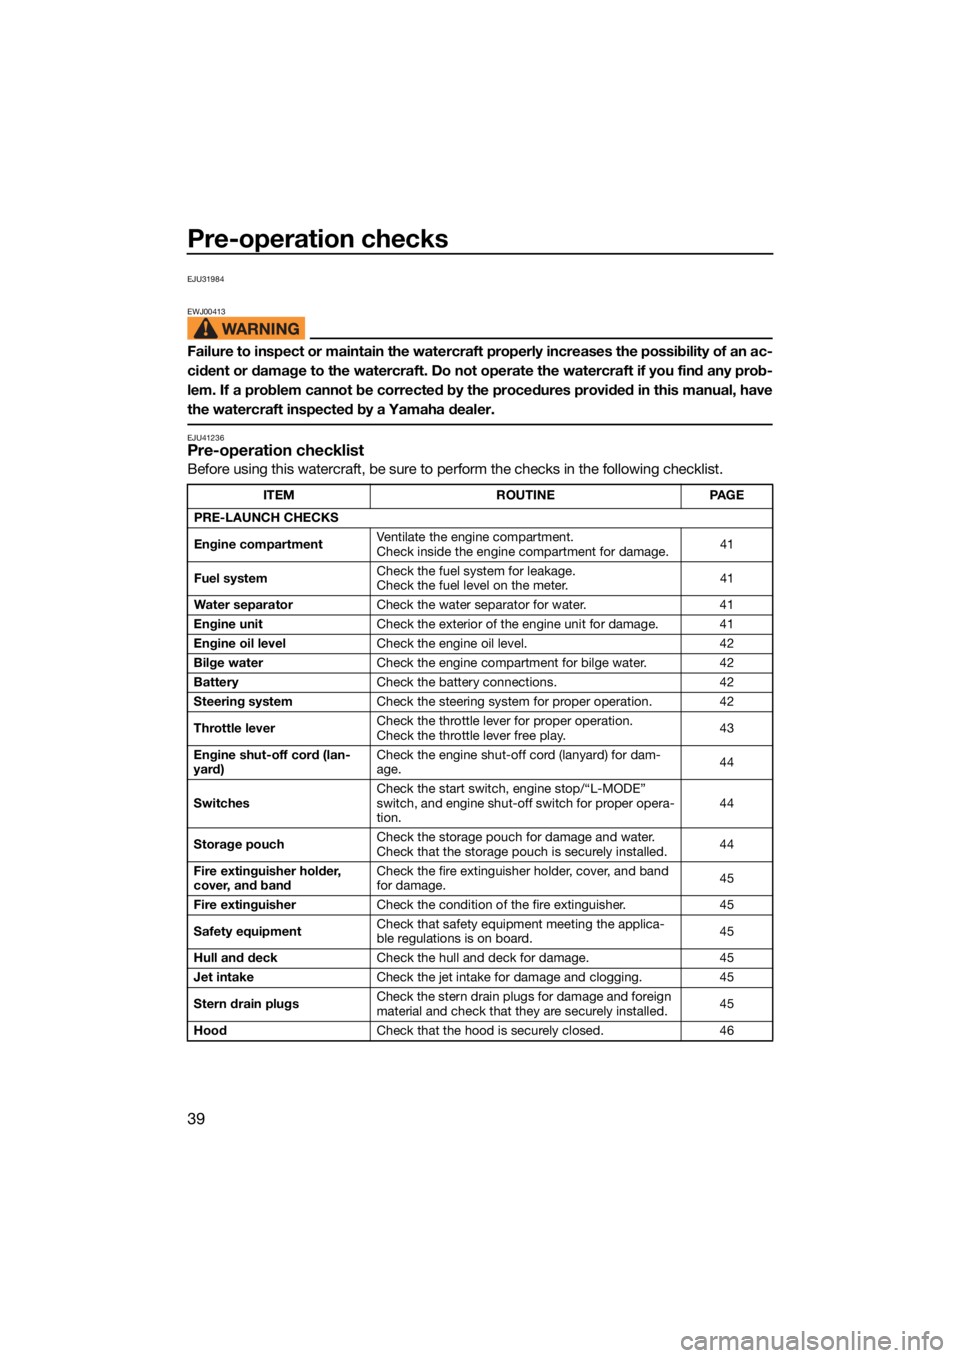
EJU41236Pre-operation checklist
Before using this watercraft, be sure to perform the checks in the following checklist.
ITEMROUTINEPAGE
PRE-LAUNCH CHECKS
Engine compartment Ventilate the engine compartment.
Check inside the engine compartment for damage.
41
Fuel system Check the fuel system for leakage.
Check the fuel level on the meter.
41
Water separator Check the water separator for water. 41
Engine unit Check the exterior of the engine unit for damage. 41
Engine oil level Check the engine oil level. 42
Bilge water Check the engine compartment for bilge water. 42
Battery Check the battery connections. 42
Steering system Check the steering system for proper operation. 42
Throttle lever Check the throttle lever for proper operation.
Check the throttle lever free play.
43
Engine shut-off cord (lan-
yard) Check the engine shut-off cord (lanyard) for dam-
age.
44
Switches Check the start switch, engine stop/“L-MODE”
switch, and engine shut-off switch for proper opera-
tion. 44
Storage pouch Check the storage pouch for damage and water.
Check that the storage pouch is securely installed.
44
Fire extinguisher holder,
cover, and band Check the fire extinguisher holder, cover, and band
for damage.
45
Fire extinguisher Check the condition of the fire extinguisher. 45
Safety equipment Check that safety equipment meeting the applica-
ble regulations is on board.
45
Hull and deck Check the hull and deck for damage. 45
Jet intake Check the jet intake for damage and clogging. 45
Stern drain plugs Check the stern drain plugs for damage and foreign
material and check that they are securely installed.
45
Hood Check that the hood is securely closed. 46
UF4R71E0.book Page 39 Monday, May 10, 2021 1:14 PM
Page 49 of 84
Pre-operation checks
42
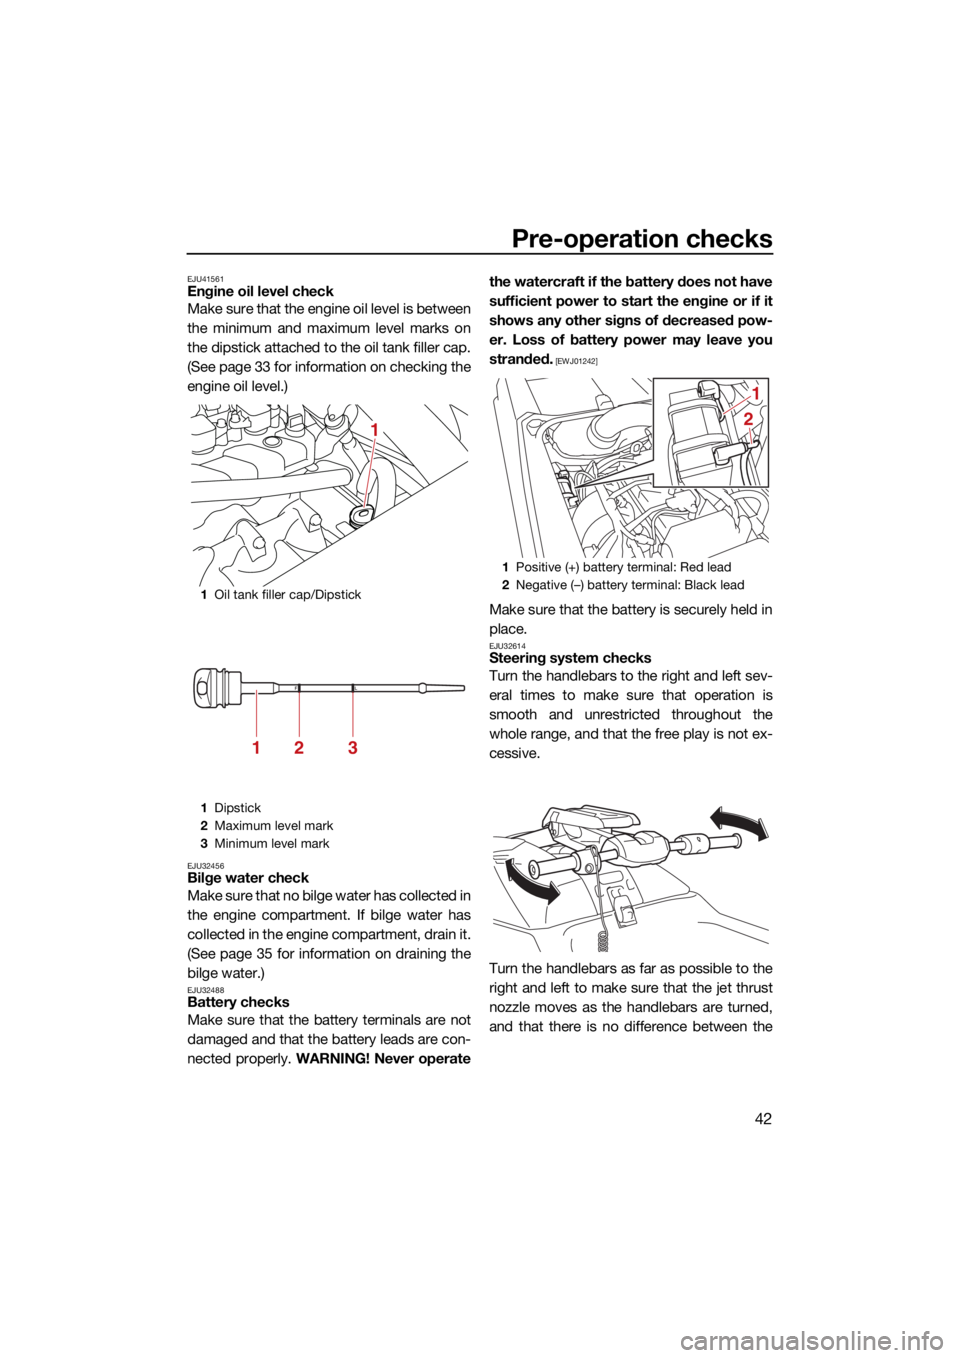
EJU41561Engine oil level check
Make sure that the engine oil level is between
the minimum and maximum level marks on
the dipstick attached to the oil tank filler cap.
(See page 33 for information on checking the
engine oil level.)
EJU32456Bilge water check
Make sure that no bilge water has collected in
the engine compartment. If bilge water has
collected in the engine compartment, drain it.
(See page 35 for information on draining the
bilge water.)
EJU32488Battery checks
Make sure that the battery terminals are not
damaged and that the battery leads are con-
nected properly. WARNING! Never operate the watercraft if the battery does not have
sufficient power to start the engine or if it
shows any other signs of decreased pow-
er. Loss of battery power may leave you
stranded.
[EWJ01242]
Make sure that the battery is securely held in
place.
EJU32614Steering system checks
Turn the handlebars to the right and left sev-
eral times to make sure that operation is
smooth and unrestricted throughout the
whole range, and that the free play is not ex-
cessive.
Turn the handlebars as far as possible to the
right and left to make sure that the jet thrust
nozzle moves as the handlebars are turned,
and that there is no difference between the
1
Oil tank filler cap/Dipstick
1 Dipstick
2 Maximum level mark
3 Minimum level mark
1
213
1Positive (+) battery terminal: Red lead
2 Negative (–) battery terminal: Black lead
1
2
UF4R71E0.book Page 42 Monday, May 10, 2021 1:14 PM