stop start YAMAHA SUPERJET 2022 Owners Manual
[x] Cancel search | Manufacturer: YAMAHA, Model Year: 2022, Model line: SUPERJET, Model: YAMAHA SUPERJET 2022Pages: 84, PDF Size: 3.76 MB
Page 6 of 84

Table of contents
General and important labels ........... 1Identification numbers .................... 1
Primary Identification (PRI-ID)
number............................................ 1
Craft Identification Number (CIN) ....... 1
Engine serial number.......................... 1
Manufactured date label .................... 2
Important labels .............................. 3
Warning labels.................................... 4
Other labels ........................................ 7
Safety information ............................. 8 Limitations on who may operate the watercraft ............................... 8
Cruising limitations .......................... 9
Operation requirements ................ 10
Recommended equipment ........... 12
Hazard information........................ 13
Watercraft characteristics ............. 13
Safe boating rules ......................... 14
Enjoy your watercraft responsibly ................................. 15
Description....................................... 16 Watercraft glossary ....................... 16
Location of main components ...... 17
Control function operation ............. 20 Watercraft control functions ......... 20
Engine stop/“L-MODE” switch......... 20
Engine shut-off switch ..................... 20
Start switch ...................................... 20
Throttle lever .................................... 21
Steering system ............................... 21
Steering pole .................................... 22
Cooling water pilot outlet ................. 22
Water separator................................ 22
Watercraft operation....................... 23Watercraft operation modes ......... 23
L-MODE ........................................... 23
Instrument operation ...................... 24Meter............................................. 24
Fuel level meter ................................ 24
Indicator lights .................................. 24
Equipment operation ...................... 26Equipment..................................... 26
Hood................................................. 26
Reboarding holder............................ 28
Bow eye............................................ 28
Stern eyes ........................................ 28
Storage pouch .................................. 28
Fire extinguisher holder .................... 29
Operation and handling
requirements ................................... 31Fuel requirements ......................... 31
Fuel................................................... 31
Engine oil requirements ................ 33
Engine oil .......................................... 33
Draining the bilge water ................ 35
Draining the bilge water on land....... 35
Draining the bilge water on water .... 35
Transporting on a trailer................ 36
First-time operation ........................ 38 Engine break-in............................. 38
Pre-operation checks ..................... 39
Pre-operation checklist .................... 39
Pre-operation check points .......... 41
Pre-launch checks ........................... 41
Post-launch checks.......................... 46
Operation ......................................... 47 Operating your watercraft ............. 47
Getting to know your watercraft....... 47
Learning to operate your
watercraft ...................................... 47
Operating positions .......................... 47
Launching the watercraft ................. 48
Starting the engine on water ............ 48
Stopping the engine ......................... 49
UF4R71E0.book Page 1 Monday, May 10, 2021 1:14 PM
Page 7 of 84

Table of contents
Leaving the watercraft...................... 49
Operating the watercraft .................. 49
Turning the watercraft ...................... 50
Stopping the watercraft ................... 51
Starting off........................................ 52
Capsized watercraft ......................... 54
Beaching the watercraft ................... 55
Operating in weeded areas .............. 55
After removing the watercraft from the water ....................................... 56
Care and storage............................. 57Post-operation care ...................... 57
Flushing the cooling water
passages....................................... 57
Cleaning the watercraft .................... 58
Battery care ...................................... 58
Long-term storage ........................ 60
Cleaning ........................................... 60
Lubrication ....................................... 60
Rustproofing..................................... 61
Maintenance .................................... 63 Maintenance.................................. 63
Adjusting the steering friction .......... 63
Adjusting the jet thrust nozzle
angle ............................................. 64
Adjusting the handlebar position ..... 65
Periodic maintenance chart ............. 66
Engine oil and oil filter ...................... 68
Specifications .................................. 69 Specifications................................ 69
Trouble recovery ............................. 70 Troubleshooting ............................ 70
Troubleshooting chart ...................... 70
Emergency procedures ................. 72
Cleaning the jet intake and
impeller ......................................... 72
Jumping the battery ......................... 73
Towing the watercraft ...................... 73
Submerged watercraft ..................... 74
Index................................................. 75
UF4R71E0.book Page 2 Monday, May 10, 2021 1:14 PM
Page 18 of 84
Safety information
11
in certain kinds of accidents and that it
could injure you in others.
A helmet is designed to provide some head
protection. Although helmets cannot pro-
tect against all foreseeable impacts, a hel-
met might reduce your injuries in a collision
with a boat or other obstacle.
A helmet may have potential safety haz-
ards, as well. Falling into the water could
risk the chance of the helmet catching wa-
ter, commonly known as “bucketing”, and
the resulting strain on your neck could
cause choking, severe and permanent
neck injuries, or death. A helmet could also
increase the risk of an accident if it reduces
your vision or hearing, or if it distracts you
or increases your fatigue.
How should you decide if a helmet’s poten-
tial safety benefits outweigh its potential
risks for you? Consider your particular rid-
ing conditions. Consider factors such as
your riding environment and your riding
style and ability. Also consider the likeli-
hood of traffic congestion, and the water
surface conditions.
If you decide to wear a helmet based upon
your riding circumstances, choose one
carefully. Look for a helmet designed for
personal watercraft use, if possible. If you
will be engaging in closed-course competi-
tion, follow the helmet requirements of the
sanctioning organization.
Never operate the watercraft after consum-
ing alcohol or taking other drugs.
For reasons of safety and proper care of
the watercraft, always perform the pre-op-
eration checks listed on page 39 before op-
erating the watercraft.
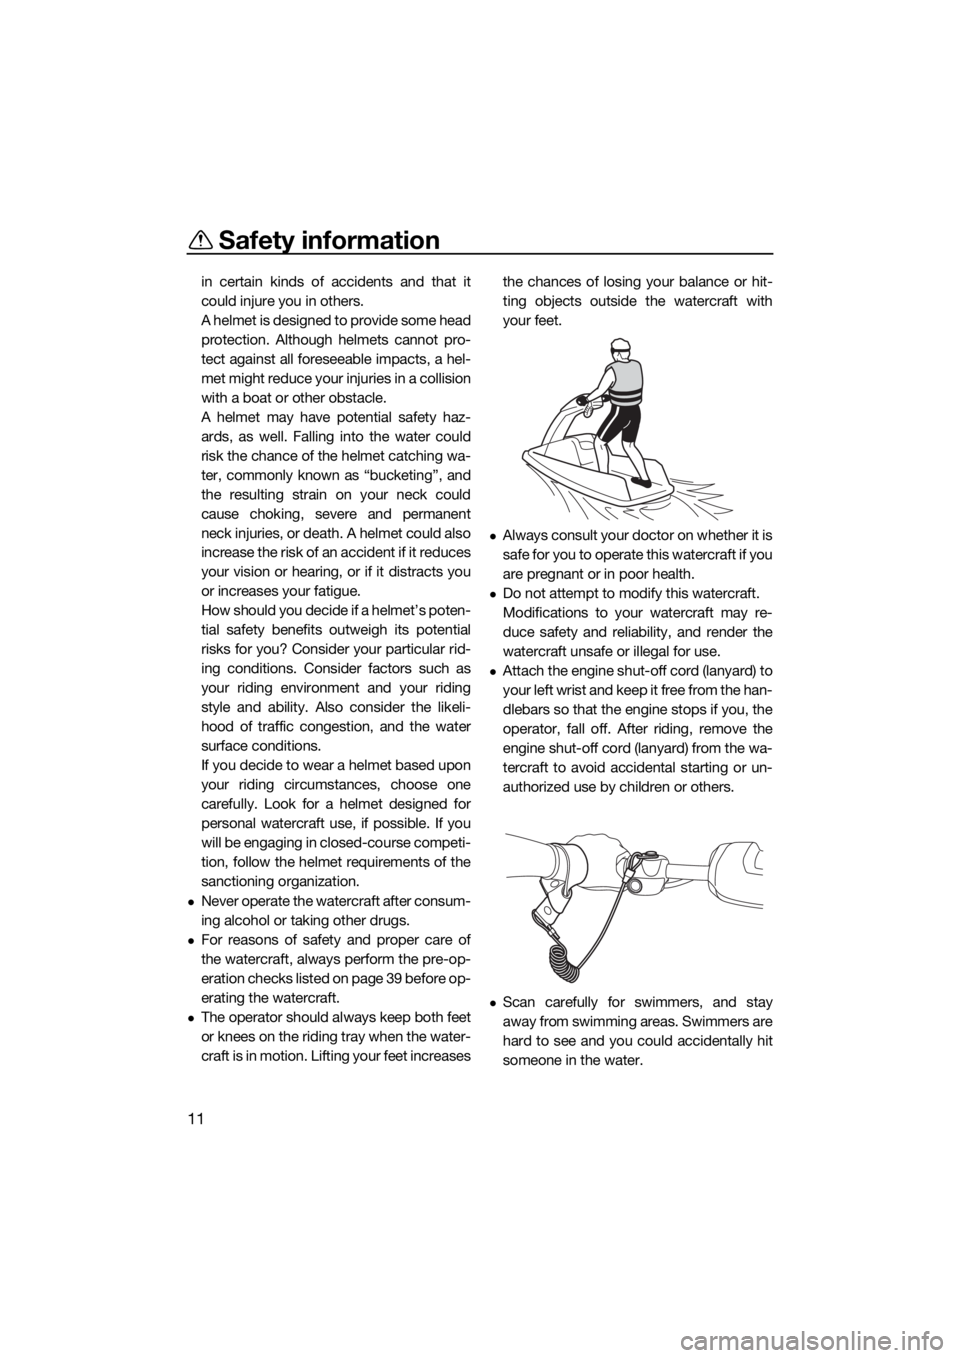
The operator should always keep both feet
or knees on the riding tray when the water-
craft is in motion. Lifting your feet increases the chances of losing your balance or hit-
ting objects outside the watercraft with
your feet.
Always consult your doctor on whether it is
safe for you to operate this watercraft if you
are pregnant or in poor health.
Do not attempt to modify this watercraft.
Modifications to your watercraft may re-
duce safety and reliability, and render the
watercraft unsafe or illegal for use.
Attach the engine shut-off cord (lanyard) to
y o u r l ef t w r is t an d k ee p i t fr e e f r o m t h e h an -
dlebars so that the engine stops if you, the
operator, fall off. After riding, remove the
engine shut-off cord (lanyard) from the wa-
tercraft to avoid accidental starting or un-
authorized use by children or others.
Scan carefully for swimmers, and stay
away from swimming areas. Swimmers are
hard to see and you could accidentally hit
someone in the water.
UF4R71E0.book Page 11 Monday, May 10, 2021 1:14 PM
Page 25 of 84
Description
18
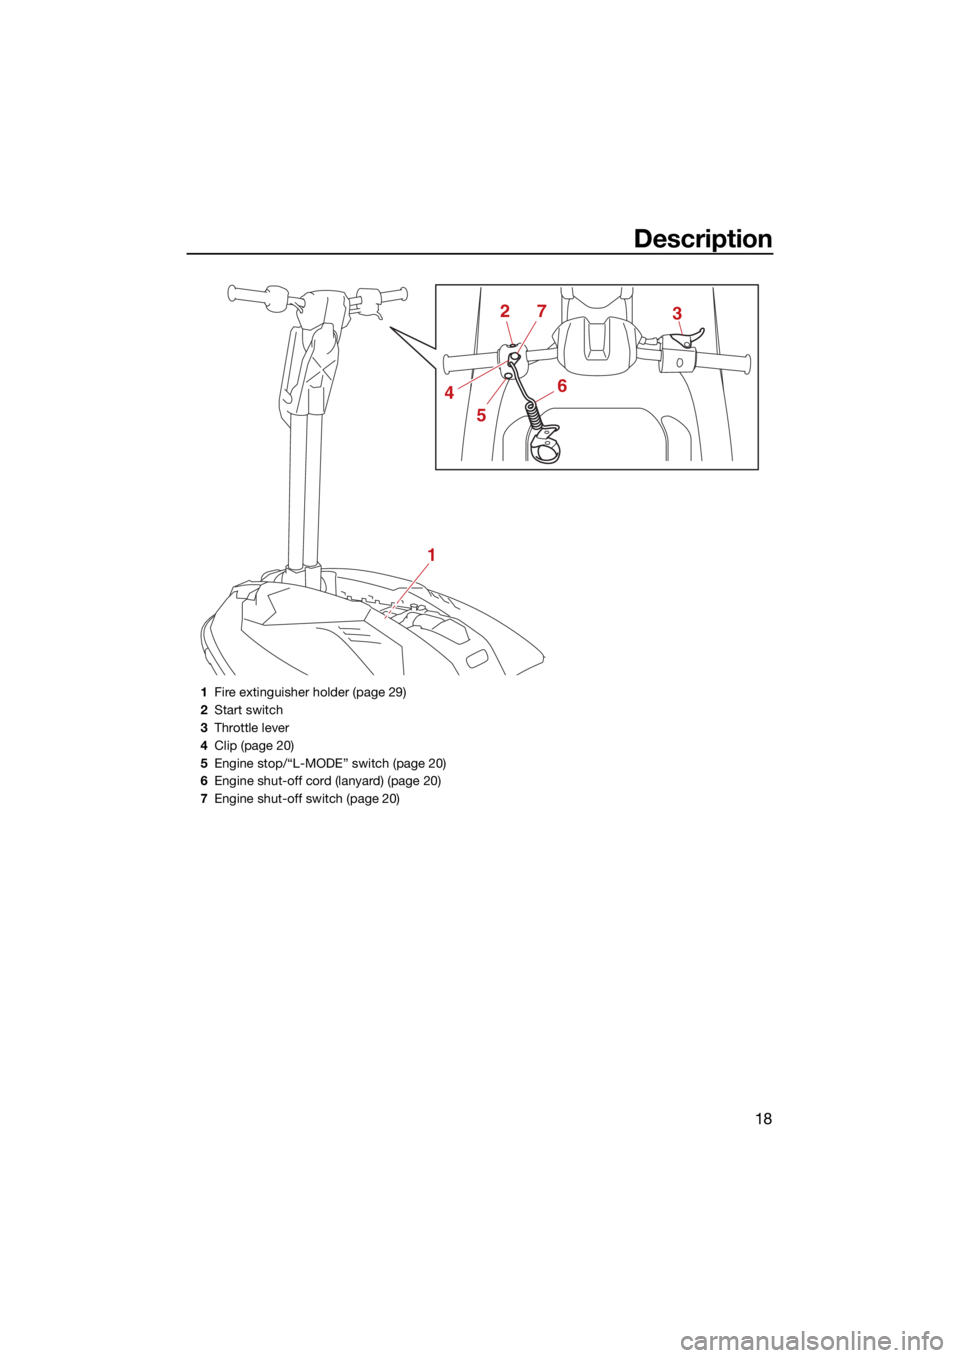
1
237
46
5
1Fire extinguisher holder (page 29)
2 Start switch
3 Throttle lever
4 Clip (page 20)
5 Engine stop/“L-MODE” switch (page 20)
6 Engine shut-off cord (lanyard) (page 20)
7 Engine shut-off switch (page 20)
UF4R71E0.book Page 18 Monday, May 10, 2021 1:14 PM
Page 27 of 84

Control function operation
20
EJU31027
Watercraft control functionsEJU45552Engine stop/“L-MODE” switch “ ”
The engine stop/“L-MODE” switch (red but-
ton) stops the engine when the switch is
pushed. You can also activate L-MODE.
EJU31164Engine shut-off switch “ ”
The engine shut-off switch automatically
stops the engine when the clip, on the end of
the engine shut-off cord (lanyard), is removed
from the switch, such as if the operator falls
off the watercraft.
Insert the clip under the engine shut-off
switch before starting the engine.
When the engine is not running, remove the
clip from the engine shut-off switch to pre-vent accidental starting or unauthorized op-
eration by children or others.
EJU45561Start switch “ ”ECJ01361
Do not run the engine for more than 15
seconds on land without supplying water,
otherwise the engine could overheat.
The start switch (green button) starts the en-
gine when the switch is pushed.
Release the start switch as soon as the en-
gine starts to run. If the engine does not start
in 5 seconds, release the start switch, wait 15
seconds, and then try again.
NOTICE: Never
push the start switch while the engine is
running. Do not operate the start switch
for more than 5 seconds, otherwise the
battery will be discharged and the engine
1 Engine stop/“L-MODE” switch
1 Clip
2 Engine shut-off switch
3 Engine shut-off cord (lanyard)
1
1
2
3
UF4R71E0.book Page 20 Monday, May 10, 2021 1:14 PM
Page 29 of 84
Control function operation
22
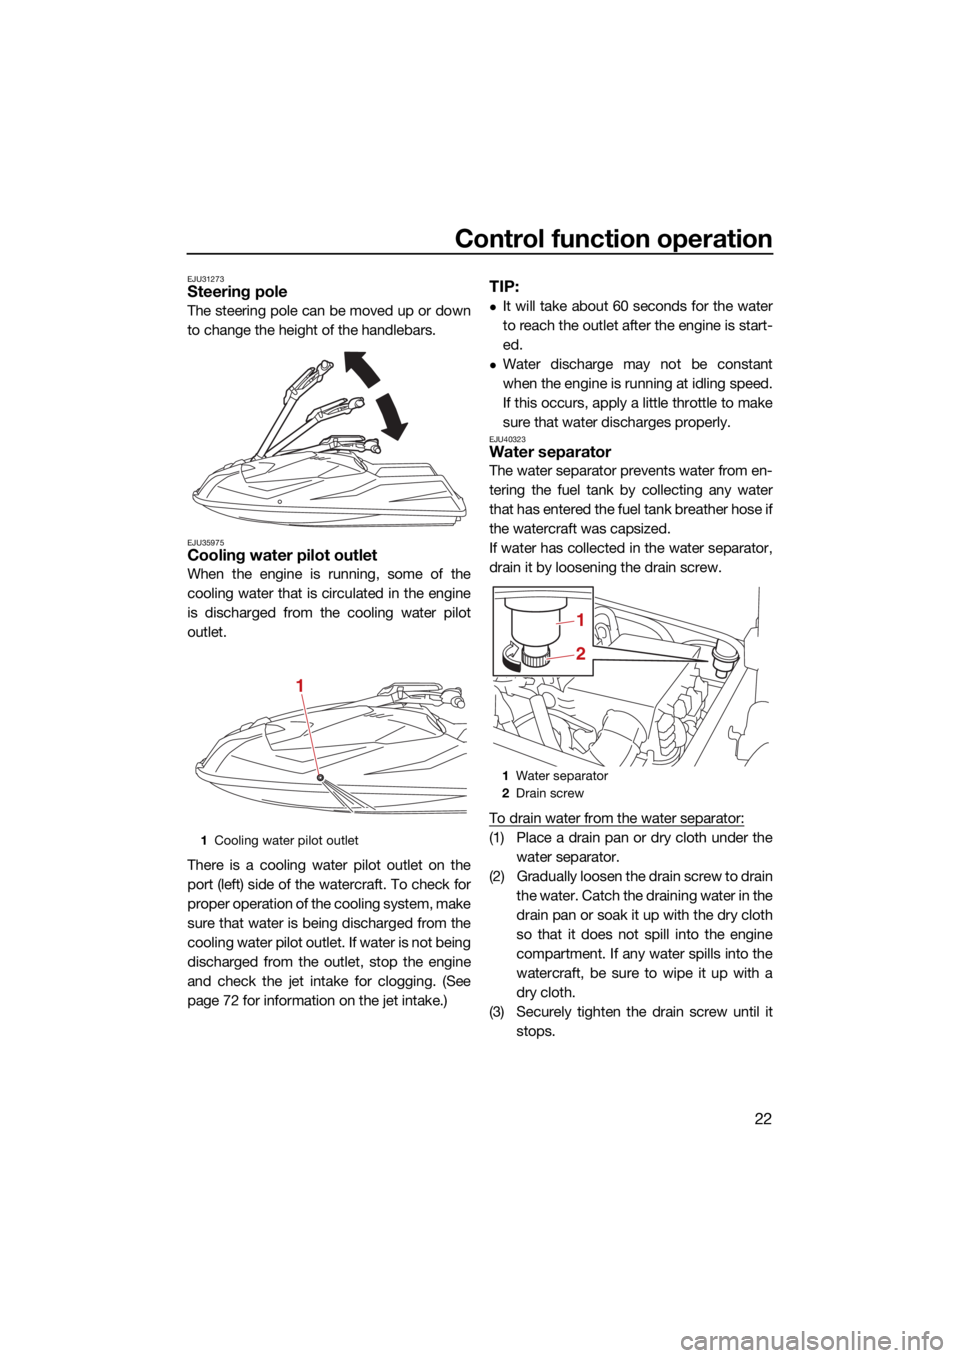
EJU31273Steering pole
The steering pole can be moved up or down
to change the height of the handlebars.
EJU35975Cooling water pilot outlet
When the engine is running, some of the
cooling water that is circulated in the engine
is discharged from the cooling water pilot
outlet.
There is a cooling water pilot outlet on the
port (left) side of the watercraft. To check for
proper operation of the cooling system, make
sure that water is being discharged from the
cooling water pilot outlet. If water is not being
discharged from the outlet, stop the engine
and check the jet intake for clogging. (See
page 72 for information on the jet intake.)
TIP:
It will take about 60 seconds for the water
to reach the outlet after the engine is start-
ed.
Water discharge may not be constant
when the engine is running at idling speed.
If this occurs, apply a little throttle to make
sure that water discharges properly.
EJU40323Water separator
The water separator prevents water from en-
tering the fuel tank by collecting any water
that has entered the fuel tank breather hose if
the watercraft was capsized.
If water has collected in the water separator,
drain it by loosening the drain screw.
To drain water from the water separator:
(1) Place a drain pan or dry cloth under thewater separator.
(2) Gradually loosen the drain screw to drain the water. Catch the draining water in the
drain pan or soak it up with the dry cloth
so that it does not spill into the engine
compartment. If any water spills into the
watercraft, be sure to wipe it up with a
dry cloth.
(3) Securely tighten the drain screw until it stops.1Cooling water pilot outlet
1
1Water separator
2 Drain screw
2
1
UF4R71E0.book Page 22 Monday, May 10, 2021 1:14 PM
Page 30 of 84
Watercraft operation
23
EJU40003
Watercraft operation modes
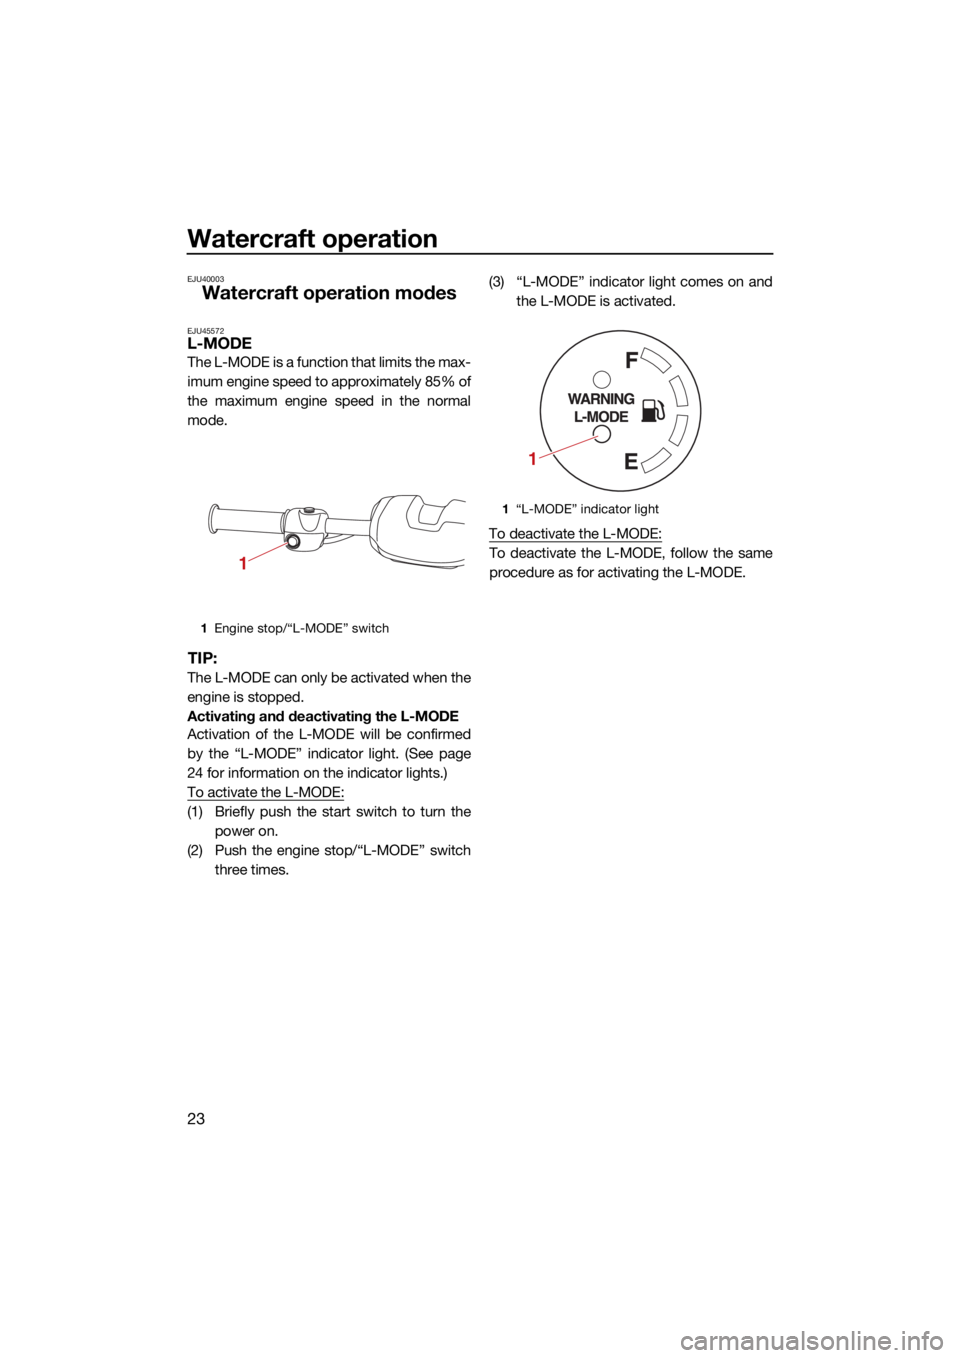
EJU45572L-MODE
The L-MODE is a function that limits the max-
imum engine speed to approximately 85% of
the maximum engine speed in the normal
mode.
TIP:
The L-MODE can only be activated when the
engine is stopped.
Activating and deactivating the L-MODE
Activation of the L-MODE will be confirmed
by the “L-MODE” indicator light. (See page
24 for information on the indicator lights.)
To activate the L-MODE:
(1) Briefly push the start switch to turn the power on.
(2) Push the engine stop/“L-MODE” switch three times. (3) “L-MODE” indicator light comes on and
the L-MODE is activated.
To deactivate the L-MODE:
To deactivate the L-MODE, follow the same
procedure as for activating the L-MODE.
1 Engine stop/“L-MODE” switch
1
1“L-MODE” indicator light
1
UF4R71E0.book Page 23 Monday, May 10, 2021 1:14 PM
Page 40 of 84
Operation and handling requirements
33
EJU40291
Engine oil requirementsEJU45591Engine oilECJ00282
Use only 4-stroke engine oil. Usage of 2-
stroke engine oil could result in severe en-
gine damage.
Why Yamalube
YAMALUBE oil is a Genuine YAMAHA Part
born of the engineers’ passion and belief that
engine oil is an important liquid engine com-
ponent. We form teams of specialists in the
fields of mechanical engineering, chemistry,
electronics and track testing, and have them
develop the engine together with the oil it will
use. Yamalube oils take full advantage of the
base oil’s qualities and blend in the ideal bal-
ance of additives to make sure the final oil
clears our performance standards. Thus,
Yamalube mineral, semisynthetic and syn- thetic oils have their own distinct characters
and value. Yamaha’s experience gained over
many years of research and development
into oil since the 1960’s helps make
Yamalube the best choice for your Yamaha engine. Checking the engine oil level
EWJ00341
Engine oil is extremely hot immediately af-
ter the engine is turned off. Coming in con-
tact with or getting any engine oil on your
clothes could result in burns.
ECJ00392
Do not run the engine with too much or
not enough oil in the oil tank, otherwise
the engine could be damaged.
Make sure that debris and water do not
enter the oil tank filler hole. Debris and
water in the engine oil can cause serious
engine damage.
TIP:
When checking the engine oil level on land,
the engine must be running while water is
being supplied to the cooling water pas-
sages. (See “Flushing the cooling water
passages” on page 57 for information on
supplying water.)
When checking the engine oil level on wa-
ter, moor the watercraft so that it will not
drift away.
To check the engine oil level:
(1) With the engine stopped, place the wa- tercraft in a precisely level position on
land or launch the watercraft.
(2) Look in all directions, and then start the engine. (See page 48 for information on
starting the engine.)
(3) Run the engine at idling speed for 6 min- utes or more. Run the engine an addi-
tional 5 minutes if the ambient
temperature is 20 °C (68 °F) or less.
(4) Stop the engine.
(5) Remove the hood. (See page 26 for hood removal and installation procedures.)
Recommended engine oil:
YAMALUBE 4W or 4-stroke motor oil
Recommended engine oil type: SAE 10W-30, 10W-40, 20W-40,
20W-50
Recommended engine oil grade: API SG, SH, SJ, SL
UF4R71E0.book Page 33 Monday, May 10, 2021 1:14 PM
Page 42 of 84
Operation and handling requirements
35
EJU40022
Draining the bilge waterECJ01302
Do not run the engine at full throttle when
bilge water remains in the engine com-
partment. The bilge water can splash into
the engine, which can result in severe
damage.
EJU44262Draining the bilge water on land
To drain the bilge water on land:
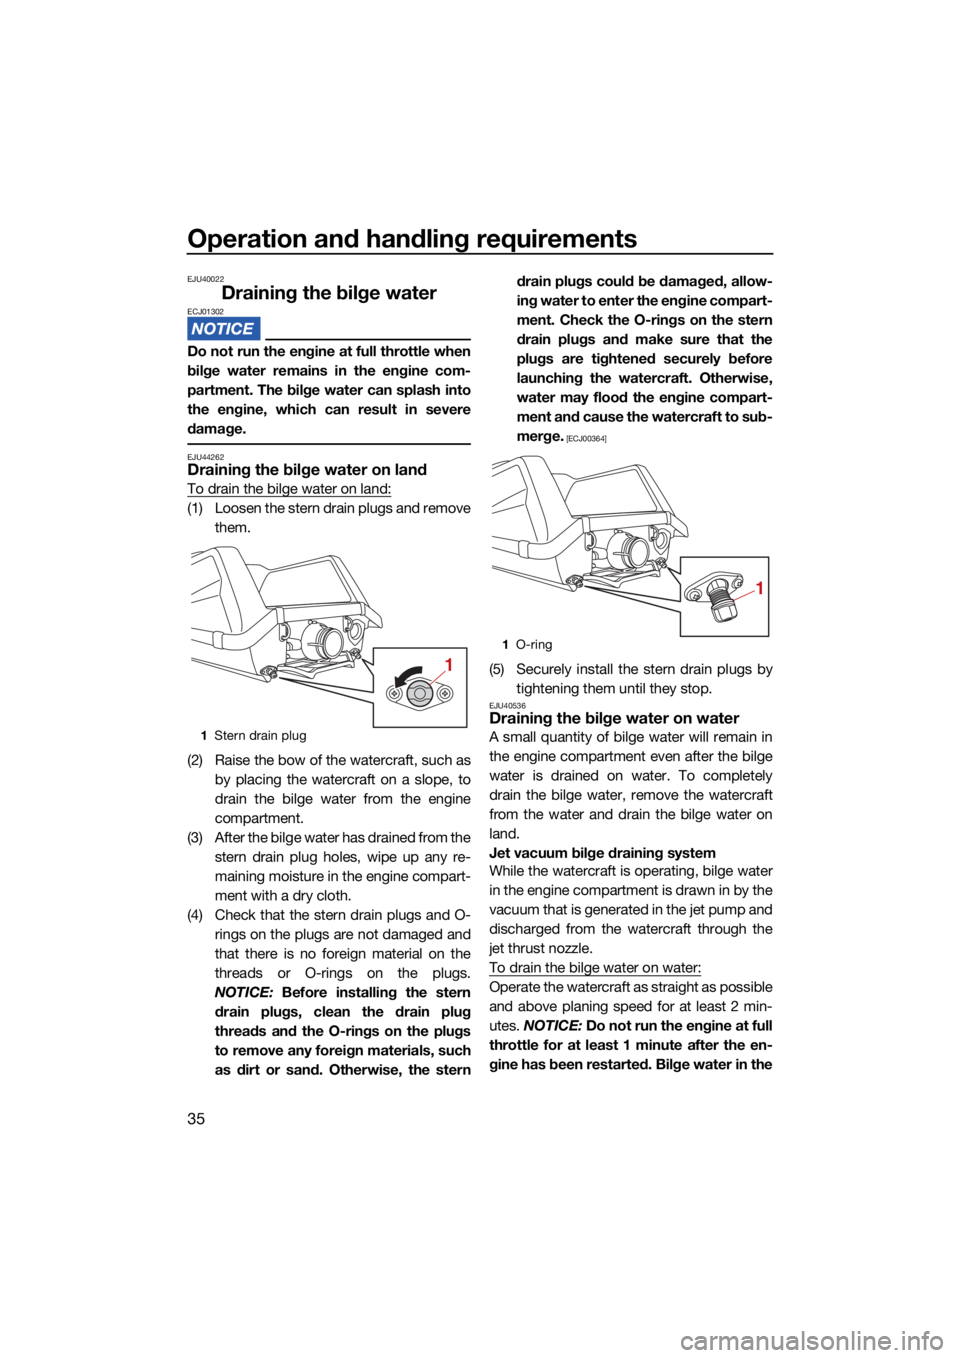
(1) Loosen the stern drain plugs and removethem.
(2) Raise the bow of the watercraft, such as by placing the watercraft on a slope, to
drain the bilge water from the engine
compartment.
(3) After the bilge water has drained from the stern drain plug holes, wipe up any re-
maining moisture in the engine compart-
ment with a dry cloth.
(4) Check that the stern drain plugs and O- rings on the plugs are not damaged and
that there is no foreign material on the
threads or O-rings on the plugs.
NOTICE: Before installing the stern
drain plugs, clean the drain plug
threads and the O-rings on the plugs
to remove any foreign materials, such
as dirt or sand. Otherwise, the stern drain plugs could be damaged, allow-
ing water to enter the engine compart-
ment. Check the O-rings on the stern
drain plugs and make sure that the
plugs are tightened securely before
launching the watercraft. Otherwise,
water may flood the engine compart-
ment and cause the watercraft to sub-
merge.
[ECJ00364]
(5) Securely install the stern drain plugs by
tightening them until they stop.
EJU40536Draining the bilge water on water
A small quantity of bilge water will remain in
the engine compartment even after the bilge
water is drained on water. To completely
drain the bilge water, remove the watercraft
from the water and drain the bilge water on
land.
Jet vacuum bilge draining system
While the watercraft is operating, bilge water
in the engine compartment is drawn in by the
vacuum that is generated in the jet pump and
discharged from the watercraft through the
jet thrust nozzle.
To drain the bilge water on water:
Operate the watercraft as straight as possible
and above planing speed for at least 2 min-
utes. NOTICE: Do not run the engine at full
throttle for at least 1 minute after the en-
gine has been restarted. Bilge water in the
1 Stern drain plug
1
1O-ring
1
UF4R71E0.book Page 35 Monday, May 10, 2021 1:14 PM
Page 46 of 84
Pre-operation checks
39
EJU31984
EWJ00413
Failure to inspect or maintain the watercraft properly increases the possibility of an ac-
cident or damage to the watercraft. Do not operate the watercraft if you find any prob-
lem. If a problem cannot be corrected by the procedures provided in this manual, have
the watercraft inspected by a Yamaha dealer.
EJU41236Pre-operation checklist
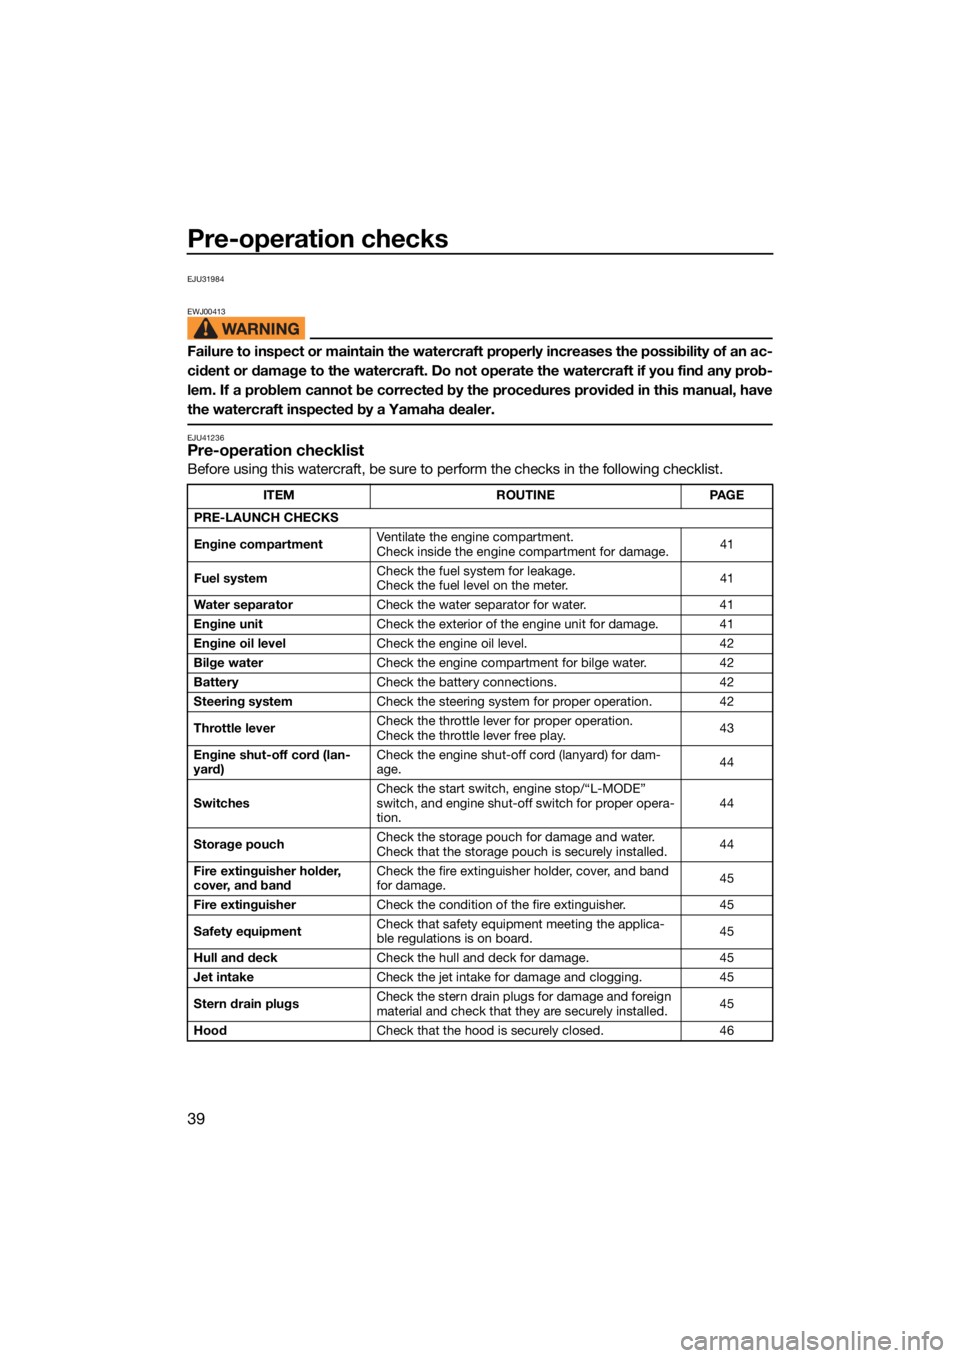
Before using this watercraft, be sure to perform the checks in the following checklist.
ITEMROUTINEPAGE
PRE-LAUNCH CHECKS
Engine compartment Ventilate the engine compartment.
Check inside the engine compartment for damage.
41
Fuel system Check the fuel system for leakage.
Check the fuel level on the meter.
41
Water separator Check the water separator for water. 41
Engine unit Check the exterior of the engine unit for damage. 41
Engine oil level Check the engine oil level. 42
Bilge water Check the engine compartment for bilge water. 42
Battery Check the battery connections. 42
Steering system Check the steering system for proper operation. 42
Throttle lever Check the throttle lever for proper operation.
Check the throttle lever free play.
43
Engine shut-off cord (lan-
yard) Check the engine shut-off cord (lanyard) for dam-
age.
44
Switches Check the start switch, engine stop/“L-MODE”
switch, and engine shut-off switch for proper opera-
tion. 44
Storage pouch Check the storage pouch for damage and water.
Check that the storage pouch is securely installed.
44
Fire extinguisher holder,
cover, and band Check the fire extinguisher holder, cover, and band
for damage.
45
Fire extinguisher Check the condition of the fire extinguisher. 45
Safety equipment Check that safety equipment meeting the applica-
ble regulations is on board.
45
Hull and deck Check the hull and deck for damage. 45
Jet intake Check the jet intake for damage and clogging. 45
Stern drain plugs Check the stern drain plugs for damage and foreign
material and check that they are securely installed.
45
Hood Check that the hood is securely closed. 46
UF4R71E0.book Page 39 Monday, May 10, 2021 1:14 PM