lock YAMAHA T105 2004 Owners Manual
[x] Cancel search | Manufacturer: YAMAHA, Model Year: 2004, Model line: T105, Model: YAMAHA T105 2004Pages: 76, PDF Size: 1.28 MB
Page 4 of 76
GIVE SAFETY THE RIGHT OF WAY ...............5
GENERAL NOTE..............................................6
DESCRIPTION ..................................................8
MOTORCYCLE IDENTIFICATION ...................9
Identification numbers record ...................9
Key identification number .......................10
Frame serial number ................................10
Engine serial number ...............................10
CONTROL FUNCTIONS................................11
Main switch ...............................................11
Indicator lights ..........................................12
Instrument panel.......................................13
Handlebar switches ..................................14
Shift pedal .................................................16
Front brake lever .......................................16
Rear brake pedal .......................................17
Fuel tank cap .............................................17
Starter lever 1..........................................18
Kick starter .................................................18Steering lock..............................................19
Seat ............................................................20
Helmet holder ...........................................21
Side cover removal...................................21
PRE-OPERATION CHECKS ...........................22
Fuel .............................................................24
Engine oil ...................................................25
Tires ............................................................26
OPERATION AND IMPORTANT
RIDING POINTS.............................................28
Starting and warming up a
cold engine ................................................28
Starting a warm engine ...........................30
Shifting.......................................................31
To start out and accelerate.......................31
To decelerate .............................................33
Engine break-in .........................................34
Parking .......................................................36
3
EAA30001
CONTENTS
5AV-F8199-E1-1 7/29/03 3:31 PM Page 3
Page 9 of 76
EAA50000
DESCRIPTION
8
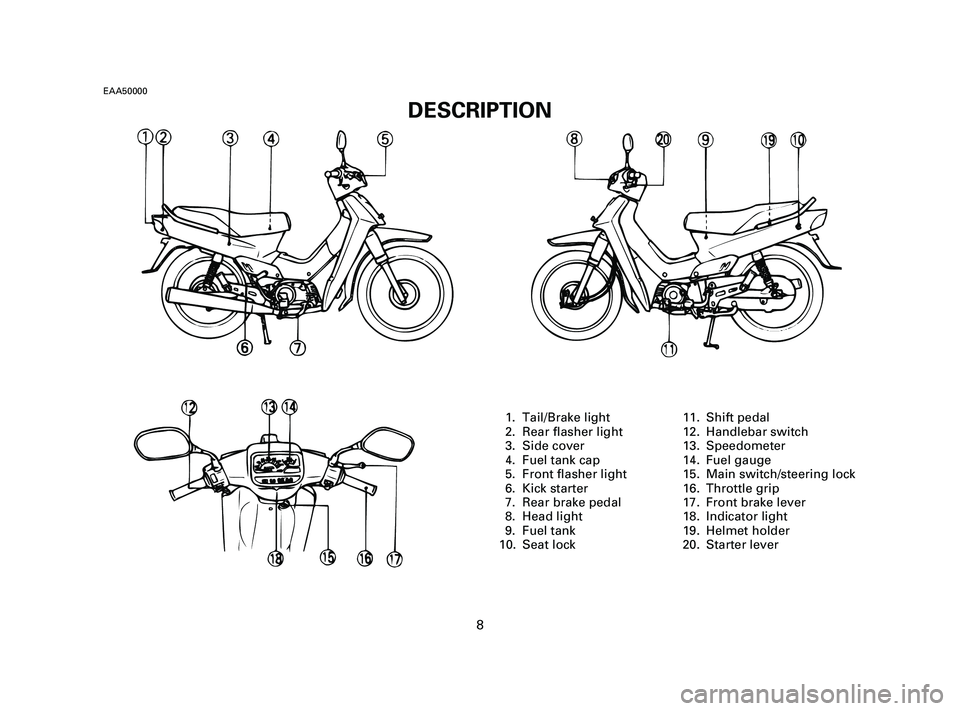
1. Tail/Brake light
2. Rear flasher light
3. Side cover
4. Fuel tank cap
5. Front flasher light
6. Kick starter
7. Rear brake pedal
8. Head light
9. Fuel tank
10. Seat lock11. Shift pedal
12. Handlebar switch
13. Speedometer
14. Fuel gauge
15. Main switch/steering lock
16. Throttle grip
17. Front brake lever
18. Indicator light
19. Helmet holder
20. Starter lever
5AV-F8199-E1-1 7/29/03 3:31 PM Page 8
Page 12 of 76
Position Function Key removal
EAB00000
CONTROL FUNCTIONS
EAB00100
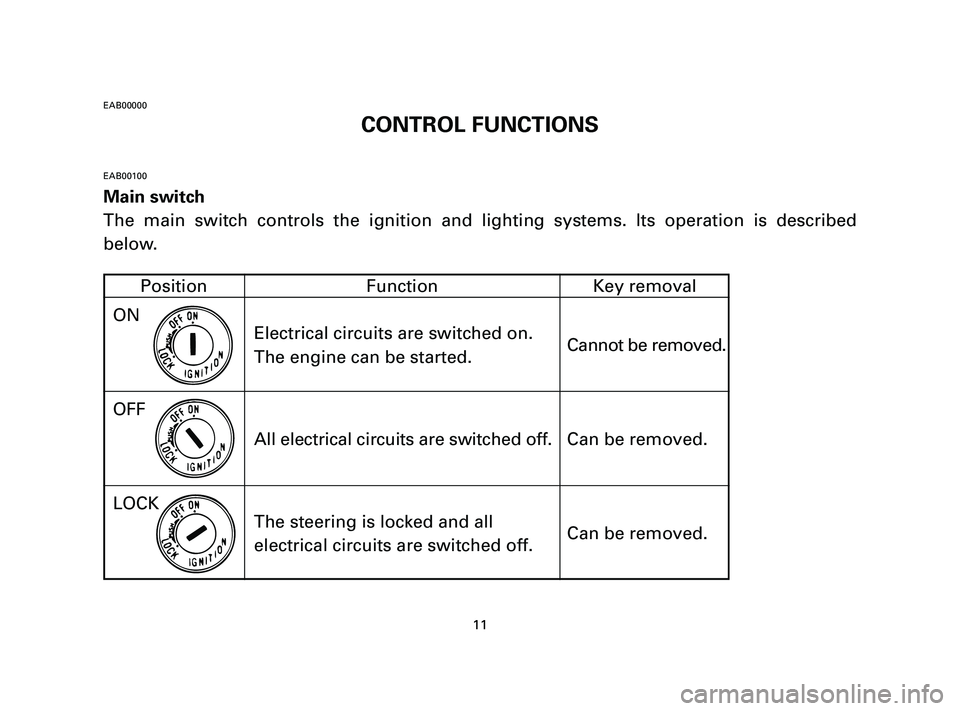
Main switch
The main switch controls the ignition and lighting systems. Its operation is described
below.
11
ON
Electrical circuits are switched on.
The engine can be started.Cannot be removed.
Can be removed.
Can be removed. All electrical circuits are switched off.
The steering is locked and all
electrical circuits are switched off. OFF
LOCK
5AV-F8199-E1-1 7/29/03 3:31 PM Page 11
Page 18 of 76
EAB90101
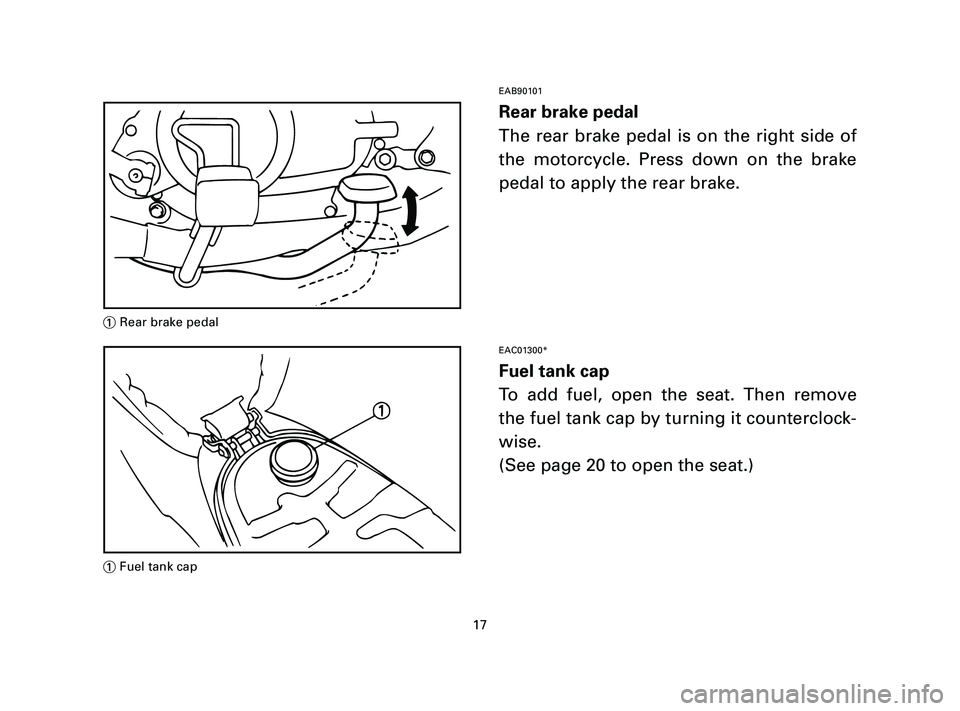
Rear brake pedal
The rear brake pedal is on the right side of
the motorcycle. Press down on the brake
pedal to apply the rear brake.
EAC01300*
Fuel tank cap
To add fuel, open the seat. Then remove
the fuel tank cap by turning it counterclock-
wise.
(See page 20 to open the seat.)
17
1Rear brake pedal
1Fuel tank cap
5AV-F8199-E1-1 7/29/03 3:32 PM Page 17
Page 20 of 76
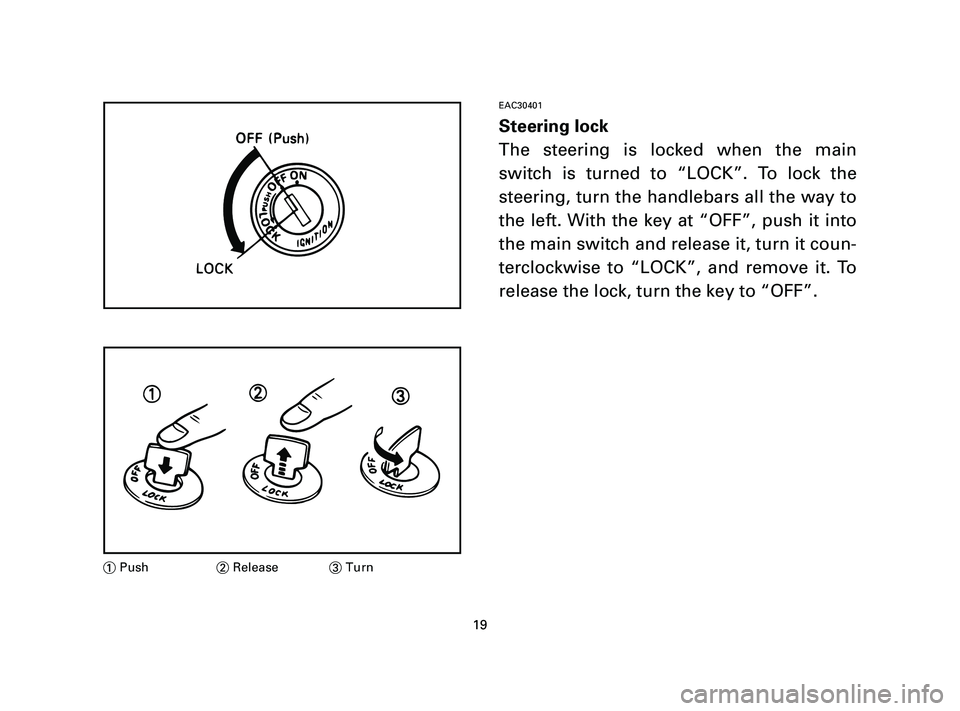
EAC30401
Steering lock
The steering is locked when the main
switch is turned to “LOCK”. To lock the
steering, turn the handlebars all the way to
the left. With the key at “OFF”, push it into
the main switch and release it, turn it coun-
terclockwise to “LOCK”, and remove it. To
release the lock, turn the key to “OFF”.
19
1Push2Release3Turn
5AV-F8199-E1-1 7/29/03 3:32 PM Page 19
Page 21 of 76
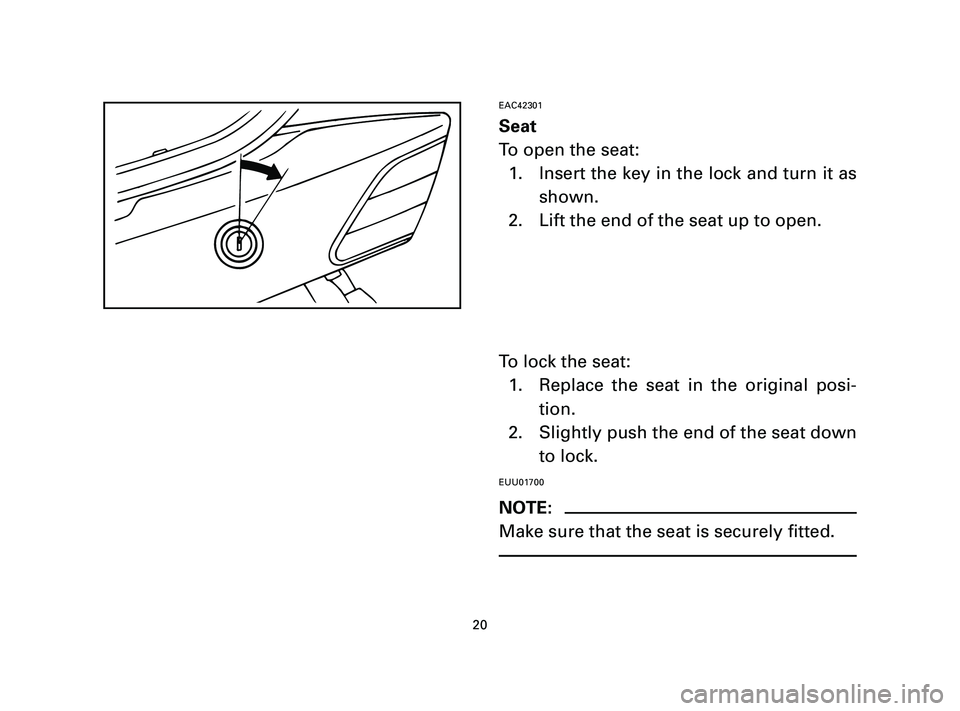
EAC42301
Seat
To open the seat:
1. Insert the key in the lock and turn it as
shown.
2. Lift the end of the seat up to open.
To lock the seat:
1. Replace the seat in the original posi-
tion.
2. Slightly push the end of the seat down
to lock.
EUU01700
NOTE:
Make sure that the seat is securely fitted.
20
5AV-F8199-E1-1 7/29/03 3:32 PM Page 20
Page 22 of 76
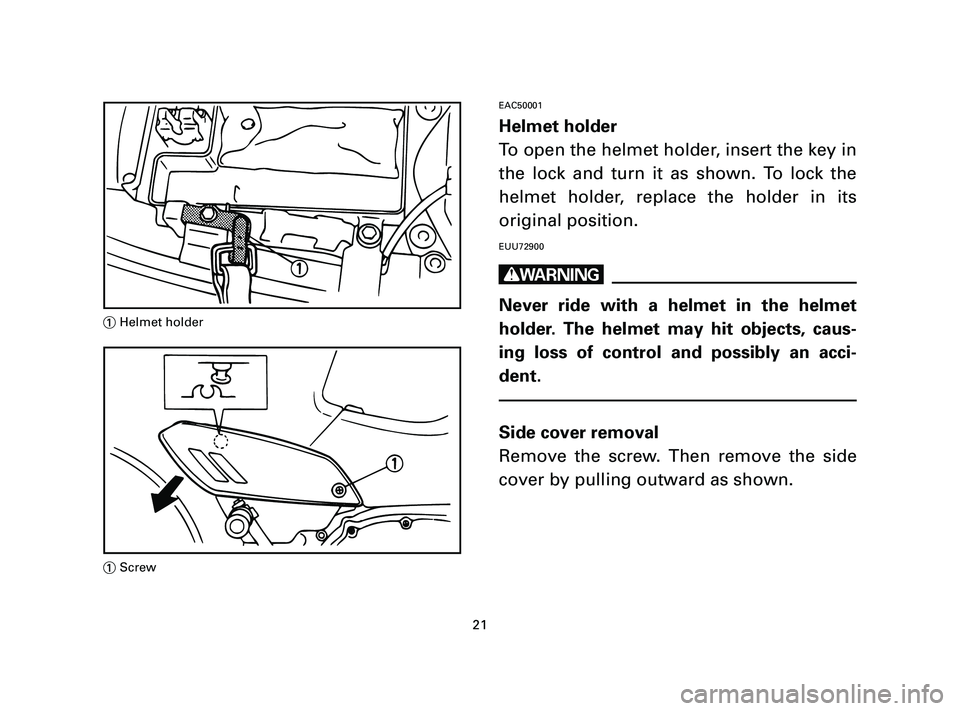
EAC50001
Helmet holder
To open the helmet holder, insert the key in
the lock and turn it as shown. To lock the
helmet holder, replace the holder in its
original position.
EUU72900
w
Never ride with a helmet in the helmet
holder. The helmet may hit objects, caus-
ing loss of control and possibly an acci-
dent.
Side cover removal
Remove the screw. Then remove the side
cover by pulling outward as shown.
21
1Helmet holder
1Screw
5AV-F8199-E1-1 7/29/03 3:32 PM Page 21
Page 51 of 76
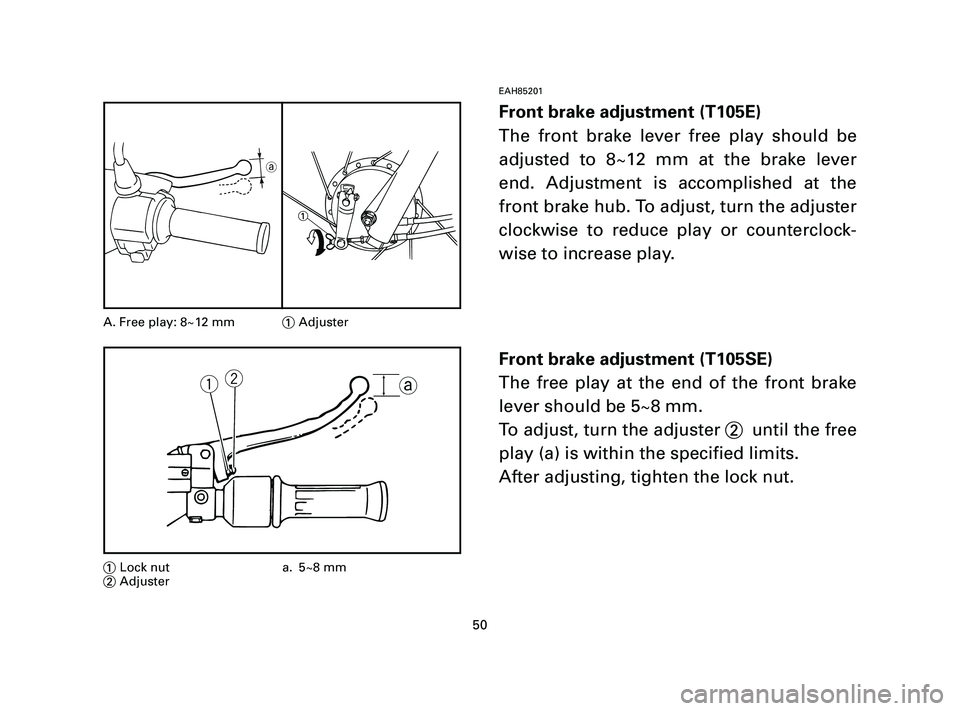
EAH85201
Front brake adjustment (T105E)
The front brake lever free play should be
adjusted to 8~12 mm at the brake lever
end. Adjustment is accomplished at the
front brake hub. To adjust, turn the adjuster
clockwise to reduce play or counterclock-
wise to increase play.
Front brake adjustment (T105SE)
The free play at the end of the front brake
lever should be 5~8 mm.
To adjust, turn the adjuster 2 until the free
play (a) is within the specified limits.
After adjusting, tighten the lock nut.
50
A. Free play: 8~12 mm1Adjuster
qwa
1Lock nut a. 5~8 mm
2Adjuster
a
1
5AV-F8199-E1-3 8/1/03 1:48 PM Page 50
Page 53 of 76
52
Observe these precautions:
8When checking the fluid level, make
sure that the top of the master cylin-
der is level by turning the handlebars.
8Use only the recommended quality
brake fluid, otherwise the rubber seals
may deteriorate, causing leakage and
poor braking performance.
NOTE:
If DOT 4 is not available, DOT 3 can be
used.
8Refill with the same type of brake
fluid. Mixing fluids may result in a
harmful chemical reaction and lead to
poor braking performance.8Be careful that water does not enter
the master cylinder when refilling.
Water will significantly lower the boil-
ing point of the fluid and may result in
vapor lock.
8Brake fluid may deteriorate painted
surfaces or plastic parts. Always clean
up spilled fluid immediately.
8As the brake pads wear, it is normal
for the brake fluid level to gradually
go down. However, if the brake fluid
level goes down suddenly, have a
Yamaha dealer check the cause. Recommended brake fluid: DOT 4
5AV-F8199-E1-3 8/1/03 1:48 PM Page 52
Page 55 of 76
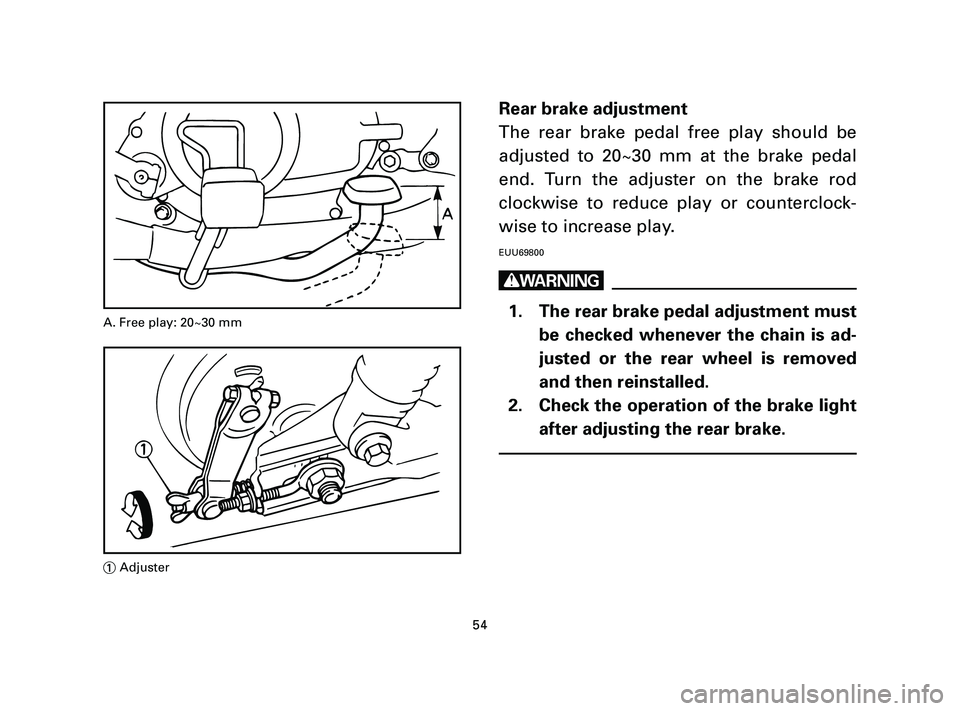
Rear brake adjustment
The rear brake pedal free play should be
adjusted to 20~30 mm at the brake pedal
end. Turn the adjuster on the brake rod
clockwise to reduce play or counterclock-
wise to increase play.
EUU69800
w
1. The rear brake pedal adjustment must
be checked whenever the chain is ad-
justed or the rear wheel is removed
and then reinstalled.
2. Check the operation of the brake light
after adjusting the rear brake.
54
A. Free play: 20~30 mm
1Adjuster
5AV-F8199-E1-3 8/1/03 1:48 PM Page 54