fuel YAMAHA T105 2005 Owners Manual
[x] Cancel search | Manufacturer: YAMAHA, Model Year: 2005, Model line: T105, Model: YAMAHA T105 2005Pages: 76, PDF Size: 1.28 MB
Page 4 of 76
GIVE SAFETY THE RIGHT OF WAY ...............5
GENERAL NOTE..............................................6
DESCRIPTION ..................................................8
MOTORCYCLE IDENTIFICATION ...................9
Identification numbers record ...................9
Key identification number .......................10
Frame serial number ................................10
Engine serial number ...............................10
CONTROL FUNCTIONS................................11
Main switch ...............................................11
Indicator lights ..........................................12
Instrument panel.......................................13
Handlebar switches ..................................14
Shift pedal .................................................16
Front brake lever .......................................16
Rear brake pedal .......................................17
Fuel tank cap .............................................17
Starter lever 1..........................................18
Kick starter .................................................18Steering lock..............................................19
Seat ............................................................20
Helmet holder ...........................................21
Side cover removal...................................21
PRE-OPERATION CHECKS ...........................22
Fuel .............................................................24
Engine oil ...................................................25
Tires ............................................................26
OPERATION AND IMPORTANT
RIDING POINTS.............................................28
Starting and warming up a
cold engine ................................................28
Starting a warm engine ...........................30
Shifting.......................................................31
To start out and accelerate.......................31
To decelerate .............................................33
Engine break-in .........................................34
Parking .......................................................36
3
EAA30001
CONTENTS
5AV-F8199-E1-1 7/29/03 3:31 PM Page 3
Page 8 of 76
7
3
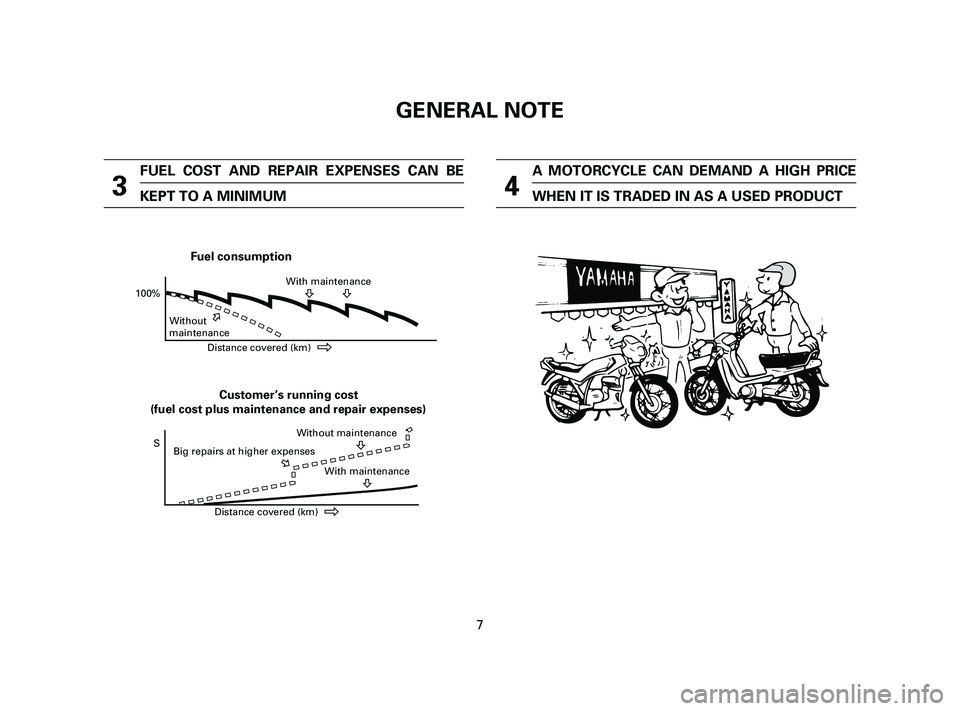
FUEL COST AND REPAIR EXPENSES CAN BE
KEPT TO A MINIMUM
4
A MOTORCYCLE CAN DEMAND A HIGH PRICE
WHEN IT IS TRADED IN AS A USED PRODUCT
100%With maintenance
Without
Distance covered (km)
Fuel consumption
maintenance
Distance covered (km)
Customer’s running cost
SWithout maintenance
With maintenance Big repairs at higher expenses
(fuel cost plus maintenance and repair expenses)
GENERAL NOTE
5AV-F8199-E1-1 7/29/03 3:31 PM Page 7
Page 9 of 76
EAA50000
DESCRIPTION
8
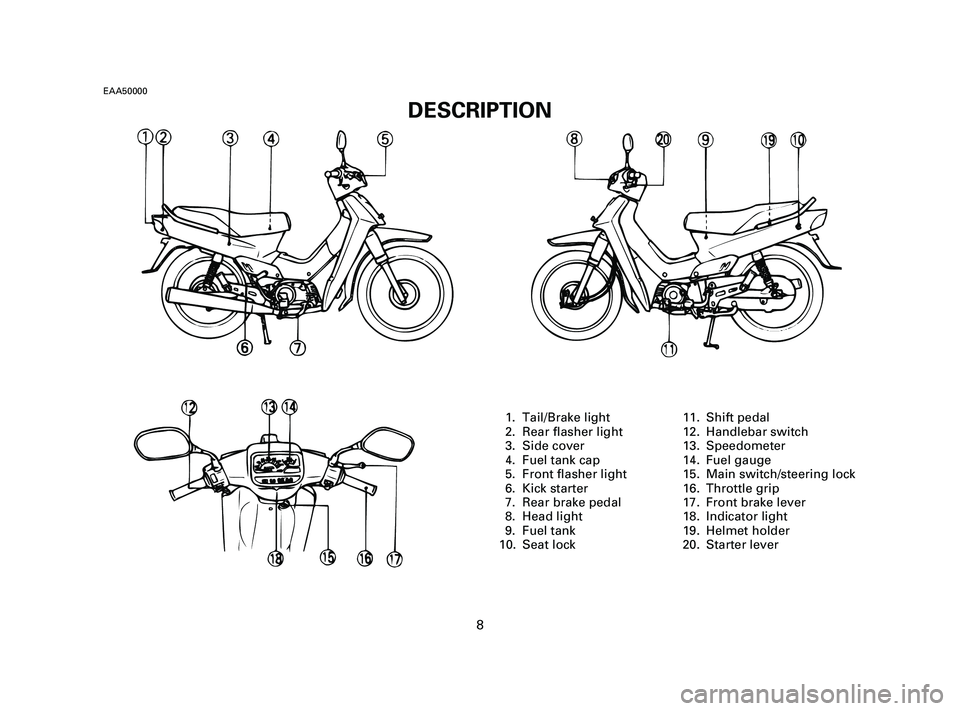
1. Tail/Brake light
2. Rear flasher light
3. Side cover
4. Fuel tank cap
5. Front flasher light
6. Kick starter
7. Rear brake pedal
8. Head light
9. Fuel tank
10. Seat lock11. Shift pedal
12. Handlebar switch
13. Speedometer
14. Fuel gauge
15. Main switch/steering lock
16. Throttle grip
17. Front brake lever
18. Indicator light
19. Helmet holder
20. Starter lever
5AV-F8199-E1-1 7/29/03 3:31 PM Page 8
Page 14 of 76
Fuel gauge Instrument panel
13
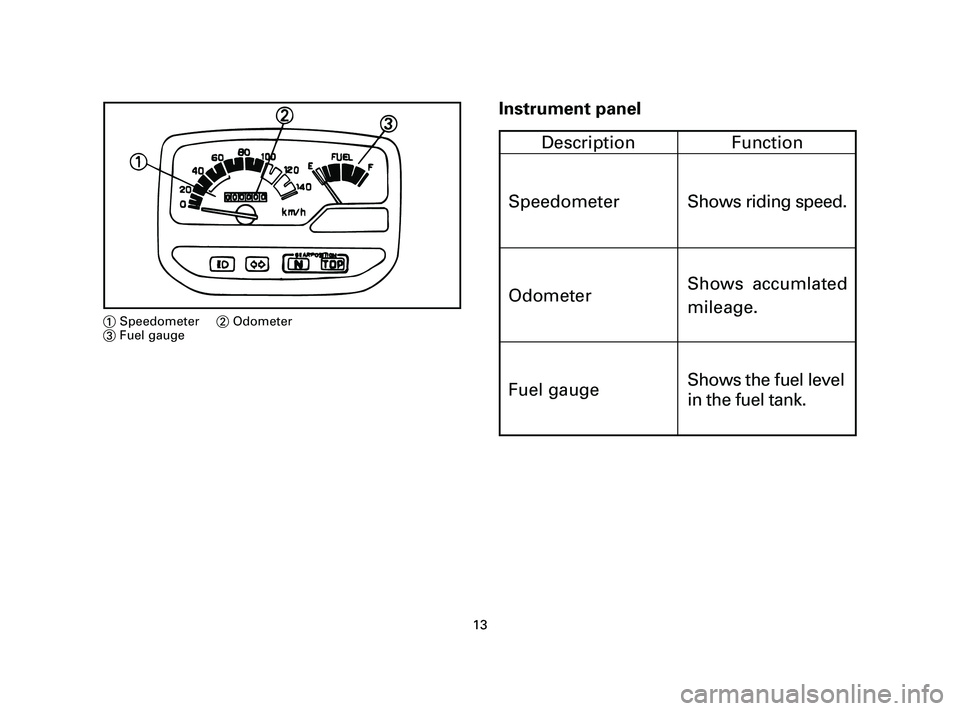
1Speedometer2Odometer
3Fuel gauge
Description Function
Speedometer
OdometerShows riding speed.
Shows accumlated
mileage.
Shows the fuel level
in the fuel tank.
5AV-F8199-E1-1 7/29/03 3:32 PM Page 13
Page 18 of 76
EAB90101
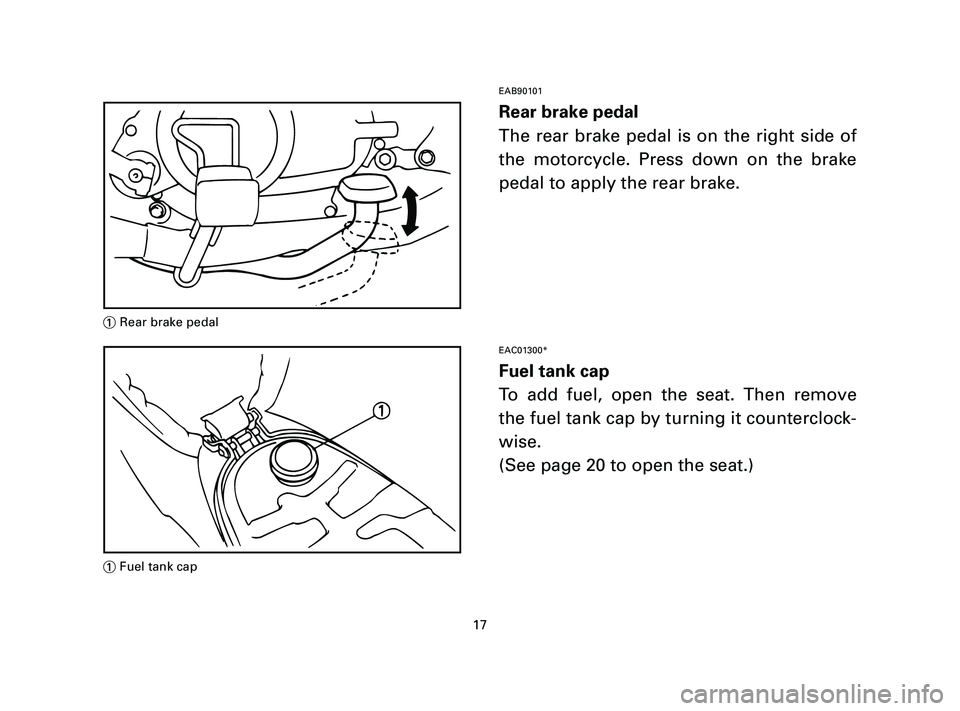
Rear brake pedal
The rear brake pedal is on the right side of
the motorcycle. Press down on the brake
pedal to apply the rear brake.
EAC01300*
Fuel tank cap
To add fuel, open the seat. Then remove
the fuel tank cap by turning it counterclock-
wise.
(See page 20 to open the seat.)
17
1Rear brake pedal
1Fuel tank cap
5AV-F8199-E1-1 7/29/03 3:32 PM Page 17
Page 19 of 76
EAC20100
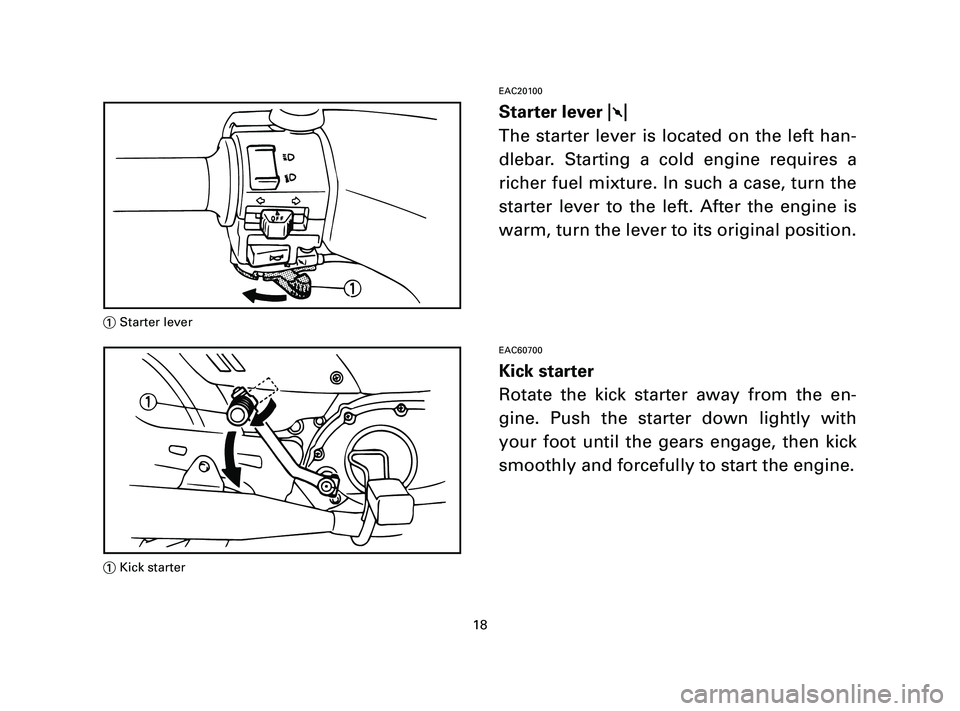
Starter lever 1
The starter lever is located on the left han-
dlebar. Starting a cold engine requires a
richer fuel mixture. In such a case, turn the
starter lever to the left. After the engine is
warm, turn the lever to its original position.
EAC60700
Kick starter
Rotate the kick starter away from the en-
gine. Push the starter down lightly with
your foot until the gears engage, then kick
smoothly and forcefully to start the engine.
18
1Starter lever
1Kick starter
5AV-F8199-E1-1 7/29/03 3:32 PM Page 18
Page 23 of 76
22
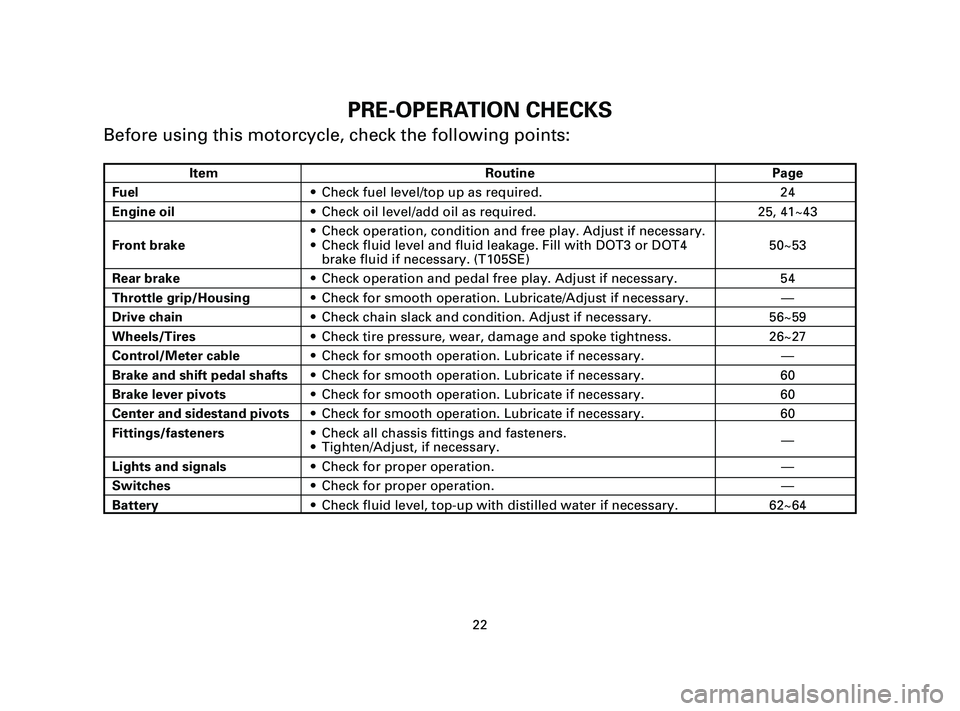
PRE-OPERATION CHECKS
Before using this motorcycle, check the following points:
Item Routine Page
Fuel9Check fuel level/top up as required. 24
Engine oil9Check oil level/add oil as required. 25, 41~43
9Check operation, condition and free play. Adjust if necessary.
Front brake9Check fluid level and fluid leakage. Fill with DOT3 or DOT4 50~53
brake fluid if necessary. (T105SE)
Rear brake9Check operation and pedal free play. Adjust if necessary. 54
Throttle grip/Housing9Check for smooth operation. Lubricate/Adjust if necessary.—
Drive chain9Check chain slack and condition. Adjust if necessary. 56~59
Wheels/Tires9Check tire pressure, wear, damage and spoke tightness. 26~27
Control/Meter cable9Check for smooth operation. Lubricate if necessary.—
Brake and shift pedal shafts9Check for smooth operation. Lubricate if necessary. 60
Brake lever pivots9Check for smooth operation. Lubricate if necessary. 60
Center and sidestand pivots9Check for smooth operation. Lubricate if necessary. 60
Fittings/fasteners9Check all chassis fittings and fasteners.
—
9Tighten/Adjust, if necessary.
Lights and signals9Check for proper operation.—
Switches9Check for proper operation.—
Battery9Check fluid level, top-up with distilled water if necessary. 62~64
5AV-F8199-E1-1 7/29/03 3:32 PM Page 22
Page 25 of 76
EAE80300EAE80000
Fuel
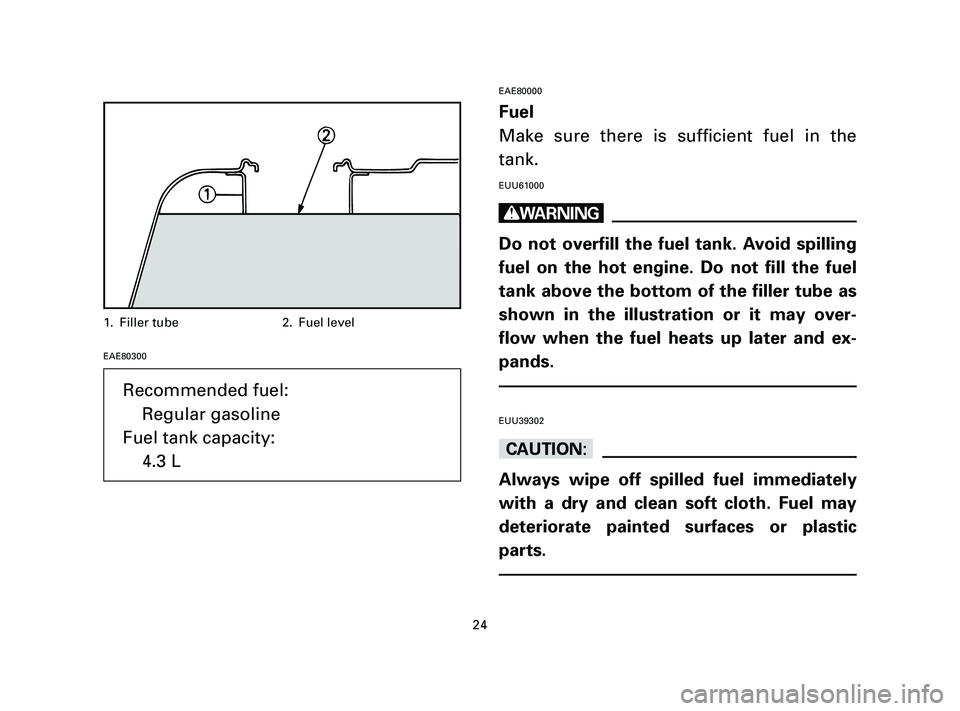
Make sure there is sufficient fuel in the
tank.
EUU61000
w
Do not overfill the fuel tank. Avoid spilling
fuel on the hot engine. Do not fill the fuel
tank above the bottom of the filler tube as
shown in the illustration or it may over-
flow when the fuel heats up later and ex-
pands.
EUU39302
cC
Always wipe off spilled fuel immediately
with a dry and clean soft cloth. Fuel may
deteriorate painted surfaces or plastic
parts.
24
1. Filler tube 2. Fuel level
Recommended fuel:
Regular gasoline
Fuel tank capacity:
4.3 L
5AV-F8199-E1-2 8/1/03 1:47 PM Page 24
Page 40 of 76
39
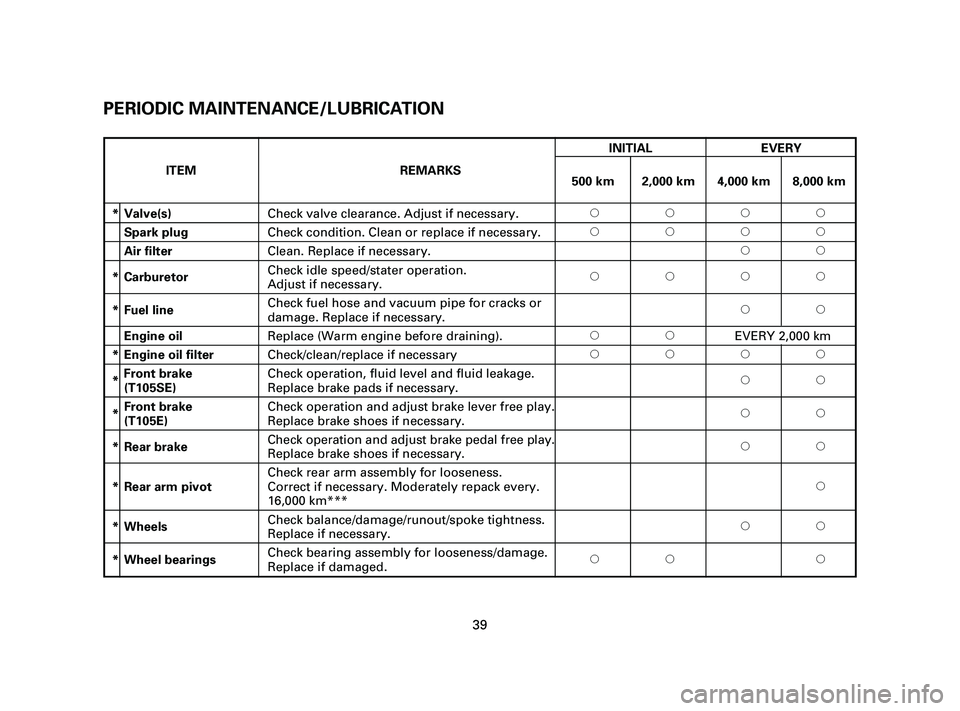
* Valve(s)Check valve clearance. Adjust if necessary.2222
Spark plug Check condition. Clean or replace if necessary.2222
Air filterClean. Replace if necessary.22
* CarburetorCheck idle speed/stater operation.
2222
Adjust if necessary.
*
Fuel lineCheck fuel hose and vacuum pipe for cracks or
22
damage. Replace if necessary.
Engine oilReplace (Warm engine before draining).22EVERY 2,000 km
* Engine oil filterCheck/clean/replace if necessary2222
*Front brakeCheck operation, fluid level and fluid leakage.
22
(T105SE)Replace brake pads if necessary.
*Front brakeCheck operation and adjust brake lever free play.
22
(T105E)Replace brake shoes if necessary.
* Rear brakeCheck operation and adjust brake pedal free play.
22
Replace brake shoes if necessary.
Check rear arm assembly for looseness.
* Rear arm pivotCorrect if necessary. Moderately repack every.2
16,000 km***
* WheelsCheck balance/damage/runout/spoke tightness.
22
Replace if necessary.
* Wheel bearingsCheck bearing assembly for looseness/damage.
22 2
Replace if damaged.
INITIAL EVERY
ITEM REMARKS
500 km 2,000 km 4,000 km 8,000 km
PERIODIC MAINTENANCE/LUBRICATION
5AV-F8199-E1-2 8/1/03 1:47 PM Page 39
Page 68 of 76
EAK00000
CLEANING AND
STORAGE
EAK01302*
A. CLEANING
Frequent, thorough cleaning of your mo-
torcycle will not only enhance its appear-
ance but will improve its general perfor-
mance and extend the useful life of many
components.
1. Rinse the dirt and degreaser off with a
garden hose.
EUU34602
cC
Excessive hose pressure may cause water
seepage and deterioration of wheel bear-
ings, front fork, brakes, transmission seals
and electrical parts.
2. After cleaning the motorcycle, dry all
surfaces with a chamois, clean towel,
or soft absorbent cloth.3. Dry the chain and lubricate it to pre-
vent rust.
4. Automotive-type wax may be applied
to all painted and chrome-plated sur-
faces. When finished, start the engine
and let it idle for several minutes.
EAK00700
B. STORAGE
Long term storage (60 days or more) of
your motorcycle will require some preven-
tive procedures to guard against deteriora-
tion. After thoroughly cleaning the motor-
cycle, prepare for storage as follows:
1. Drain the fuel tank, fuel lines, and car-
buretor float bowl(s).
2. Remove the empty fuel tank, pour a
cup of SAE 10W30 or 20W40 motor oil
in the tank, shake the tank to coat the
inner surfaces thoroughly and drain
off the excess oil. Reinstall the tank.
67
5AV-F8199-E1-3 8/1/03 1:48 PM Page 67