wheel YAMAHA TDM 850 2000 Owners Manual
[x] Cancel search | Manufacturer: YAMAHA, Model Year: 2000, Model line: TDM 850, Model: YAMAHA TDM 850 2000Pages: 99, PDF Size: 10.69 MB
Page 35 of 99

4-1
4
EAU01114
4-PRE-OPERATION CHECKSOwners are personally responsible for their vehicle’s condition. Your motorcycle’s vital functions can start to deteriorate
quickly and unexpectedly, even if it remains unused (for instance, if it is exposed to the elements). Any damage, fluid leak or
loss of tire pressure could have serious consequences. Therefore, it is very important that, in addition to a thorough visual in-
spection, you check the following points before each ride.
EAU00340
PRE-OPERATION CHECK LIST
ITEM CHECKS PAGE
Front brake• Check operation, fluid level and brake fluid leakage.
• Fill with DOT 4 brake fluid if necessary.
3-9, 6-20 ~ 6-23
Rear brake• Check operation, fluid level and brake fluid leakage.
• Fill with DOT 4 brake fluid if necessary.
Clutch• Check operation, condition and free play.
• Adjust if necessary.3-8, 6-19 ~ 6-20
Throttle grip and housing• Check for smooth operation.
• Lubricate if necessary.6-16, 6-25
Engine oil• Check oil level.
• Fill with oil if necessary.6-8 ~ 6-10
Coolant reservoir tank• Check coolant level.
• Fill with coolant if necessary.6-10
Drive chain• Check chain slack and condition.
• Adjust if necessary.6-23 ~ 6-24
Wheels and tires• Check tire pressure, wear and damage. 6-17 ~ 6-19, 6-28
Control and meter cables• Check for smooth operation.
• Lubricate if necessary.6-24 ~ 6-25
Brake and shift pedal
shafts• Check for smooth operation.
• Lubricate if necessary.6-25
E_4tx_Preop.fm Page 1 Saturday, October 16, 1999 9:36 AM
Page 46 of 99
6
PERIODIC MAINTENANCE AND MINOR REPAIR
Tool kit................................................................... 6-1
Periodic maintenance and lubrication ................... 6-2
Cowling and panel removal and installation.......... 6-5
Cowlings A and B ................................................. 6-5
Panels A and B ..................................................... 6-6
Spark plugs........................................................... 6-6
Engine oil .............................................................. 6-8
Cooling system ................................................... 6-10
Changing the coolant .......................................... 6-11
Air filter ............................................................... 6-13
Carburetor adjustment ........................................ 6-15
Idle speed adjustment ........................................ 6-15
Throttle cable free play inspection ...................... 6-16
Valve clearance adjustment ................................ 6-16
Tires .................................................................... 6-17
Clutch lever free play adjustment........................ 6-19
Rear brake pedal height adjustment ................... 6-20
Brake light switch adjustment ............................. 6-21
Checking the front and rear brake pads.............. 6-21
Inspecting the brake fluid level............................ 6-22
Brake fluid replacement ...................................... 6-23Drive chain slack check ...................................... 6-23
Drive chain slack adjustment ............................. 6-23
Drive chain lubrication........................................ 6-24
Cable inspection and lubrication ........................ 6-24
Throttle cable and grip lubrication ...................... 6-25
Brake and shift pedal lubrication ........................ 6-25
Brake and clutch lever lubrication ...................... 6-25
Sidestand lubrication.......................................... 6-26
Rear suspension lubrication............................... 6-26
Front fork inspection ........................................... 6-27
Steering inspection ............................................ 6-27
Wheel bearings .................................................. 6-28
Battery................................................................ 6-28
Fuse replacement .............................................. 6-29
Headlight bulb replacement ............................... 6-30
Tail/brake light bulb replacement ........................ 6-31
Turn signal light bulb replacement...................... 6-32
Troubleshooting .................................................. 6-32
Troubleshooting chart ......................................... 6-33
Engine overheating ............................................ 6-34
E_4tx_PeriodicTOC.fm Page 1 Saturday, October 16, 1999 9:37 AM
Page 48 of 99

PERIODIC MAINTENANCE AND MINOR REPAIR
6-2
6
EAU00473
PERIODIC MAINTENANCE AND LUBRICATION
CP-01ENO. ITEM CHECKS AND MAINTENANCE JOBSINITIAL
(1,000 km)EVERY
6,000 km
or
6 months
(whichever
comes first)12,000 km
or
12 months
(whichever
comes first)
1
*Fuel line• Check fuel hoses for cracks or damage.
• Replace if necessary.ÖÖ
2*Fuel filter• Check condition.
• Replace if necessary.Ö
3 Spark plugs• Check condition.
• Clean, regap or replace if necessary.ÖÖÖ
4*Valves• Check valve clearance.
• Adjust if necessary.Every 42,000 km or 42 months
(whichever comes first)
5 Air filter
• Clean or replace if necessary.ÖÖ
6Clutch• Check operation.
• Adjust or replace cable.ÖÖÖ
7*Front brake• Check operation, fluid level and vehicle for fluid leakage.
(See NOTE on page 6-4.)
• Correct accordingly.
• Replace brake pads if necessary.ÖÖÖ
8*Rear brake• Check operation, fluid level and vehicle for fluid leakage.
(See NOTE on page 6-4.)
• Correct accordingly.
• Replace brake pads if necessary.ÖÖÖ
9*Wheels• Check balance, runout and for damage.
• Rebalance or replace if necessary.ÖÖ
10*Tires• Check tread depth and for damage.
• Replace if necessary.
• Check air pressure.
• Correct if necessary.ÖÖ
11*Wheel bearings• Check bearing for looseness or damage.
• Replace if necessary. ÖÖ
E_4tx_Periodic.fm Page 2 Saturday, October 16, 1999 9:37 AM
Page 49 of 99

PERIODIC MAINTENANCE AND MINOR REPAIR
6-3
6
12
*Swingarm• Check swingarm pivoting point for play.
• Correct if necessary.
• Lubricate with molybdenum disulfide grease every 24,000 km
or 24 months (whichever comes first).ÖÖ
13 Drive chain• Check chain slack.
• Adjust if necessary. Make sure that the rear wheel is properly aligned.
• Clean and lubricate. Every 500 km and after washing the
motorcycle or riding in the rain
14*Steering bearings• Check bearing play and steering for roughness.
• Correct accordingly.
• Lubricate with lithium soap base grease every 24,000 km
or 24 months (whichever comes first).ÖÖ
15*Chassis fasteners• Make sure that all nuts, bolts and screws are properly tightened.
• Tighten if necessary.ÖÖ
16 Sidestand• Check operation.
• Lubricate and repair if necessary.ÖÖ
17*Sidestand switch• Check operation.
• Replace if necessary.ÖÖÖ
18*Front fork• Check operation and for oil leakage.
• Correct accordingly.ÖÖ
19*Rear shock absorber
assembly• Check operation and shock absorber for oil leakage.
• Replace shock absorber assembly if necessary. ÖÖ
20*Rear shock absorber
assembly pivoting points• Check operation.
• Lubricate with molybdenum disulfide grease every 24,000 km
or 24 months (whichever comes first).ÖÖ
21*Carburetors• Check engine idling speed, synchronization and starter operation.
• Adjust if necessary.ÖÖÖ
22 Engine oil• Check oil level and vehicle for oil leakage.
• Correct if necessary.
• Change. (Warm engine before draining.)ÖÖÖ
23 Engine oil filter element
• Replace.ÖÖ NO. ITEM CHECKS AND MAINTENANCE JOBSINITIAL
(1,000 km)EVERY
6,000 km
or
6 months
(whichever
comes first)12,000 km
or
12 months
(whichever
comes first)
E_4tx_Periodic.fm Page 3 Saturday, October 16, 1999 9:37 AM
Page 64 of 99
PERIODIC MAINTENANCE AND MINOR REPAIR
6-18
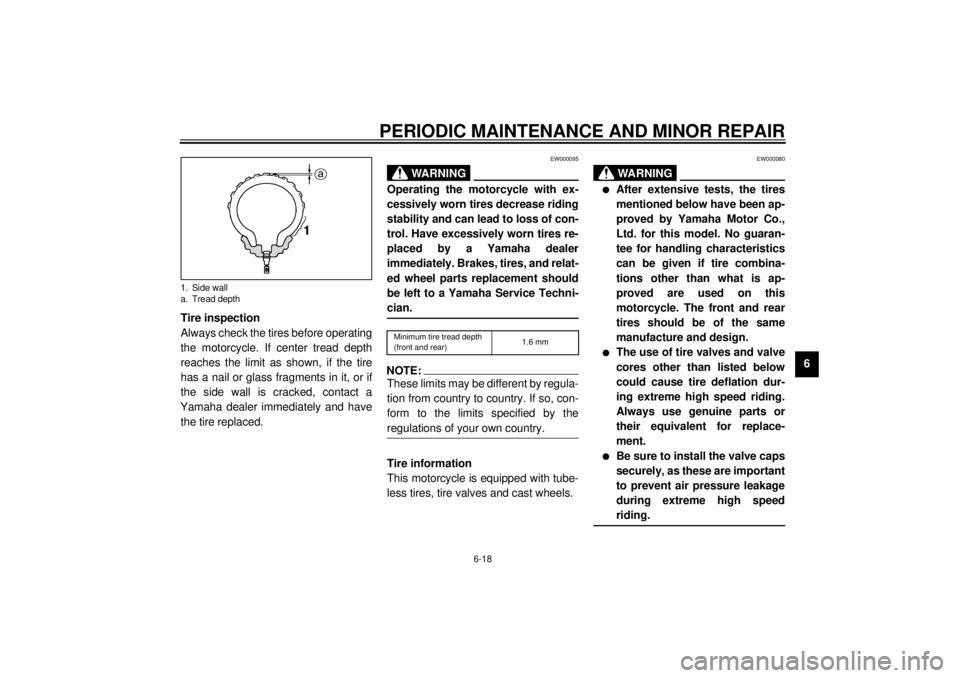
6 Tire inspection
Always check the tires before operating
the motorcycle. If center tread depth
reaches the limit as shown, if the tire
has a nail or glass fragments in it, or if
the side wall is cracked, contact a
Yamaha dealer immediately and have
the tire replaced.
EW000095
WARNING
@ Operating the motorcycle with ex-
cessively worn tires decrease riding
stability and can lead to loss of con-
trol. Have excessively worn tires re-
placed by a Yamaha dealer
immediately. Brakes, tires, and relat-
ed wheel parts replacement should
be left to a Yamaha Service Techni-
cian. @CE-26ENOTE:@ These limits may be different by regula-
tion from country to country. If so, con-
form to the limits specified by the
regulations of your own country. @Tire information
This motorcycle is equipped with tube-
less tires, tire valves and cast wheels.
EW000080
WARNING
@ l
After extensive tests, the tires
mentioned below have been ap-
proved by Yamaha Motor Co.,
Ltd. for this model. No guaran-
tee for handling characteristics
can be given if tire combina-
tions other than what is ap-
proved are used on this
motorcycle. The front and rear
tires should be of the same
manufacture and design.
l
The use of tire valves and valve
cores other than listed below
could cause tire deflation dur-
ing extreme high speed riding.
Always use genuine parts or
their equivalent for replace-
ment.
l
Be sure to install the valve caps
securely, as these are important
to prevent air pressure leakage
during extreme high speed
riding.
@
1. Side wall
a. Tread depth
Minimum tire tread depth
(front and rear)1.6 mm
E_4tx_Periodic.fm Page 18 Saturday, October 16, 1999 9:37 AM
Page 69 of 99
PERIODIC MAINTENANCE AND MINOR REPAIR
6-23
6
EAU00742
Brake fluid replacementThe brake fluid should be replaced only
by trained Yamaha service personnel.
Have the Yamaha dealer replace the
following components during periodic
maintenance or when they are dam-
aged or leaking:l
oil seals (every two years)
l
brake hoses (every four years)
EAU00744
Drive chain slack checkNOTE:@ Spin the wheel several times and find
the tightest position of the chain. Check
and/or adjust the chain slack while it’s
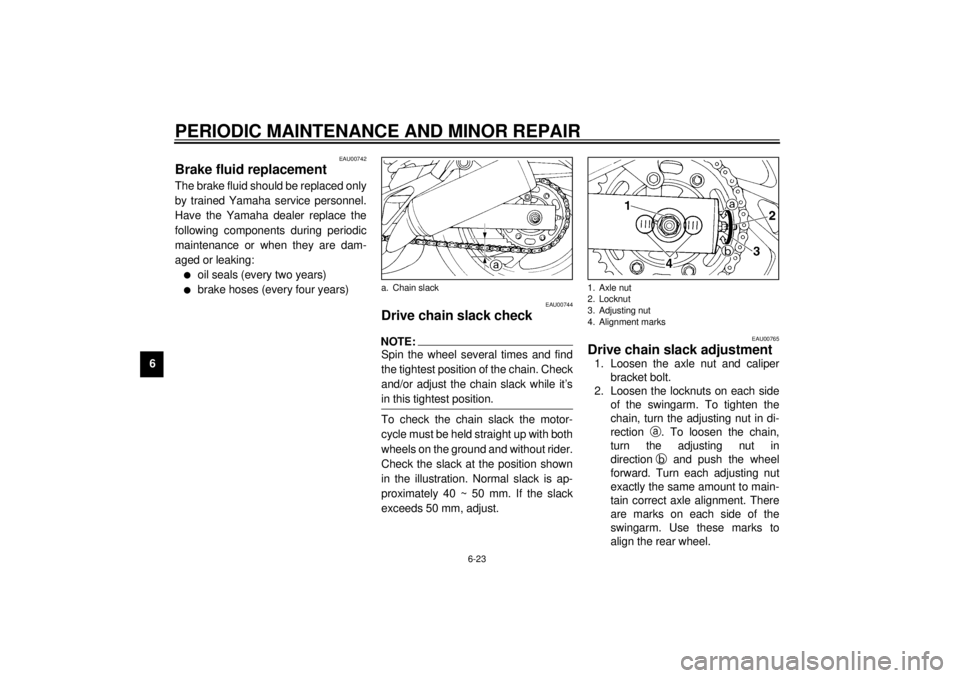
in this tightest position. @To check the chain slack the motor-
cycle must be held straight up with both
wheels on the ground and without rider.
Check the slack at the position shown
in the illustration. Normal slack is ap-
proximately 40 ~ 50 mm. If the slack
exceeds 50 mm, adjust.
EAU00765
Drive chain slack adjustment1. Loosen the axle nut and caliper
bracket bolt.
2. Loosen the locknuts on each side
of the swingarm. To tighten the
chain, turn the adjusting nut in di-
rection
a. To loosen the chain,
turn the adjusting nut in
direction
b and push the wheel
forward. Turn each adjusting nut
exactly the same amount to main-
tain correct axle alignment. There
are marks on each side of the
swingarm. Use these marks to
align the rear wheel.
a. Chain slack
1. Axle nut
2. Locknut
3. Adjusting nut
4. Alignment marks
E_4tx_Periodic.fm Page 23 Saturday, October 16, 1999 9:37 AM
Page 73 of 99
PERIODIC MAINTENANCE AND MINOR REPAIR
6-27
6
EAU02939
Front fork inspectionVisual check
EW000115
WARNING
@ Securely support the motorcycle so
there is no danger of it falling over. @Check for scratches or damage on the
inner tube and excessive oil leakage
from the front fork.
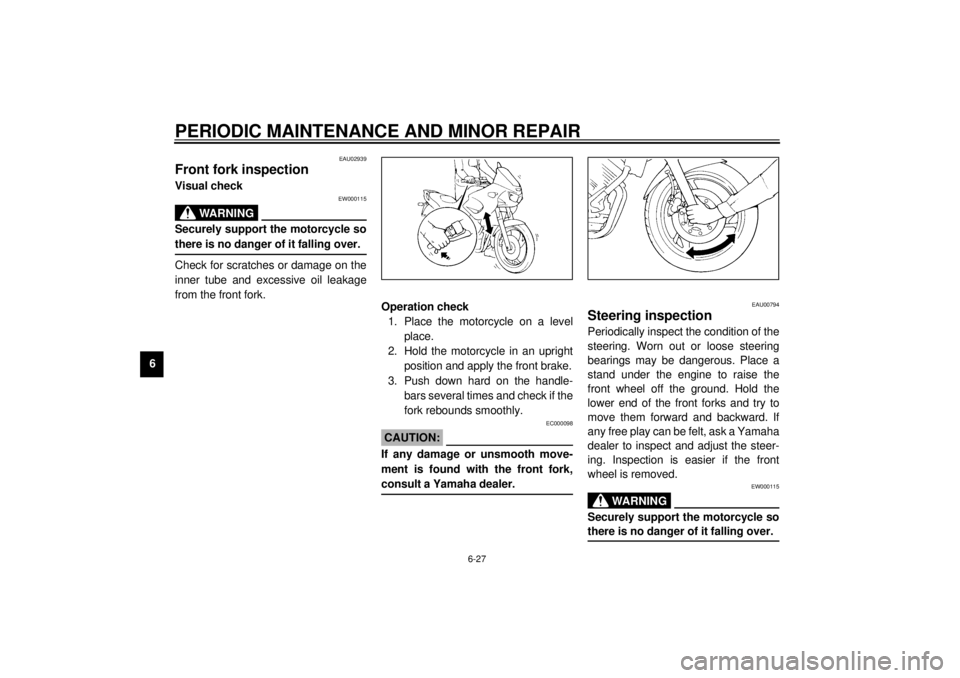
Operation check
1. Place the motorcycle on a level
place.
2. Hold the motorcycle in an upright
position and apply the front brake.
3. Push down hard on the handle-
bars several times and check if the
fork rebounds smoothly.
EC000098
CAUTION:@ If any damage or unsmooth move-
ment is found with the front fork,
consult a Yamaha dealer. @
EAU00794
Steering inspectionPeriodically inspect the condition of the
steering. Worn out or loose steering
bearings may be dangerous. Place a
stand under the engine to raise the
front wheel off the ground. Hold the
lower end of the front forks and try to
move them forward and backward. If
any free play can be felt, ask a Yamaha
dealer to inspect and adjust the steer-
ing. Inspection is easier if the front
wheel is removed.
EW000115
WARNING
@ Securely support the motorcycle so
there is no danger of it falling over. @
E_4tx_Periodic.fm Page 27 Saturday, October 16, 1999 9:37 AM
Page 74 of 99
PERIODIC MAINTENANCE AND MINOR REPAIR
6-28
6
EAU01144
Wheel bearingsIf there is play in the front or rear wheel
hub or if the wheel does not turn
smoothly, have a Yamaha dealer in-
spect the wheel bearings.
EAU00800
BatteryThis motorcycle is equipped with a
sealed-type battery. Therefore it is not
necessary to check the electrolyte or fill
the battery with distilled water.l
If the battery seems to have dis-
charged, consult a Yamaha deal-
er.
l
If the motorcycle is equipped with
optional electrical accessories, the
battery tends to discharge more
quickly, so be sure to recharge it
periodically.
EC000101
CAUTION:@ Never try to remove the sealing caps
of the battery cells. The battery will
be damaged. @
EW000116
WARNING
@ Battery electrolyte is poisonous and
dangerous, causing severe burns,
etc. It contains sulfuric acid. Avoid
contact with skin, eyes or clothing.
ANTIDOTE:l
EXTERNAL: Flush with water.
l
INTERNAL: Drink large quanti-
ties of water or milk. Follow with
milk of magnesia, beaten egg,
or vegetable oil. Call a physi-
cian immediately.
l
EYES: Flush with water for
15 minutes and get prompt
medical attention.
Batteries produce explosive gases.
Keep sparks, flame, cigarettes etc.,
away. Ventilate when charging or
using in an enclosed space. Always
shield your eyes when working near
batteries.
KEEP OUT OF REACH OF CHIL-
DREN.
@
E_4tx_Periodic.fm Page 28 Saturday, October 16, 1999 9:37 AM
Page 83 of 99

7-1
7
EAU01517
7-MOTORCYCLE CARE AND STORAGECareThe exposure of its technology makes a
motorcycle charming but also vulnera-
ble. Although high-quality components
are used, they are not all rust-resistant.
While a rusty exhaust pipe may remain
unnoticed on a car, it does look unat-
tractive on a motorcycle. Frequent and
proper care, however, will keep your
motorcycle looking good, extend its life
and maintain its performance. More-
over, the warranty states that the vehi-
cle must be properly taken care of. For
all these reasons, it is recommended
that you observe the following cleaning
and storing precautions.Before cleaning
1. Cover up the muffler outlets with
plastic bags.
2. Make sure that all caps and covers
as well as all electrical couplers
and connectors, including the
spark plug caps, are tightly in-
stalled.
3. Remove extremely stubborn dirt,
like oil burnt onto the crankcase,
with a degreasing agent and a
brush, but never apply such prod-
ucts onto seals, gaskets, sprock-
ets, the drive chain and wheel
axles. Always rinse the dirt and
degreaser off with water.Cleaning
After normal use
Remove dirt with warm water, a neutral
detergent and a soft clean sponge,
then rinse with plenty of clean water.
Use a tooth or bottle brush for hard-to-
reach parts. Tougher dirt and insects
will come off more easily if the area is
covered with a wet cloth for a few min-
utes before cleaning.
E_4tx_Cleaning.fm Page 1 Saturday, October 16, 1999 9:38 AM
Page 84 of 99
MOTORCYCLE CARE AND STORAGE
7-2
7
ECA00010
CAUTION:@ l
Avoid using strong acidic wheel
cleaners, especially on spoked
wheels. If you do use such
products for hard-to-remove
dirt, do not leave it on any long-
er than instructed, then thor-
oughly rinse it off with water,
immediately dry the area and
apply a corrosion protection
spray.
l
Improper cleaning can damage
windshields, cowlings, panels
and other plastic parts. Use
only a soft, clean cloth or
sponge with mild detergent and
water to clean plastic.
l
Do not use any harsh chemical
products on plastic parts. Be
sure to avoid using cloths or
sponges which have been in
contact with strong or abrasive
cleaning products, solvent or
thinner, fuel (gasoline), rust re-
movers or inhibitors, brake flu-
id, antifreeze or electrolyte.
l
Do not use high-pressure wash-
ers or steam-jet cleaners since
they cause water seepage and
deterioration in the following ar-
eas: seals (of wheel bearings,
swingarm bearings, forks and
brakes), electric components
(couplers, connectors, instru-
ments, switches and lights),
breather hoses and vents.
l
For motorcycles equipped with
a windshield: Do not use strong
cleaners or hard sponges as
they will cause dulling or
scratching. Some cleaning
compounds for plastic may
leave scratches on the wind-
shield. Test the product on a
small hidden part of the wind-
shield to make sure they do not
leave any marks. If the wind-
shield is scratched, use a quali-
ty plastic polishing compound
after washing.
@After riding in the rain, near the sea oron salt-sprayed roadsSince sea salt or salt sprayed on the
roads in the winter are extremely corro-
sive in combination with water, carry
out the following steps after each ride
in the rain, near the sea or on salt-
sprayed roads. (Salt sprayed in the
winter may remain on the roads well
into spring.)
E_4tx_Cleaning.fm Page 2 Saturday, October 16, 1999 9:38 AM