lock YAMAHA TENERE 700 2020 User Guide
[x] Cancel search | Manufacturer: YAMAHA, Model Year: 2020, Model line: TENERE 700, Model: YAMAHA TENERE 700 2020Pages: 102, PDF Size: 10.31 MB
Page 30 of 102
Instrument and control functions
3-15
3
EAU26827
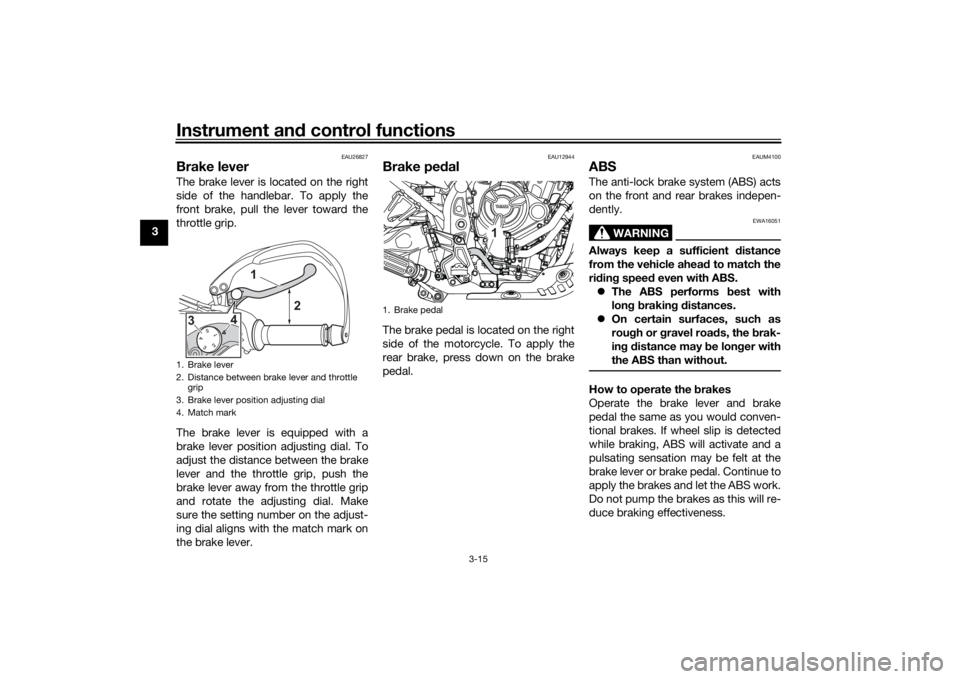
Brake leverThe brake lever is located on the right
side of the handlebar. To apply the
front brake, pull the lever toward the
throttle grip.
The brake lever is equipped with a
brake lever position adjusting dial. To
adjust the distance between the brake
lever and the throttle grip, push the
brake lever away from the throttle grip
and rotate the adjusting dial. Make
sure the setting number on the adjust-
ing dial aligns with the match mark on
the brake lever.
EAU12944
Brake pedalThe brake pedal is located on the right
side of the motorcycle. To apply the
rear brake, press down on the brake
pedal.
EAUM4100
ABSThe anti-lock brake system (ABS) acts
on the front and rear brakes indepen-
dently.
WARNING
EWA16051
Always keep a sufficient distance
from the vehicle ahead to match the
riding speed even with ABS.
The ABS performs best with
long braking distances.
On certain surfaces, such as
rough or gravel roads, the brak-
ing distance may be longer with
the ABS than without.How to operate the brakes
Operate the brake lever and brake
pedal the same as you would conven-
tional brakes. If wheel slip is detected
while braking, ABS will activate and a
pulsating sensation may be felt at the
brake lever or brake pedal. Continue to
apply the brakes and let the ABS work.
Do not pump the brakes as this will re-
duce braking effectiveness.
1. Brake lever
2. Distance between brake lever and throttle
grip
3. Brake lever position adjusting dial
4. Match mark
1
4
3
2
1. Brake pedal
1
UBW3E0E0.book Page 15 Friday, May 24, 2019 11:01 AM
Page 31 of 102
Instrument and control functions
3-16
3 The ABS performs a self-check
when you first start off. During this
time a clicking noise from the hy-
draulic unit may be audible, and if
the brake lever or brake pedal is
applied a vibration can be felt, but
this is not a malfunction.
The brake system will revert to a
conventional brake system in case
of ABS malfunction.
NOTICE
ECA20100
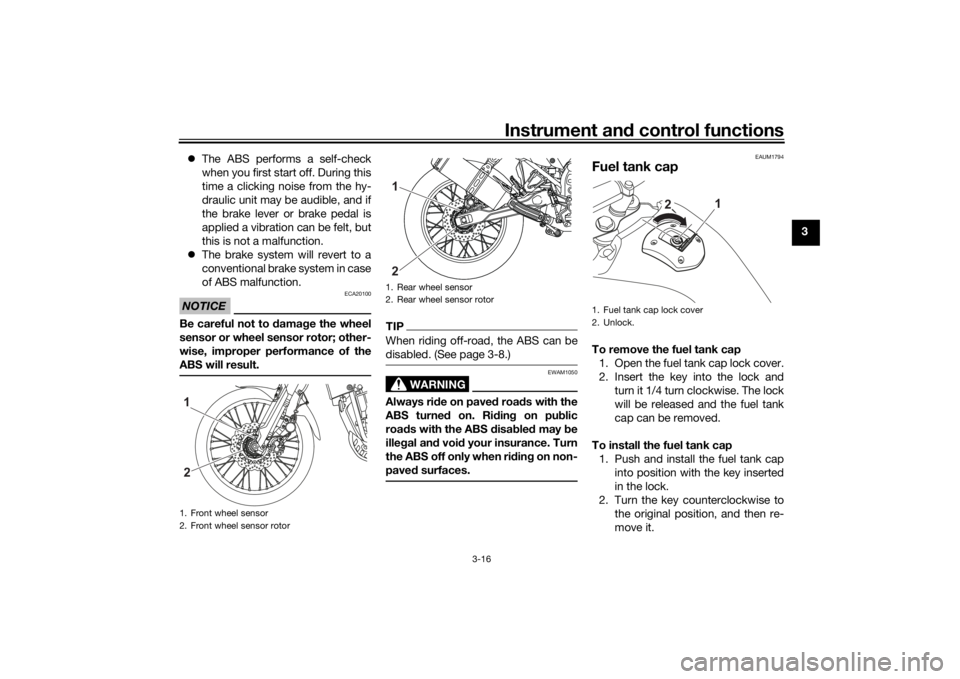
Be careful not to damage the wheel
sensor or wheel sensor rotor; other-
wise, improper performance of the
ABS will result.
TIPWhen riding off-road, the ABS can be
disabled. (See page 3-8.)
WARNING
EWAM1050
Always ride on paved roads with the
ABS turned on. Riding on public
roads with the ABS disabled may be
illegal and void your insurance. Turn
the ABS off only when riding on non-
paved surfaces.
EAUM1794
Fuel tank capTo remove the fuel tank cap
1. Open the fuel tank cap lock cover.
2. Insert the key into the lock and
turn it 1/4 turn clockwise. The lock
will be released and the fuel tank
cap can be removed.
To install the fuel tank cap
1. Push and install the fuel tank cap
into position with the key inserted
in the lock.
2. Turn the key counterclockwise to
the original position, and then re-
move it.
1. Front wheel sensor
2. Front wheel sensor rotor21
1. Rear wheel sensor
2. Rear wheel sensor rotor12
1. Fuel tank cap lock cover
2. Unlock.
1
2
UBW3E0E0.book Page 16 Friday, May 24, 2019 11:01 AM
Page 32 of 102
Instrument and control functions
3-17
3
TIPThe fuel tank cap cannot be installed
unless the key is in the lock. In addi-
tion, the key cannot be removed if the
cap is not properly installed and
locked.3. Close the lock cover.
WARNING
EWA11142
Make sure that the fuel tank cap is
properly installed before riding.
Leaking fuel is a fire hazard.
EAU13222
FuelMake sure there is sufficient gasoline in
the tank.
WARNING
EWA10882
Gasoline and gasoline vapors are
extremely flammable. To avoid fires
and explosions and to reduce the
risk of injury when refueling, follow
these instructions.1. Before refueling, turn off the en-
gine and be sure that no one is sit-
ting on the vehicle. Never refuel
while smoking, or while in the vi-
cinity of sparks, open flames, or
other sources of ignition such as
the pilot lights of water heaters
and clothes dryers.
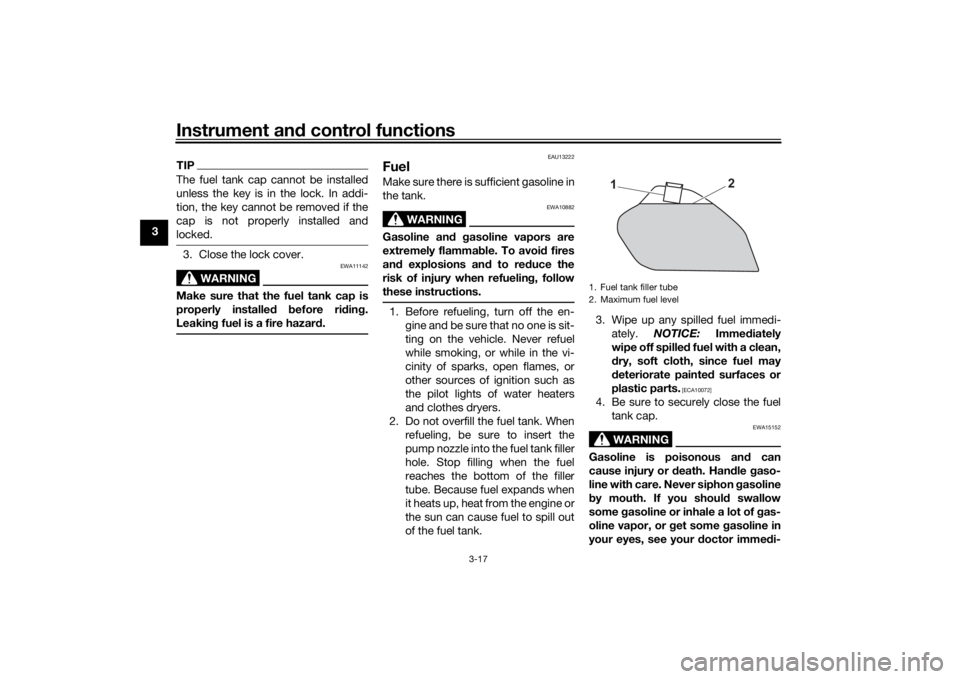
2. Do not overfill the fuel tank. When
refueling, be sure to insert the
pump nozzle into the fuel tank filler
hole. Stop filling when the fuel
reaches the bottom of the filler
tube. Because fuel expands when
it heats up, heat from the engine or
the sun can cause fuel to spill out
of the fuel tank.3. Wipe up any spilled fuel immedi-
ately. NOTICE: Immediately
wipe off spilled fuel with a clean,
dry, soft cloth, since fuel may
deteriorate painted surfaces or
plastic parts.
[ECA10072]
4. Be sure to securely close the fuel
tank cap.
WARNING
EWA15152
Gasoline is poisonous and can
cause injury or death. Handle gaso-
line with care. Never siphon gasoline
by mouth. If you should swallow
some gasoline or inhale a lot of gas-
oline vapor, or get some gasoline in
your eyes, see your doctor immedi-1. Fuel tank filler tube
2. Maximum fuel level
2
1
UBW3E0E0.book Page 17 Friday, May 24, 2019 11:01 AM
Page 34 of 102
Instrument and control functions
3-19
3
EAU80200
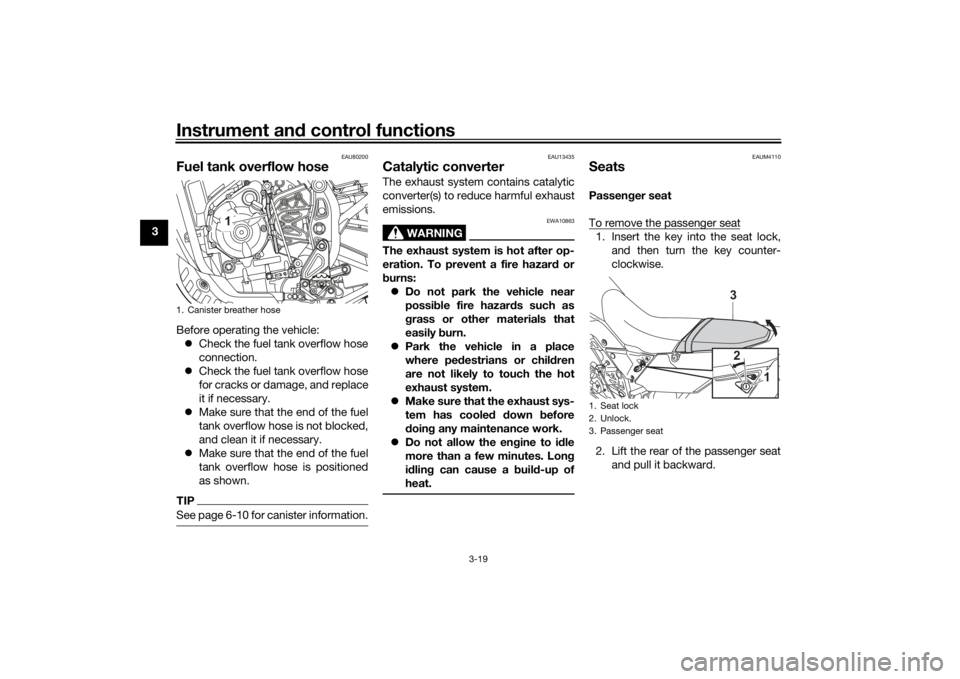
Fuel tank overflow hoseBefore operating the vehicle:
Check the fuel tank overflow hose
connection.
Check the fuel tank overflow hose
for cracks or damage, and replace
it if necessary.
Make sure that the end of the fuel
tank overflow hose is not blocked,
and clean it if necessary.
Make sure that the end of the fuel
tank overflow hose is positioned
as shown.TIPSee page 6-10 for canister information.
EAU13435
Catalytic converterThe exhaust system contains catalytic
converter(s) to reduce harmful exhaust
emissions.
WARNING
EWA10863
The exhaust system is hot after op-
eration. To prevent a fire hazard or
burns:
Do not park the vehicle near
possible fire hazards such as
grass or other materials that
easily burn.
Park the vehicle in a place
where pedestrians or children
are not likely to touch the hot
exhaust system.
Make sure that the exhaust sys-
tem has cooled down before
doing any maintenance work.
Do not allow the engine to idle
more than a few minutes. Long
idling can cause a build-up of
heat.
EAUM4110
SeatsPassenger seat
To remove the passenger seat1. Insert the key into the seat lock,
and then turn the key counter-
clockwise.
2. Lift the rear of the passenger seat
and pull it backward.
1. Canister breather hose
1
1. Seat lock
2. Unlock.
3. Passenger seat
2
13
UBW3E0E0.book Page 19 Friday, May 24, 2019 11:01 AM
Page 35 of 102
Instrument and control functions
3-20
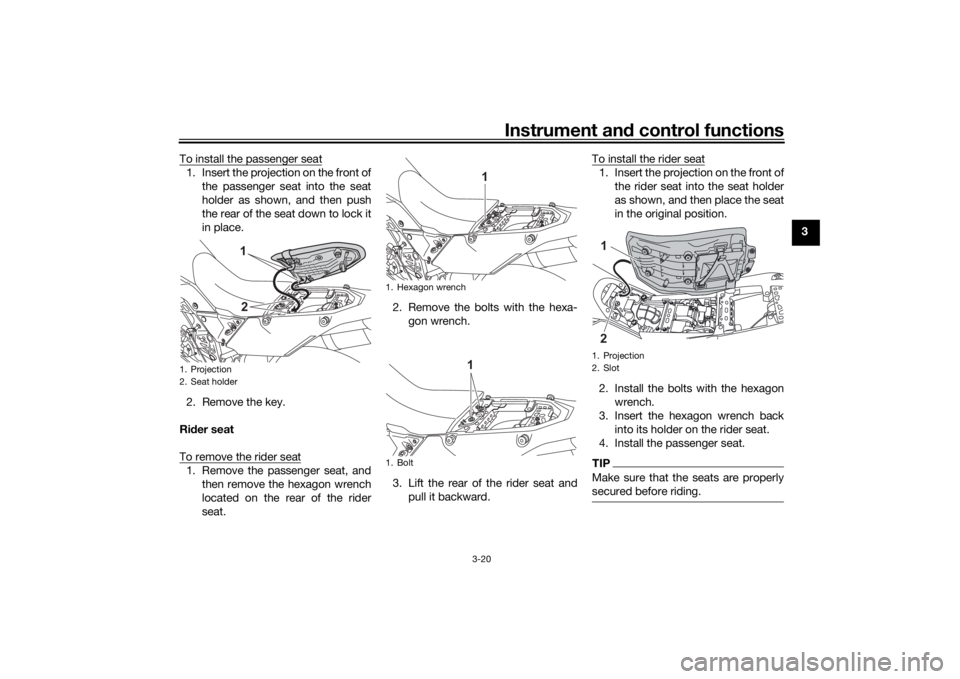
3 To install the passenger seat
1. Insert the projection on the front of
the passenger seat into the seat
holder as shown, and then push
the rear of the seat down to lock it
in place.
2. Remove the key.
Rider seat
To remove the rider seat1. Remove the passenger seat, and
then remove the hexagon wrench
located on the rear of the rider
seat.2. Remove the bolts with the hexa-
gon wrench.
3. Lift the rear of the rider seat and
pull it backward.To install the rider seat
1. Insert the projection on the front of
the rider seat into the seat holder
as shown, and then place the seat
in the original position.
2. Install the bolts with the hexagon
wrench.
3. Insert the hexagon wrench back
into its holder on the rider seat.
4. Install the passenger seat.TIPMake sure that the seats are properly
secured before riding.
1. Projection
2. Seat holder
12
1. Hexagon wrench
1. Bolt
1
1
1. Projection
2. Slot1 2
UBW3E0E0.book Page 20 Friday, May 24, 2019 11:01 AM
Page 61 of 102
Periodic maintenance and adjustment
6-10
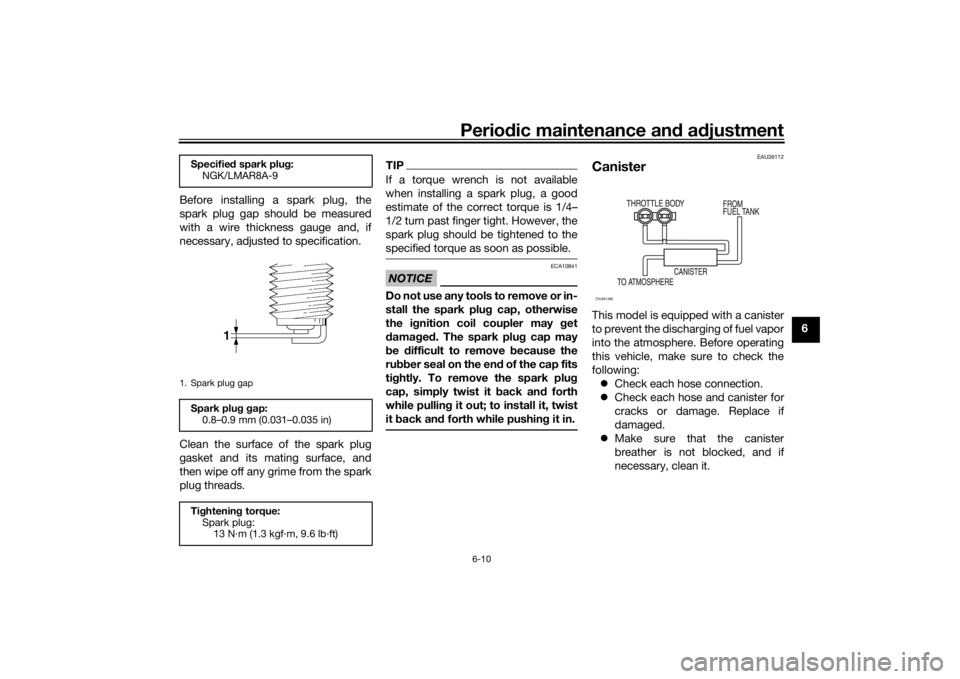
6 Before installing a spark plug, the
spark plug gap should be measured
with a wire thickness gauge and, if
necessary, adjusted to specification.
Clean the surface of the spark plug
gasket and its mating surface, and
then wipe off any grime from the spark
plug threads.
TIPIf a torque wrench is not available
when installing a spark plug, a good
estimate of the correct torque is 1/4…
1/2 turn past finger tight. However, the
spark plug should be tightened to the
specified torque as soon as possible.NOTICE
ECA10841
Do not use any tools to remove or in-
stall the spark plug cap, otherwise
the ignition coil coupler may get
damaged. The spark plug cap may
be difficult to remove because the
rubber seal on the end of the cap fits
tightly. To remove the spark plug
cap, simply twist it back and forth
while pulling it out; to install it, twist
it back and forth while pushing it in.
EAU36112
CanisterThis model is equipped with a canister
to prevent the discharging of fuel vapor
into the atmosphere. Before operating
this vehicle, make sure to check the
following:
Check each hose connection.
Check each hose and canister for
cracks or damage. Replace if
damaged.
Make sure that the canister
breather is not blocked, and if
necessary, clean it.
Specified spark plug:
NGK/LMAR8A-91. Spark plug gapSpark plug gap:
0.8–0.9 mm (0.031–0.035 in)
Tightening torque:
Spark plug:
13 N·m (1.3 kgf·m, 9.6 lb·ft)
ZAUM1386
UBW3E0E0.book Page 10 Friday, May 24, 2019 11:01 AM
Page 71 of 102
Periodic maintenance and adjustment
6-20
6
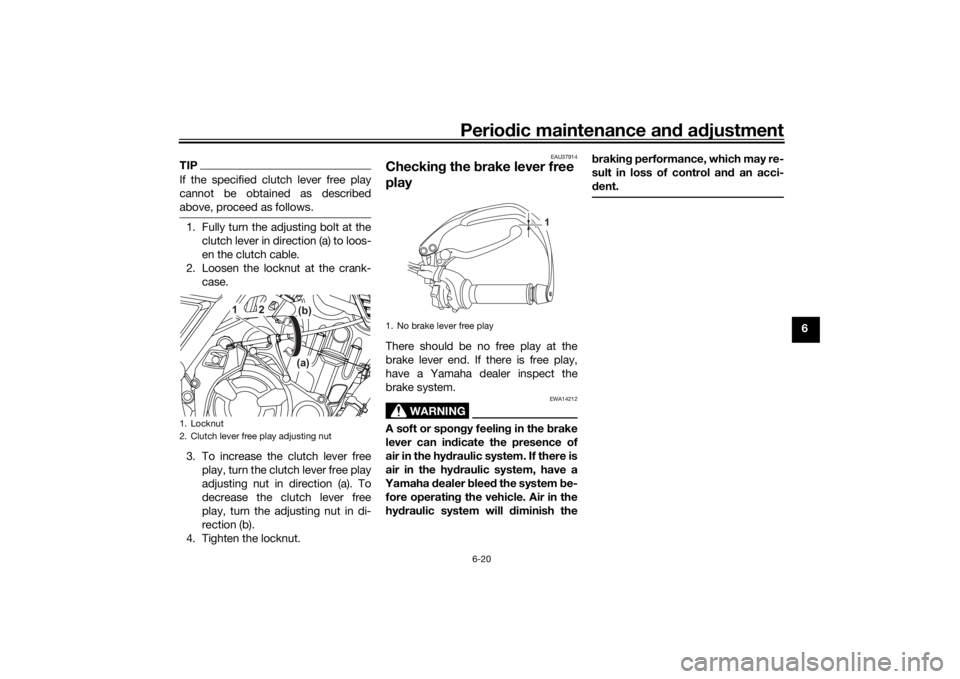
TIPIf the specified clutch lever free play
cannot be obtained as described
above, proceed as follows.1. Fully turn the adjusting bolt at the
clutch lever in direction (a) to loos-
en the clutch cable.
2. Loosen the locknut at the crank-
case.
3. To increase the clutch lever free
play, turn the clutch lever free play
adjusting nut in direction (a). To
decrease the clutch lever free
play, turn the adjusting nut in di-
rection (b).
4. Tighten the locknut.
EAU37914
Checking the brake lever free
playThere should be no free play at the
brake lever end. If there is free play,
have a Yamaha dealer inspect the
brake system.
WARNING
EWA14212
A soft or spongy feeling in the brake
lever can indicate the presence of
air in the hydraulic system. If there is
air in the hydraulic system, have a
Yamaha dealer bleed the system be-
fore operating the vehicle. Air in the
hydraulic system will diminish thebraking performance, which may re-
sult in loss of control and an acci-
dent.
1. Locknut
2. Clutch lever free play adjusting nut
2
(b)
(a)
1
1. No brake lever free play
1
UBW3E0E0.book Page 20 Friday, May 24, 2019 11:01 AM
Page 72 of 102
Periodic maintenance and adjustment
6-21
6
EAU36505
Brake light switchesThe brake light should come on just
before braking takes effect. The brake
light is activated by switches connect-
ed to the brake lever and brake pedal.
Since the brake light switches are
components of the anti-lock brake sys-
tem, they should only be serviced by a
Yamaha dealer.
EAU22393
Checking the front and rear
brake padsThe front and rear brake pads must be
checked for wear at the intervals spec-
ified in the periodic maintenance and
lubrication chart.
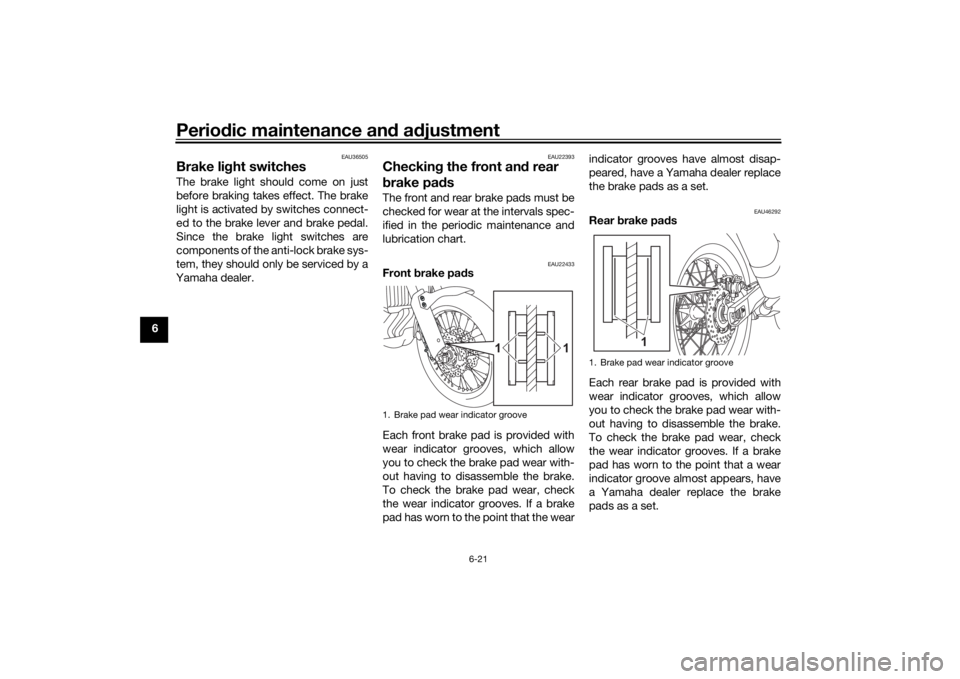
EAU22433
Front brake pads
Each front brake pad is provided with
wear indicator grooves, which allow
you to check the brake pad wear with-
out having to disassemble the brake.
To check the brake pad wear, check
the wear indicator grooves. If a brake
pad has worn to the point that the wearindicator grooves have almost disap-
peared, have a Yamaha dealer replace
the brake pads as a set.
EAU46292
Rear brake pads
Each rear brake pad is provided with
wear indicator grooves, which allow
you to check the brake pad wear with-
out having to disassemble the brake.
To check the brake pad wear, check
the wear indicator grooves. If a brake
pad has worn to the point that a wear
indicator groove almost appears, have
a Yamaha dealer replace the brake
pads as a set.
1. Brake pad wear indicator groove
1 1
1. Brake pad wear indicator groove
1
UBW3E0E0.book Page 21 Friday, May 24, 2019 11:01 AM
Page 73 of 102
Periodic maintenance and adjustment
6-22
6
EAU40262
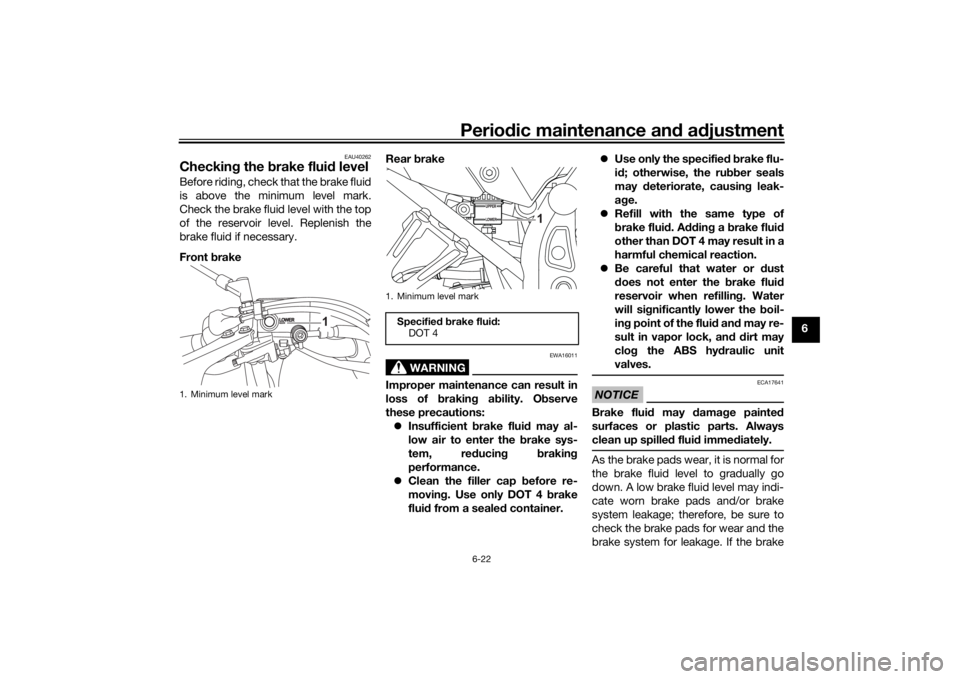
Checking the brake fluid levelBefore riding, check that the brake fluid
is above the minimum level mark.
Check the brake fluid level with the top
of the reservoir level. Replenish the
brake fluid if necessary.
Front brakeRear brake
WARNING
EWA16011
Improper maintenance can result in
loss of braking ability. Observe
these precautions:
Insufficient brake fluid may al-
low air to enter the brake sys-
tem, reducing braking
performance.
Clean the filler cap before re-
moving. Use only DOT 4 brake
fluid from a sealed container.Use only the specified brake flu-
id; otherwise, the rubber seals
may deteriorate, causing leak-
age.
Refill with the same type of
brake fluid. Adding a brake fluid
other than DOT 4 may result in a
harmful chemical reaction.
Be careful that water or dust
does not enter the brake fluid
reservoir when refilling. Water
will significantly lower the boil-
ing point of the fluid and may re-
sult in vapor lock, an
d dirt may
clog the ABS hydraulic unit
valves.
NOTICE
ECA17641
Brake fluid may damage painted
surfaces or plastic parts. Always
clean up spilled fluid immediately.As the brake pads wear, it is normal for
the brake fluid level to gradually go
down. A low brake fluid level may indi-
cate worn brake pads and/or brake
system leakage; therefore, be sure to
check the brake pads for wear and the
brake system for leakage. If the brake
1. Minimum level mark
1
1. Minimum level mark
Specified brake fluid:
DOT 4
1
UBW3E0E0.book Page 22 Friday, May 24, 2019 11:01 AM
Page 75 of 102
Periodic maintenance and adjustment
6-24
6
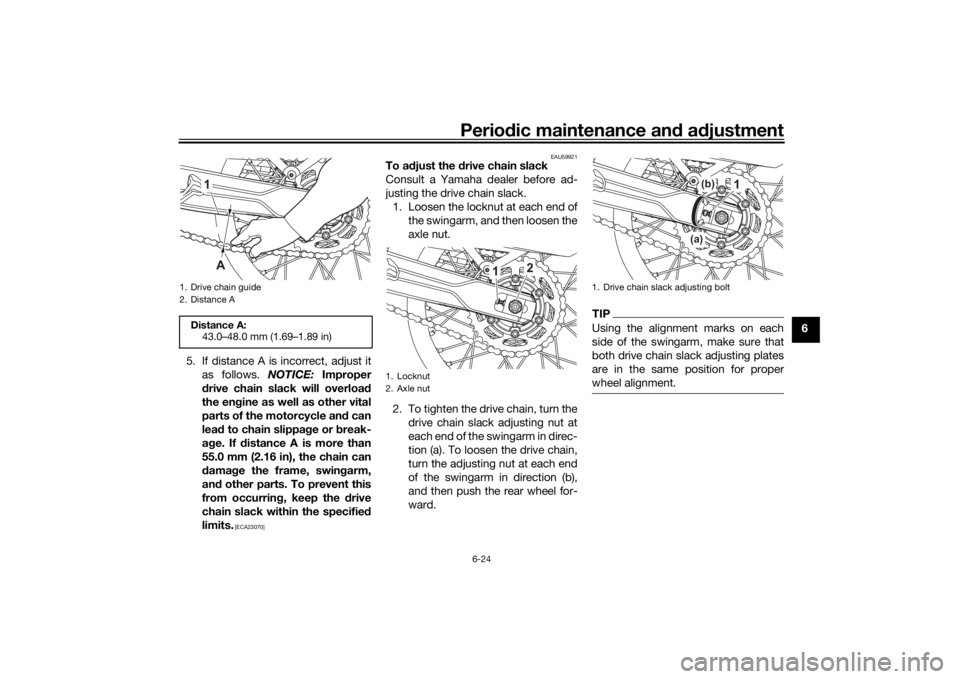
5. If distance A is incorrect, adjust it
as follows. NOTICE: Improper
drive chain slack will overload
the engine as well as other vital
parts of the motorcycle and can
lead to chain slippage or break-
age. If distance A is more than
55.0 mm (2.16 in), the chain can
damage the frame, swingarm,
and other parts. To prevent this
from occurring, keep the drive
chain slack within the specified
limits.
[ECA23070]EAU59921
To adjust the drive chain slack
Consult a Yamaha dealer before ad-
justing the drive chain slack.
1. Loosen the locknut at each end of
the swingarm, and then loosen the
axle nut.
2. To tighten the drive chain, turn the
drive chain slack adjusting nut at
each end of the swingarm in direc-
tion (a). To loosen the drive chain,
turn the adjusting nut at each end
of the swingarm in direction (b),
and then push the rear wheel for-
ward.
TIPUsing the alignment marks on each
side of the swingarm, make sure that
both drive chain slack adjusting plates
are in the same position for proper
wheel alignment.
1. Drive chain guide
2. Distance ADistance A:
43.0–48.0 mm (1.69–1.89 in)
1
A
1. Locknut
2. Axle nut
2
1
1. Drive chain slack adjusting bolt
1
(b)
(a)
UBW3E0E0.book Page 24 Friday, May 24, 2019 11:01 AM