fuel YAMAHA TENERE 700 RALLY EDITION 2021 Owner's Manual
[x] Cancel search | Manufacturer: YAMAHA, Model Year: 2021, Model line: TENERE 700 RALLY EDITION, Model: YAMAHA TENERE 700 RALLY EDITION 2021Pages: 102, PDF Size: 6.31 MB
Page 88 of 102
Periodic maintenance an d a djustment
6-37
6
EAU86350
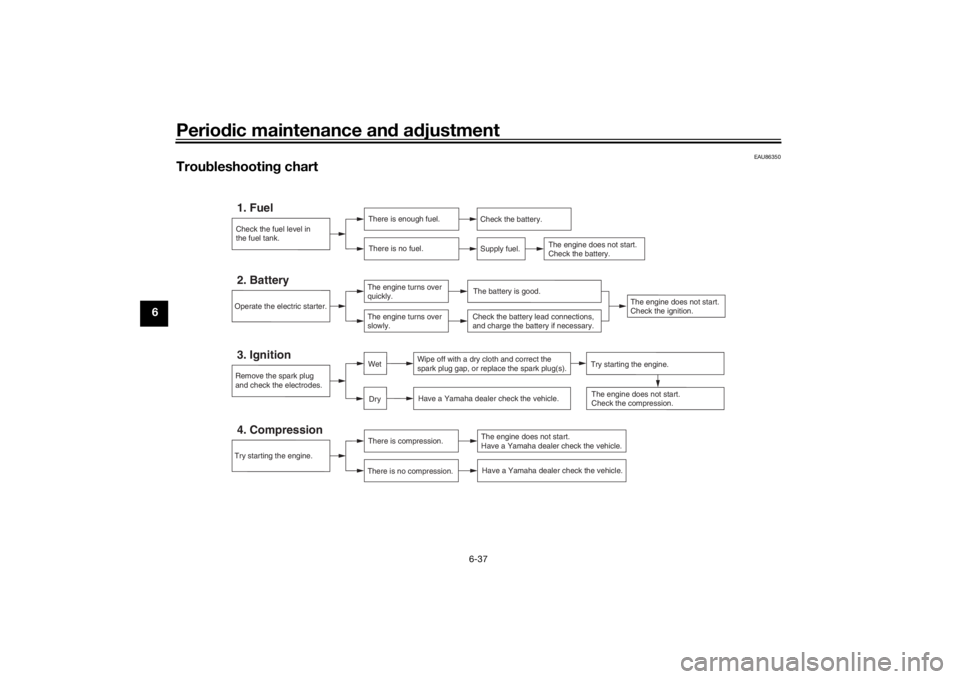
Trou bleshootin g chart
Check the fuel level in
the fuel tank.1. Fuel
There is enough fuel.
There is no fuel.
Check the battery.
Supply fuel.
The engine does not start.
Check the battery.
Try starting the engine.4. Compression
There is compression.
There is no compression.
The engine does not start.
Have a Yamaha dealer check the vehicle.Have a Yamaha dealer check the vehicle.
Remove the spark plug
and check the electrodes.3. Ignition
Wipe off with a dry cloth and correct the
spark plug gap, or replace the spark plug(s). Have a Yamaha dealer check the vehicle.
The engine does not start.
Check the compression.
Operate the electric starter.2. Battery
The engine turns over
quickly.
The engine turns over
slowly.
The battery is good.
DryWet
Try starting the engine.
Check the battery lead connections,
and charge the battery if necessary.
The engine does not start.
Check the ignition.
UBEHEAE0.book Page 37 Thursday, January 21, 2021 5:45 PM
Page 92 of 102
Motorcycle care and stora ge
7-3
7 will
become slippery, which
coul d cause loss of control.
Thorou ghly clean the surfaces
of these parts before operatin g
the vehicle.
[EWA20650]
5. Treat rubber, vinyl, and unpainted plastic parts with a suitable care
product.
6. Touch up minor paint damage caused by stones, etc.
7. Wax all painted surfaces using a non-abrasive wax or use a detail
spray for motorcycles.
8. When finished cleaning, start the engine and let it idle for several mi-
nutes to help dry any remaining
moisture.
9. If the headlight lens has fogged up, start the engine and turn on
the headlight to help remove the
moisture.
10. Let the vehicle dry completely be- fore storing or covering it.NOTICE
ECA26320
Do not apply wax to ru bber or
unpainte d plastic parts.
Do not use a brasive polishin g
compoun ds as they will wear
away the paint.
Apply sprays an d wax sparin gly.
Wipe off excess afterwar ds.
WARNING
EWA20660
Contaminants left on the b rakes or
tires can cause loss of control. Make sure there is no lu bricant
or wax on the brakes or tires.
If necessary, wash the tires with
warm water an d a mil d d eter-
g ent.
If necessary, clean the brake
d iscs an d pa ds with brake
cleaner or acetone.
Before ri din g at hi gher spee ds,
test the vehicle’s b raking per-
formance an d cornerin g b ehav-
ior.
EAU83472
Stora geAlways store the vehicle in a cool, dry
place. If necessary, protect it against
dust with a porous cover. Be sure the
engine and the exhaust system are
cool before covering the vehicle. If the
vehicle often sits for weeks at a time
between uses, the use of a quality fuel
stabilizer is recommended after each
fill-up.NOTICE
ECA21170
Storin g the vehicle in a poorly
ventilate d room or coverin g it
with a tarp, while it is still wet,
will allow water an d humi dity to
seep in an d cause rust.
To prevent corrosion, avoi d
d amp cellars, sta bles (b ecause
of the presence of ammonia)
an d areas where stron g chemi-
cals are store d.Lon g term stora ge
Before storing the vehicle long term (60
days or more):
UBEHEAE0.book Page 3 Thursday, January 21, 2021 5:45 PM
Page 93 of 102
Motorcycle care and stora ge
7-4
7
1. Make all necessary repairs and
perform any outstanding mainte-
nance.
2. Follow all instructions in the Care section of this chapter.
3. Fill up the fuel tank, adding fuel stabilizer according to product in-
structions. Run the engine for 5
minutes to distribute treated fuel
through the fuel system.
4. For vehicles equipped with a fuel cock: Turn the fuel cock lever to
the off position.
5. For vehicles with a carburetor: To prevent fuel deposits from build-
ing up, drain the fuel in the carbu-
retor float chamber into a clean
container. Retighten the drain bolt
and pour the fuel back into the fuel
tank.
6. Use a quality engine fogging oil according to product instructions
to protect internal engine compo-
nents from corrosion. If engine
fogging oil is not available, per-
form the following steps for each
cylinder:a. Remove the spark plug cap and spark plug. b. Pour a teaspoonful of engine
oil into the spark plug bore.
c. Install the spark plug cap onto the spark plug, and then place
the spark plug on the cylinder
head so that the electrodes are
grounded. (This will limit spark-
ing during the next step.)
d. Turn the engine over several times with the starter. (This will
coat the cylinder wall with oil.)
WARNING! To prevent dam-
a g e or injury from sparkin g,
make sure to groun d the
spark plu g electro des while
turnin g the en gine over.
[EWA10952]
e. Remove the spark plug cap
from the spark plug, and then
install the spark plug and the
spark plug cap.
7. Lubricate all control cables, piv- ots, levers and pedals, as well as
the sidestand and centerstand (if
equipped).
8. Check and correct the tire air pressure, and then lift the vehicle
so that all wheels are off the
ground. Otherwise, turn the wheels a little once a month in or-
der to prevent the tires from be-
coming degraded in one spot.
9. Cover the muffler outlet with a plastic bag to prevent moisture
from entering it.
10. Remove the battery and fully char- ge it, or attach a maintenance
charger to keep the battery opti-
mally charged. NOTICE: Confirm
that the battery an d its char ger
are compati ble. Do not char ge a
VRLA battery with a convention-
al char ger.
[ECA26330]
TIP If the battery will be removed,
charge it once a month and store
it in a temperate location between
0-30 °C (32-90 °F).
See page 6-31 for more informa-
tion on charging and storing the
battery.
UBEHEAE0.book Page 4 Thursday, January 21, 2021 5:45 PM
Page 94 of 102
Specifications
8-1
8
Dimensions:Overall length:2370 mm (93.3 in)
Overall width:
905 mm (35.6 in)
Overall height: 1455 mm (57.3 in)
Seat height: 875 mm (34.4 in)
Wheelbase:
1595 mm (62.8 in)
Ground clearance: 240 mm (9.45 in)
Minimum turning radius: 2.8 m (9.47 ft)Wei ght:Curb weight:
204 kg (450 lb)Engine:Combustion cycle:
4-stroke
Cooling system: Liquid cooled
Valve train: DOHC
Cylinder arrangement:
Inline
Number of cylinders: 2-cylinder
Displacement: 689 cm³
Bore × stroke:
80.0 × 68.6 mm (3.15 × 2.70 in) Starting system:
Electric starter
Engine oil:Recommended brand:
SAE viscosity grades:
10W-40
Recommended engine oil grade: API service SG type or higher, JASO
standard MA
Engine oil quantity:
Without oil filter cartridge replacement: 2.30 L (2.43 US qt, 2.02 Imp.qt)
With oil filter cartridge replacement:
2.60 L (2.75 US qt, 2.29 Imp.qt)Coolant quantity:Coolant reservoir (up to the maximum level
mark):0.25 L (0.26 US qt, 0.22 Imp.qt) Radiator (including all routes):
1.60 L (1.69 US qt, 1.41 Imp.qt)
Fuel:Recommended fuel:
Unleaded gasoline (E10 acceptable)
Octane number (RON): 90
Fuel tank capacity: 16 L (4.2 US gal, 3.5 Imp.gal)
Fuel reserve amount:
4.3 L (1.14 US gal, 0.95 Imp.gal)Fuel injection:Throttle body:ID mark: 1WS1 10Drivetrain:Gear ratio:
1st:2.846 (37/13)
2nd:
2.125 (34/16)
3rd: 1.632 (31/19)
4th: 1.300 (26/20)
5th:
1.091 (24/22)
6th: 0.964 (27/28)Front tire:Type:
With tube
Size: 90/90 - 21 M/C 54V M+S
–20 –10 0 1020 30 40 50 C
10 30 50 70 90 110
0 130 F
SAE 10W-40
UBEHEAE0.book Page 1 Thursday, January 21, 2021 5:45 PM
Page 97 of 102
Consumer information
9-2
9
The model label is affixed to the frame
under the passenger seat. Record the
information on this label in the space
provided. This information will be
needed when ordering spare parts
from a Yamaha dealer.
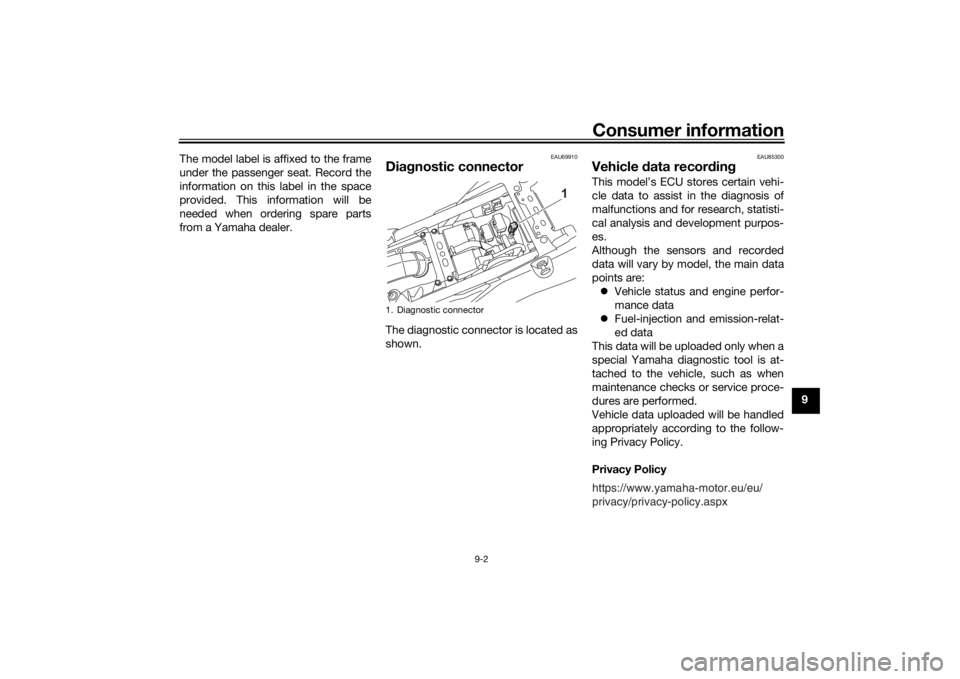
EAU69910
Dia
gnostic connectorThe diagnostic connector is located as
shown.
EAU85300
Vehicle data recor din gThis model’s ECU stores certain vehi-
cle data to assist in the diagnosis of
malfunctions and for research, statisti-
cal analysis and development purpos-
es.
Although the sensors and recorded
data will vary by model, the main data
points are:
Vehicle status and engine perfor-
mance data
Fuel-injection and emission-relat-
ed data
This data will be uploaded only when a
special Yamaha diagnostic tool is at-
tached to the vehicle, such as when
maintenance checks or service proce-
dures are performed.
Vehicle data uploaded will be handled
appropriately according to the follow-
ing Privacy Policy.
Privacy Policy
1. Diagnostic connector
1
https://www.yamaha-motor.eu/eu/
privacy/privacy-policy.aspx
UBEHEAE0.book Page 2 Thursday, January 21, 2021 5:45 PM
Page 99 of 102
10-1
10
Index
AABS....................................................... 3-16
ABS off warning light .............................. 3-5
ABS warning light ................................... 3-5
Air filter element and check hose,
replacing and cleaning ....................... 6-15BBattery .................................................. 6-31
Brake and clutch levers, checking and
lubricating........................................... 6-28
Brake and shift pedals, checking and lubricating........................................... 6-27
Brake fluid, changing............................ 6-24
Brake fluid level, checking.................... 6-22
Brake lever............................................ 3-15
Brake lever free play, checking ............ 6-21
Brake light switches ............................. 6-21
Brake pedal .......................................... 3-16CCables, checking and lubricating ......... 6-26
Canister ................................................ 6-10
Care ........................................................ 7-1
Catalytic converter ............................... 3-20
Clutch lever........................................... 3-15
Clutch lever free play, adjusting ........... 6-20
Coolant ................................................. 6-14
Coolant temperature warning light ......... 3-4
Cowlings, removing and installing.......... 6-9DData recording, vehicle........................... 9-2
DC power outlets.................................. 3-26
Diagnostic connector ............................. 9-2
Dimmer switch...................................... 3-13
Drive chain, cleaning and lubricating ... 6-26 Drive chain slack .................................. 6-24
EEngine break-in ...................................... 5-1
Engine oil and oil filter cartridge........... 6-11
Engine overheating .............................. 6-38
Engine serial number ............................. 9-1
Engine stop switch............................... 3-14FFront and rear brake pads, checking ... 6-22
Front fender.......................................... 3-26
Front fork, adjusting ............................. 3-21
Front fork, bleeding .............................. 3-23
Front fork, checking ............................. 6-29
Fuel ...................................................... 3-18
Fuel consumption, tips for reducing ...... 5-4
Fuel tank cap........................................ 3-17
Fuel tank overflow hose ....................... 3-19
Fuses, replacing ................................... 6-32HHandlebar switches ............................. 3-13
Hazard switch ...................................... 3-14
Headlight beams, adjusting ................. 3-21
High beam indicator light ....................... 3-3
Horn switch .......................................... 3-14IIdentification numbers ........................... 9-1
Ignition circuit cut-off system .............. 3-28
Immobilizer system ................................ 3-1
Immobilizer system indicator light ......... 3-5
Indicator lights and warning lights ......... 3-3LLicense plate light ................................ 6-35
Luggage strap holders ......................... 3-26
MMain switch/steering lock ....................... 3-2
Maintenance and lubrication, periodic ... 6-5
Maintenance, emission control
system .................................................. 6-3
Malfunction indicator light (MIL) ............. 3-4
Matte color, caution................................ 7-1
Model label ............................................. 9-1
Multi-function meter unit ........................ 3-6NNeutral indicator light ............................. 3-3OOil pressure warning light ....................... 3-3PParking.................................................... 5-4
Part locations.......................................... 2-1
Pass switch........................................... 3-13RRear suspension, lubricating ................ 6-29SSafety information................................... 1-1
Seat....................................................... 3-20
SELECT switch ..................................... 3-14
Shifting.................................................... 5-3
Shift pedal............................................. 3-15
Shock absorber assembly, adjusting ... 3-23
Sidestand.............................................. 3-28
Sidestand, checking and lubricating .... 6-28
Spark plugs, checking ............................ 6-9
Specifications ......................................... 8-1
Starting the engine ................................. 5-2
Start switch ........................................... 3-14
Steering, checking ................................ 6-30
Storage ................................................... 7-3
UBEHEAE0.book Page 1 Thursday, January 21, 2021 5:45 PM